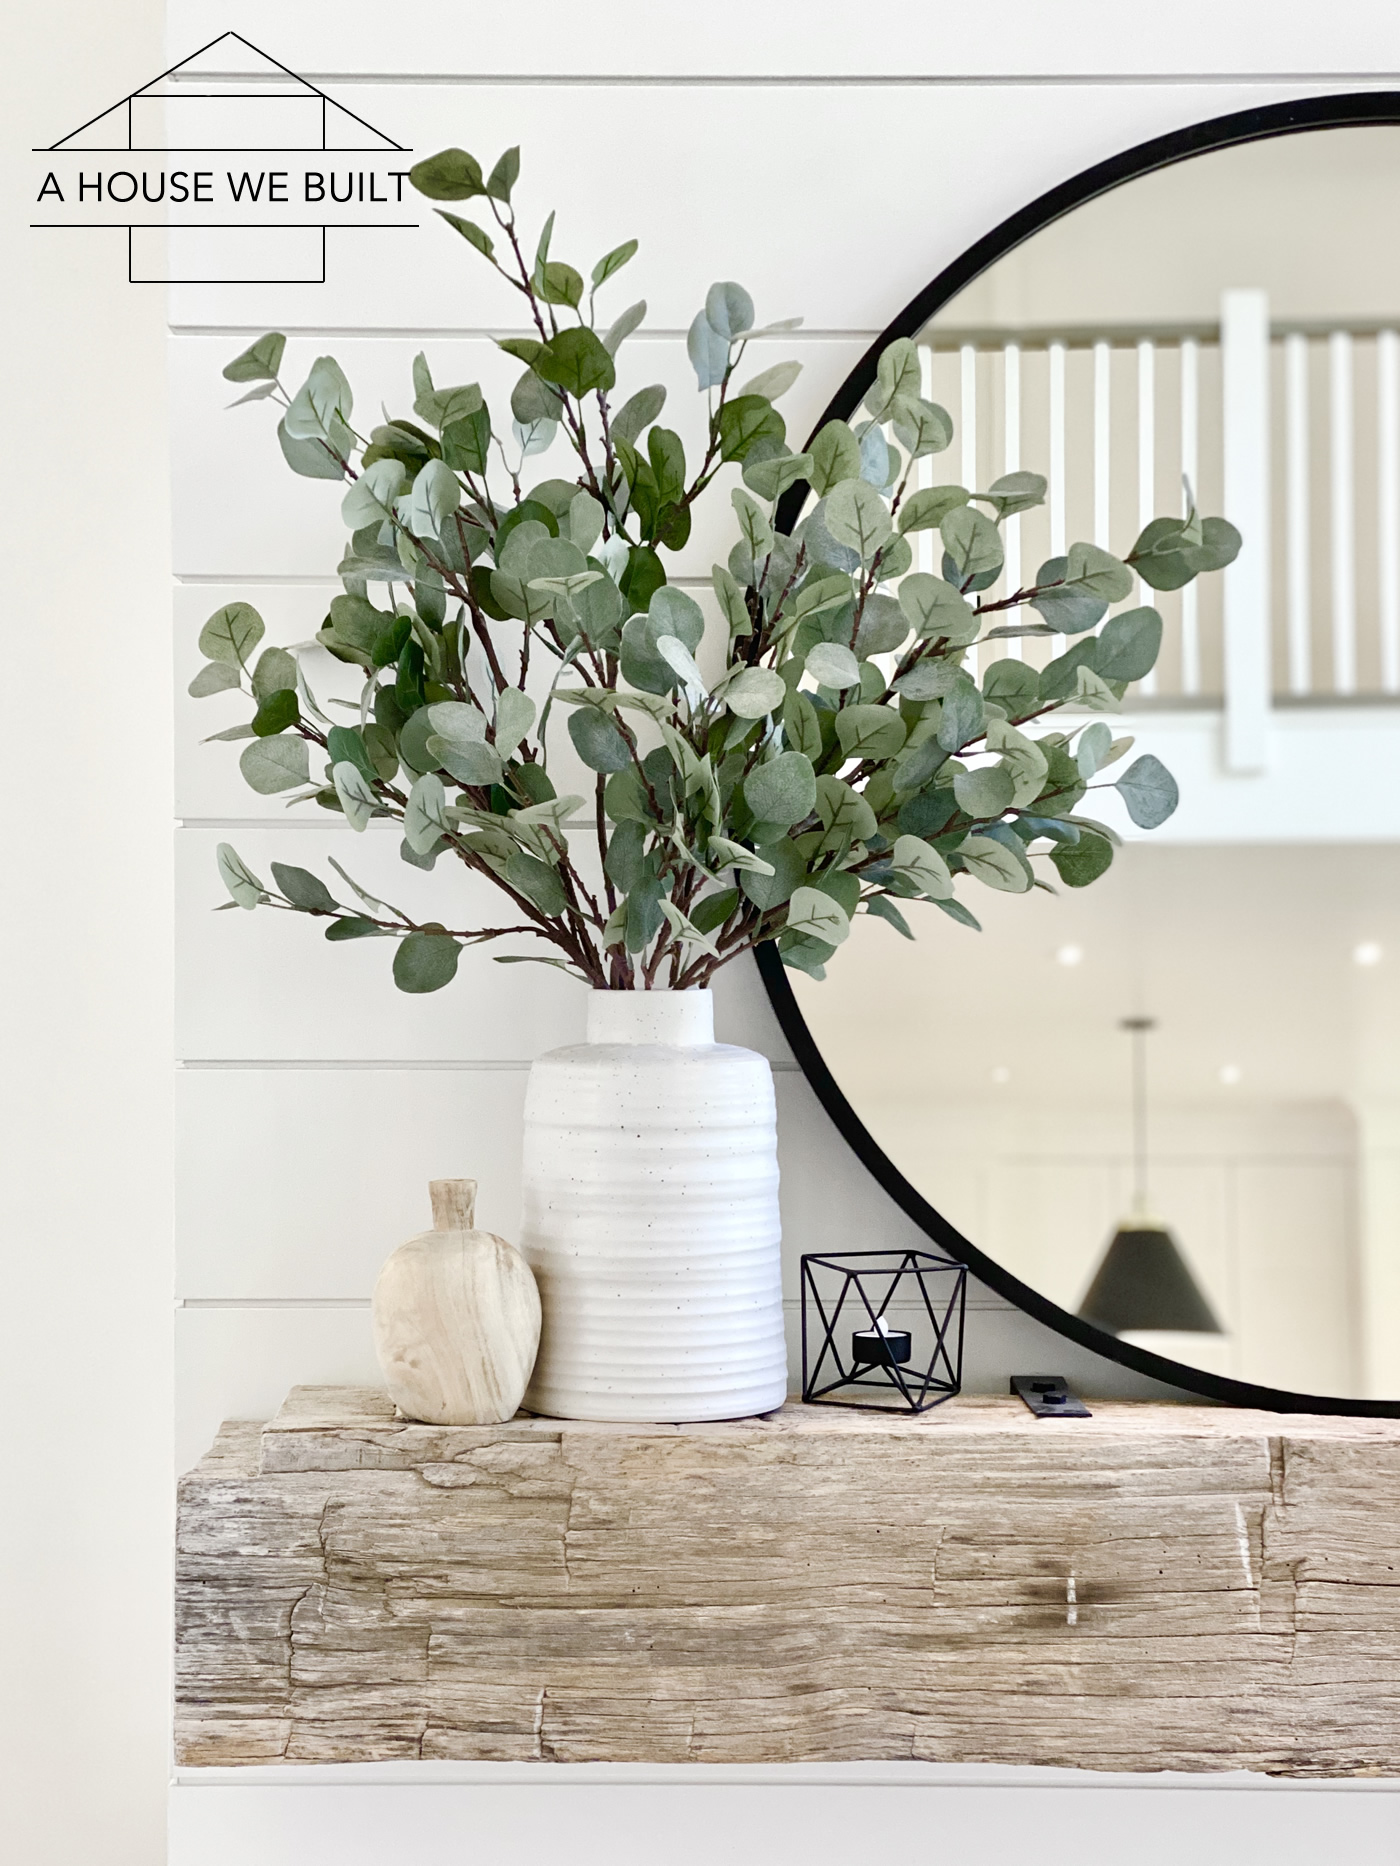
• Skip to primary navigation
  • Skip to main content
  • Skip to primary sidebar
  • Skip to footer

A House We Built

Custom House Designed by Husband & Wife Team | Modern Farmhouse Inspired

  • Shop Our Home
  • Sources by Room
    • All Sources & FAQs
    • Kitchen Sources
    • Pantry Sources
    • Living Room Sources
    • Dining Room Sources
    • Home Office Sources
    • Laundry Room Sources
    • Entryway Sources
    • Mudroom Sources
    • Gallery Wall Sources
    • Reading Room Sources
    • Theater Room Sources
    • Game Room Sources
    • Guest Bedroom Sources
    • Primary Bedroom Sources
    • Primary Closet Sources
    • Primary Bathroom Sources
    • Powder Bathroom Sources
    • Buffalo Check Bathroom Sources
    • Basement Bathroom Sources
    • Basement Sources
    • Stairs, Landings & Hallways
    • Paint Colors and Stain Recap
    • Cleaning Sources & Routines
  • Tutorials
    • How to Make a Staircase Gallery Wall
    • How to Make Textured Canvas Art
    • How to Install Shiplap
    • How to Build a Slat Wall
    • How to Paint an Ikea Dresser
    • How to Build Bypass Barn Doors
    • How to Build a Farmhouse Table and Benches
    • How to Build a Rustic Sideboard
    • How to Build a Slat Sideboard
    • How to Make a Sofa Pit
    • How to DIY a Faux Brick Wall
    • How to Build a Window Seat
    • How to Build a Paneled Accent Wall
    • How to DIY a Functional Play Kitchen
    • How to Stencil a Wall
    • How to Build a Round Table
    • How to Build a Console Table
    • How to Make Paper Stars
    • How to Make Paper Mache Bowls
    • How to Make Clay Links
    • How to Texture Bowls & Vases
    • How to Install Open Shelves
    • How to Make Wood Block Art
    • How to Make a Wood Bead Garland
    • How to Build Cabinet Doors
    • How to Build a Wood Countertop
    • How to DIY a Nightstand Charging Drawer
    • How to Make a Wheat Wreath
    • How to Hang Gallery Wall Frames
    • How to Stain Stairs and Paint Risers
    • How to Make Industrial Stair Railings
    • How to Build a Window Seat Cushion
    • How to Make Salt Dough Ornaments
    • How to DIY a Modern Mantel Christmas Tree
    • How to DIY a Wooden Christmas Village
    • How to Build a Wood Christmas Tree Collar Box
    • How to Make Paper Christmas Trees
  • Cats
    • Cat Room Tour & Litterboxes
    • Cat-Related Sources & Cleaning Tips
    • How to Cat-Proof Christmas Trees & Decor
    • How to Stop Cats from Scratching Furniture
    • How to Stop Cats from Playing with Decor
    • How to Train Cats and Kittens
    • How to Cope with Cat Allergies
    • How to Introduce New Kittens to Older Cats
  • Christmas
    • Christmas Decor Favorites 2023
    • How to Build a Wood Christmas Tree Collar Box
    • Neutral Christmas Present Wrapping
    • How to Make Paper Christmas Stars
    • How to Make Paper Christmas Trees
    • How to Make Salt Dough Ornaments
    • DIY Holiday Art Ideas
    • How to Cat-Proof Christmas Trees & Decor
    • How to Make Modern Tabletop Trees
    • How to Make a Wooden Christmas Village
    • Holiday Cheese & Snack Boards
    • Christmas Decor 2021
    • Christmas Decor 2020
    • Christmas Decor 2019
    • Gingerbread House & Cookies Recipe
    • Puff Tastry Christmas Tree Recipe
    • Christmas Decor 2018
  • Cleaning
    • Cleaning Sources & Routines
    • Minimalism: How To Get Started
    • Cat-Related Cleaning Tips
  • Recipes
    • Apple Turnovers Recipe
    • Baked Pumpkin Donuts Recipe
    • Banana Chocolate Chip Bread Recipe
    • Blueberry Lemon Cake Recipe
    • Cheese & Cracker Snack Boards
    • Chocolate Chip Cookie Recipe
    • Christmas Crack Recipe
    • Chocolate Crinkle Cookies Recipe
    • Cinnamon Rolls Recipe
    • Cinnamon Star Pastry Recipe
    • Coconut Curry Squash Soup Recipe
    • Creamy No-Cheese Pasta Sauce Recipe
    • Crumble Recipe
    • Easy Veggie Pasta Recipe
    • Fresh Rolls Recipe
    • Garlic Flatbread Recipe
    • Gingerbread Biscotti Recipe
    • Gingerbread House & Cookies Recipe
    • Healthy Hearty Salad Recipe
    • Homemade Bread Recipe
    • Lasagna Recipe
    • Molasses Cookies Recipe
    • Oatmeal Raisin Cookies Recipe
    • Pad Thai Recipe
    • Pesto Pasta Recipe
    • Potato Curry + Naan Bread
    • Puff Pastry Christmas Tree Recipe
    • Pumpkin Donut Bites Recipe
    • Pumpkin Loaf Recipe
    • Pumpkin Oat Muffins Recipe
    • Roasted Red Pepper Pasta Recipe
    • Rocky Road Bars Recipe
    • Vegan Bolognese Pasta Sauce
    • Vegetable Soup Recipe
  • About
    • About Us
    • Website Roadmap
    • Shop Our Home
    • Minimalism: How To Get Started
    • Privacy Policy
  • Blog

admin

Summer Decor 2020

June 23, 2020 by admin Leave a Comment

Living room mantel:

  • Round mirror (same mirror, multiple sources): Amazon | Urban Outfitters | Wayfair
  • Medium white vase (left side): Crate & Barrel
  • Eucalyptus greenery (left side, in medium vase): Pottery Barn | Crate & Barrel (I used about 9 stems)
  • Tall white vase (right side): Crate & Barrel
  • Large fern greenery (right side, in tall vase): Crate & Barrel
  • White pampas grass (behind fern & on coffee table): Crate & Barrel
  • Shorter white vase (right side): Crate & Barrel
  • Wood vases: McGee & Co (only dark version still available) | similar: Crate & Barrel
  • Lanterns (similar): West Elm | Crate & Barrel
  • Fireplace: Overstock | Amazon | Walmart
  • Mantel: old barn beam (sun-weathered wood, no stain)
  • Paint colors & more details on our Living Room Sources Page

Filed Under: Past Decor

How to Install Shiplap

May 9, 2020 by admin 62 Comments

We have shiplap all over our house and its clean lines make it one of my favorite design elements to use! I even used a picture of our shiplap as the background of our website here! Shiplap is visually clean, minimal and simple, but all the lines also add really great interest and texture to any room, wall, or ceiling.

In our house, we’ve used horizontal shiplap in our living room, entryway, mudroom, laundry room, home office room, powder bathroom, master bathroom, and master bedroom, we’ve also used vertical shiplap in our pantry and basement, we have shiplap ceilings in our kitchen, dining room, and basement, and even have done designs with it in my home office. We’ve used it to create small accent features (like in our master bathroom) and at other times we’ve also done almost entire rooms with it (our theater room). So it’s an extremely versatile type of paneling that makes for a beautiful accent or design feature!

Shiplap is pretty easy to install as long as you plan your project out well and have the right tools on hand. There are many different ways to get the shiplap look but my preference is using real shiplap – which means boards manufactured to interlock/overlap in a way that leaves a small even gap between them.

SHIPLAP MATERIALS:

To start, you need to choose a shiplap board. Typical widths are variations of 1x6s and 1x8s. I use 1/2″ pre-primed MDF shiplap boards that I source locally, but I’ve provided a few other shiplap options below.

  • Primed wood shiplap: Home Depot (1x8x8 – this generally looks visually closest to what I use from what I was able to find available online though it’s a different material and thicker board)
  • MDF shiplap: Home Depot (full length) | Home Depot (wainscot length)
  • Pine shiplap (multiple color options): Home Depot (1x6x8) | Home Depot (1x8x8)
  • Cedar shiplap: Home Depot (1x8x8)
  • Nickel gap shiplap: Home Depot (1x6x8) | Home Depot (1x8x8 – this one is also a different material but from the pictures seems visually fairly similar to the type of shiplap I use)

*Note 1: If you’re using wood shiplap, check each boards for straightness before using each one. MDF has some flexibility and is generally easier to install. Real wood requires a greater level of cut accuracy.

*Note 2: If you’re using wood paneling or shiplap, I recommend to let it sit and acclimatize to your interior temperature and humidity for a week or two before using it, so allow for that time.

TOOLS + SUPPLIES YOU’LL NEED:

  • Miter saw: Home Depot | Amazon (for all regular straight or angled cuts)
  • Table saw: Home Depot | Amazon (for “ripping” side boards down to size, meaning to shorten the width of a board – you can technically do this with a jig saw or circular saw too but it’s a lot harder)
  • Level: Home Depot | Amazon (to make sure your boards are installed straight)
  • Measuring tape: Home Depot | Amazon (I hope this one is self-explanatory)
  • Carpenter’s square: Home Depot | Amazon (to draw straight lines where to saw the boards)
  • Nail gun (+ nails): Home Depot | Amazon (to attach boards to the wall)
  • Rubber mallet: Home Depot | Amazon (to tap the boards into place)
  • Paneling adhesive: Home Depot (to attach boards to the wall)
  • Caulk: Home Depot | Amazon (to fill in seams after installation)
  • Caulk gun: Home Depot (for your adhesive and caulk)
  • Wood filler: Home Depot | Amazon (to fill in nail holes)
  • Putty knife: Home Depot | Amazon (to apply wood filler to nail holes)
  • Sandpaper: Home Depot | Amazon (to sand wood filler after nail holes are filled)
  • You’ll also need painting and/or staining supplies but I figure I don’t need to list all that.

If you have to cut around anything (outlets, vents, lighting, etc) you’ll also need:

  • Jig saw: Home Depot | Amazon (to cut around outlets etc)
  • Drill: Home Depot | Amazon (you’ll need this to cut a hole in the middle of your board – drill is needed to make a hole in each corner of your cutout for your jig saw blade. Details below.)
  • Hole saw: Home Depot | Amazon (to cut out recessed lighting holes – make sure you get the right size for the specific recessed lighting you’re planning to use – they’re all different)

IMPORTANT THINGS TO CONSIDER BEFORE INSTALLATION:

  • Calculate the placement of boards across your wall/ceiling to determine the most symmetrical or aesthetically pleasing configuration of boards. Almost any walls or ceiling you decide to shiplap will not perfectly fit full boards across it. So, for example, if your wall is 114″ wide, and your shiplap boards are 5.5″ wide, that means you can fit 20 full boards (covering 110″), but you’re left with 4″ to cover which means you’ll have to use a table saw to rip that last board down to the right width. So planning ahead allows you to choose exactly where you’re going to have those uneven boards. One option is to just leave the side pieces smaller than the rest, or you can center all the boards so have have evenly smaller pieces on the two ends, or maybe you just want the one side smaller. These are things we take into consideration every time we install shiplap before installation.
  • Get extra boards. When you’re calculating how much shiplap you’ll need for a given project, it’s usually safe to count on about 10% extra for waste – better to have too much material than too little.
  • If you’re shiplapping a wall, consider whether you want a full board to start at the top or the bottom (I prefer at the top). And also consider which parts of your shiplap (if any) will be covered by baseboard or crown molding because that’ll affect how much of the boards will be visible. Note: when doing your calculations, remember to include the gap between boards in your math!
  • If you’re covering an area that is longer than the length of your shiplap board, you will have to hide the seams if you want the look of a continuous board plank from one end of your shiplap installation to the other, so also consider where these seams will be and try to vary them across your wall so you don’t end up with a line of seams all in the same spot. Also, it’s best to plan to always have the seam on a stud so that you can nail both then ends of both the boards butting up next to each other into the stud (if you don’t do this, they can bow outward and your seam will be more visible) so it’s worth it to do this even if you end up losing a bit of length off your board.
  • Once you start installing your shiplap, it is helpful to have the ‘notch’ side facing the direction you want to go because it will make it easier to interlock new boards (see middle pic below). One of the reasons for this is that you can use the rubber mallet to tap against the notch if needed to tap the board into place without damaging any part of the board that will be seen.

GENERAL INSTALLATION INSTRUCTIONS:

  1. Using your miter saw, cut your board to length. Be sure you cut as you go instead of pre-cutting all your boards – this will ensure the greatest possible accuracy in your measurements and cuts.
  2. Apply adhesive to the back of the board in a wavy line down the middle.
  3. Place the board on the wall, and use a level to make sure it’s straight.
  4. Once you get past the first board, you will need to make sure each new shiplap board you put up properly interlocks with the one before it. You have to really check to be sure that it’s fully locked in along the entire length of the board before you go to the next step. This may require a gentle tap with a rubber mallet (just be careful not to damage the edges of the board when tapping it).
  5. Check again to make sure it’s level.
  6. Nail the board to the wall. If you’re doing horizontal shiplap, you must nail into studs, you can’t just nail it into drywall. If you’re doing vertical shiplap, obviously some of your boards won’t land on studs so for the boards that are on studs nail once per linear foot into the stud because these boards are your anchor, then for the boards between studs you’ll have to nail them into drywall but try to angle your nailer at 45* to give the nails a better grip and do a couple nails into the small overlap between boards to secure them to each other.
  7. When you get to the sides, you will have to rip your final board down to size with a table saw. Note that some homes have slightly (or very) uneven walls and ceilings so be prepared that your side boards may have varying widths along the board so measure them every 1-3 feet.

Possible things you may run into:

  • If you need to shiplap around an outlet or vent, you’ll need to precut the hole in your board. So first, measure where the hole needs to be and draw the lines with a pencil. If the hole is in the center of the board drill 4 large holes at the corners of the box you need to cut out on the inside of the box (don’t drill outside the lines) – the purpose of these holes is to give your jigsaw blade starting point in the middle of your board. Then use your jigsaw to carefully cut out the 4 lines of the box. If the hole is at the side of the board, then you’ll just need to drill 2 holes for the corners of the box that fall in the middle of the board, then cut it out with your jigsaw.
  • If you need to cut a round hole for recessed lighting, measure where the hole needs to be and find the center point. Use a hole saw to cut the hole around the center point (make sure you have the correct size hole saw for your particular recessed lighting – they’re all a little different).

HOW TO DEAL WITH CORNERS:

  • If you’re wrapping shiplap around an inside or outside corner, or down a ceiling-to-wall edge, we always miter all those corners at a 45* angle to ensure a seamless transition and so that it looks like the board is literally wrapping around the corners. You have to to consider this in your board length calculation because the mitered edge will change the overall length of your board. The easiest way I find to do it is to calculate the length of your board based on the space you’re shiplapping, then miter *out* from there for outside corners, or miter *back* from there for inside corners. This is how we make it look like the shiplap wraps around the wall with no capping trim.
  • If you need to terminate your shiplap to an outside corner that you don’t want to wrap the shiplap around (like a doorway or a drywall window return), I make my own trim by ripping a board that’s slightly thicker than my shiplap (so if I’m using 1/2″ shiplap, I’ll make my trim from a board that’s 5/8″) down to about a 1/2″ little strip. (Note: I like to use primed MDF board for this with ever-so-slightly rounded edges but if the board you’re using doesn’t have rounded edges, just sand the outside edge a bit before you rip it down so that if you bump into it it won’t be painful.) I then glue and nail that into place with a setback of about 2/16″ from the actual finished wall corner, then use that edge as the “wall” to terminate my shiplap to. Have this trim in place before installing your shiplap. If you scroll back up, you can see an example of this in the top left picture at the start of this post. I would think you can also buy this type of trim from a specialty hardware store or wood shop but I’ve had no luck finding trim of this exact size in stores so it’s easier to make my own.
  • If you’re just shiplapping a ceiling or wall without wrapping around any corners and without any corner trim, then just cut each piece as you go so that the lengths are perfectly precise, then caulk the seam between the shiplap and wall.

FINISHING INSTRUCTIONS:

Note: this only applies to shiplap you plan to paint. If you’re using natural wood shiplap that you’re going to either leave raw or stain, then you may not wish to finish it quite the same way. It’s up to you.

  1. After all your shiplap is installed, run a bead of caulk around all seams where the shiplap terminates to a wall, or along inside corners. Use your finger to run over the bead of caulk and shmoosh it into the seam while smoothing it out. Have a wet hand towel to clean your finger as you go.
  2. Fill in all your nail holes and seams between boards with wood filler and a putty knife.
  3. Sand everything you used wood filler on (nail holes and seams between boards) until smooth.
  4. Now you’re ready to prime/paint.

PAINTING TIPS:

  • My preference is to brush and roller shiplap. Paint sprayers are great in theory but I don’t have the patience to do all the prep-work involved, I don’t like how all the little paint particles get blown into the air (and then my hair!), and finally cleaning a paint sprayer is beyond frustrating so if you have the patience for that, all power to you. But I like to stick with a traditional, easy peasy brush and roller. If you brush and roller properly, the end result is just as smooth as spraying.
  • If you’re painting horizontal shiplap white (and it’s already been primed), I wouldn’t paint your final white in between the boards. I find the slightly different tone of the primer in the grooves makes the grooves pop and you don’t notice that it’s a different white because it just looks like a shadow.
  • If you’re painting vertical shiplap white and you find that your lines between boards are “disappearing”, I recommend painting the lines with a small brush in a very light gray color – I did this in our game room and in the nook at the end of our basement hallway (behind the wood art) and found that it made a huge difference in making the shiplap pop.
  • If you’re painting shiplap anything other than white, I recommend to always paint between the seams before rollering the boards. Feather your brush strokes carefully to leave the boards smooth and with no paint streak lines or drip marks. I can’t stress enough how important this is!
  • The paint colors we’ve used are recapped on this page: Paint Colors and Stain Recap, and also posted on the individual room “sources pages” on our website so pick any room you want to know about, go to that source page, and you’ll find the relevant paint colors we used listed at the bottom. If you need help navigating, here’s our website roadmap.
  • Regarding paint sheen, we’ve used both flat and satin on shiplap and love the look of both.
  • If you use un-primed wood shiplap, you also have the option of staining it instead of painting.

PS: If you’re wondering about the wood paneling that we installed in our theater room design (similar to this: Home Depot), that is tongue-and-groove, not shiplap, but the installation method is generally the same. The natural wood material is much more frustrating to work with though, is less forgiving, and requires a greater level of accuracy so if you’re new to this, I would start with shiplap work instead.

BONUS TIP:

In our theater room, we had this white exterior door in the middle of all our shiplap whose location we couldn’t change (for reasons) so my goal was to visually minimize it while keeping it accessible. Originally, I considered hiding it behind a barn door but the door handle didn’t allow for that. Finally, I decided to simply hide it in plain sight by painting gray shiplap lines onto it continuing the shadow lines of the real shiplap boards surrounding the door! Super simple solution!!! I used frog tape (Home Depot), which is better than painter’s tape, to connect the shiplap boards on either side of the door (including the trim to keep the lines seamless) and then just painted the lines gray. I mixed different grays I had lying around my house so I don’t have a specific color to share but this project was low-risk since I could always paint it back to white if needed. Luckily though, my idea worked! Here are the before, during, after pics:

FREQUENTLY ASKED QUESTIONS:

  • Do you constantly have to dust between the boards? I’ve never had to (not even on the black shiplap that would really show the dust if it were there). If you live in a really dusty climate and have your windows open a lot, I suppose that might change things, but it hasn’t been an issue for us.
  • What type of shiplap is easiest to install? Horizontal shiplap installed on a wall with two perpendicular walls on either side (meaning that each side can terminate to a 90 degree wall without wrapping around a corner) will always be the easiest type of shiplap to install.
  • How do you decide between vertical or horizontal shiplap? How do you pick what parts of your house to shiplap? This is 100% personal preference. There are no rules here – in your house, you should choose whatever you love most. I make my design decisions based purely on what looks good and feels right to me. Horizontal and vertical shiplap have very different feelings to me so it really depends on what look you’re going for and what makes you feel warm and fuzzy when you look at it. Not to be cheesy here but just let your heart decide!
  • How do you have shiplap around your fireplace? Our fireplace is electric so the surround and front of it don’t get hot like a gas/real fireplace so it’s not an issue.
  • Is it trendy? What if it goes out of style??! Personally, I don’t care. I don’t follow trends or care what’s “in style”. I choose all my design elements based on how much I love them. Shiplap has been around for hundreds of years so while it may be having a moment in the spotlight, that’s not why I love or or the reason I chose to use it in my home. I strongly advise making design choices for your home based on whatever truly makes your heart happy instead of based on trends.

If you want to follow our daily progress, come follow us on Instagram @ahousewebuilt!

SOURCES:

  • Light fixture (black/gold): Build.com | Wayfair | Gold version: Overstock | Black version: Wayfair
  • Gold drawer pulls: Amazon | Home Depot | Schoolhouse
  • Brick wall tutorial: How to DIY a Faux Brick Wall
  • More sources from our basement: Basement Sources Page

Left pic is our Theater Room | Right pic is our Game Room


For more of our tutorials, click here.
To explore rooms in our home, click here (most have some kind of shiplap).
To follow our daily updates and home progress, follow us on Instagram @ahousewebuilt.

Filed Under: Tutorials

How to Build a Wood Countertop

May 7, 2020 by admin 12 Comments

We decided to build our own wood countertops for all the cabinetry in our basement because we wanted this space to have a more rustic feeling than the rest of our house. They were really easy to make, I absolutely love their look, and it was a huge cost savings over some of the more traditional countertops.

You can use any type of wood you like, but we chose to use 2x6x8 and 2x6x12 cedar planks (raw, not treated). Originally, I considered using wider boards, but I wanted the look of the counter to show the actual planks so I was worried if I went too wide it would diminish that look – so 2×6’s worked perfectly. I also considered using fancier lumber with square edges, but I preferred the rounded edge of standard lumber because it would accentuate the look of the grooves between the planks (and also be a safer front edge). I’m not a carpenter so I’m not sure what the terminology is but I hope that makes sense.

We chose to use cedar because it was naturally the color we wanted since we’d already done a lot of cedar paneling in our theater room, plus our wood hallway beams are a similar color as well.

We built wood countertops for our: Game Room, Home Theater Room, Basement Bathroom.

Finally, it’s important to choose a board length longer than your total span of countertop because (at least to my preference) I don’t think you don’t want to have planks meet end-to-end in the middle of your counter. So for example, if your counter is 11′ long, use 12′ foot boards instead of 2 sets of 8′ lengths.

RAW MATERIALS:

  • 2x6x8’s if your counter is under 8′ long
  • 2x6x12’s if your counter is under 12′ long
  • No matter what boards you use, make sure they are absolutely straight and not warped.

TOOLS YOU’LL NEED:

  • Miter saw: Home Depot | Amazon (for all regular cuts)
  • Table saw: Home Depot | Amazon (only needed if you have to rip down a board)
  • Kreg jig: Home Depot | Amazon (to drill pocket holes to join the planks together)
  • Pocket hole screws: Home Depot | Amazon
  • Drill: Home Depot | Amazon
  • Sandpaper: Home Depot | Amazon
  • Matte top coat: Home Depot | Amazon (protective layer to coat your countertop)
  • Chip brush: Home Depot | Amazon

BUILD INSTRUCTIONS:

  1. Plan out your counter. If you need an uneven number of boards to cover the depth of your countertop, make sure it’s the board closest to the wall you rip down to the right width, not the front board. So for example: if the counter depth you need is 25.5″ but your boards are 5.5″ wide each, you’ll need 4 full width boards, and a 5th board ripped down to 3.5″ width. Also, be sure to include about a 1.5″ overhang at the front of your counter in your final depth calculations. So if you’re covering a 24″ counter depth from the wall, your countertop should be about 25.5″ wide.
  2. Before cutting your boards, lay them all out on the floor and assess what they look like. Flip each one over front and back and determine which side you want on top. Then rearrange them so that you’re happiest with their configuration taking the veining and color variations into consideration.
  3. Cut your boards to length. We measured each one individually. Some were 1/16″ different from each other and we cut accordingly. The more accurate your cuts, the more seamless and custom your counter will look. When you’re finished cutting all your boards to length, lay them out on the counter to double check that all your lengths are correct and that everything fits.
  4. Place the boards top down and mark the bottoms – number them so you know which order they go in. I also like to mark the locations of the pocket holes you’re about to drill. See diagram below for pocket hole placement – this is just an example, your pocket holes don’t have to be identical to this, but the holes have to be every 1′ alternating sides.
  5. Use the Kreg Jig (one of the best tools we ever bought!) to drill pocket holes on the bottom of each board – these will be used to connect each board to the other.
  6. Next screw your boards together with pocket hole screws into the pocket holes you just drilled. Be sure to first clamp the boards down to ensure that they’re level with each other (we just used hubby’s weights to hold them down straight lol).
  7. Lightly sand the boards (I just did the rough spots because I didn’t want to lighten the board too much). A trick is to run a knitted sweater over the boards, if nothing catches, it’s sanded enough.
  8. Paint the top coat on with a paint brush using even strokes. You’ll want to do 3-5 coats. Apply the next coat as soon as the first coat is dry to the touch, lightly sanding the rough spots between coats. After the first 2 coats, start to specifically add more globs of top coat in the seams between the planks (feather out the strokes) but this will seal up the grooves so they’re easier to clean long term). Note: I put my paintbrush into a ziploc bag between coats to keep it from drying out.
  9. Allow the countertop to fully dry for 24 hours, then install it. Just left it into place and secure it to the cabinet (usually using short screws from the underside going up into the bottom of the counter). — Tip: If your counter is between two walls or tall cabinets and you’re worried about scratching them as you lift the counter into place, use painters tape to cover the bottom edges of the counter to protect whatever it’s brushing up against. Still use caution as installing it and go very slowly.

STAIN OPTION:

We’ve also done a version of this countertop with a stain which you can see in our Basement Bathroom. I’ve listed all the info on the stain we used below. I just apply them according to the instructions on the cans with a light sand between the final stain coat and top coat application to make sure it’s smooth. The top coat we use fully seals it so we have no issues with water.

  • Pre-stain conditioner (one coat): Amazon | Home Depot
  • Gray stain (one coat): Amazon | Home Depot
  • Matte top coat (two coats): Amazon | Home Depot

OTHER SOURCES:

  • Gold cabinet knobs: CB2
  • Gold drawer pulls: Amazon | Similar: Home Depot | Schoolhouse
  • Tutorial on the brick wall: How to DIY a Faux Brick Wall with a German Schmear
  • For more sources from our basement, go to: Basement Sources Page

Filed Under: Tutorials

Spring Decor 2020

May 5, 2020 by admin Leave a Comment

Living room spring mantel decor:

  • Round mirror: Wayfair | Amazon | Urban Outfitters (same mirror)
  • Tall white vase (right side): Crate & Barrel
  • White flower branches (right side): Crate & Barrel | Similar: McGee & Co
  • White vase (left side): Crate & Barrel (my vase is no longer available but I also have and love this similar option from the same source: Crate & Barrel, or this one: Crate & Barrel)
  • Black candle sticks: Amazon | Similar: Wayfair
  • Lanterns (similar): West Elm | Crate & Barrel
  • Wood vases: McGee & Co (only dark version still available) | similar: Crate & Barrel
  • Fireplace: Overstock | Amazon | Walmart
  • Mantel: old barn beam (no stain)
  • Branches: from our forest | Similar faux branches: Crate & Barrel

Kitchen spring decor:

  • Gray bunnies on the island: Pottery Barn
  • White ceramic bunny: Crate & Barrel
  • All other sources: Kitchen sources

Entryway spring decor:

  • Gray bunnies: Pottery Barn
  • Leather tufted benches: Pottery Barn (many customizable options) | Wayfair
  • We built our table (tutorial). Similar tables: West Elm | Pottery Barn | Wayfair | Wayfair | Crate & Barrel
  • My dad built our mirror, but I’ve found several other tall mirror options at the following places: CB2 | Pottery Barn | West Elm | Crate & Barrel | Crate & Barrel
  • Large white chevron vase: Crate & Barrel
  • Twirly wood stems: Crate & Barrel
  • Smaller white textured vase: Crate & Barrel
  • Gallery wall frames: West Elm (mine are sold out but there are similar options still available)

All other sources: click here.

Filed Under: Past Decor

Cleaning Sources & Routines

May 2, 2020 by admin 22 Comments

One of the most common questions that I’m asked on our Instagram page @ahousewebuilt is how we keep our house clean. We do it all ourselves (no cleaning service) so here are some of our cleaning routines and habits we’ve developed that help us keep a clean, clutter-free home!

GENERAL CLEANING SOURCES RECAP

  • Robot vacuum #1: Walmart | Amazon
  • Robot vacuum #2: Walmart | Amazon
  • Fuzzy bumpers on our roombas: Amazon
  • Cordless vacuum: Amazon | Walmart
  • Corded vacuum: Amazon | Walmart
  • Floor mop: Amazon | Walmart
  • Laundry pods: Amazon | Walmart
  • Dishwasher pods: Amazon | Walmart
  • Hand soap (liquid): Amazon | Walmart
  • Dish soap (liquid): Amazon | Walmart
  • Bar soap: Amazon | Walmart
  • General cleaner: Amazon | Walmart
  • Leather conditioner: Amazon | Walmart

I’ve provided details on all these sources and how we use them below:

CLEANING MINDSET

We consciously choose to not own a lot of “stuff” and everything we own has a specifically designated spot it lives in. Our house rule (which was my parents’ rule while I grew up and that worked really well so I’ve continued it in our house) is that “anything you take out must be returned to where you found it, in the same condition you found it in, as soon as you’re finished with it”. It takes a while to make that into a habit (especially if you didn’t grow up with this rule) but once you get into this habit, it eliminates a pile up of “random stuff” around the house because you’ve put everything away when you’re done with it.

So a combination of not owning a lot of stuff, having designated homes where all your stuff lives, and a developing an instinctive habit of putting away anything you take out helps to keep your home tidy.

CLEANING HABITS

  1. Clean as you go as much as possible. The purpose of this is to keep everything mostly tidy throughout the day so that when you go to actually properly clean, you’re more “topping off” the clean, rather than starting from scratch. In my opinion, this is the most important thing you can do.
  2. Set small timers for cleaning tasks. It’s amazing how much you can get done in sixty seconds, or as much as five whole minutes. Instead of dedicating massive chunks of time (or *shudder* whole days) to cleaning, I’ll just pick a room, set a timer for 1-2 mins and seriously you can get so much done in that time. I find that setting that little timer helps me mentally not get overwhelmed with the idea of “cleaning” as this huge impossible task. This way feels more manageable and achievable when you’re only having to find an extra two minutes in your day instead of two hours.
  3. Multitask. Anytime I go from A to B in our house, I just quickly ask myself if there’s anything else I could do at the same time. For example, if I’m on the main floor but I need something from an upper floor, I’ll see if there’s maybe a load of laundry I can carry up at the same time or whatever else is needed. I’m already needing to make the trip from point A to point B in our house, but doing two things at once doubles my productivity and saves me time/energy in the long run.
  4. End-of-day tidy-up. This is strongly linked to the clean-as-you-go habit because if you’ve been mostly cleaning as you go throughout the day, then you shouldn’t have too much left to tidy up at the end of the day. But right before bed, just do a quick walkthrough and put away anything still left out of place so that when you start your day the next morning, you’re waking up to a tidy house. If this sounds like a lot, then start with doing this in just one room (I recommend the kitchen) and once you’ve formed that habit, expand this habit to the rest of your house too.

One more thing is that if you’re married, living with someone (even a roommate) or have a family, then it can’t just be you cleaning up after everyone. Get them on board with the same habits as you and/or designate certain tasks between you. And also teach your kids to follow suite both by teaching them, and by leading by example. Everyone old enough to participate should be involved in keeping your communal living environment (your home) tidy. Most of my own cleaning habits were ones I learned as a kid from my parents – not only through practice, but also by observing my own parents keeping a tidy house and watching their habits, so it’s never too early to start and habits formed early on are the easiest ones to make and to continue. But whether these habits are something you grew up with or something you’re just starting now, it is possible to form these habits if you put your mind to it and make it a priority.

CLEANING TOOLS

  • Robot vacuums: We have 2 different styles of these for different parts of our house. First is this: Walmart | Amazon (regular vacuum, manual disposal). Second is this: Walmart | Amazon (automatic disposal). We specifically have these because we have five rescue cats but my husband is allergic to cats to we have these to control the allergens in our home. They both have high-efficiency filter systems and they cover a lot of ground. We run them both 4-6 times a week in different parts of our house but I should note that the purpose of these in our house is to remove cat hair from our floors – like the subtle stuff that you don’t even see – and they do a fantastic job at this in particular. But in terms of actually cleaning floors after a mess or a spill, or like cleaning under the dining table after a meal, cleaning up crumbs, or cleaning an entryway mats etc, that stuff we still need to do ourselves because the roombas honestly just aren’t as good at it. So in our house we use them specifically as cat allergen controllers, otherwise we probably wouldn’t have them.
  • Cordless vacuum: Amazon | Walmart. We have 3 of these for different parts of our house. They run smooth and have multiple attachments. Overall this is my favorite and most-used vacuum. We can keep our entire house clean with it. If I could only have one vacuum, I’d choose this one.
  • Corded vacuum: Amazon | Walmart. We’ve had ours for many years (ours is the slightly older version of these) but since getting our cordless vacuum cleaners and robot vacuums, I’ve used this corded one less and less. It’s a very good vacuum though and I’ll use this once a month or so for a deeper clean, but that’s it. If you have pets, this is a great vacuum for deep cleans.
  • Floor mop: Amazon | Walmart. About once a season we lightly mop out floors down with water, but that’s really all it takes to keep them clean (on top of daily vacuuming). I don’t like using cleaning products unless I really can’t avoid it so my primary go-to for cleaning is always just fresh water.

Grooming the cats regularly makes the biggest difference as far as keeping the house free of fur. I use this grooming tool and I groom all our cats at night before bed every other night. If I’m late by even one day, I notice a difference. This is the best way to get ahead of keeping your house free of fur. Note: this also helps with allergies. To learn more about How to Cope with Cat Allergies, click here.

CLEANING PRODUCTS

We try our best to use non-toxic products where possible, but we also balance practicality with that. So, for cleaning products we use daily like laundry & dishwasher pods, or dish & hand soaps, we choose to use “cleaner” products. But for rarely-used products like glass & steel cleaners etc, we just use whatever the best-working product we can find is because they’re used so infrequently that we prioritize function for those items. If you ever want to go down the rabbit hole of researching how many products in your everyday life are toxic, be warned that the list is likely extensive. I did this a little while back and that’s how I came up with this list of cleaner cleaning products for us to use (I did the same for my makeup and skincare too although that’s not the topic of this post but just FYI, I recommend looking into the ingredients of the products you use if you want to be informed about what you’re breathing in regularly and/or absorbing into your skin). Ultimately, it’s all about finding whatever the right balance is for your household that you feel safe and comfortable with and here I’m sharing the products we like to use:

  • Laundry pods: Amazon | Walmart
  • Dishwasher pods: Amazon | Walmart
  • Hand soap (liquid): Amazon | Walmart
  • Dish soap (liquid): Amazon | Walmart
  • Bar soap: Amazon | Walmart
  • General cleaner: Amazon | Walmart

LEATHER CARE

  • Leather conditioner: Amazon | Walmart. This stuff is amazing! I use it to buff out any accidental scratches our couches get and also just to condition them (maybe once every couple weeks/months). It’s kept our leather looking brand new even though we have 5 cats!
  • If you want more info, go to our post: How to Stop Cats from Scratching Furniture

I hope this helps answer your cleaning questions!
If there’s something else you’d like to know, just leave me a comment down below and I’ll answer!


To explore other rooms in our home, click here for our website roadmap.
To follow our daily progress and house projects, follow us on Instagram @ahousewebuilt.

Filed Under: Cleaning

Cinnamon Pumpkin Donut Bites

April 18, 2020 by admin Leave a Comment

I adore these little donut bites so I thought I’d share the recipe. You don’t need an oven, but you do need a specific cake pop appliance to make these. However, it’s fairly inexpensive, I’ve had mine for years and it’s held up really well so personally I think it’s worth it for the homemade donut yum.

The Cake Pop Appliance I use can be found at: Walmart, Bed Bath & Beyond, and Amazon. It comes with the appliance, special prongs (really useful), cooling rack (with little holes), and recipes.

Dry ingredients (combine in a bowl and mix):

  • 
1 3/4 cup flour
  • 2 tsp baking powder
  • 1 tsp cinnamon

  • 1/2 tsp nutmeg

  • 1/2 tsp salt
  • 1/8 tsp cloves

Wet ingredients (combine in a separate bowl and mix):

  • 
1 egg
 (whisked lightly with a fork)
  • 
3/4 cup canned pumpkin
  • 

1/2 cup milk (or soy milk)
  • 1/2 cup brown sugar (white or half white/half brown works too)
  • 1/3 cup melted butter (or sunflower oil)
  • 
1-2 tsp vanilla


Coating:

  1. Small bowl of sunflower oil or melted butter (~3-4 tablespoons)
  2. Small bowl of cinnamon sugar (mix 1/2 cup white sugar and 2-3 tbsp cinnamon)

Directions:

  1. Preheat your Cake Pop appliance – just plug it in, when the light turns green, it’s ready to use.
  2. Combine the contents of your wet and dry ingredient bowls and mix.
  3. Lightly spray the appliance’s baking tray with cooking oil. Spoon batter into each little hole – each one should be filled about half-way. Don’t overfill them or they’ll overflow.
  4. Close and bake for 3-5 minutes. They’ll be softly golden brown when done.
  5. Use prongs to remove them from the heat and cool on the designated rack for about 1 min.
  6. When they’re cool enough to touch (but still warm!), brush them with melted butter (or sunflower oil), then roll them in the cinnamon sugar until fully coated.
  7. Place them on a drying rack until they’re all complete.
  8. Repeat until your batter is used up.

Sources:

  • Cake pop appliance kit: Walmart | Bed Bath & Beyond | and Amazon
  • Glass jar: The Container Store
  • Label maker: Amazon | Walmart | The Container Store
  • Hex coasters: Crate & Barrel
  • Utensil crock (similar): McGee & Co
  • Wood utensils (similar): Bed Bath & Beyond | Bed Bath & Beyond
  • Rectangular cutting board: Amazon
  • Salt cellar (similar): Crate & Barrel
  • White ceramic vases (set of 3): Amazon | Similar: Wayfair
  • Drawer pulls: Amazon | Similar: Schoolhouse
  • Cabinet knobs: CB2 (mine were sold out and replaced with these very similar ones)
  • White ceramic bunny: Crate & Barrel (sold out)

Filed Under: Recipes

Potato Chickpea Curry + Homemade Naan Bread

April 15, 2020 by admin Leave a Comment

This is our newest favorite dish and since we’ve made it like 3 times in a row recently, I thought I’d share the recipes here (it’s actually two recipes: one for the curry, one for the naan). These last few weeks, we’ve been focusing on meals made from pantry shelf staples without fresh ingredients as part of our efforts to keep staying home and limit grocery runs during these pandemic times.

Note: these are not ethnically-accurate recipes. These are just our own versions of these dishes so I’m sure the technique or recipe may not be authentic but they work really well and taste amazing!

RECIPE #1: POTATO CHICKPEA CURRY

Preparation: get all the following groups of ingredients prepped in bowls and set aside.


Into a small bowl | Spice blend:

  • 3 tbsp curry powder 
  • 2 tsp ginger (or grated fresh ginger if available)
  • 1 1/2 tsp smoked/normal paprika 
  • 3/4 tsp cumin powder
  • 3/4 tsp cayenne pepper
  • 1 tsp salt

Into a larger bowl | Wet ingredients: 

  • 1 can (~2 cups) chickpeas, drained and rinsed
  • 1 can (~2-3 cups) crushed tomatoes
  • 1 can (~2 cups) coconut milk (if you don’t have coconut milk, substitute veggie stock)
  • 2 cups vegetable broth/stock

Into a large sauce pot that you’ll be cooking the curry in:

  • 2 tbsp olive oil 
  • 1-2 onion, diced
  • 4 garlic cloves, minced (optional)

Into a cast iron pan or baking sheet:

  • 2-3 medium potatoes, cut into small cubes
  • 3 tsp olive oil

Cooking instructions for potatoes:

  • Option 1: fry the potato chunks in olive oil on the stovetop in a cast iron pan on medium-high heat, stirring every 2 minutes until they are crispy on all sides and fork tender. About 10 mins.
  • Option 2: roast the potato chunks in olive oil in the oven at 350-400, stirring every 5 minutes until they’re fork tender.

Cooking instructions for main curry:

  1. In large pot on medium-high heat, stir garlic/onion/olive oil for 3 min until onion is translucent.
  2. Add  in Spice Blend and stir for 1 minute.
  3. Add the chickpeas, tomatoes, broth, and coconut milk. Bring to boil then turn down the heat to medium and simmer for 35 minutes or until the sauce has thickened. Stir every 5 minutes.
  4. Add in fried/baked potato chunks whenever they’re ready. Then you’re done!

Notes:

  • Rutabagas work instead of potatoes, and squash would also be good. Prepped same way.
  • Possible additions: peas, lentils, cumin seeds.
  • Serve with rice and/or naan bread.


RECIPE #2: VEGAN NAAN BREAD

Dough ingredients:

  • ~3 loose cups or 375g sifted all-purpose flour
  • 2 1/2 tsp active dry yeast
  • 2 tsp coarse grain salt (or 1 tsp table salt)
  • 1 cup + 1/8 cup warm water
  • 1 tbsp honey
  • 1 tbsp olive oil

Dough preparation:

  1. Combine flour, yeast, & salt.
  2. Add honey to warm water and mix that up.
  3. Using a stand mixer (Amazon | Bed Bath & Beyond), slowly add wet ingredients to dry ingredients, mixing constantly. Mix on medium until dough comes away from sides (1-2 mins).
  4. Add olive oil using it to coat the dough and create a ball.
  5. Leave in a bowl, covered, for at least 1 hour until it triples in size.

Olive oil/garlic mixture: (only do this if you want garlic naan)

  • 4 garlic cloves, finely minced
  • 1/2 tsp dried parsley
  • 1/2 tsp salt
  • 2 tbsp olive oil

Cooking instructions:

  1. Divide dough into 6 balls (pinch them away).
  2. Roll them out flat with rolling pin (use olive oil if too sticky, not flour) until about 1/8″ to 1/4” thick
  3. To cook, place them on a cast iron pan pre-heated to medium-high heat. Once the dough has been placed in the pan, brush the top with the oil/garlic/herb mixture.
  4. When it’s cooked (~1 min), flip and cook the other side for about 30 seconds. Basically the same concept as a bready pancake. Repeat x6.

For sources from our kitchen, click here.
For sources from our pantry, click here.
For more of our recipes, click here.

Filed Under: Recipes

Vegan Bolognese Pasta Sauce

April 13, 2020 by admin Leave a Comment

Pasta is one of my favorite dishes and with since we’ve been pretty strict about staying home these past few pandemic weeks, I’ve tried getting creative with making recipes out of pantry shelf stapes – without extra fresh ingredients (that by now we’re out of). The catch is that I’m also trying to make the meals as balanced as possible so I wanted this to be more than just tomato sauce and pasta so this is a bit of a jazzed up version with protein from the beans/lentils while still being a yummy pasta dish!

(If you’re wondering why we don’t just use ground meat, we just don’t really like to eat much meat in our house. We’re not vegan – we eat cheese/eggs/fish – but we typically don’t eat meat products.)

Ingredients:

  • 1 can tomatoes (either used crushed, or crush the tomatoes you have)
  • 1 can black beans or lentils or chickpeas (drained + rinsed + lightly crushed/mashed.)
  • 1 cup vegetable stock/broth
  • 1 onion (any kind, chopped)
  • 4 garlic cloves (minced)
  • 3 tbsp olive oil
  • 2 tbsp tomato paste (optional, but tasty)
  • 1 tbsp sugar
  • 1 tsp salt
  • 1 tsp garlic powder
  • 1 tsp dried basil
  • 1 tsp dried oregano
  • 1/2 tsp dried parsley
  • 1/2 tsp red pepper/chili flakes
  • 1/2 tsp ground black pepper

Now, if we were still doing regular grocery runs (which we’re not), I would totally add chopped celery, fresh basil, spinach or kale, even some roasted cherry tomatoes… but we’re really trying to stay home right now for as long as we possibly can, so that means that we’re working with pantry staples.

Preparation:

  1. I like to pre-prep everything into 3 bowls before I start cooking to make things simpler. First, chop up your onion and mince the garlic and place them into a large sauce pan with a healthy glug of olive oil, and set aside.
  2. In a large bowl, drain and rinse your beans/lentils/chickpeas and mush them up with a fork/potato masher until they’re just a bit broken up, but NOT a paste!! Add in your can of crushed tomato + cup of veggie stock/broth + olive oil. This is your liquids bowl.
  3. In a small bowl, assemble all your spices and set aside.

Cooking instructions:

  1. In a sauce pan on medium-high heat, fry up the onion and garlic in olive oil for about 3 minutes, or until the onion is translucent.
  2. Add in the spice blend, and stir constantly for about a minute.
  3. Add in the tomato paste and stir it through. (This is optional.)
  4. Add in the contents of your liquids bowl (crushed tomatoes, mushed beans/lentils, veggie stock, olive oil) and stir it through. Reduce to medium-low heat and cook for around 30 mins or until the sauce thickens up a little, stirring occasionally.
  5. Optional last step that I personally like to do (but is not strictly necessary), use an immersion blender (Amazon) to break it up a little. But JUST pulse it a few times for like half a second in different spots around the sauce pan. You don’t want to turn it into soup!! It should have texture.
  6. Prepare your pasta of choice according to package instructions.
  7. Serve & enjoy!

For sources from our kitchen, click here.
For sources from our pantry, click here.
For more of our recipes, click here.

Filed Under: Recipes

Coconut Curry Squash Soup

March 28, 2020 by admin Leave a Comment

I thought I’d share this delicious, healthy soup I’ve been loving recently. I’ve recently started considering squash as a pantry staple. It’s a low-maintenance fresh produce item and pandemic or not, I think everyone should always have at least one squash in their pantry because they last for months, they’re versatile and nutritious, and they’re a fresh item that doesn’t need to be refrigerated.

Please note that pretty much all these ingredients are highly modifiable. You can add more or less of them and your soup should turn out just fine. You can even make it without any of the spices and just a bit of salt, for a milder version. So please consider this recipe more of a general guideline.

Ingredients:

  • 1 x medium/large squash cubed into even chunks (I used butternut)
  • 2 x small/medium onions, chopped
  • 4 x garlic cloves, chopped
  • Small peeled bit of fresh ginger (optional), about half a thumb size
  • 2 tsp olive oil (or any other oil or melted butter honestly)
  • 2-3 cups vegetable broth
  • 1 can coconut milk
  • 2 tbsp maple syrup or honey
  • 1 tsp salt
  • 1/2 tsp pepper or chili flakes
  • 1 1/2 tsp curry powder
  • 1 tsp ginger (use this only if you don’t have fresh ginger)
  • 1/2 tsp cinnamon

Instructions:

  1. In a large pot on medium/high heat, heat the oil then add in the onions and garlic (and fresh ginger if you have it). Stir them around for 2-3 minutes until the onions are translucent.
  2. Add in the squash and stir for 1 minute.
  3. Add in all your spices (salt, pepper, curry, ginger, cinnamon) and stir until everything is coated. Cover the pot and cook for 5 minutes. Stir every minute or so.
  4. Add in all your liquids (coconut milk, broth, sweetener). Bring to a boil, then reduce heat to low and simmer for 15-20 minutes until the squash is fork tender. Poke a few different chunks to be sure they’re all evenly cooked.
  5. Blend the soup using either an immersion blender (Amazon), or a normal blender (Amazon) and blend until perfectly smooth.

I like to serve it with toasted bread & goat cheese but there are loads of options for serving. You can garnish with cilantro, toasted seeds or chickpeas, serve with salad, or anything your heart desires.

For sources from our kitchen, click here.
For sources from our pantry, click here.
For more of our recipes, click here.

Filed Under: Recipes

Minimalism: How To Get Started

January 19, 2020 by admin 8 Comments

I love the clutter-free feeling of knowing that everything in my house is something I either love, use, or need. On our Instagram page @ahousewebuilt, one of the things people comment on most frequently is either noting how minimal our house is or asking about how we keep things so minimal. For us, the getting to this clutter-free point has been a long, intentional journey so I thought I’d share our tips and the things we did in hopes that they might help you if you’re thinking about becoming more minimal.

We don’t consider ourselves “minimalist” by title, we’re just “generally minimal” by nature. We still do buy stuff frequently, we just focus on buying stuff we genuinely love, use or need. Our policy is that we don’t let anything into our house that doesn’t fit the “love, use, or need” criteria – stopping things at the door before they get settled into your home really nips clutter in the bud by halting it before it even gets started. We’re intentional about our purchases so the end result is that our house is filled only with things we love/use/need. (Just as one example, if you’ve seen my closet, you’ll note it’s hardly a capsule wardrobe or anything remotely close to “traditional” minimalism; but on the flip side, every single piece I have is one I genuinely love, wear, and that fits me. It’s my own way of being minimal.)

To me, being minimal isn’t about having less stuff, it’s about having the right stuff. It’s about having stuff you love, stuff you use, stuff you need, stuff you actually want. And I love having stuff! I love getting seasonal decor, I love acquiring beautiful things to style my house with, I love furnishing my home with furniture and furnishings, I enjoy clothing and fashion, I love pretty things, I love cozy things, I love fun things, I love gadgets, I love technology, I love finding the right tools for the projects I’m working on, and I absolutely don’t try to restrict myself from these things, but I do try to make intentional purchases. But again, the point is that I try to buy stuff I genuinely love, stuff I’ll actually use, and things I really need.

Being minimal is not a “better” way to be, it’s simply a life choice. I feel the need to say that you don’t have to be minimal unless you want to. If a clutter-free house brings you happiness, then I hope this post helps you. But if you love maximalism, if clutter doesn’t bother you, if you love knick-knacks and just enjoy having stuff in general, that is equally ok! You should always do whatever feels right for your home.

Achieving a state of minimalism you’re happy with is a process and it will not happen overnight. In fact, my best advice is to intentionally work towards minimalism in stages. This way it’s easier on you, and you’ll probably end up feeling better about what you decided to get rid of if you do it more gradually.

Before moving into our house, we purged our possessions three times. It so happened that we moved three times in the couple years before moving into this house so we purged as we packed each time – and only packed the things we love/use/need. We also took things a little further and sold/donated all our old furniture so that when we moved into our new house, we started with a completely clean slate.

If you’re not moving and you have a house full of stuff you don’t love/use/need and you want to start being more minimal, I have lots of tips for you because we used to have way more stuff than we have now, and we’ve gotten to the more minimal state we’re in now by the following process:

Focus on one room at a time. If you break your decluttering down by room, it’ll feel more manageable than trying to declutter your whole house at once. The goal will feel more attainable. So pick any room to start and systematically go through everything you have in it. If you’re moving, then only pack the stuff you love, use, or need. If you’re not moving, then just pretend you are and do a “reverse pack” where instead of packing what you you love/use/need, then pack up everything you don’t love/use/need.

If there are items you’re unsure about getting rid of, that’s totally understandable. My advice is to have an “unsure box” where you place all these items that you think you may still want in the future. Once this box is full, place it somewhere out of sight (maybe in your garage, basement, the back of a closet, etc) where you can forget about it. If six months to a year goes by and you literally never think about or need any of these items, then you may end up feeling better about truly not needing those items in your life.

It’s ok to get rid of “perfectly good stuff”. If you don’t personally want these items, one option is to sell them (especially furniture or decor that’s no longer your style) online or at a yard/garage sale. Another option is to donate them to people you know or organizations that might be able to repurpose or rehome them. But don’t feel held back by this – take action, and move these items you don’t want in your life along because if they’re not useful to you and you don’t love them, then they’re just cluttering up your life.

Don’t be afraid to keep things you love. There’s no single right or wrong way to be minimal, so the end result of minimalism will look very different for each person/family. For example, I actually do have a lot of clothing (see my closet) but I don’t buy anything I won’t genuinely wear, I don’t keep anything that doesn’t fit me, and I don’t hold onto any piece I don’t love. Another example is that I have lots and lots of vases all over our house (and more in storage) because… I love vases! I just do. They make me happy, they’re versatile, and when I find a new one I love and I think it would look good in my home, I buy it with zero guilt. It’s that simple. But if I find a vase that I only sorta-kinda like and I’m not sure about, then I don’t buy it. We also cook a lot so both our kitchen and our pantry are full of gadgets we use regularly, but we don’t generally have multiples of things, and we store the most-used items in the easiest-to-reach zones.

Don’t keep items out of guilt. In contrast to my previous point, I don’t keep items I don’t love even if someone gave it to me as a present. If someone gifts me something I don’t like, then I tell them how grateful I am for the gift and how much it means to me that they thought of me, but then I just regift or rehome it. While I don’t feel guilt about holding on to items I love, I also don’t keep items out of guilt.

For the items you love/use/need and want to keep, figure out storage solutions for them so that they’re not just left out all the time. This is a really simple way to organize your house. Designate a “home” for each item you keep so that it has a place it belongs. This really helps keep you home clean, because if you follow my cleaning routines, then you always have a designated spot to return each item to.

Organize your home by priority. This means to try and make the most commonly use items easiest to access. Utilize the backs of deep cupboards/closets, or higher shelving, or low-traffic zones for items that you don’t reach for very often. Have everything you use most often easily reachable. Not only will this make accessing them easier, but the easier their location is to access, the easier it is to tidy up.

Ultimately, the goal is to create a home environment that you are happy with. Naturally, the end result of this goal will look different for each person, so don’t worry about making your minimalism goal look the same as anyone else’s. Again, in my opinion, being minimal isn’t about having less stuff, it’s about having the right stuff. Just take your time, be intentional, and do whatever feels right for you.

Sources from our mantel decor (pictured above):

  • Round mirror: Wayfair | Amazon | Urban Outfitters (same mirror)
  • Metal vases: Crate & Barrel (large) | Crate & Barrel (medium)
  • Square frame: West Elm (newer version of mine)
  • Tall vase: Crate & Barrel (newer version of mine)
  • Wood vases (similar): Wayfair | McGee & Co
  • Lanterns (similar): West Elm | Crate & Barrel
  • Fireplace: Overstock | Amazon
  • Side table: Target | Wayfair
  • Basket: Crate & Barrel
  • Shiplap: Tutorial & Info
  • Mantel: old barn beam (sun-weathered solid wood, no stain)
  • Branches: foraged from our forest

For our cleaning routines, go to Our House Cleaning Tips.
For daily updates, follow our Instagram page @ahousewebuilt.

If you have any more questions, feel free to leave me a comment down below.

Filed Under: Cleaning

Cheese & Cracker Snack Boards

November 26, 2019 by admin Leave a Comment

Cheese boards are perfect for decadent and tasty snacking! They’re also excellent party pleasers! I know that a charcuterie board is often the more traditional option, but since we don’t eat a lot of meat in our house, a cheese board is the way to go for us! It’s not only perfect for parties, it’s can also be an amazing option for those random nights when you don’t know what to make for dinner and you just want to snack!

My favorite board to use is this slate board from Crate & Barrel (comes in small, medium, and I have large) and I paired it with this adorable modern copper handled cheese knife set and Christmas tree ramekins which felt perfect for the holiday season! More on other cheese boards & knives I love down below!

The best cheese boards have a variety of flavors to compliment each other – a mix of cheeses, crackers, fruit (fresh & dried), sweet treats, salty snacks, some crunchy bits and anything else your heart desires!

As far as presentation goes, there are basically a zillion different cheese board styles and cheese knives out there to choose from, so I’ve rounded up my favorites styles below to help narrow down the selection!

Favorite cheese board styles:

  • Slate board: Crate & Barrel (this is the one in all my pics)
  • Wood & marble boards: McGee & Co (striped) | West Elm (long octagon) | Crate & Barrel (rectangle) | West Elm (round w/handle) | World Market (round w/handle) | Overstock (round no handle) | Wayfair (paddle) | Wayfair (oblong) | Wayfair (round) | Wayfair (pineapple shape)
  • Petrified wood: CB2 | West Elm
  • Wood with inlay: CB2 (resin & wood) | Wayfair (extra long)
  • Natural wood: CB2 (teak) | CB2 (olive)
  • Traditional wood: Crate & Barrel (extra long) | Crate & Barrel (leather handles) | Crate & Barrel (copper accent) | Crate & Barrel (classic)
  • Large cutting boards: McGee & Co (set of 3)Crate & Barrel


Favorite styles of cheese knives & accessories:

  • Copper handles (modern): Crate & Barrel (the ones in my pics)
  • Black handles (modern): Crate & Barrel
  • Geometric handles: CB2
  • Agate handles: World Market
  • Mother of pearl handles: CB2
  • Marble handles: West Elm (square) | West Elm (rounded) | Crate & Barrel (dark marble)
  • Wooden: Crate & Barrel
  • Copper: West Elm
  • Gold: West Elm (textured) | CB2 (chunky) | West Elm (gold & silver)
  • Christmas tree ramekins: Crate & Barrel (shown in my pics)
  • Soapstone chalk: Crate & Barrel (writes on the slate cheese boards)


Favorite snack board foods:

Cheeses (I like to do 3):

  • 1 hard (my fav is manchego, I usually slice this to make triangle wedges)
  • 1 medium (my fav is goat gouda or cheddar, I’ll slice gouda but cube cheddar)
  • 1 soft (my fav is soft unripened goat, but brie is common too)

Crackers (I also like to do 3, in a variety of shapes):

  • 1 Flavored
  • 1 Crispy
  • 1 Softer
  • A baguette (sliced or in chunks)

Fresh fruit:

  • Grapes are a must for me
  • Berries are also a must
  • Seasonal options: pears, peaches, figs, persimmons, apples, tangerines, grapefruit, melon…

Salty snacks:

  • Olives are my go-to, the more variety the better
  • Roasted red peppers
  • Mini pickles/cornichons

Sweet treats:

  • Chocolate bites/truffles
  • Dried fruit (apricots, dates, cranberries, figs…)
  • Candied ginger (sweet with a bit of a kick)

Spreads:

  • Jams and spreads (sweet or spicy)
  • Humus (for color, try beet or pea humus)
  • Honey in a cute little jar/dish

Crunch factor:

  • Nuts (roasted & salted for extra yum)
  • Roasted corn kernels
  • Pretzels and breadsticks

Veggies:

  • Cherry tomatoes
  • Cucumber slices

Honestly there’s no right or wrong way to do make these boards. I did up a couple different versions here as examples, but there are literally endless different and fun ways to make these yummy snack boards! And you don’t even have to do cheese… you can do veggie boards, fruit platters, or even dessert trays!!

Filed Under: Recipes

How to Make Salt Dough Ornaments

November 13, 2019 by admin 2 Comments

To fit in with our minimal Christmas decor style, I thought I’d try making some homemade salt dough ornaments and loved how they turned out! They couldn’t be easier so here’s how to make them:

Ingredients:

  • 2 cups flour
  • 1 cup salt
  • 1 cup water

Directions:

  1. Combine flour, salt, and water in a mixing bowl. Mix with a fork. Once combined, knead mixture with your hands for about a minute until it forms a non-sticky ball of dough (similar to playdough).
  2. Roll it out with a rolling pin until it’s about 1/8″ thick.
  3. Use cookie cutters to make your desired shapes.
  4. Use a straw to make a hole near the top to hang the ornaments from.
  5. You’ll have lots of scraps left over so roll those back up into a new dough ball and make more ornaments. I did this process 4 times until I was out of dough.
  6. Bake at 350 on a lined baking sheet for about 10-11 minutes.
  7. Allow to cool for at least 30 mins before moving them, and allow them to completely cool for several hours (overnight would be ideal) before hanging them on the tree.

One ball of dough made me a total of 55 medium size star ornaments and I only ended up needing 50 to fully decorate our tree as per the picture at the top of this post – granted I only decorated the two sides visible from the room since our tree is placed in a corner, but that should give you an idea of quantity.

Cookie cutters (I’ve had mine for ages but these are very similar ones):

  • Holiday sets: Amazon | Crate & Barrel
  • Star shapes: Amazon | Williams Sonoma
  • Snowflake shapes: Williams Sonoma | Williams Sonoma (mine is an older version of these)

To hang them you can either use ornament hooks or for a more rustic look, you can use:

  • Twine: Amazon
  • Baker’s twine: Amazon (red/green/white/natural) | Amazon (black/white)

I kept my salt dough ornaments all the same shape for consistency, although I also think it would be super cute with variety so you can have a lot of fun with different ways of decorating. I also added in some starbust and wire ornaments to my tree as well so I’ve found some similar ones if you like the look:

  • Starburst ornaments (similar): West Elm | Target | Crate & Barrel
  • Wire ornaments (similar): West Elm | Crate & Barrel | Target | H&M Home
  • Tree topper (I didn’t use a tree topper this year but I would have used one of these if I was planning to do one): Crate & Barrel | Crate & Barrel | McGee & Co
  • Other ornaments I love: McGee & Co (gold) | McGee & Co (black) | H&M Home (paper) | Target (snowflake) | Target (snowflakes)

Sources from our mantel decor:

  • Round mirror: Amazon | Wayfair | Urban Outfitters (same mirror)
  • Black modern Christmas trees: DIY Tutorial (Very similar: Crate & Barrel)
  • Striped vase: Crate & Barrel
  • Greenery mix: Michaels | West Elm | Michaels
  • Gold reindeer (similar): West Elm
  • Fireplace: Amazon | Walmart
  • Mantle: real barn beam
  • For more, visit our Living Room sources page

Sources for our Christmas tree box stand:

  • Tree box stand: DIY Tutorial
  • Alternative tree collars: Crate & Barrel (wicker natural) | Crate & Barrel (woven black/gold) | Crate & Barrel (textured gold) | Crate & Barrel (galvanized metal) | Target (metal) | Home Depot (metal) | BarnwoodUSA (Etsy) (wood crate) | Pottery Barn (basket) | Wayfair (gray crate with X) | Wayfair (dark crate no X) | Target (basket w/handles) | Target (black poplar) | Target (white rope)

For more info, please visit our Living Room Sources Page.

Filed Under: Christmas, Tutorials

  • « Go to Previous Page
  • Go to page 1
  • Interim pages omitted …
  • Go to page 3
  • Go to page 4
  • Go to page 5
  • Go to page 6
  • Go to page 7
  • Interim pages omitted …
  • Go to page 10
  • Go to Next Page »

Primary Sidebar

SHOP OUR HOME

Click any image below for sources from our pics!

WEBSITE ROADMAP

  • Shop Our Home
  • Sources by Room
    • All Sources & FAQs
    • Kitchen Sources
    • Pantry Sources
    • Living Room Sources
    • Dining Room Sources
    • Home Office Sources
    • Laundry Room Sources
    • Entryway Sources
    • Mudroom Sources
    • Gallery Wall Sources
    • Reading Room Sources
    • Theater Room Sources
    • Game Room Sources
    • Guest Bedroom Sources
    • Primary Bedroom Sources
    • Primary Closet Sources
    • Primary Bathroom Sources
    • Powder Bathroom Sources
    • Buffalo Check Bathroom Sources
    • Basement Bathroom Sources
    • Basement Sources
    • Stairs, Landings & Hallways
    • Paint Colors and Stain Recap
    • Cleaning Sources & Routines
  • Tutorials
    • How to Make a Staircase Gallery Wall
    • How to Make Textured Canvas Art
    • How to Install Shiplap
    • How to Build a Slat Wall
    • How to Paint an Ikea Dresser
    • How to Build Bypass Barn Doors
    • How to Build a Farmhouse Table and Benches
    • How to Build a Rustic Sideboard
    • How to Build a Slat Sideboard
    • How to Make a Sofa Pit
    • How to DIY a Faux Brick Wall
    • How to Build a Window Seat
    • How to Build a Paneled Accent Wall
    • How to DIY a Functional Play Kitchen
    • How to Stencil a Wall
    • How to Build a Round Table
    • How to Build a Console Table
    • How to Make Paper Stars
    • How to Make Paper Mache Bowls
    • How to Make Clay Links
    • How to Texture Bowls & Vases
    • How to Install Open Shelves
    • How to Make Wood Block Art
    • How to Make a Wood Bead Garland
    • How to Build Cabinet Doors
    • How to Build a Wood Countertop
    • How to DIY a Nightstand Charging Drawer
    • How to Make a Wheat Wreath
    • How to Hang Gallery Wall Frames
    • How to Stain Stairs and Paint Risers
    • How to Make Industrial Stair Railings
    • How to Build a Window Seat Cushion
    • How to Make Salt Dough Ornaments
    • How to DIY a Modern Mantel Christmas Tree
    • How to DIY a Wooden Christmas Village
    • How to Build a Wood Christmas Tree Collar Box
    • How to Make Paper Christmas Trees
  • Cats
    • Cat Room Tour & Litterboxes
    • Cat-Related Sources & Cleaning Tips
    • How to Cat-Proof Christmas Trees & Decor
    • How to Stop Cats from Scratching Furniture
    • How to Stop Cats from Playing with Decor
    • How to Train Cats and Kittens
    • How to Cope with Cat Allergies
    • How to Introduce New Kittens to Older Cats
  • Christmas
    • Christmas Decor Favorites 2023
    • How to Build a Wood Christmas Tree Collar Box
    • Neutral Christmas Present Wrapping
    • How to Make Paper Christmas Stars
    • How to Make Paper Christmas Trees
    • How to Make Salt Dough Ornaments
    • DIY Holiday Art Ideas
    • How to Cat-Proof Christmas Trees & Decor
    • How to Make Modern Tabletop Trees
    • How to Make a Wooden Christmas Village
    • Holiday Cheese & Snack Boards
    • Christmas Decor 2021
    • Christmas Decor 2020
    • Christmas Decor 2019
    • Gingerbread House & Cookies Recipe
    • Puff Tastry Christmas Tree Recipe
    • Christmas Decor 2018
  • Cleaning
    • Cleaning Sources & Routines
    • Minimalism: How To Get Started
    • Cat-Related Cleaning Tips
  • Recipes
    • Apple Turnovers Recipe
    • Baked Pumpkin Donuts Recipe
    • Banana Chocolate Chip Bread Recipe
    • Blueberry Lemon Cake Recipe
    • Cheese & Cracker Snack Boards
    • Chocolate Chip Cookie Recipe
    • Christmas Crack Recipe
    • Chocolate Crinkle Cookies Recipe
    • Cinnamon Rolls Recipe
    • Cinnamon Star Pastry Recipe
    • Coconut Curry Squash Soup Recipe
    • Creamy No-Cheese Pasta Sauce Recipe
    • Crumble Recipe
    • Easy Veggie Pasta Recipe
    • Fresh Rolls Recipe
    • Garlic Flatbread Recipe
    • Gingerbread Biscotti Recipe
    • Gingerbread House & Cookies Recipe
    • Healthy Hearty Salad Recipe
    • Homemade Bread Recipe
    • Lasagna Recipe
    • Molasses Cookies Recipe
    • Oatmeal Raisin Cookies Recipe
    • Pad Thai Recipe
    • Pesto Pasta Recipe
    • Potato Curry + Naan Bread
    • Puff Pastry Christmas Tree Recipe
    • Pumpkin Donut Bites Recipe
    • Pumpkin Loaf Recipe
    • Pumpkin Oat Muffins Recipe
    • Roasted Red Pepper Pasta Recipe
    • Rocky Road Bars Recipe
    • Vegan Bolognese Pasta Sauce
    • Vegetable Soup Recipe
  • About
    • About Us
    • Website Roadmap
    • Shop Our Home
    • Minimalism: How To Get Started
    • Privacy Policy
  • Blog

WHERE WE SHOP

Amazon

Wayfair

West Elm

Crate & Barrel

CB2

Pottery Barn

McGee & Go

Overstock

Rejuvenation

Joss and Main

All Modern

Target

Home Depot

World Market

Etsy

H&M Home

Lulu and Georgia

Serena & Lily 

Schoolhouse

Anthropologie

RECENT POSTS

  • Christmas 2023
  • Christmas Decor Favorites 2023
  • How to Make a Staircase Gallery Wall
  • Functional Play Kitchen DIY
  • Christmas Decor 2022
  • Cinnamon Rolls Recipe

Meta

  • Log in
  • Entries feed
  • Comments feed
  • WordPress.org

Footer

RECENT POSTS

  • Christmas 2023
  • Christmas Decor Favorites 2023
  • How to Make a Staircase Gallery Wall
  • Functional Play Kitchen DIY
  • Christmas Decor 2022
  • Cinnamon Rolls Recipe
  • Christmas Decor 2021
  • Cinnamon Star Pastry Recipe

SHOP OUR HOME

FOLLOW US

ON INSTAGRAM

For daily updates on our house projects and rescue kitties, follow us on Instagram @ahousewebuilt

ON SHOP.LTK

To shop our home pics daily, follow ahousewebuilt in the free SHOP.LTK app (formerly LIKEtoKNOW.it) now available from the App Store to get product sources from our pics. With this app, you can instantly shop your screenshot of any of our Instagram pics! We always link exactly what we have when available and often offer similar options as well!

Copyright © 2025 · Metro Pro on Genesis Framework · WordPress · Log in