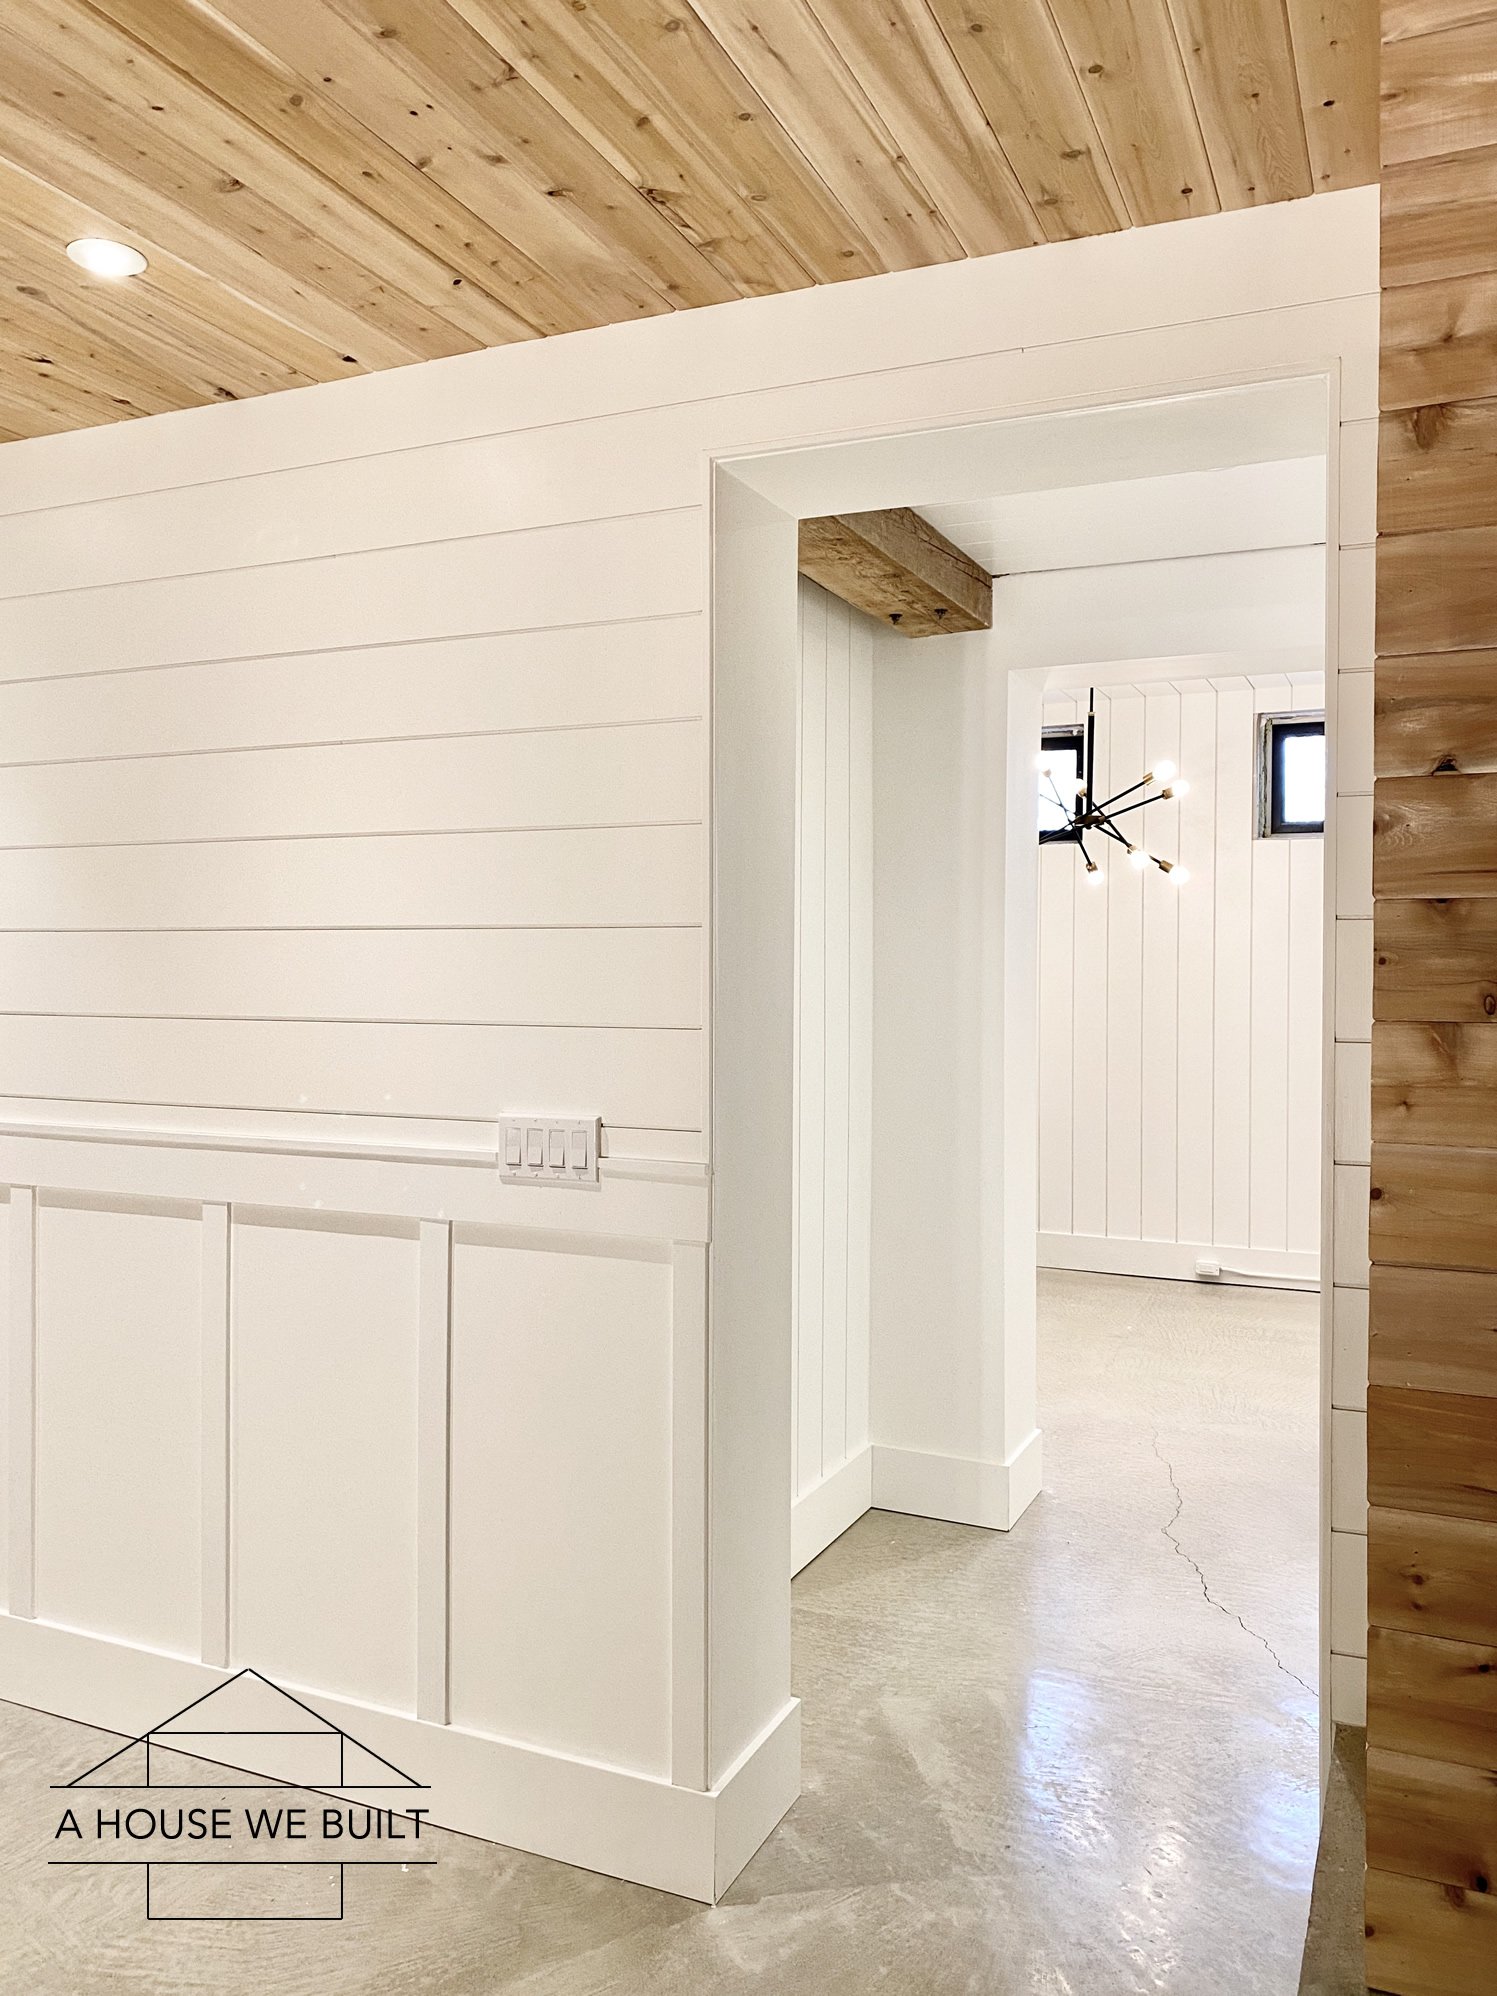
We have shiplap all over our house and its clean lines make it one of my favorite design elements to use! I even used a picture of our shiplap as the background of our website here! Shiplap is visually clean, minimal and simple, but all the lines also add really great interest and texture to any room, wall, or ceiling.
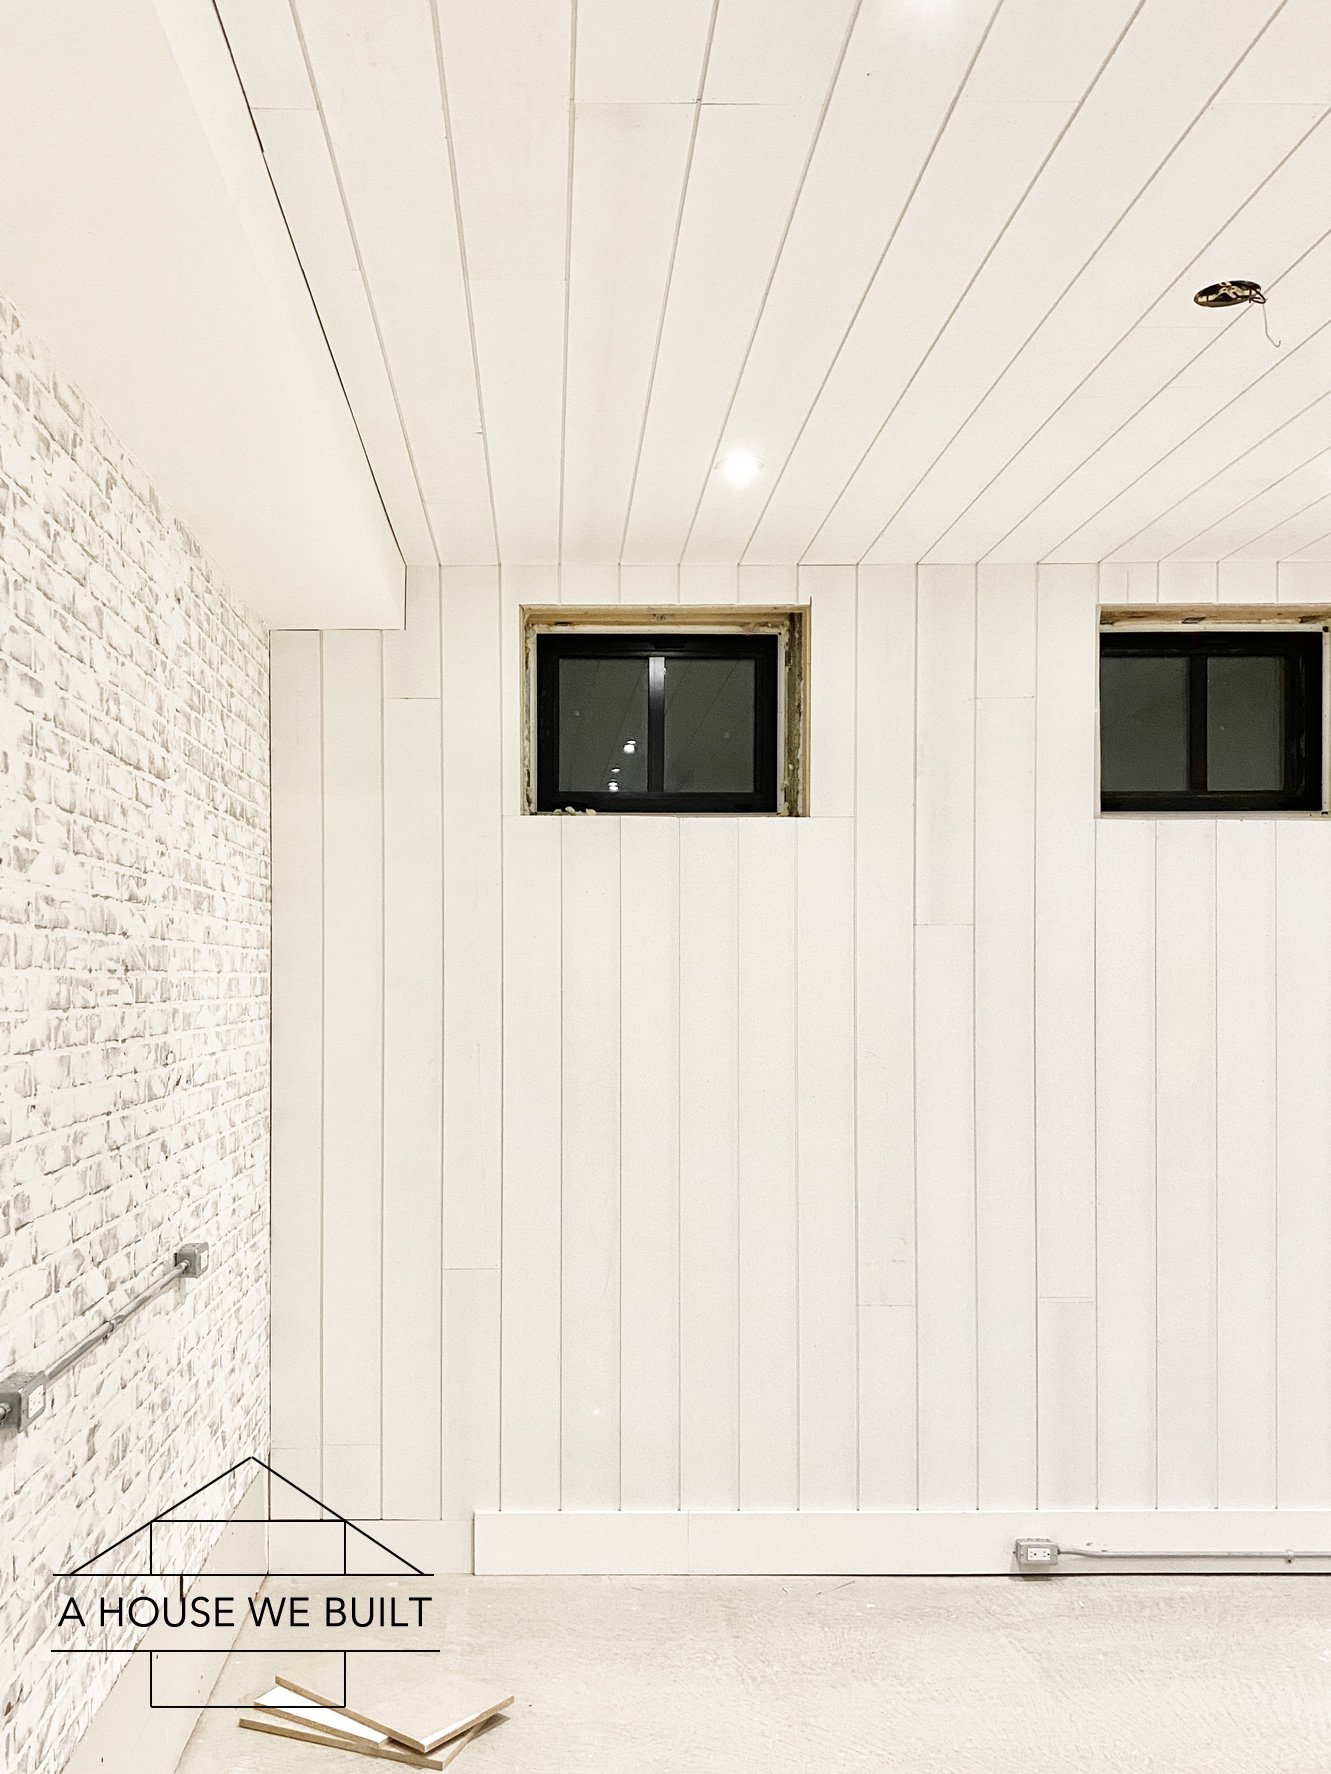
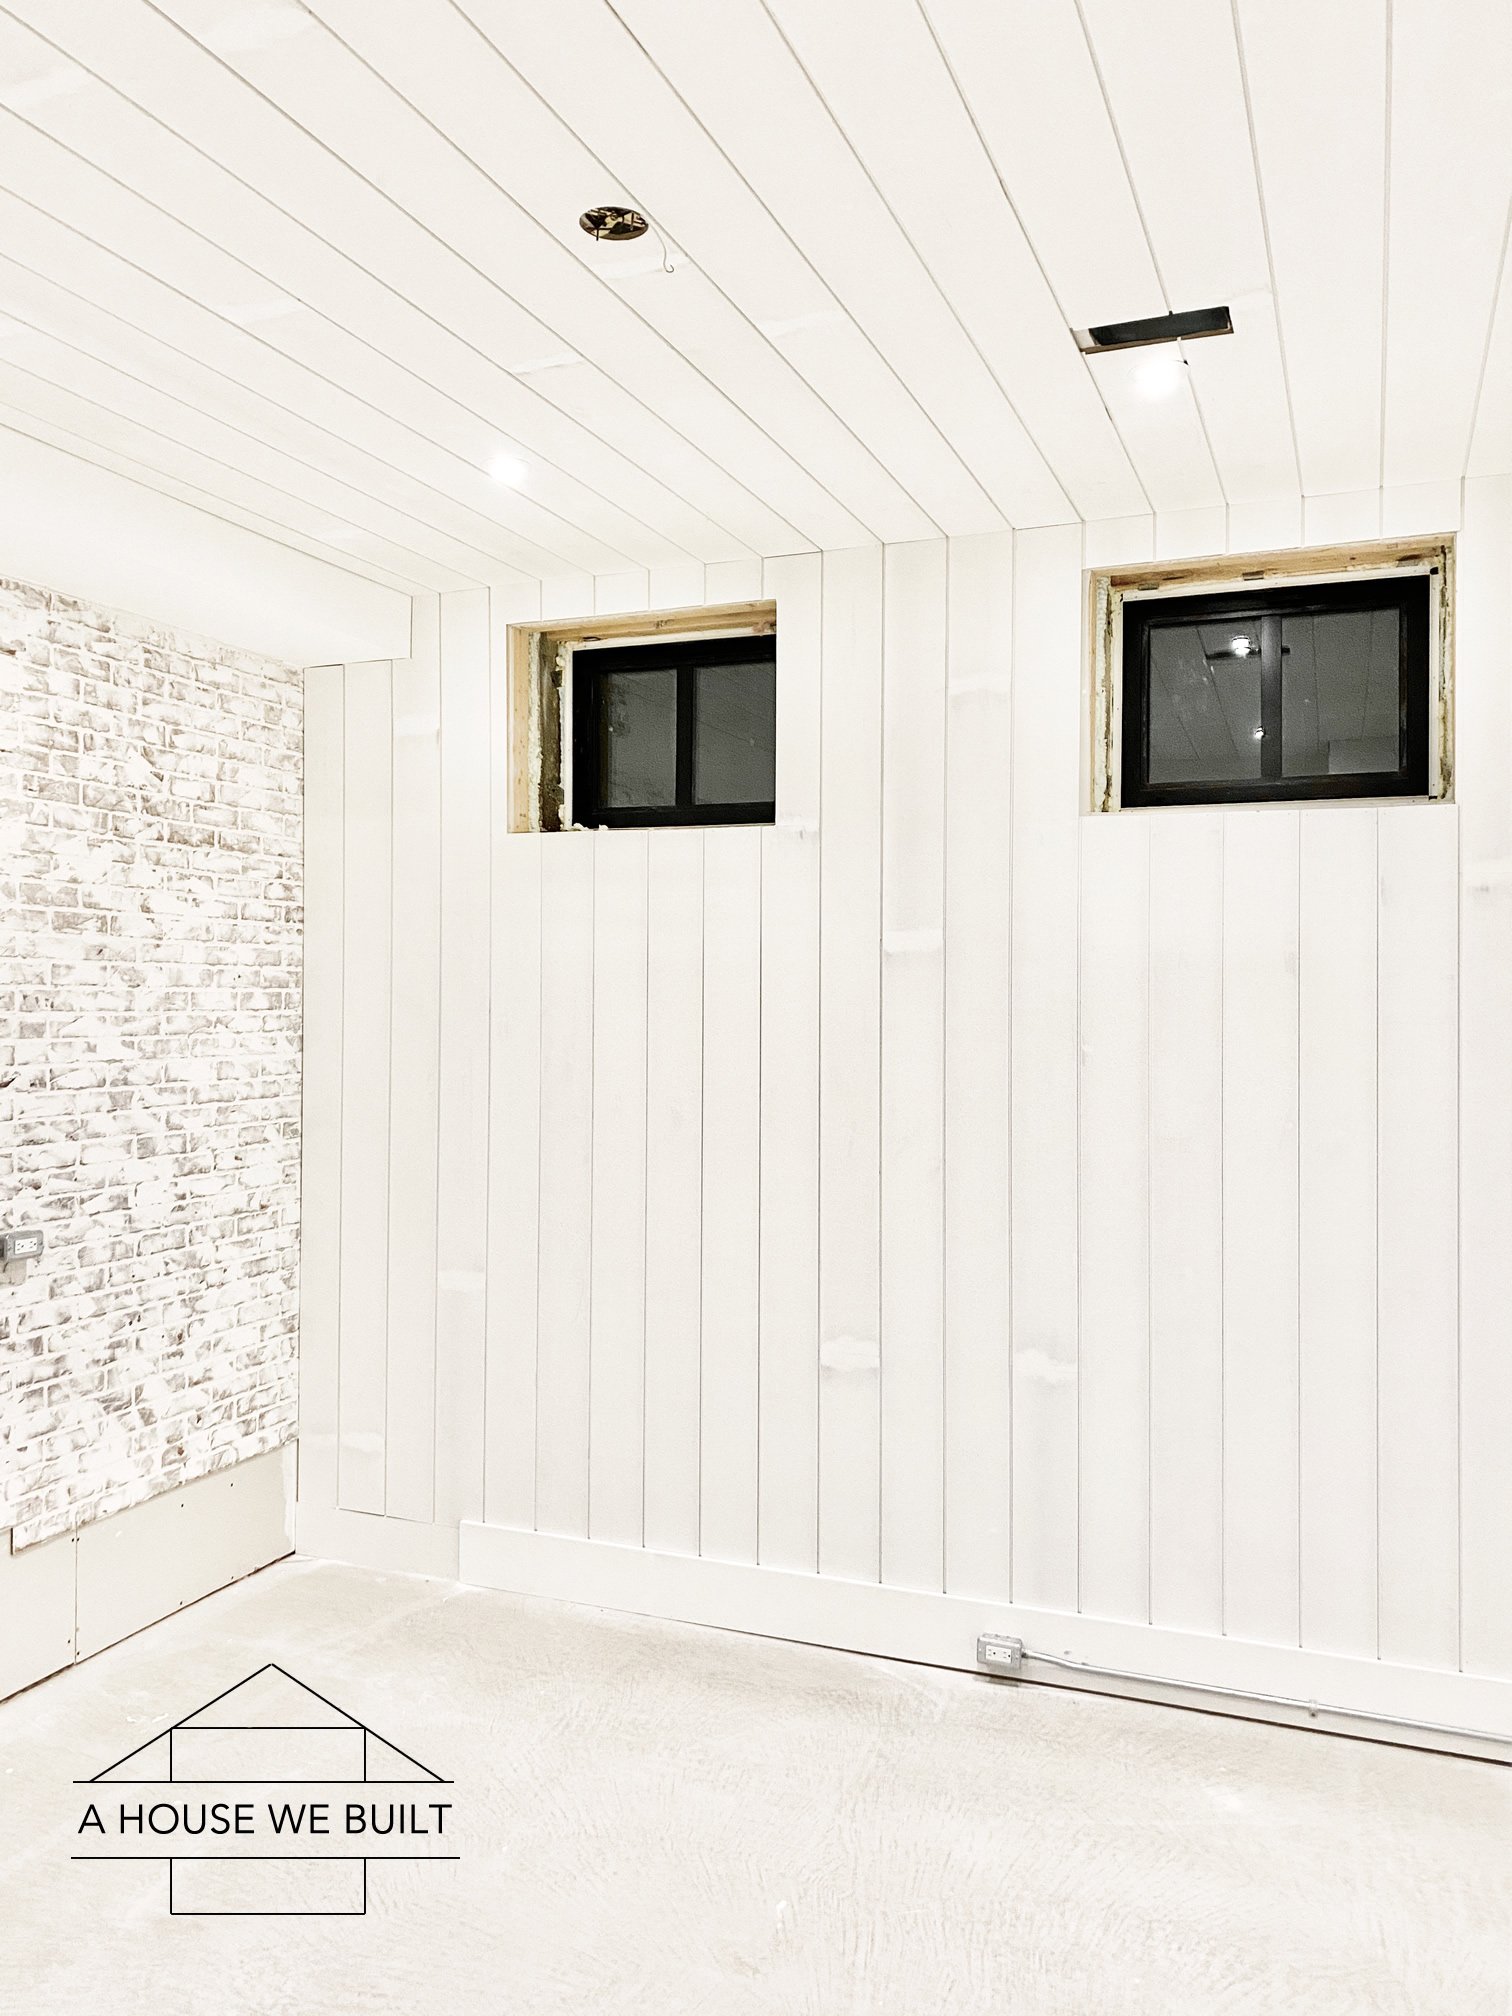
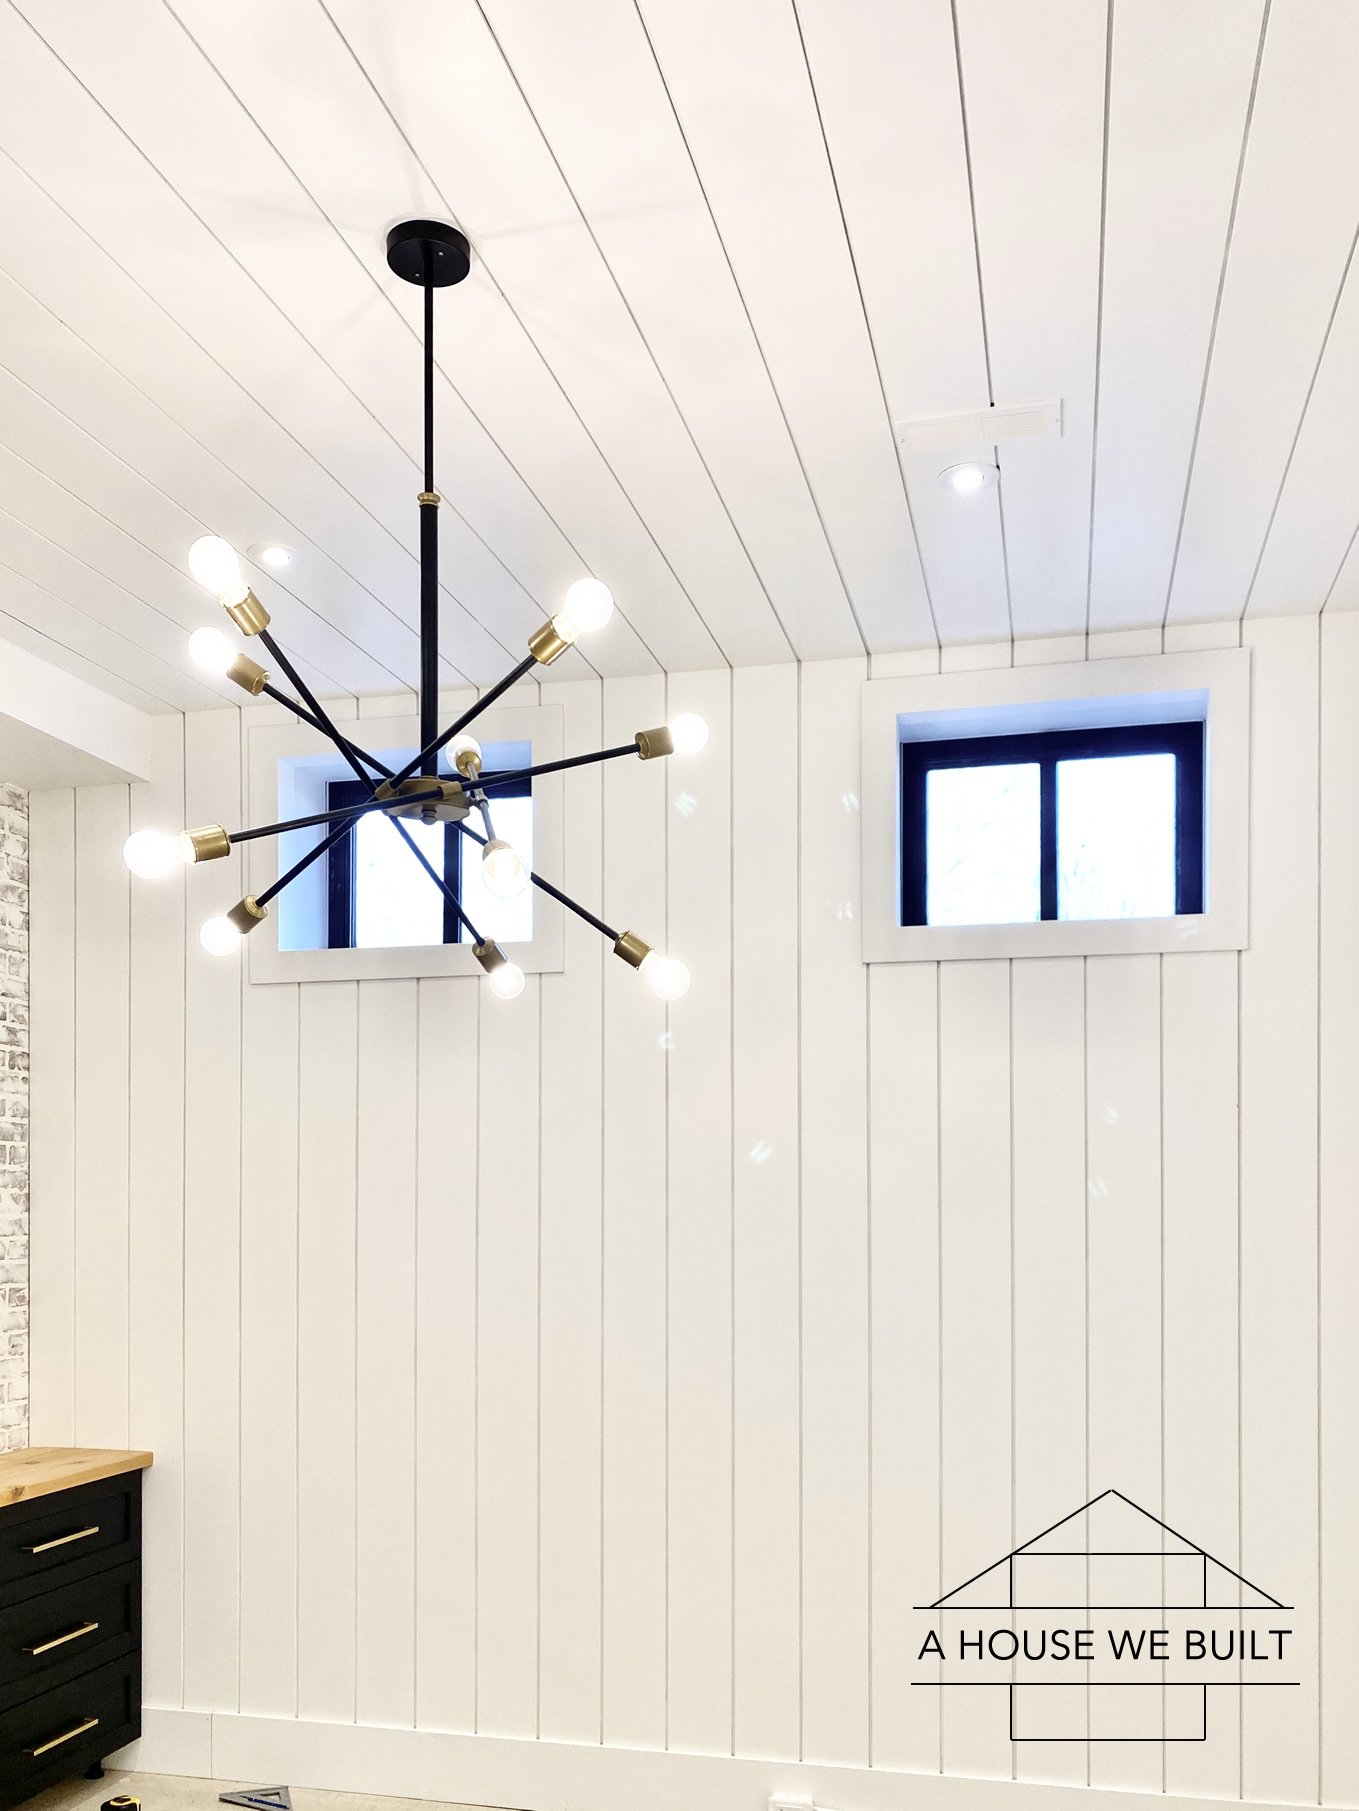
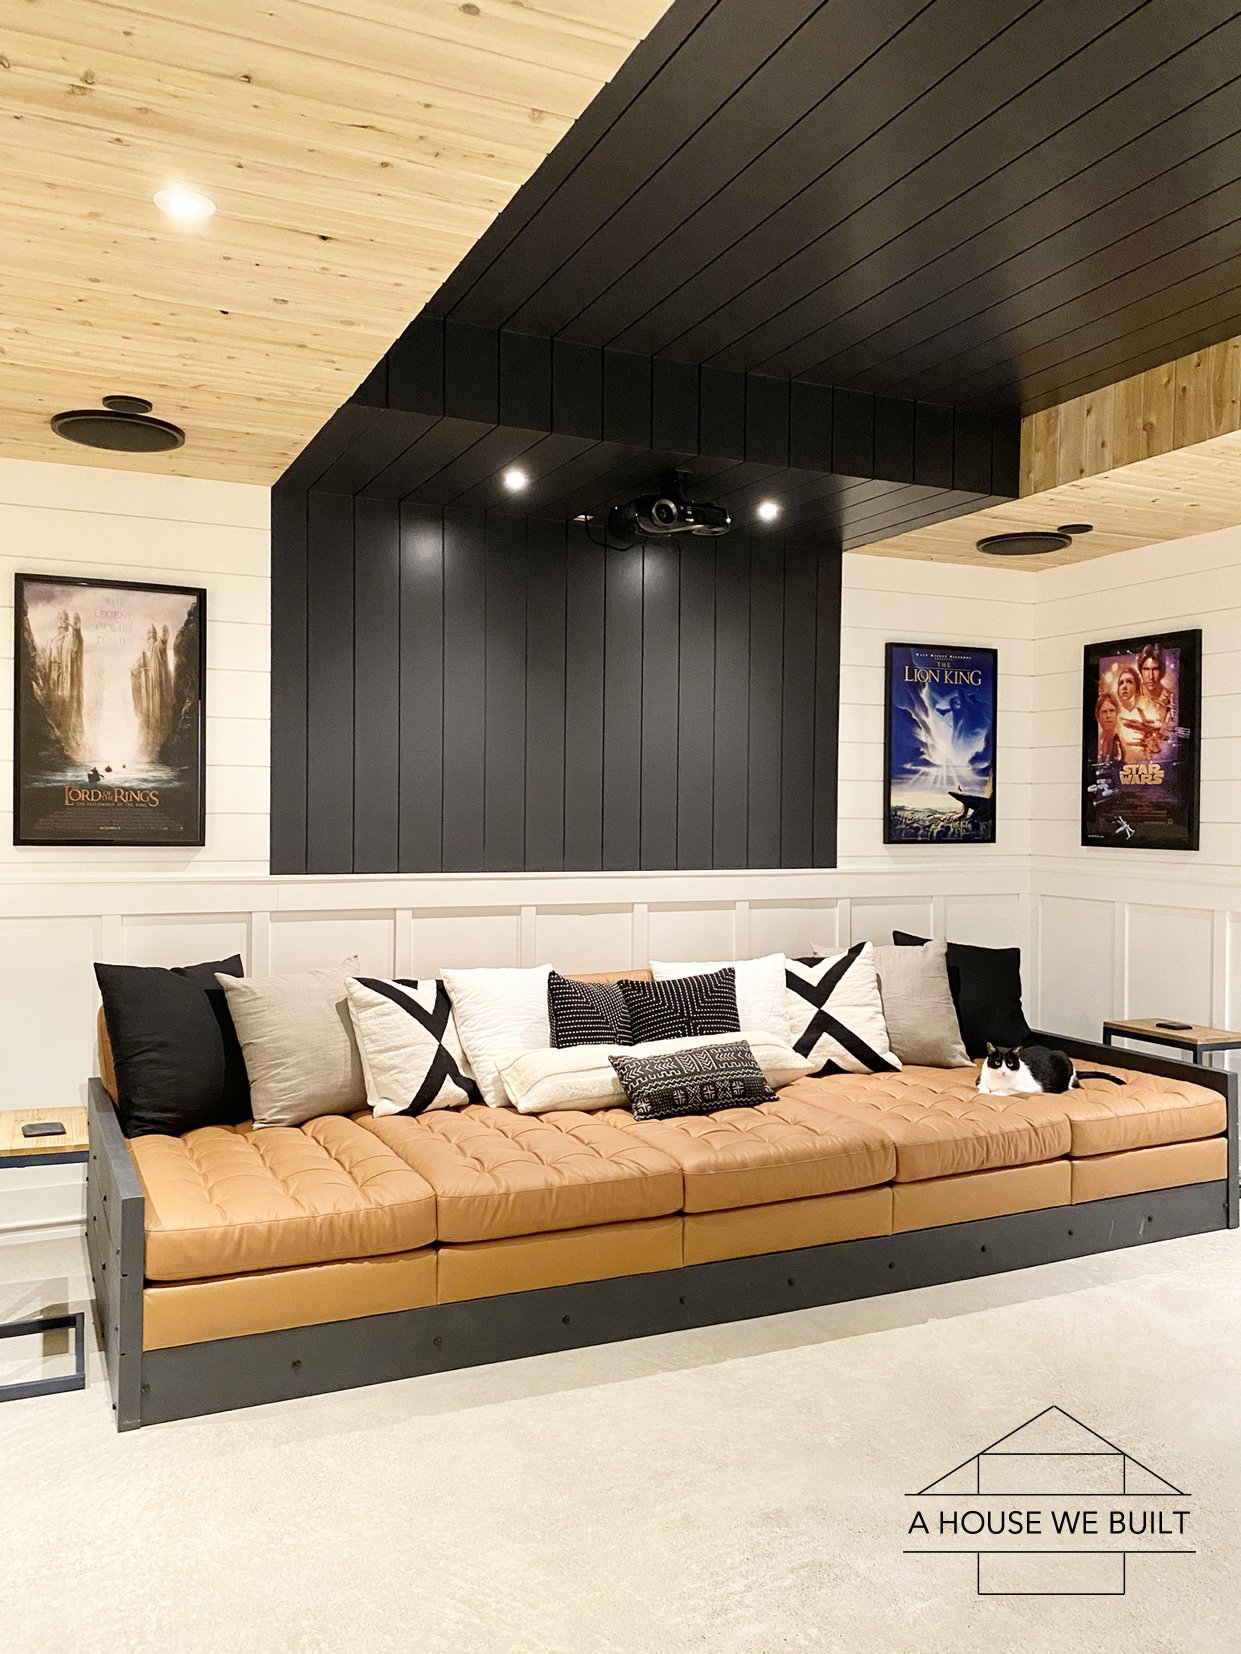
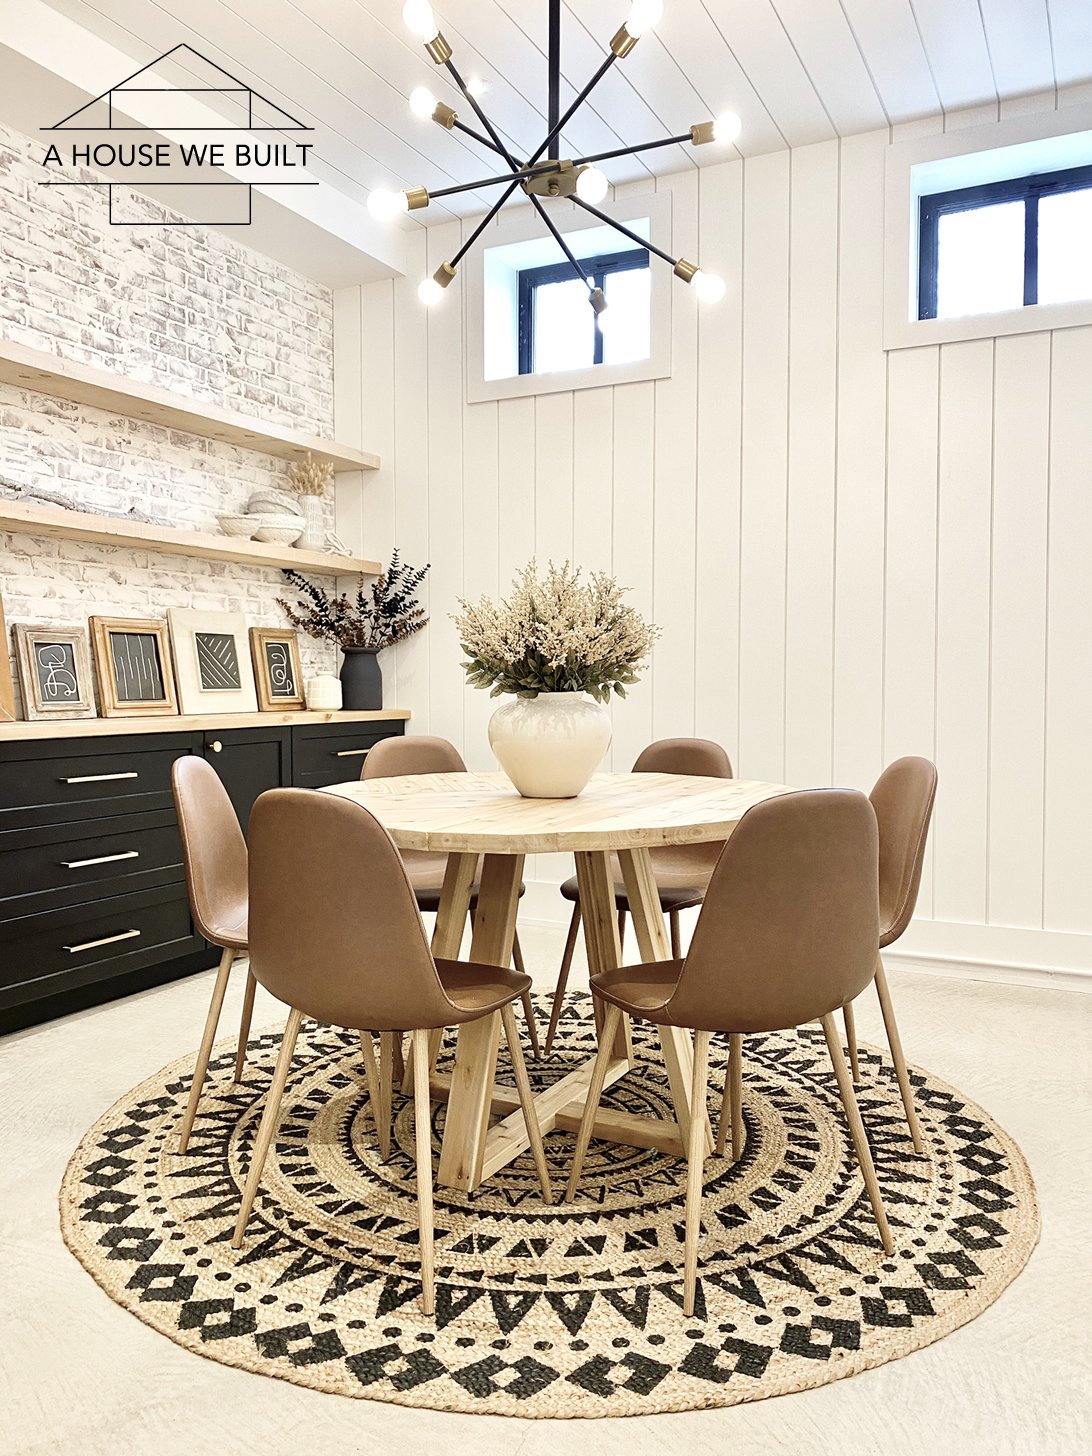
In our house, we’ve used horizontal shiplap in our living room, entryway, mudroom, laundry room, home office room, powder bathroom, master bathroom, and master bedroom, we’ve also used vertical shiplap in our pantry and basement, we have shiplap ceilings in our kitchen, dining room, and basement, and even have done designs with it in my home office. We’ve used it to create small accent features (like in our master bathroom) and at other times we’ve also done almost entire rooms with it (our theater room). So it’s an extremely versatile type of paneling that makes for a beautiful accent or design feature!
Shiplap is pretty easy to install as long as you plan your project out well and have the right tools on hand. There are many different ways to get the shiplap look but my preference is using real shiplap – which means boards manufactured to interlock/overlap in a way that leaves a small even gap between them.
SHIPLAP MATERIALS:
To start, you need to choose a shiplap board. Typical widths are variations of 1x6s and 1x8s. I use 1/2″ pre-primed MDF shiplap boards that I source locally, but I’ve provided a few other shiplap options below.
- Primed wood shiplap: Home Depot (1x8x8 – this generally looks visually closest to what I use from what I was able to find available online though it’s a different material and thicker board)
- MDF shiplap: Home Depot (full length) | Home Depot (wainscot length)
- Pine shiplap (multiple color options): Home Depot (1x6x8) | Home Depot (1x8x8)
- Cedar shiplap: Home Depot (1x8x8)
- Nickel gap shiplap: Home Depot (1x6x8) | Home Depot (1x8x8 – this one is also a different material but from the pictures seems visually fairly similar to the type of shiplap I use)
*Note 1: If you’re using wood shiplap, check each boards for straightness before using each one. MDF has some flexibility and is generally easier to install. Real wood requires a greater level of cut accuracy.
*Note 2: If you’re using wood paneling or shiplap, I recommend to let it sit and acclimatize to your interior temperature and humidity for a week or two before using it, so allow for that time.
TOOLS + SUPPLIES YOU’LL NEED:
- Miter saw: Home Depot | Amazon (for all regular straight or angled cuts)
- Table saw: Home Depot | Amazon (for “ripping” side boards down to size, meaning to shorten the width of a board – you can technically do this with a jig saw or circular saw too but it’s a lot harder)
- Level: Home Depot | Amazon (to make sure your boards are installed straight)
- Measuring tape: Home Depot | Amazon (I hope this one is self-explanatory)
- Carpenter’s square: Home Depot | Amazon (to draw straight lines where to saw the boards)
- Nail gun (+ nails): Home Depot | Amazon (to attach boards to the wall)
- Rubber mallet: Home Depot | Amazon (to tap the boards into place)
- Paneling adhesive: Home Depot (to attach boards to the wall)
- Caulk: Home Depot | Amazon (to fill in seams after installation)
- Caulk gun: Home Depot (for your adhesive and caulk)
- Wood filler: Home Depot | Amazon (to fill in nail holes)
- Putty knife: Home Depot | Amazon (to apply wood filler to nail holes)
- Sandpaper: Home Depot | Amazon (to sand wood filler after nail holes are filled)
- You’ll also need painting and/or staining supplies but I figure I don’t need to list all that.
If you have to cut around anything (outlets, vents, lighting, etc) you’ll also need:
- Jig saw: Home Depot | Amazon (to cut around outlets etc)
- Drill: Home Depot | Amazon (you’ll need this to cut a hole in the middle of your board – drill is needed to make a hole in each corner of your cutout for your jig saw blade. Details below.)
- Hole saw: Home Depot | Amazon (to cut out recessed lighting holes – make sure you get the right size for the specific recessed lighting you’re planning to use – they’re all different)
IMPORTANT THINGS TO CONSIDER BEFORE INSTALLATION:
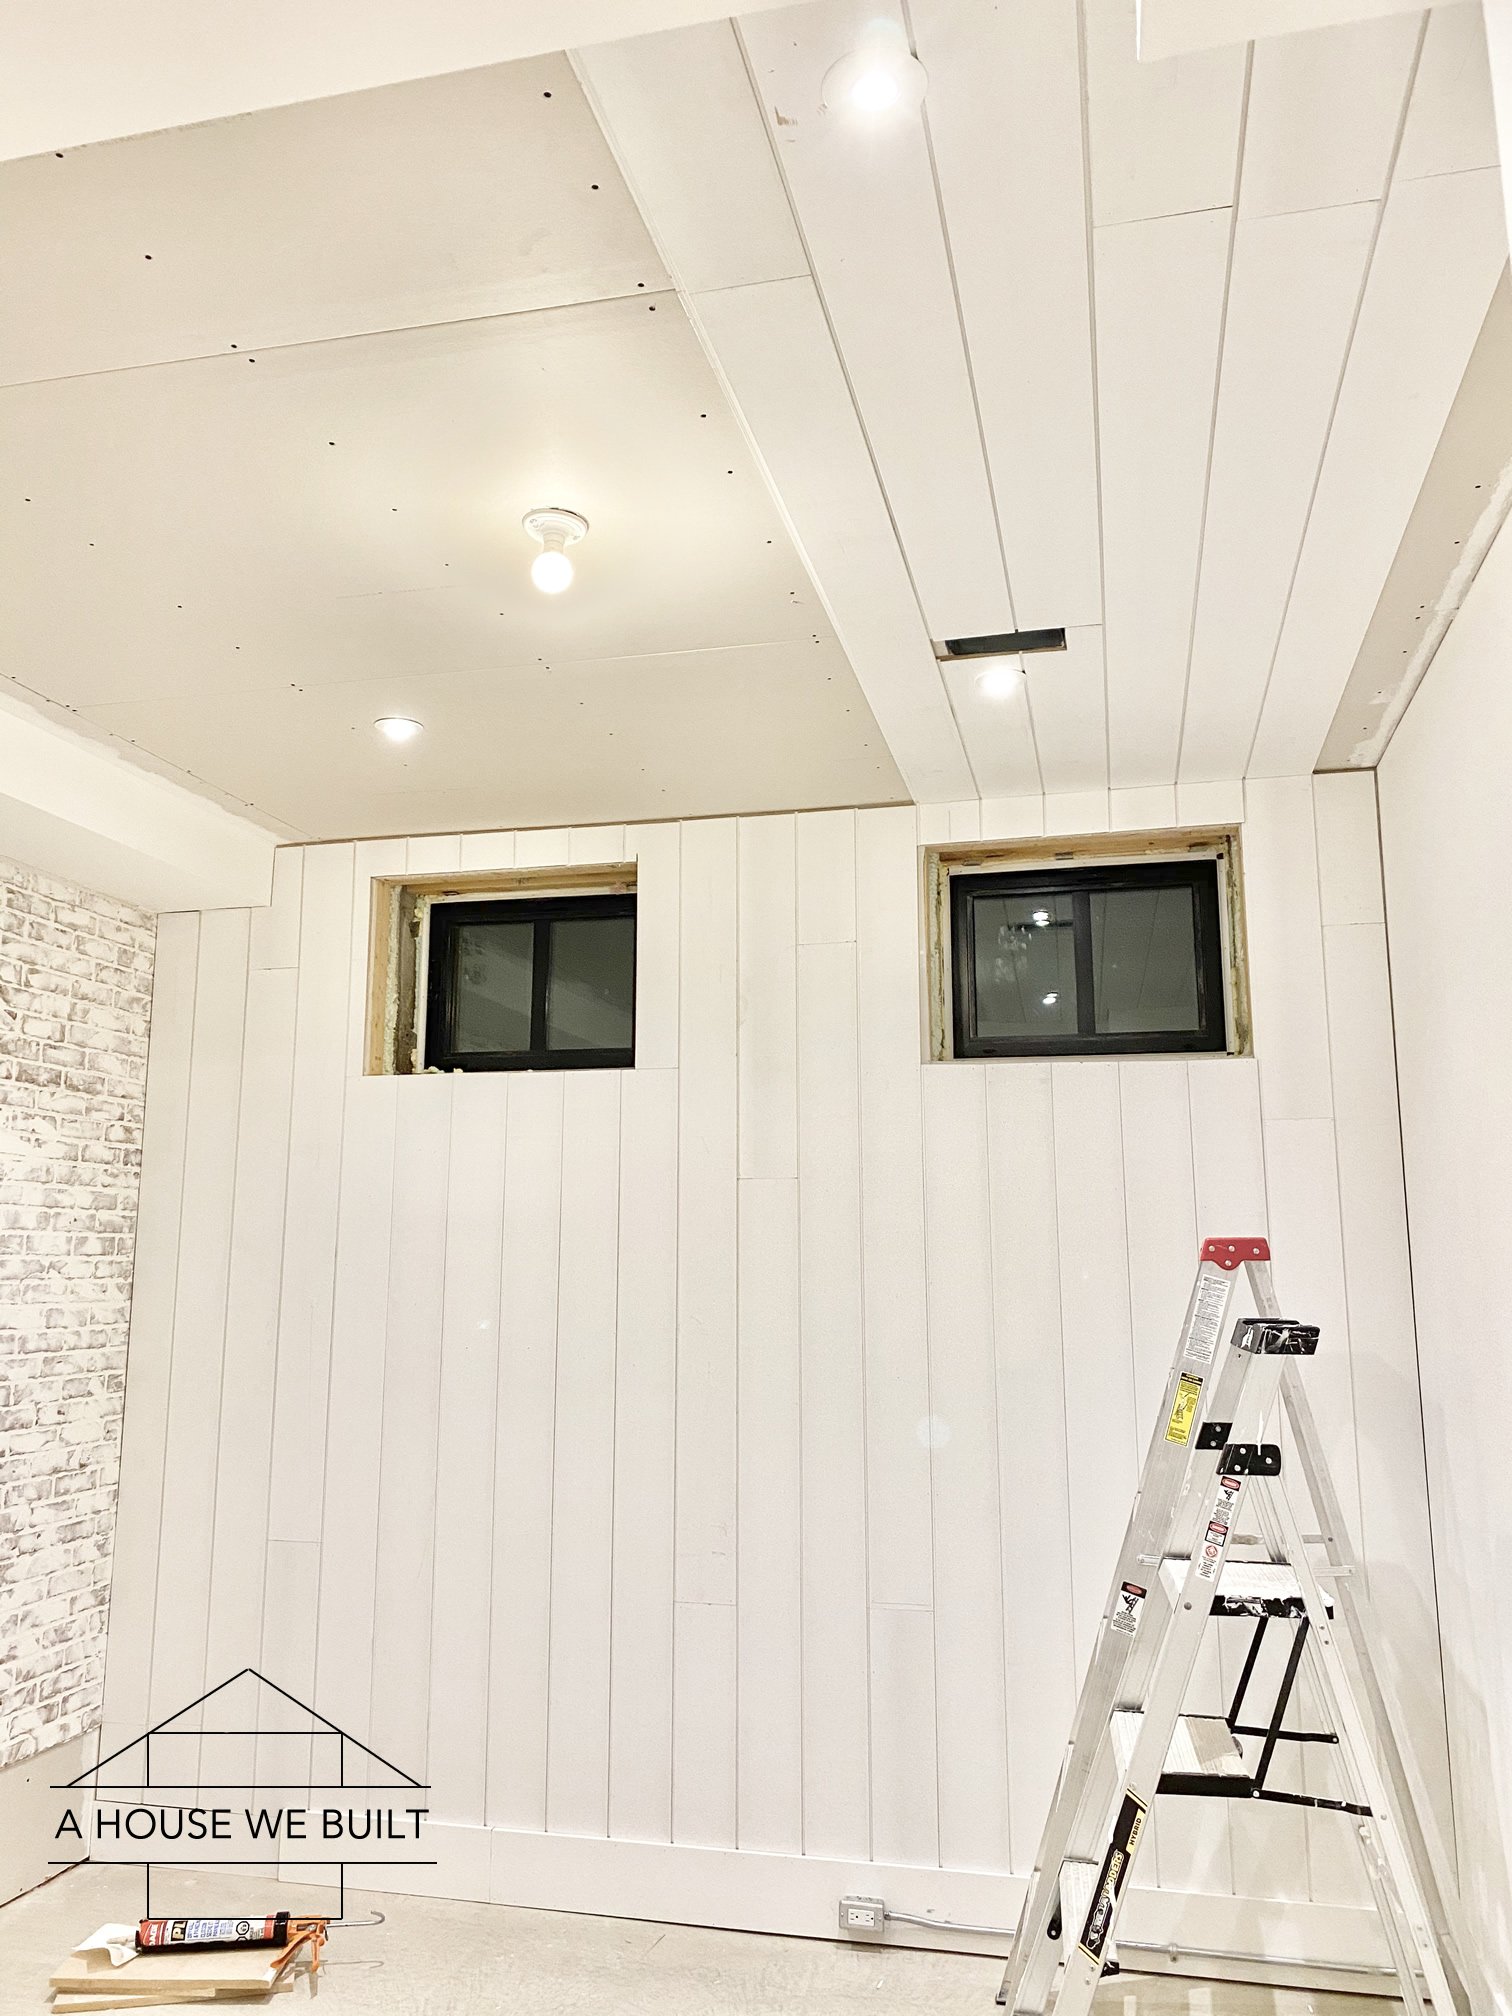
- Calculate the placement of boards across your wall/ceiling to determine the most symmetrical or aesthetically pleasing configuration of boards. Almost any walls or ceiling you decide to shiplap will not perfectly fit full boards across it. So, for example, if your wall is 114″ wide, and your shiplap boards are 5.5″ wide, that means you can fit 20 full boards (covering 110″), but you’re left with 4″ to cover which means you’ll have to use a table saw to rip that last board down to the right width. So planning ahead allows you to choose exactly where you’re going to have those uneven boards. One option is to just leave the side pieces smaller than the rest, or you can center all the boards so have have evenly smaller pieces on the two ends, or maybe you just want the one side smaller. These are things we take into consideration every time we install shiplap before installation.
- Get extra boards. When you’re calculating how much shiplap you’ll need for a given project, it’s usually safe to count on about 10% extra for waste – better to have too much material than too little.
- If you’re shiplapping a wall, consider whether you want a full board to start at the top or the bottom (I prefer at the top). And also consider which parts of your shiplap (if any) will be covered by baseboard or crown molding because that’ll affect how much of the boards will be visible. Note: when doing your calculations, remember to include the gap between boards in your math!
- If you’re covering an area that is longer than the length of your shiplap board, you will have to hide the seams if you want the look of a continuous board plank from one end of your shiplap installation to the other, so also consider where these seams will be and try to vary them across your wall so you don’t end up with a line of seams all in the same spot. Also, it’s best to plan to always have the seam on a stud so that you can nail both then ends of both the boards butting up next to each other into the stud (if you don’t do this, they can bow outward and your seam will be more visible) so it’s worth it to do this even if you end up losing a bit of length off your board.
- Once you start installing your shiplap, it is helpful to have the ‘notch’ side facing the direction you want to go because it will make it easier to interlock new boards (see middle pic below). One of the reasons for this is that you can use the rubber mallet to tap against the notch if needed to tap the board into place without damaging any part of the board that will be seen.
GENERAL INSTALLATION INSTRUCTIONS:
- Using your miter saw, cut your board to length. Be sure you cut as you go instead of pre-cutting all your boards – this will ensure the greatest possible accuracy in your measurements and cuts.
- Apply adhesive to the back of the board in a wavy line down the middle.
- Place the board on the wall, and use a level to make sure it’s straight.
- Once you get past the first board, you will need to make sure each new shiplap board you put up properly interlocks with the one before it. You have to really check to be sure that it’s fully locked in along the entire length of the board before you go to the next step. This may require a gentle tap with a rubber mallet (just be careful not to damage the edges of the board when tapping it).
- Check again to make sure it’s level.
- Nail the board to the wall. If you’re doing horizontal shiplap, you must nail into studs, you can’t just nail it into drywall. If you’re doing vertical shiplap, obviously some of your boards won’t land on studs so for the boards that are on studs nail once per linear foot into the stud because these boards are your anchor, then for the boards between studs you’ll have to nail them into drywall but try to angle your nailer at 45* to give the nails a better grip and do a couple nails into the small overlap between boards to secure them to each other.
- When you get to the sides, you will have to rip your final board down to size with a table saw. Note that some homes have slightly (or very) uneven walls and ceilings so be prepared that your side boards may have varying widths along the board so measure them every 1-3 feet.
Possible things you may run into:
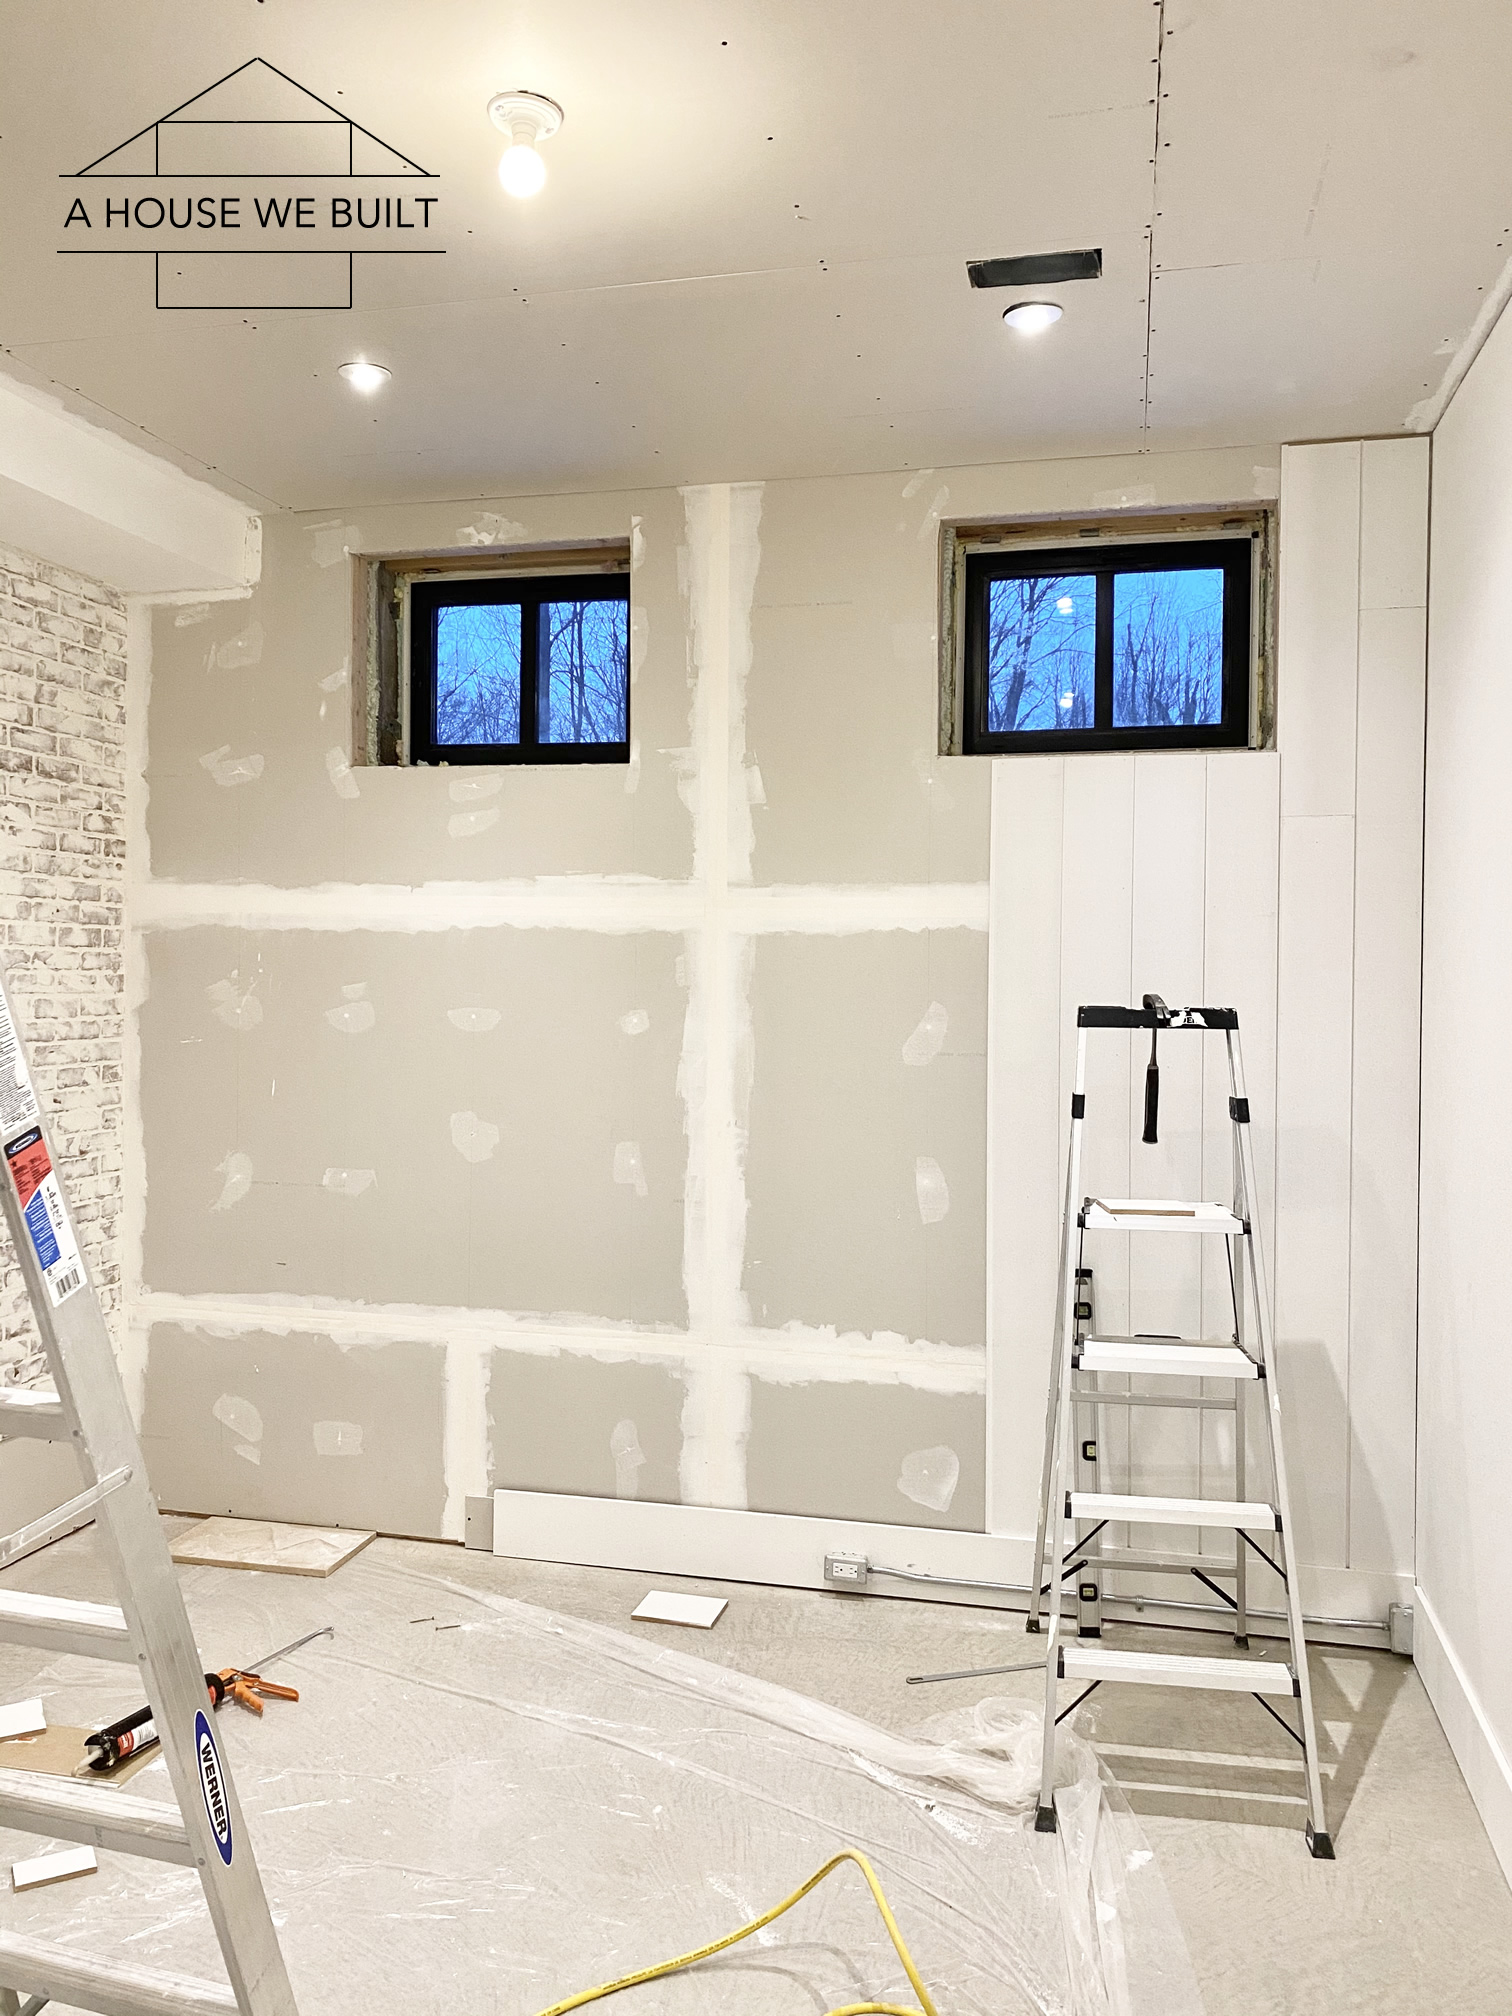
- If you need to shiplap around an outlet or vent, you’ll need to precut the hole in your board. So first, measure where the hole needs to be and draw the lines with a pencil. If the hole is in the center of the board drill 4 large holes at the corners of the box you need to cut out on the inside of the box (don’t drill outside the lines) – the purpose of these holes is to give your jigsaw blade starting point in the middle of your board. Then use your jigsaw to carefully cut out the 4 lines of the box. If the hole is at the side of the board, then you’ll just need to drill 2 holes for the corners of the box that fall in the middle of the board, then cut it out with your jigsaw.
- If you need to cut a round hole for recessed lighting, measure where the hole needs to be and find the center point. Use a hole saw to cut the hole around the center point (make sure you have the correct size hole saw for your particular recessed lighting – they’re all a little different).
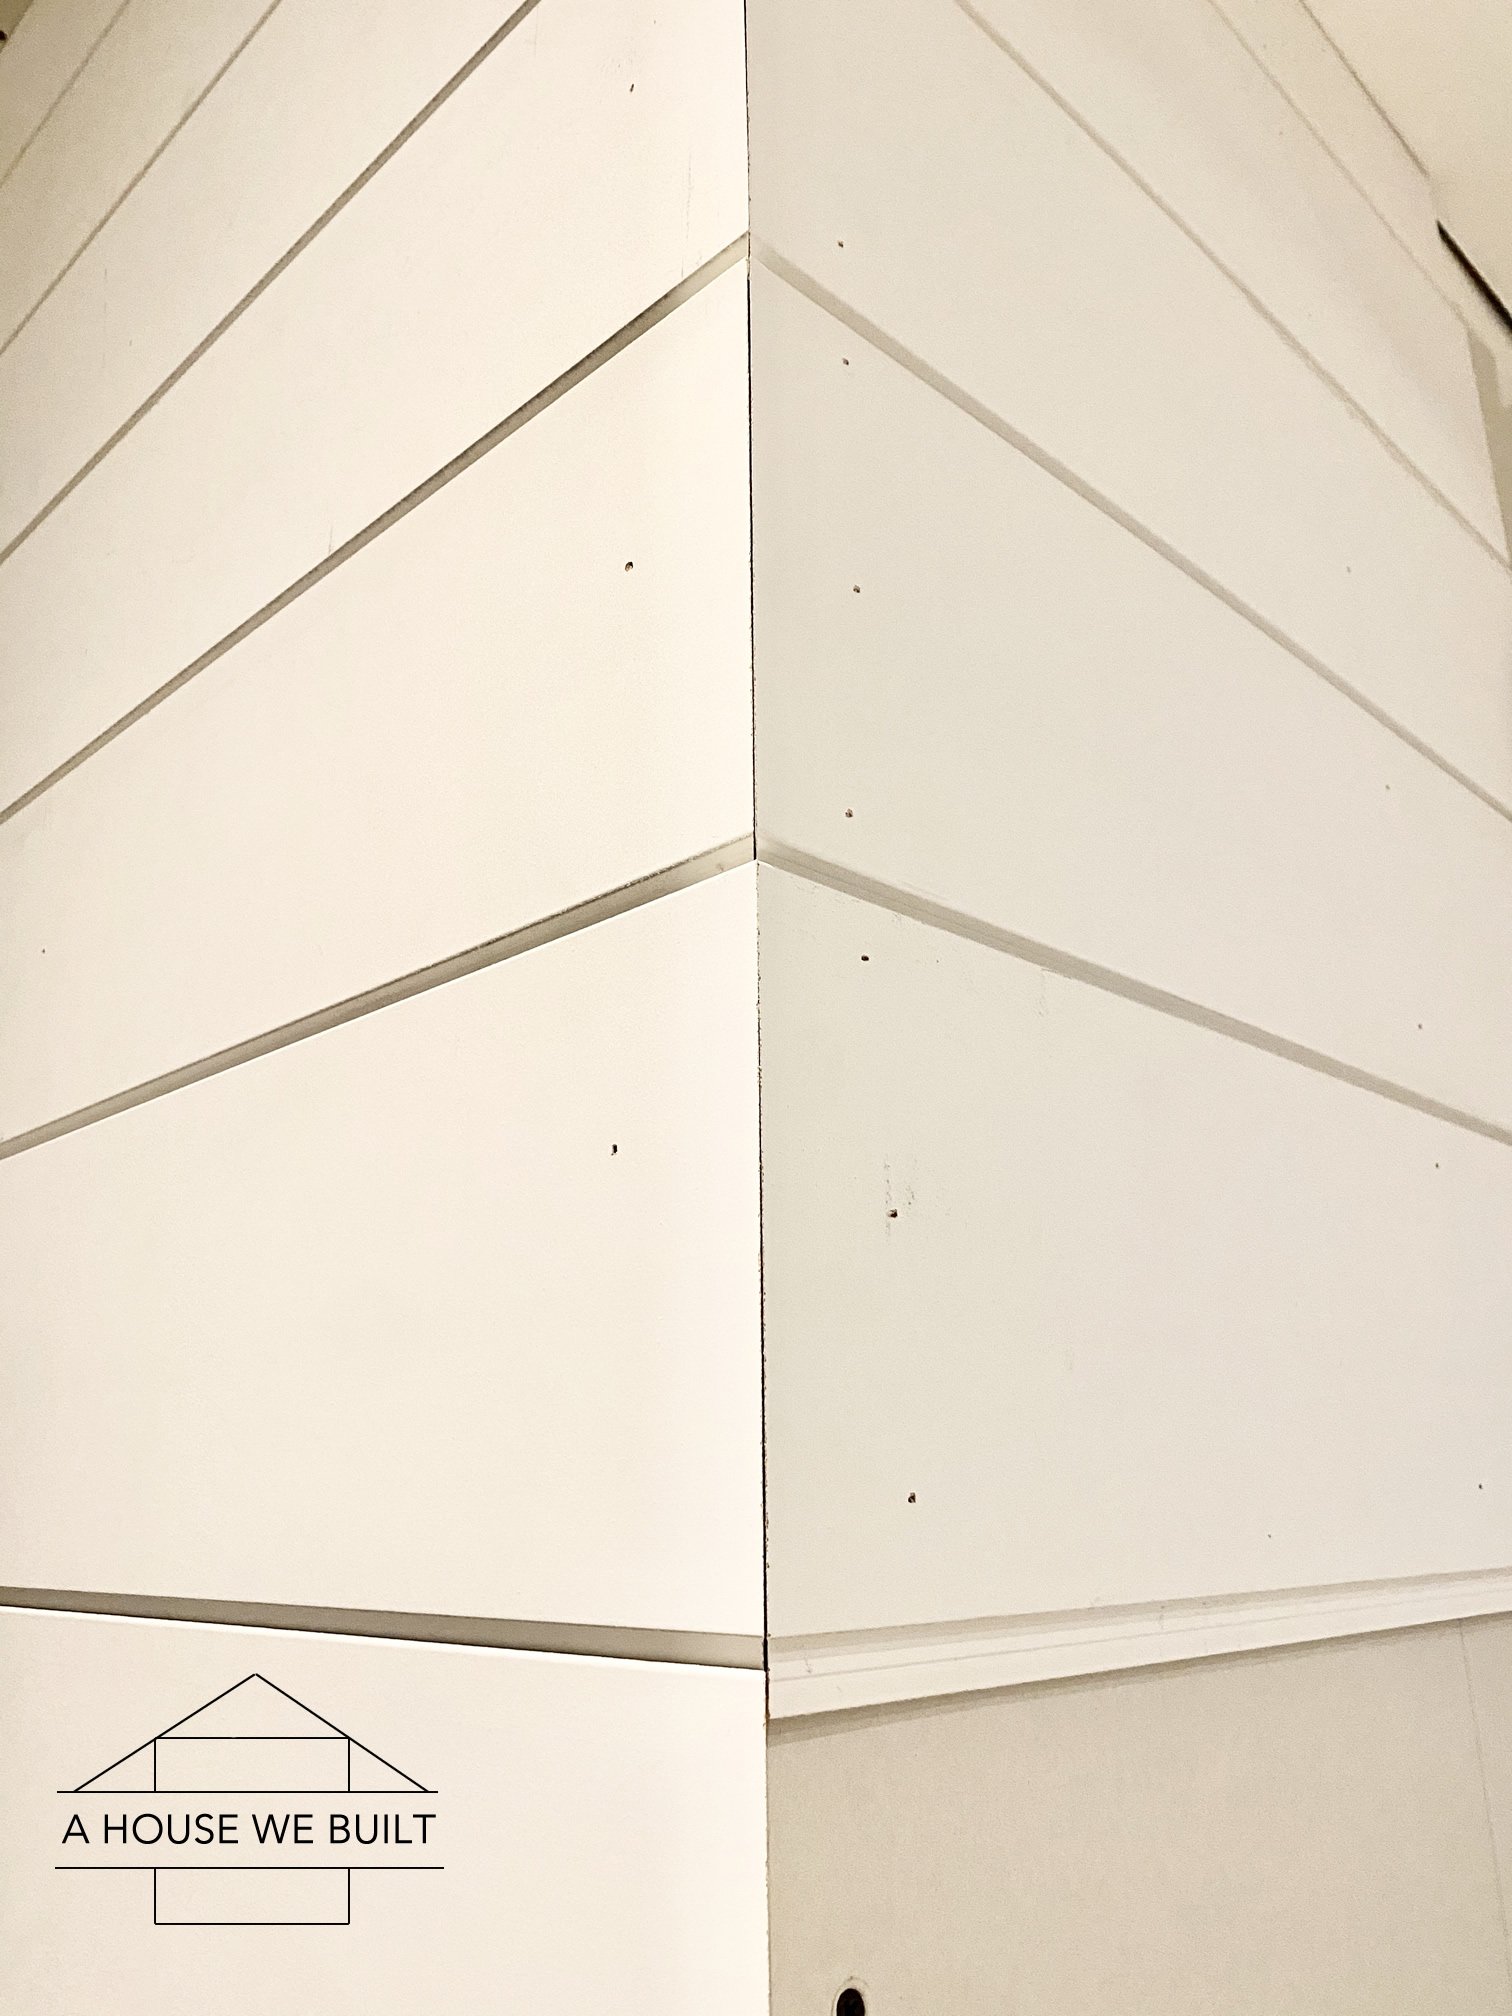
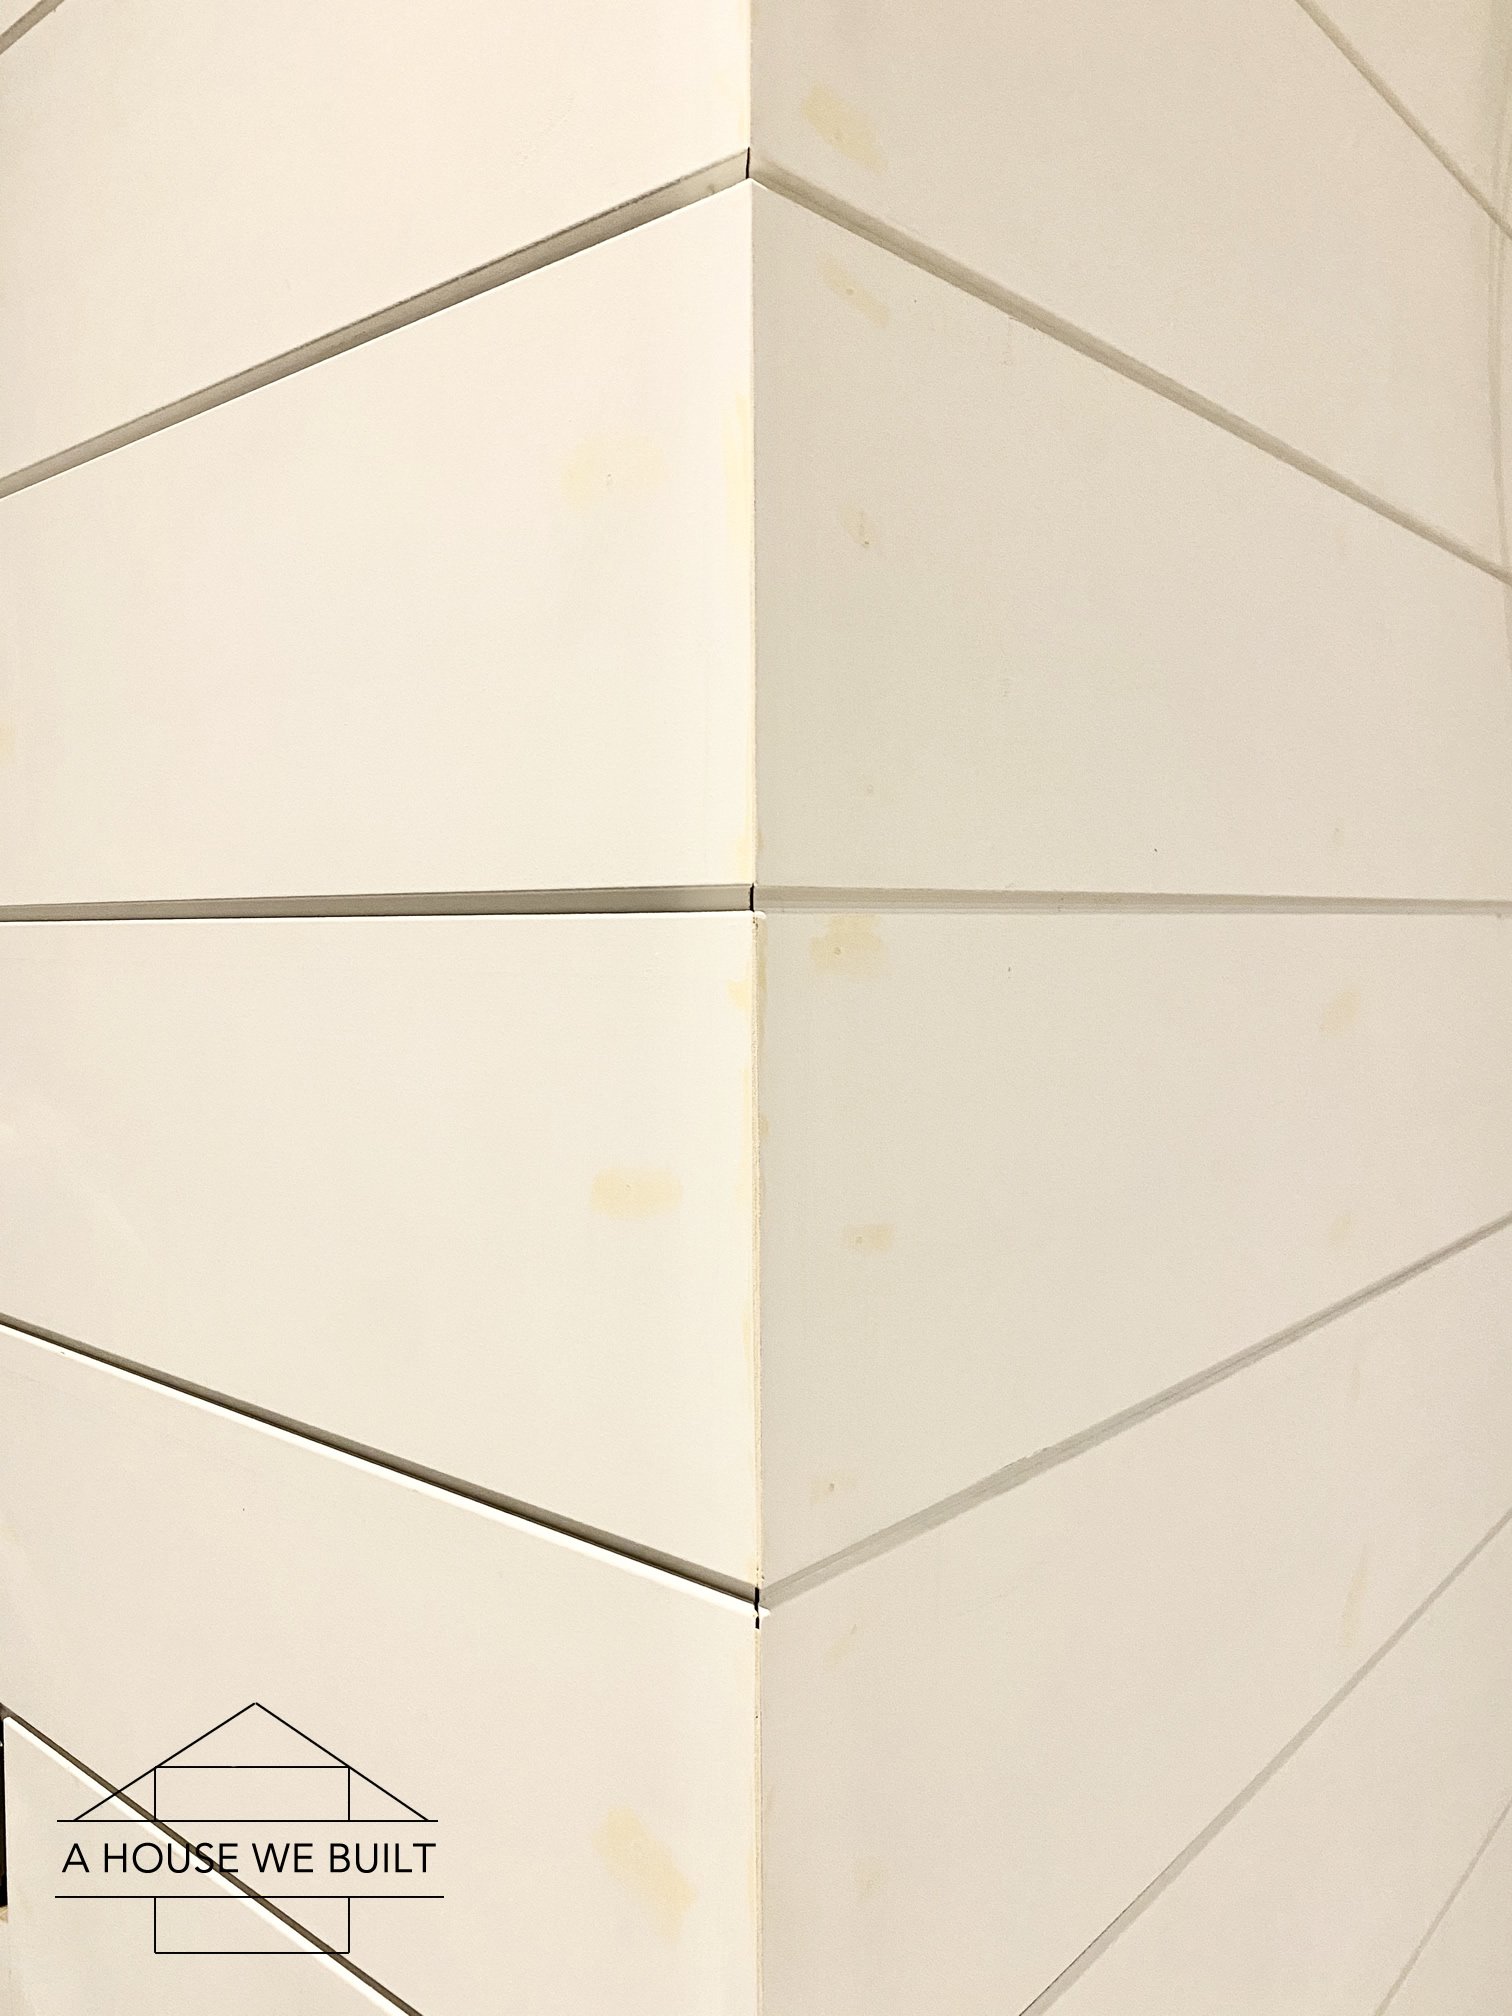
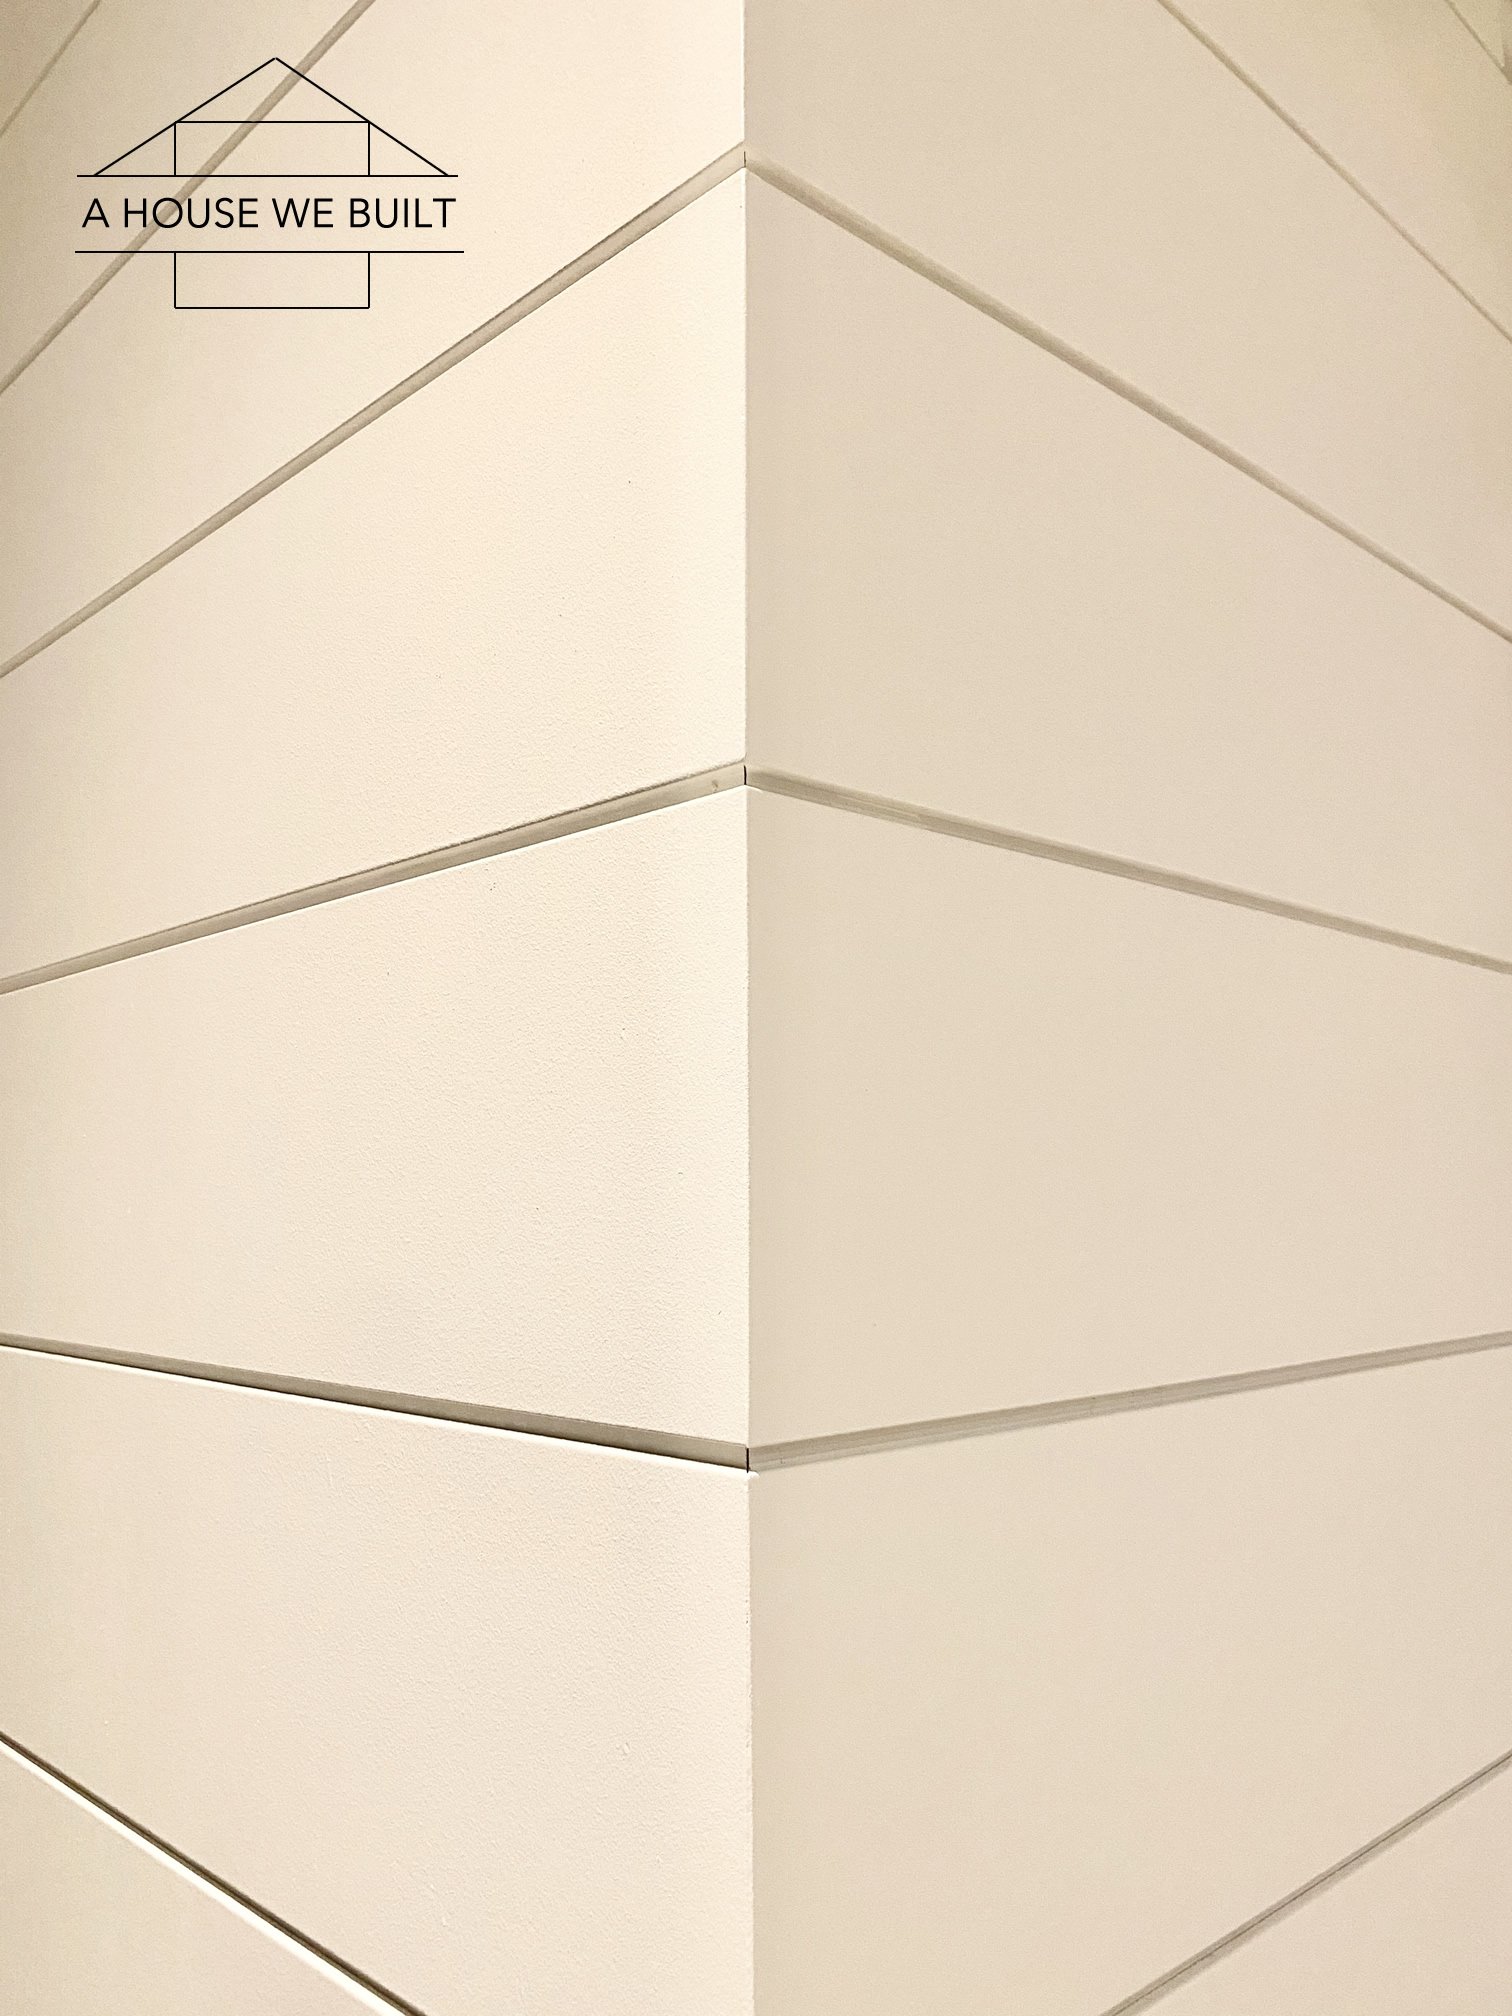
HOW TO DEAL WITH CORNERS:
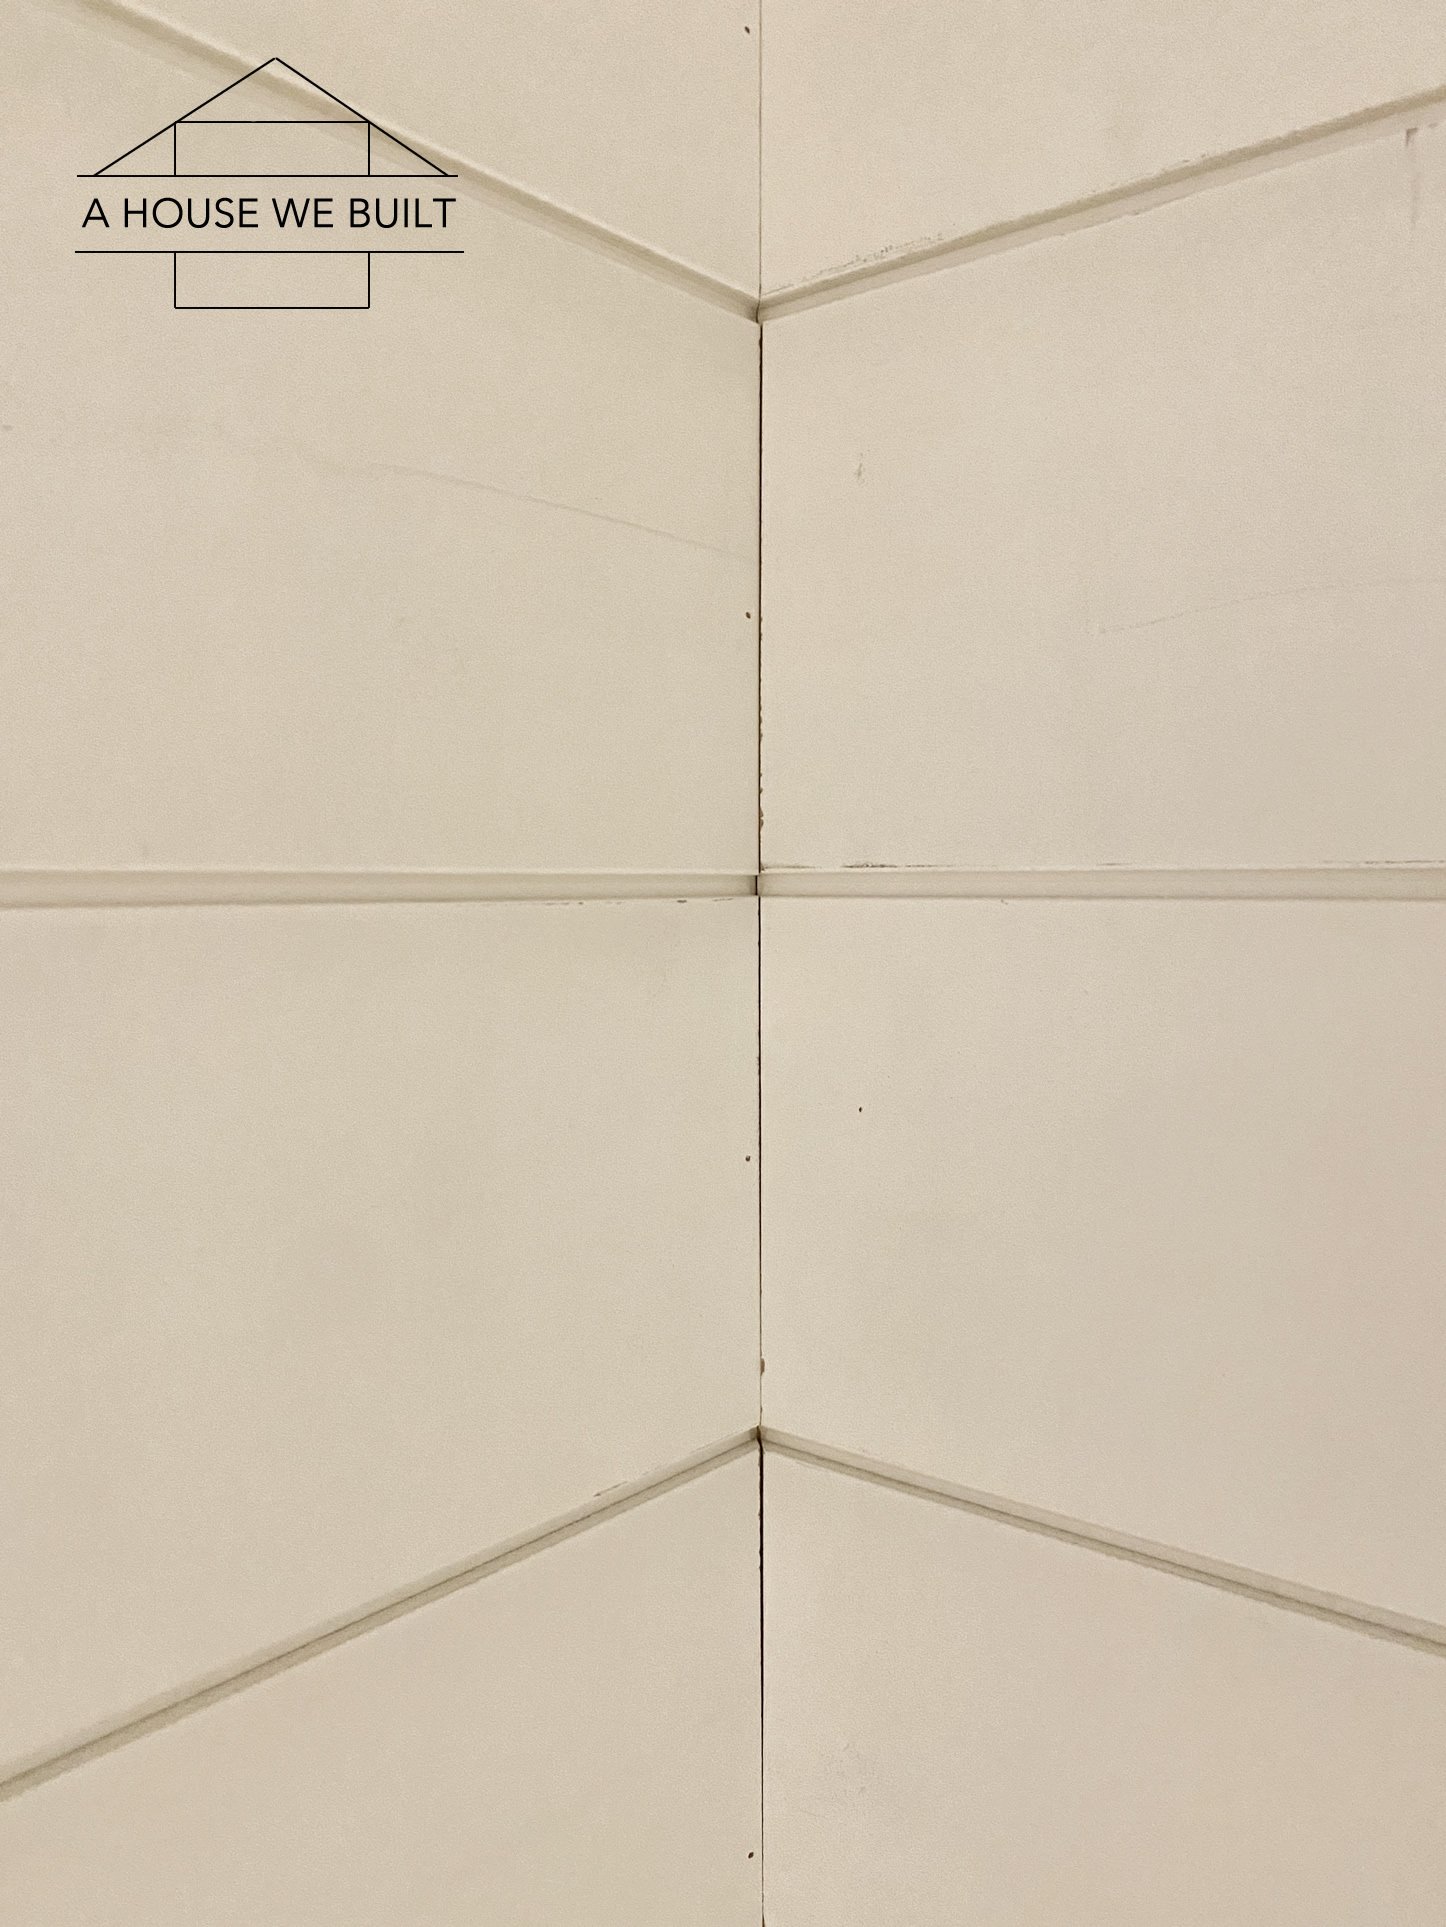
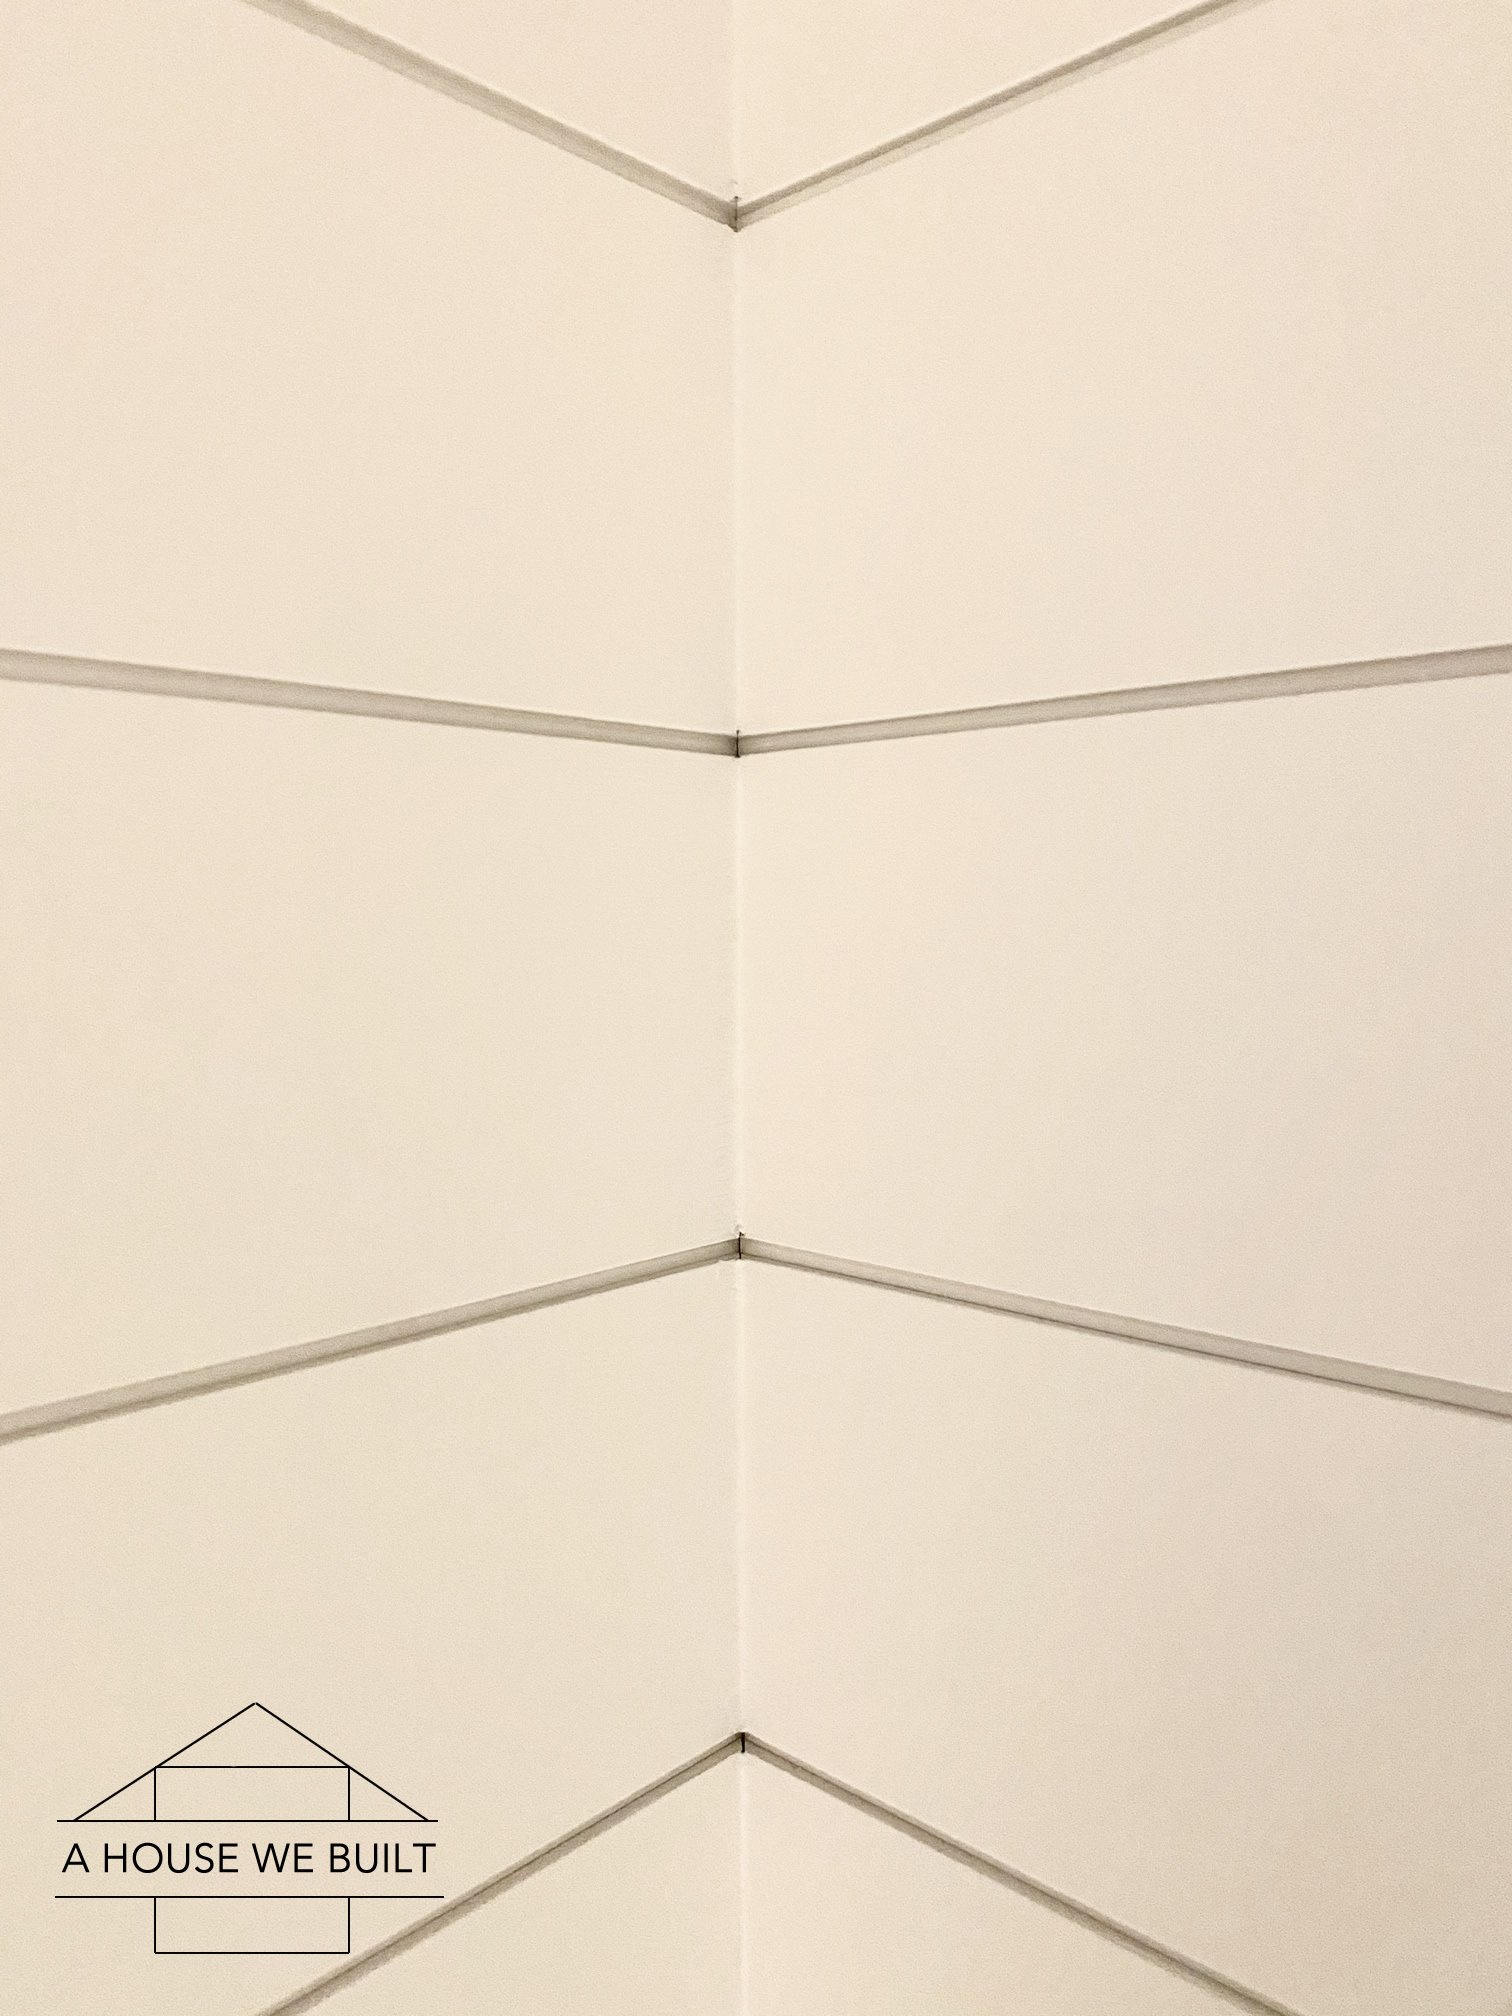
- If you’re wrapping shiplap around an inside or outside corner, or down a ceiling-to-wall edge, we always miter all those corners at a 45* angle to ensure a seamless transition and so that it looks like the board is literally wrapping around the corners. You have to to consider this in your board length calculation because the mitered edge will change the overall length of your board. The easiest way I find to do it is to calculate the length of your board based on the space you’re shiplapping, then miter *out* from there for outside corners, or miter *back* from there for inside corners. This is how we make it look like the shiplap wraps around the wall with no capping trim.
- If you need to terminate your shiplap to an outside corner that you don’t want to wrap the shiplap around (like a doorway or a drywall window return), I make my own trim by ripping a board that’s slightly thicker than my shiplap (so if I’m using 1/2″ shiplap, I’ll make my trim from a board that’s 5/8″) down to about a 1/2″ little strip. (Note: I like to use primed MDF board for this with ever-so-slightly rounded edges but if the board you’re using doesn’t have rounded edges, just sand the outside edge a bit before you rip it down so that if you bump into it it won’t be painful.) I then glue and nail that into place with a setback of about 2/16″ from the actual finished wall corner, then use that edge as the “wall” to terminate my shiplap to. Have this trim in place before installing your shiplap. If you scroll back up, you can see an example of this in the top left picture at the start of this post. I would think you can also buy this type of trim from a specialty hardware store or wood shop but I’ve had no luck finding trim of this exact size in stores so it’s easier to make my own.
- If you’re just shiplapping a ceiling or wall without wrapping around any corners and without any corner trim, then just cut each piece as you go so that the lengths are perfectly precise, then caulk the seam between the shiplap and wall.
FINISHING INSTRUCTIONS:
Note: this only applies to shiplap you plan to paint. If you’re using natural wood shiplap that you’re going to either leave raw or stain, then you may not wish to finish it quite the same way. It’s up to you.
- After all your shiplap is installed, run a bead of caulk around all seams where the shiplap terminates to a wall, or along inside corners. Use your finger to run over the bead of caulk and shmoosh it into the seam while smoothing it out. Have a wet hand towel to clean your finger as you go.
- Fill in all your nail holes and seams between boards with wood filler and a putty knife.
- Sand everything you used wood filler on (nail holes and seams between boards) until smooth.
- Now you’re ready to prime/paint.


PAINTING TIPS:
- My preference is to brush and roller shiplap. Paint sprayers are great in theory but I don’t have the patience to do all the prep-work involved, I don’t like how all the little paint particles get blown into the air (and then my hair!), and finally cleaning a paint sprayer is beyond frustrating so if you have the patience for that, all power to you. But I like to stick with a traditional, easy peasy brush and roller. If you brush and roller properly, the end result is just as smooth as spraying.
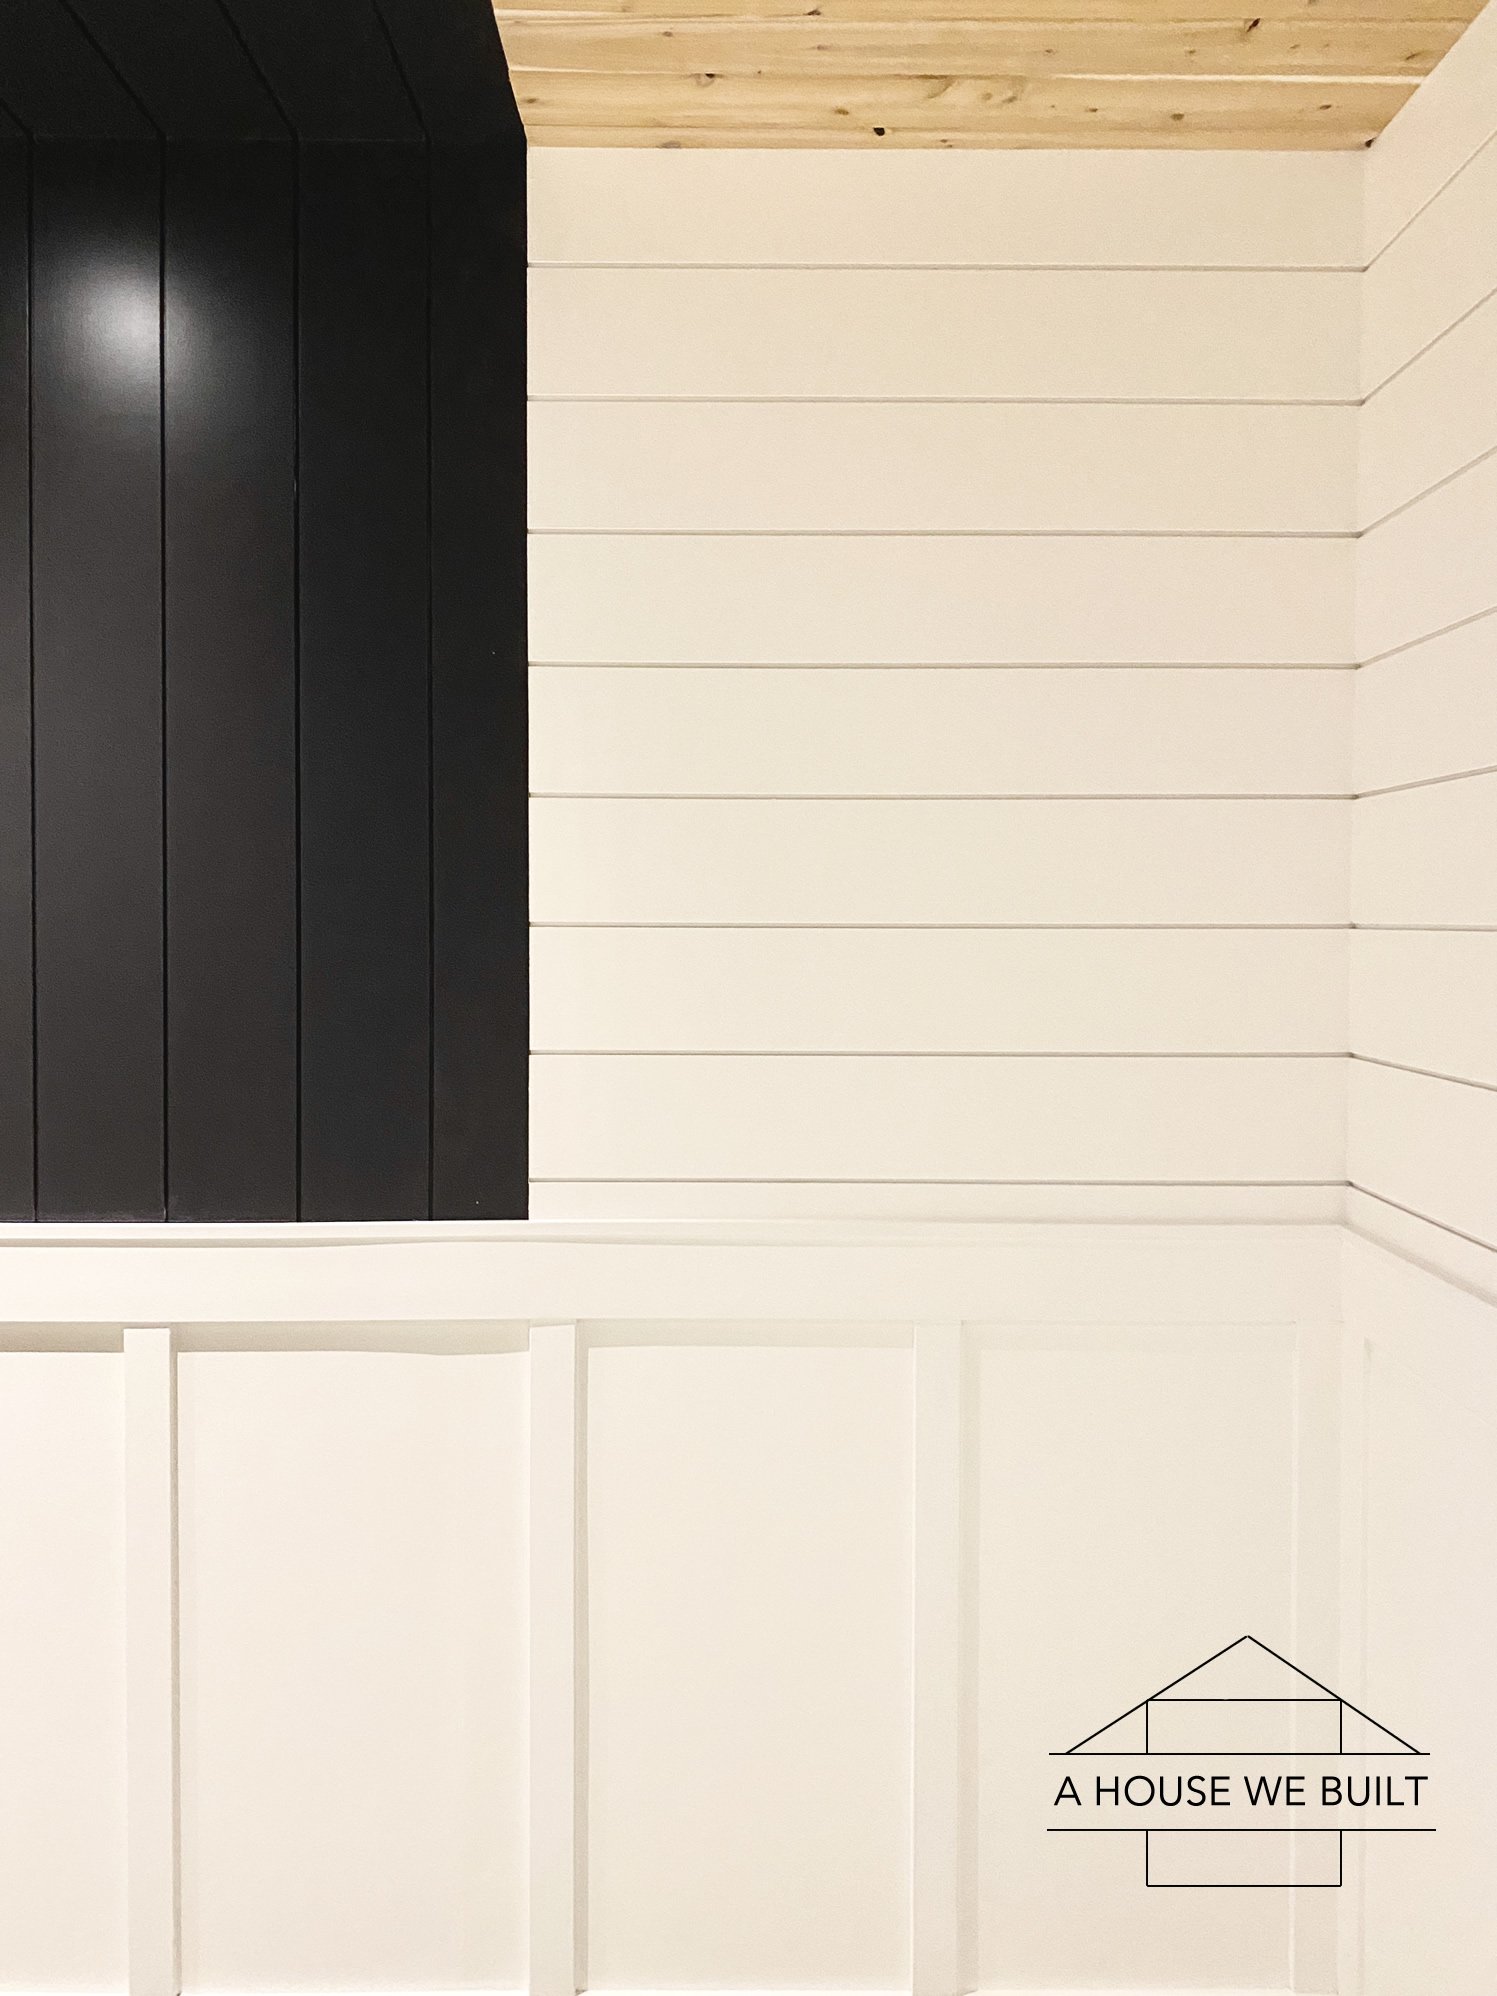
- If you’re painting horizontal shiplap white (and it’s already been primed), I wouldn’t paint your final white in between the boards. I find the slightly different tone of the primer in the grooves makes the grooves pop and you don’t notice that it’s a different white because it just looks like a shadow.
- If you’re painting vertical shiplap white and you find that your lines between boards are “disappearing”, I recommend painting the lines with a small brush in a very light gray color – I did this in our game room and in the nook at the end of our basement hallway (behind the wood art) and found that it made a huge difference in making the shiplap pop.
- If you’re painting shiplap anything other than white, I recommend to always paint between the seams before rollering the boards. Feather your brush strokes carefully to leave the boards smooth and with no paint streak lines or drip marks. I can’t stress enough how important this is!
- The paint colors we’ve used are recapped on this page: Paint Colors and Stain Recap, and also posted on the individual room “sources pages” on our website so pick any room you want to know about, go to that source page, and you’ll find the relevant paint colors we used listed at the bottom. If you need help navigating, here’s our website roadmap.
- Regarding paint sheen, we’ve used both flat and satin on shiplap and love the look of both.
- If you use un-primed wood shiplap, you also have the option of staining it instead of painting.
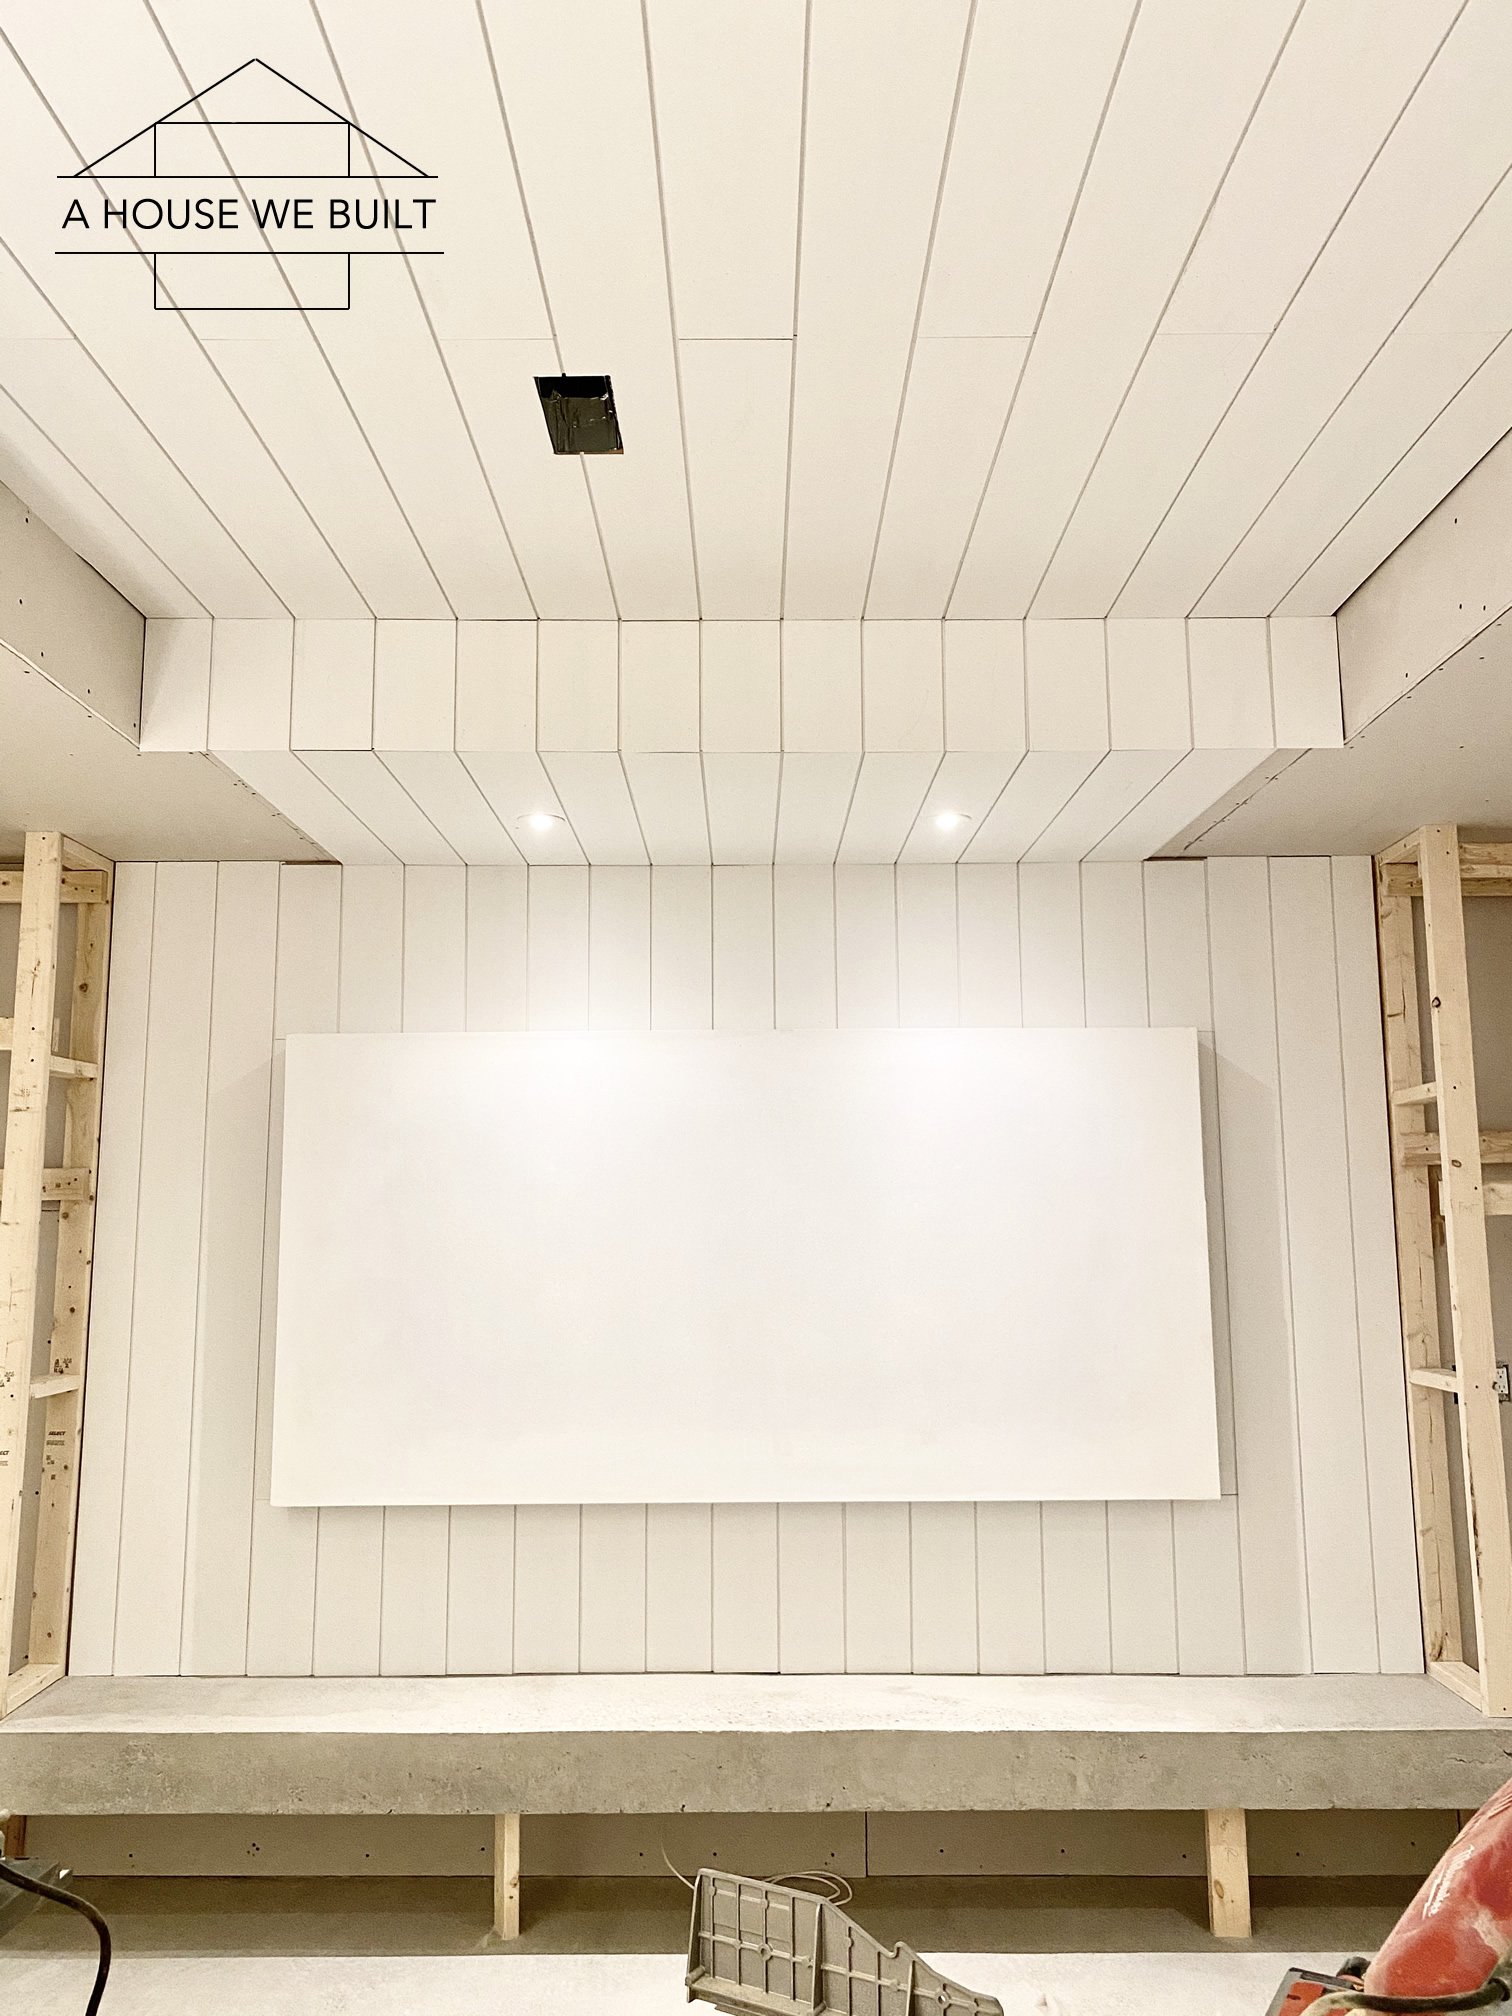
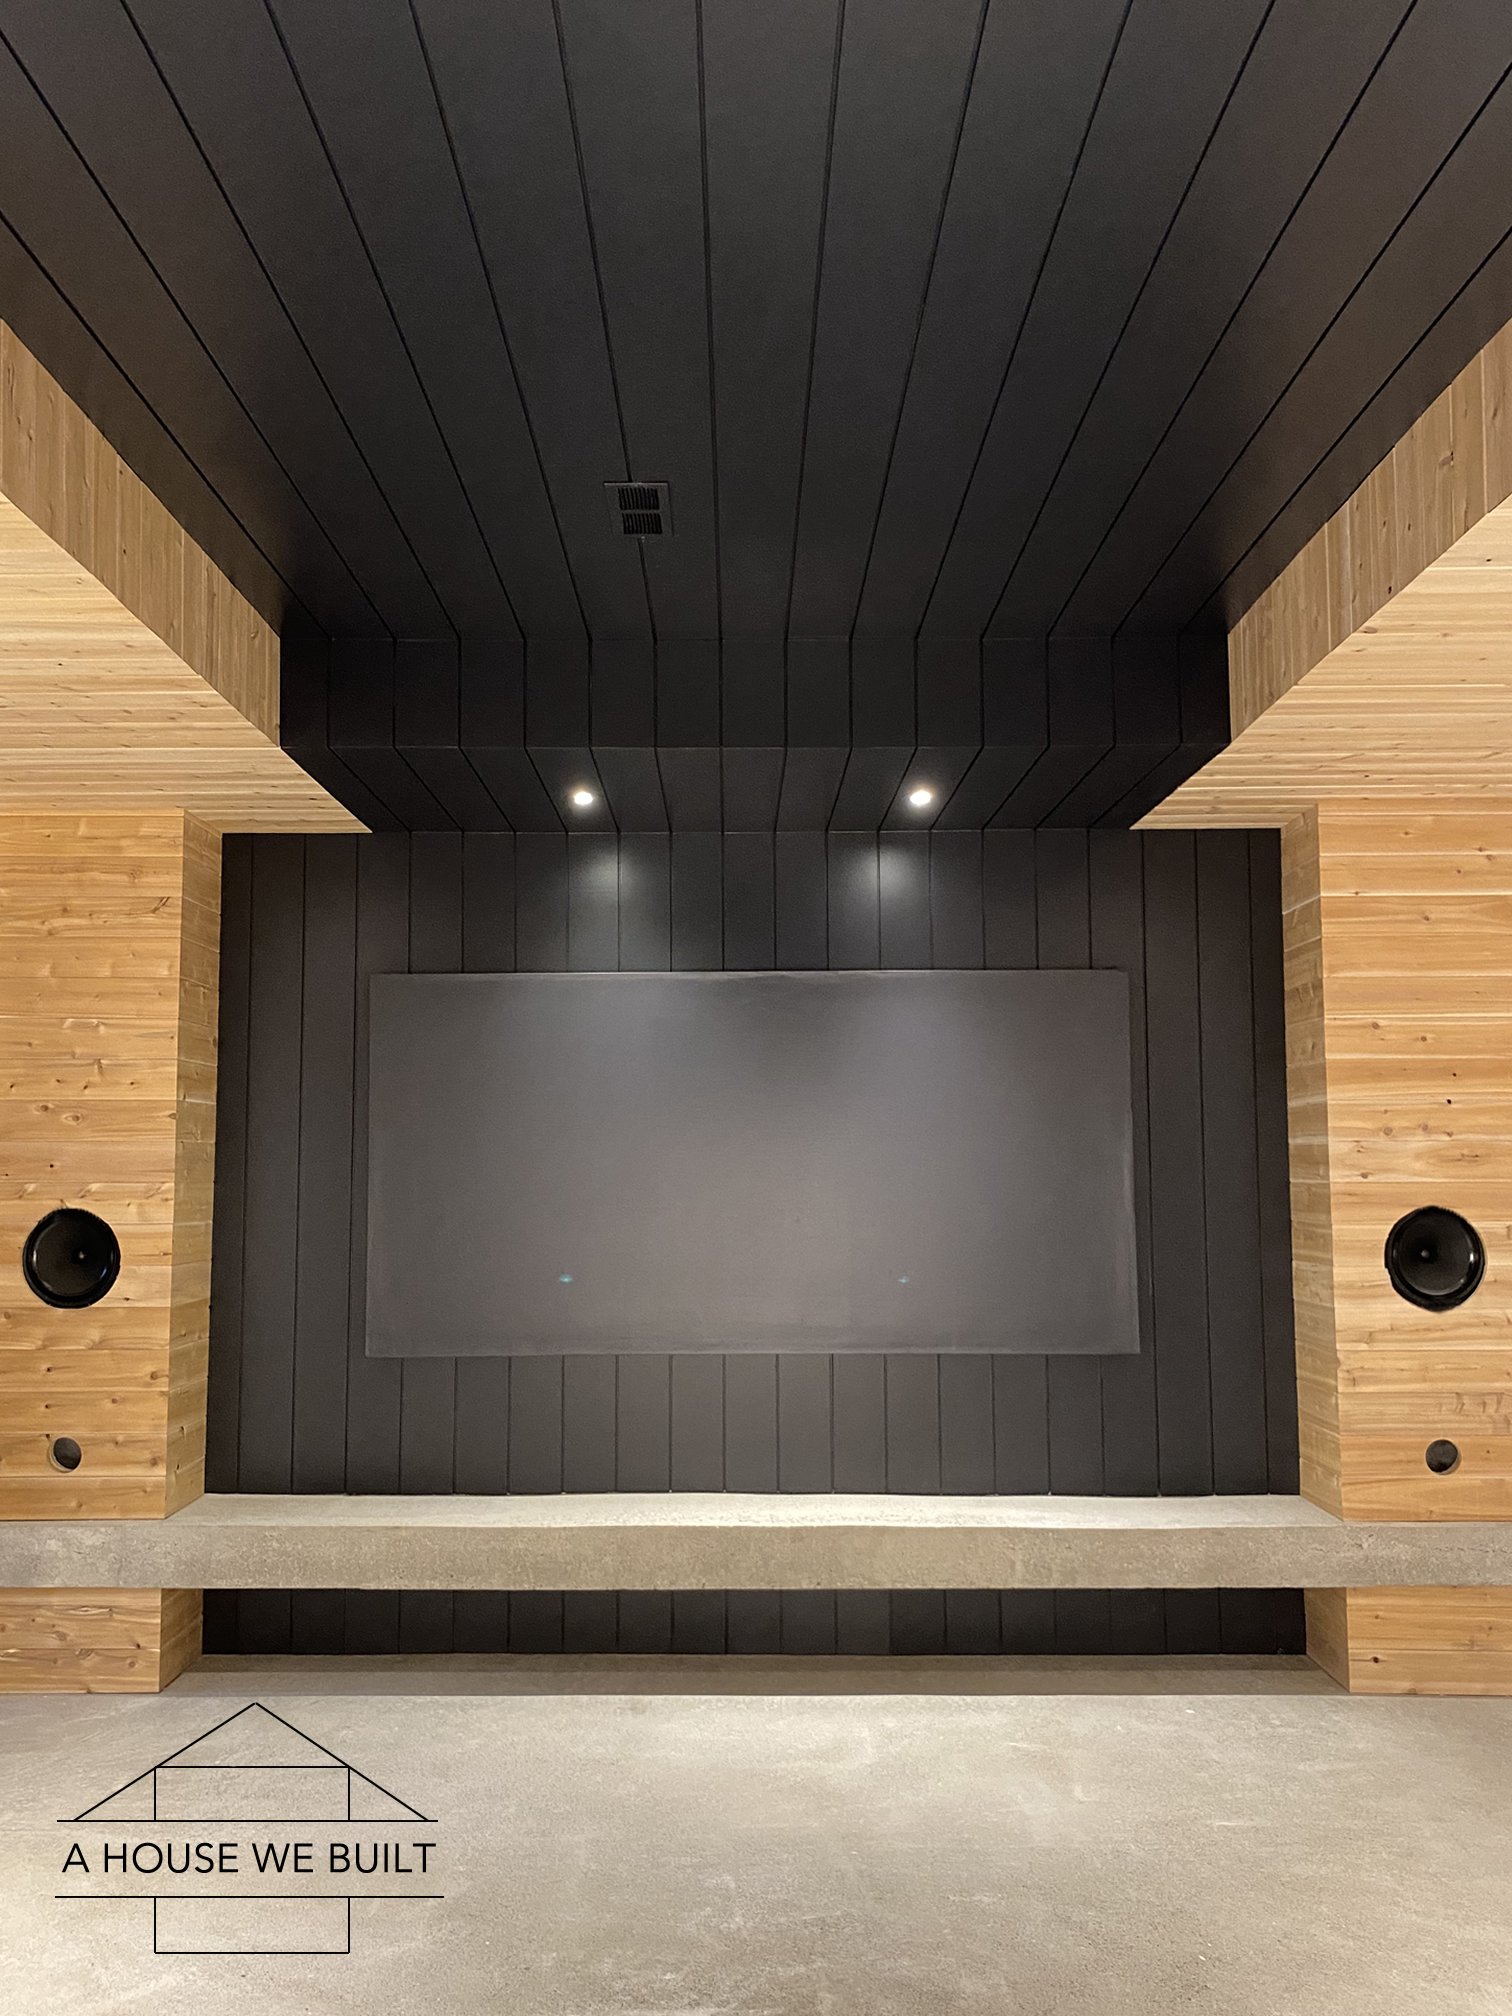
PS: If you’re wondering about the wood paneling that we installed in our theater room design (similar to this: Home Depot), that is tongue-and-groove, not shiplap, but the installation method is generally the same. The natural wood material is much more frustrating to work with though, is less forgiving, and requires a greater level of accuracy so if you’re new to this, I would start with shiplap work instead.
BONUS TIP:
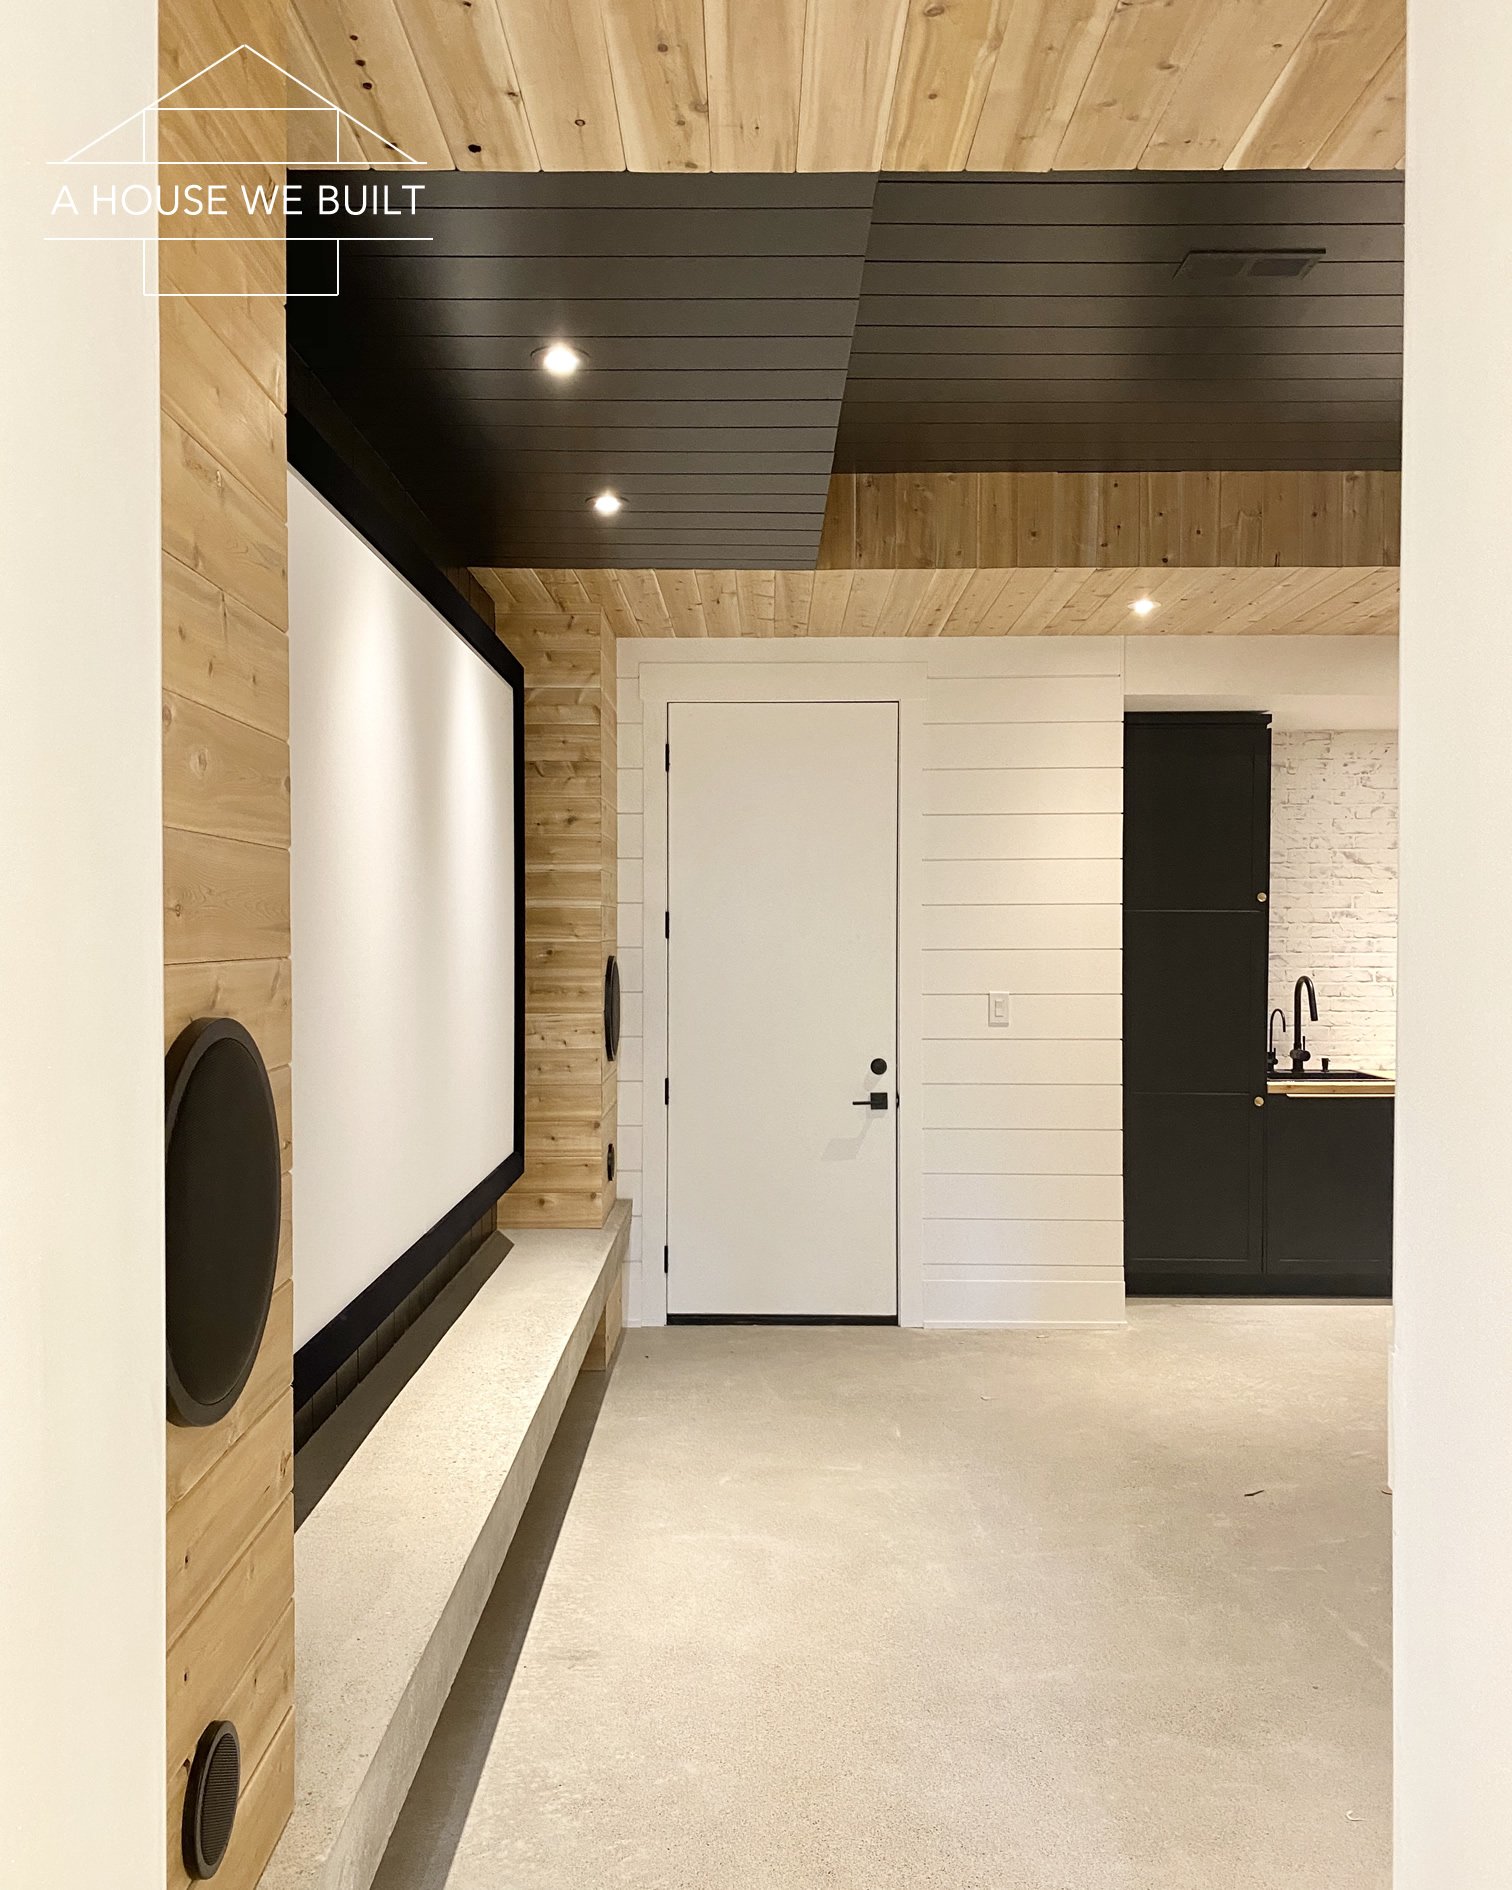
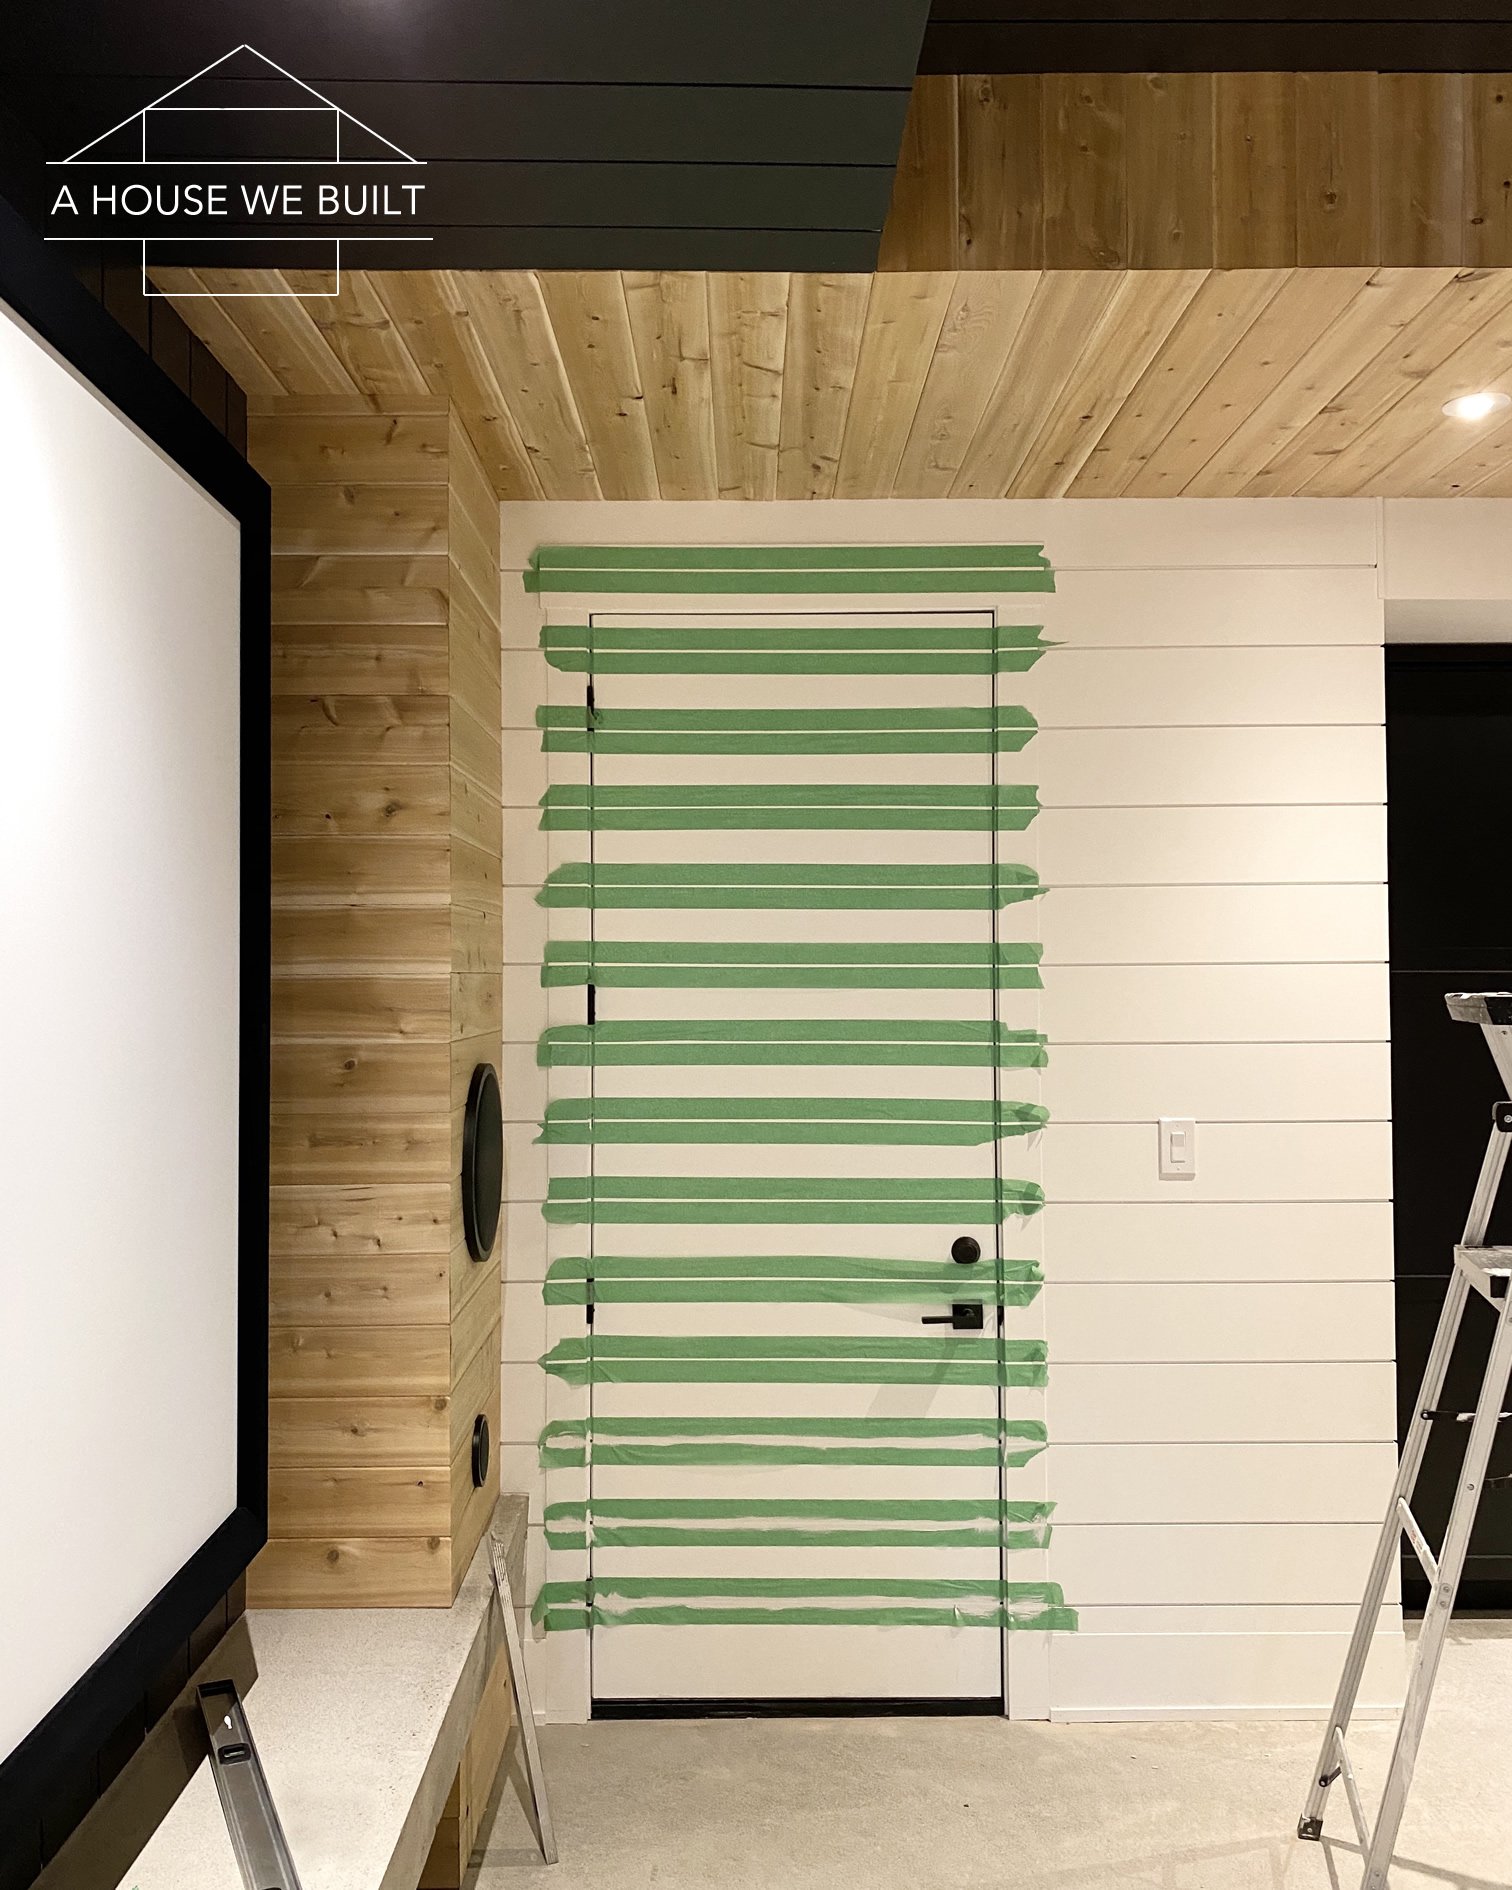
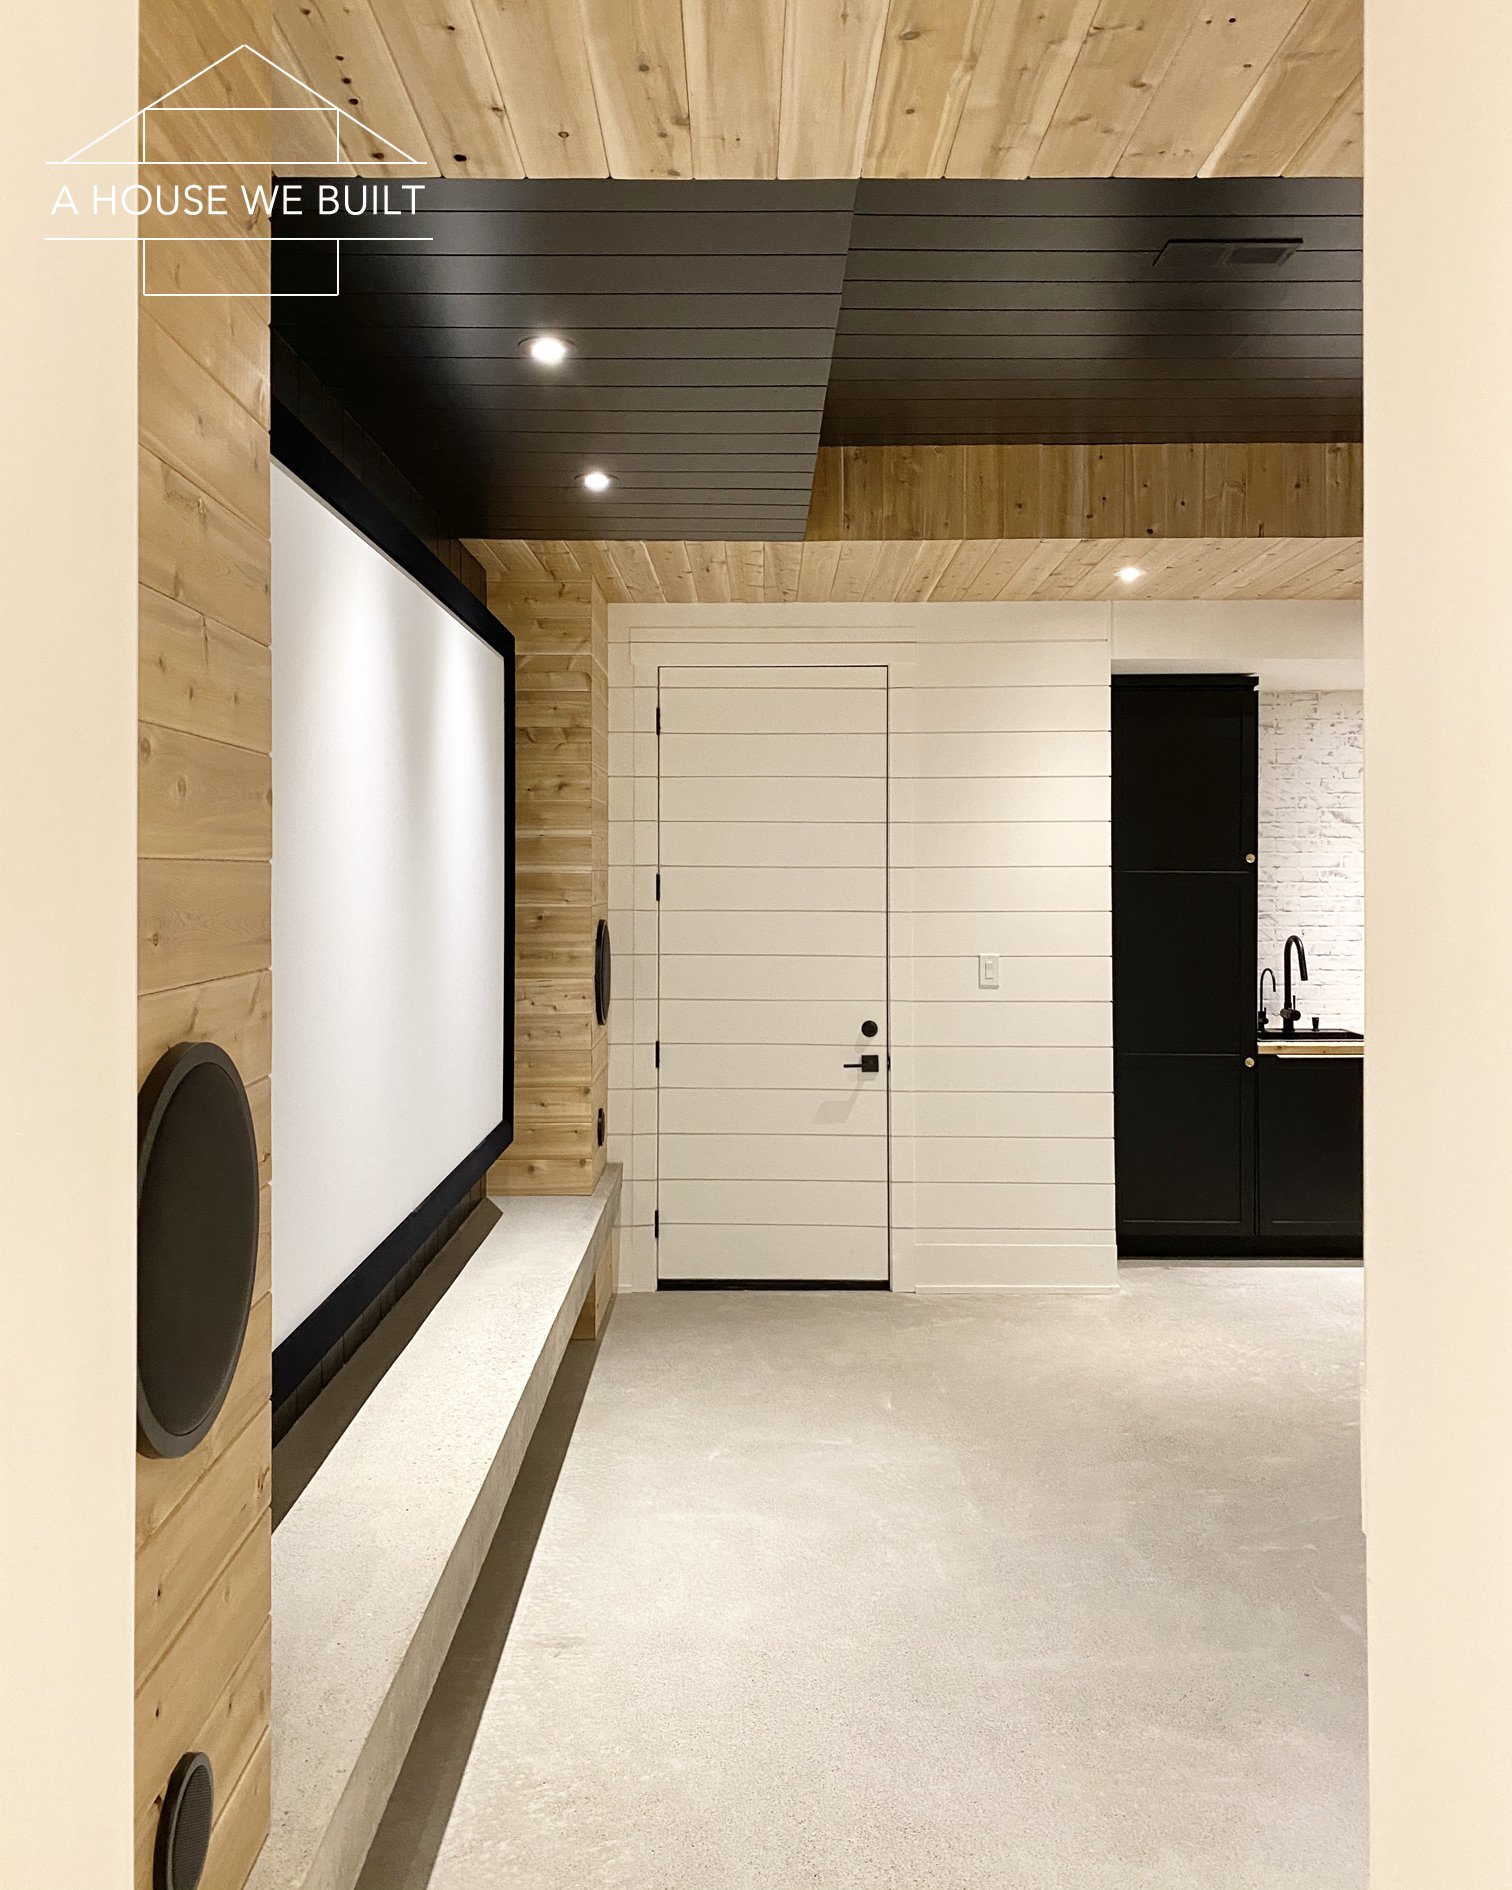
In our theater room, we had this white exterior door in the middle of all our shiplap whose location we couldn’t change (for reasons) so my goal was to visually minimize it while keeping it accessible. Originally, I considered hiding it behind a barn door but the door handle didn’t allow for that. Finally, I decided to simply hide it in plain sight by painting gray shiplap lines onto it continuing the shadow lines of the real shiplap boards surrounding the door! Super simple solution!!! I used frog tape (Home Depot), which is better than painter’s tape, to connect the shiplap boards on either side of the door (including the trim to keep the lines seamless) and then just painted the lines gray. I mixed different grays I had lying around my house so I don’t have a specific color to share but this project was low-risk since I could always paint it back to white if needed. Luckily though, my idea worked! Here are the before, during, after pics:
FREQUENTLY ASKED QUESTIONS:
- Do you constantly have to dust between the boards? I’ve never had to (not even on the black shiplap that would really show the dust if it were there). If you live in a really dusty climate and have your windows open a lot, I suppose that might change things, but it hasn’t been an issue for us.
- What type of shiplap is easiest to install? Horizontal shiplap installed on a wall with two perpendicular walls on either side (meaning that each side can terminate to a 90 degree wall without wrapping around a corner) will always be the easiest type of shiplap to install.
- How do you decide between vertical or horizontal shiplap? How do you pick what parts of your house to shiplap? This is 100% personal preference. There are no rules here – in your house, you should choose whatever you love most. I make my design decisions based purely on what looks good and feels right to me. Horizontal and vertical shiplap have very different feelings to me so it really depends on what look you’re going for and what makes you feel warm and fuzzy when you look at it. Not to be cheesy here but just let your heart decide!
- How do you have shiplap around your fireplace? Our fireplace is electric so the surround and front of it don’t get hot like a gas/real fireplace so it’s not an issue.
- Is it trendy? What if it goes out of style??! Personally, I don’t care. I don’t follow trends or care what’s “in style”. I choose all my design elements based on how much I love them. Shiplap has been around for hundreds of years so while it may be having a moment in the spotlight, that’s not why I love or or the reason I chose to use it in my home. I strongly advise making design choices for your home based on whatever truly makes your heart happy instead of based on trends.
If you want to follow our daily progress, come follow us on Instagram @ahousewebuilt!
SOURCES:
- Light fixture (black/gold): Build.com | Wayfair | Gold version: Overstock | Black version: Wayfair
- Gold drawer pulls: Amazon | Home Depot | Schoolhouse
- Brick wall tutorial: How to DIY a Faux Brick Wall
- More sources from our basement: Basement Sources Page
Left pic is our Theater Room | Right pic is our Game Room
For more of our tutorials, click here.
To explore rooms in our home, click here (most have some kind of shiplap).
To follow our daily updates and home progress, follow us on Instagram @ahousewebuilt.
Dela says
Hi!
What width did you use on your ceiling for the shiplap? I live in a small town and widths only come in 5 5/16 or 7 1/4 I love your look so am hoping it’s one of those! Thank you!
admin says
Hi 🙂 The first shiplap link in the post is the closest in look/size to what we used.
Ivette Morales says
Hi! Is the shiplab behind the bathrooms vanity treated for water damage? If so, what do you used? Thank you!
admin says
No, but neither is the drywall used in most bathrooms, nor the cabinets, etc… 😉
As long as you don’t have it directly in the line of water it’s usually fine. Although I do always recommend at least an eggshell paint finish for bathrooms or satin.
Renee says
Hi- how do you trim around the windows that don’t have any window casing/trim around window?
admin says
We did returns on all our windows instead of trim. It’s a technique and we chose it for aesthetic reasons. It’s more work though – trimming windows out is easier overall.
Maxine Goldner says
Good morning,
I am very happy to see your excellent website. I love shiplap. I have a question that is troubling me ver much. We are building a home and have shiplap on the fireplace wall. Not finished yet and the fireplace is not completed with surround and hearth yet. But, many of the shiplap board have cracks and splits.
Also, the builder did not wrap the shiplap, only used moulding at the edge. Not so great looking.
Anyway, my main question is…..is this typical for the boards to crack/split?
Thank you so much for your advice.
admin says
Hi, well I’m actually not a shiplap expert as I’ve only ever worked with one kind – MDF. I don’t believe MDF should/would ever crack or split as that’s not something that the material really does. If your shiplap was wood though then I suppose cracks *could* happen, but I would not say that’s typical of wood shiplap based on what I’ve heard of it from other people. I don’t believe that the corner wrap (or lack thereof) is related to the cracking though – that seems a separate, aesthetic consideration which is really personal preference. Shiplap is not all that hard to install though so if you plan to re-do it, I would suggest MDF as (in my opinion) it’s a better material to work with. You should just note though that if the material is surrounding a gas/real fireplace, you need to take code into consideration unless you have a proper surround in place (our fireplace is electric so it isn’t an issue). Hope this helps.
Maxine says
So kind of you to reply. Very helpful, indeed!! Thank you so much!
Maxine
admin says
One more random thing I thought of – when working with wood paneling (or shiplap), you have to let it acclimatize to the interior temp/humidity before working with it. We did that with all the wood paneling in our theater room – we actually let it sit untouched for weeks before using it. That way the material has a chance to get all of its warping/movement out of the way before you work with it. If you don’t allow this time and you have a big change in temp/humidity, that’s when cracking/warping can occur.
Craig says
Nice! Can you share the material used on brick wall?
Thanks, Craig
admin says
We have a tutorial for it: https://www.ahousewebuilt.com/faux-brick-wall/
Mikah Diehl says
We are putting new flooring in along with adding ship lap to the walls and all new trim work. From your experience what order do you believe is best to install and complete this project? In the past we have not removed trim and put ship lap up and just installed the shiplap tight to the trim and baseboards and I think it looks fine doing that with some caulk. I am worried about putting shiplap up first and trimming over that specifically around doorways assuming the shiplap is installed to the edge of the door way and you trim over that does this make the edge look too thick or can you see the shiplap sitting between the trim and the door jam? I hope this makes sense. I was hoping to find a zoomed in picture of the doorways so I can visually see this.
admin says
Around doors you may need to take into account the size of your door frame to be sure the width of the shiplap is accounted for. If you don’t have that extra width on your door frame, then around the door, have your shiplap butt up to the trim instead of putting the trim over the shiplap. In areas where it’s just wall + flooring (no doors), then the order really doesn’t matter – it’s just about the look you want. In those areas we typically do floor first, then shiplap, then trim.
Kendra says
We’re getting ready to install this as an accent wall that has two windows (no trim around the windows just a sill) and wall butts up against other walls. Do you recommend trim on the sides of the walls that the shiplap dead ends into? What type of trim would you use around the windows as well? Thanks for your help!
admin says
The answer to this is absolutely personal preference – there’s no right or wrong way. We have windows done both ways in our home. If you choose not to trim your windows, our tutorial above addresses how we terminate shiplap to outside corners. Best of luck!
Cory says
Sorry if the answer to this should be obvious, but I’m new to this stuff – do you install boards from bottom to top, or top to bottom? (I’m planning to do a wall and have the boards horizontal)
admin says
You can do it either way. We usually start at the top for horizontal boards.
Mark says
If you start from the top in a bathroom, is there a risk of water splashed on the shiplap getting behind because of the tongue then is facing down? If you install from the bottom, the tongue is up and would prevent water penetration, right? Is there a way to install from the top with the tongue side up?
admin says
Unless it’s maybe in a younger kid’s bathroom, realistically the amount of water landing on it is very small. We’ve never had issues with water. If you’re really worried, you can put a small bead of caulk in the seam.
Vince says
Hi quick question,
To join two pieces of shiplap side by side do you mitre the joint or butt the joints and fill with dap/filler?
Thanks
Great read!
admin says
You could miter them but we’ve never needed to. Butt joints (and filler) work fine as long as the surface you’re installing over is even.
Neha says
Is your the chevron design behind your desk in your office shiplap as well? If so, do you have any tips for stacking shiplap in a chevron layout? Thanks!
admin says
No, my office chevron is not shiplap. Though to install shiplap in a chevron pattern would really be the same as straight shiplap, just with angles on the ends and then you’d just treat the middle join as a butt joint and fill it accordingly (as shown in the tutorial ^)
Nash says
Great Article! Thanks for all the helpful tips!
However my walls are so horrible that my inside corners still came out horrible. Too much gaps in between the 45 mitre cuts.
Not sure if I should go back in with Wood filler or caulk…? I want those crisp inside joint lines!
Wish me luck!!!!
admin says
Working with uneven walls is definitely tricky. However, on an inside corner, caulk should fix that! It’s harder to repair on an outside corner, but you should be able to successfully fix it with caulk on the inside corner. A trick if you have a larger gap is that you can layer the caulk so do one line and let it dry, then go back and do another. Best of luck!
Nita Schutt says
We are going to follow your tutorial on the Shiplap for an accent wall as well as a wall of the faux brick tutorial. Can I please ask do you paint the shiplap and brick wall the same color as my trim but only a different sheen? I have SW Pure White semi gloss on all of my trim and cabinets. My walls are SW Worldly Gray. Just not sure what to do with them once they are installed. Thank you Nita
admin says
It’s totally personal preference as to what colors you use and I don’t think there are any right or wrong decisions. In our house, we did not paint our our brick at all – we were just happy with the color our mud dried.
CAT TAYLOR says
I think our shiplap is slightly bowed — unfortunately the 45’s arent meeting up.
We will need to use rip trim for the door jamb.
Oh well, thanks so much for the tips.
admin says
Sorry to hear that. Unfortunately, if you’re using wood shiplap and it’s already installed, there’s not much you can do about bowed wood. MDF (the kind we use) is quite flexible and can be wrapped around most wall unevenness. For next time, I’d recommend checking each piece of lumber before installation for straightness and ideally let it acclimatize to the temp/humidity of your room for a week or two prior to installation.
Tom says
Hi! My wife and I want to shiplap a few of our bedrooms, but we do not have enough studs in the wall for shiplapping support. What would you recommend?
Thanks!
admin says
Hi! For vertical shiplap, check out point #6 under General Installation Instructions in my post ^^. For horizontal shiplap, it’s almost impossible not to find studs somewhere in the wall (unless you have a very unique situation?) and you only need a couple anchor points to nail the shiplap into.
vmelo says
How are the vertical seems that you filled with putty holding up? I’m curious if the putty has cracked or opened due to wood expansion and contraction. Thank you.
admin says
It looks the same now as the day we installed it – no cracking. We have a very steadily climate controlled house though and we typically allow all materials we use to acclimatize to our interior climate for a couple weeks before installing them.
Joe P. says
First off GORGEOUS house. Entirely envious.
I stumbled on your website as we’re doing a kitchen “refresh” and we’re using shiplap as the backsplash around the countertops and I had a couple of quick questions.
A) you recommend satin paint, but as a backsplash, I feel like we might have to go semi-gloss for more frequent clean-ups etc? I plan on priming all 6 sides of every board around the sink area for added protection
B) you recommend 45* miter cuts for inside corners, but I would assume this wouldn’t work too well for an old house (like ours) with plaster/lather walls that have seen some wear and tear in their lives – there’s no way those corners are prefect right angles, so I was thinking about going with butt joints but not sure which way to butt them together?
C) your recommendations on how to help the gaps “pop” a little more in painting are brilliant.
admin says
Thank you!
A) Yeah, you definitely want something easy to clean around a sink. Semi-gloss is a good idea. You may also be able to find a top coat product that will seal it, but I recommend testing them out first if you’re using a light colored paint as many of them (even the clear ones) have a faint ambering effect.
B) Honestly that depends on how uneven the walls are… you can cover up quite a lot of unevenness in an inside cover with caulk, especially if you do it in stages and layer it. Consider using MDF instead of Wood shiplap if you’re working with uneven walls as that material has quite a bit of flex. If you’re going to butt them, I don’t think it matters which way you do it. I would probably do it so that the small hole that’s inevitably created in the seam space is facing away from the direction you view it most regularly.
C) Glad it’s helpful 🙂
Joe P. says
Thanks for the quick reply! I think I will cut a few test boards and try out the mitered inside corners to see just how bad/good the joints will line up. I’d prefer to go that route, I just don’t have much faith in the squareness of those corners (from prior experience around the house). FWIW, I wanted to stay away from MDF due to the potential of water in the kitchen.
Thanks, and again, congrats on the gorgeous house!
PS: you should make it so that the pictures on your website are clickable and come out to full size. I want to zoom in on some of them!
admin says
Very welcome! Best of luck with your project 🙂
Vandana Dommaraju says
Hi,
My builder is offering shiplap surround for fireplace with cedar wood mantle. I fell in love with your shiplap fireplace and barn wood mantle. My builder is not offering barn wood mantles. Is it possible to install reclaimed barn wood mantle on the existing shiplap later after we close? Or does the mantle has to be installed first before shiplap? Wondering if we need any other studs and blocks added inside the Sheetrock to support an heavy barn wood mantle if can be done later. Please suggest.
Thank you!
admin says
Yes, you can absolutely install it after shiplap. Just make sure you have enough studs along the wall to secure it too. We used steel L-brackets (about 6″ each direction) on both the top and bottom of the mantel (so that it wouldn’t roll) and bolted it to the studs. We used 5 studs along the wall. I recommend having a bracket every 12-16″. We actually don’t have extra blocking in our wall but it can never hurt to add it if you feel like it. Best of luck 🙂
Vandana Dommaraju says
Thank you so much! That’s very helpful!
Alexandra Love says
Hi!! This is so gorgeous! Where did you order your fireplace from?
admin says
Sources are on our Living Room page 🙂 https://www.ahousewebuilt.com/living-room/
Deena says
Hi!
I had a question about the baseboards and trim. They are 5/8 so would it look ok to have the shiplap the same depth? I was going to only go half way up the wall in the bathroom.
Thanks!
admin says
Yeah, we have some areas where the shiplap butts up to our baseboards (like our entry) and some areas where we put the baseboards over the shiplap (basement) so it’s fine either way.
Stefanie says
I am loving your designs and instructions!! Quick question: I am planning on mounting my tv on my shiplap wall and floating shelves as well, should I add the tv mount and shelves over the shiplap? Thanks so much!!
admin says
Thank you! Yes, you can mount them over the shiplap. Just make sure you’re screwing them into studs because the shiplap alone won’t hold the weight.
JC says
We would love to shiplap the ceiling in our cottage kitchen/eating area and hallway. The tops of our kitchen cabinets are 1 3/8″ below the ceiling. How can we fasten the shiplap to the ceiling area above the cabinets?
admin says
Hmm. Well if you run the planks perpendicular to your cabinets instead of parallel (so the opposite direction of the way we have it in our kitchen), then you can probably get away with sliding the planks above the cabinets with some construction adhesive on them and just starting to nail them right after the cabinets. Upper kitchen cabinets are not usually very deep so I don’t think it should cause any issues. Of course, I haven’t seen your home so I’m just guessing here based on your description but it doesn’t seem to me like a problem. Hope that helps 🙂
admin says
As a follow up, you may have room for a tiny strip of some kind of thin curved cove molding above the cabinets that could polish up the gap between the cabinets and shiplap.
marlene marateo says
i just used engineered white shiplap to do my wall behind my sinks in bathroom (i installed small ceramic tile backsplash 4 inch inches high now have 1-1.25 inch area on bottom that i have to finish and i am stuck. Should i use a trim to finish or cut the shiplap to finish the last row. I have looked many pictures, and i just think the wall sides and the bottom needs to be trimmed and i don’t know what to do. The ceiling is trimmed in 5 inch crown moulding. I am a DIY who does it all, but i really will have a hard time cutting a strip of the shiplap perfect to finish the bottom.
I sure hope you have some suggestions for me. THANK YOU!
admin says
It’s really up to you. You could consider a different material entirely almost like a shallow shelf/lip as a possibility. If you want to use shiplap and don’t have the equipment to rip it down to size, you may be able to take it to a hardware store and have them do the one cut too. Best of luck!
marlene marateo says
i like the idea as using a shelf all the way across.
I might look into that
thank you
Lindsay says
When doing the Shiplap on top of board and batten did you remove the drywall behind the shiplap?
admin says
No, we always drywall first with a coat of mud and tape to seal it.
Monica says
Hello! Beautiful home!
I have a question about putting baseboard trim back down after shiplap. We bought 1/2” thick rough cut planks(aka No lap shiplap) and have finished installing in our kitchen. Now we have the issue of adding the baseboard but noticed that it will stick out slightly past the doorways and cased openings. We didn’t think about this first. Will it look bad that way it is there another solution that’s not too difficult or expensive?
admin says
If you use 5/8″ baseboards in those specific areas instead of 1/2″ and remove the bottom piece of shiplap, you can put the baseboard in place at the bottom, then rip the last piece of shiplap down to fit the remaining space. That way the baseboard will still be a little thicker than the shiplap, but without being AS thick as if you’d put it over the shiplap. We did that in a few places in our home.
Jared says
Hi there,
I’m doing a shiplap wall behind a vanity in a bathroom and there is a fibreglass shower installed on the same wall. We were planning on leaving the wall above the shower painted and not shiplapped, do you know of a product for the side of the shiplap? Going for a modern clean look so I was thinking tile edging but wanted to know if you had any ideas.
Thanks.
admin says
I don’t know of any specific product intended for that purpose. In our basement bathroom, we have shiplap on an outside corner where there is tile on the other side of the corner and we just used tile edging between the two materials. It worked quite well.
Jared says
Thanks! I’ll go with that.
J says
Hello! Love the look of your house and appreciate the detailed tutorial! We are going to be using shiplap on an accent wall. One side of the wall butts into another wall and the other side is an outside corner. It’s kind of hard to explain but we don’t want to shiplap the wall that the outside corner runs into. Would you recommend just using some sort of straight MDF trim piece on each side of the shiplapped wall? Or how should we finish the side where the outside corner is? Let me know if that explanation doesn’t make sense! Thanks for your help!
admin says
It makes sense! The second bullet point in the tutorial’s “How to Deal with Corners” section answers how I would personally choose to deal with your corner situation. Also, the top left picture at the top of the tutorial is an example of it. Hope this helps!