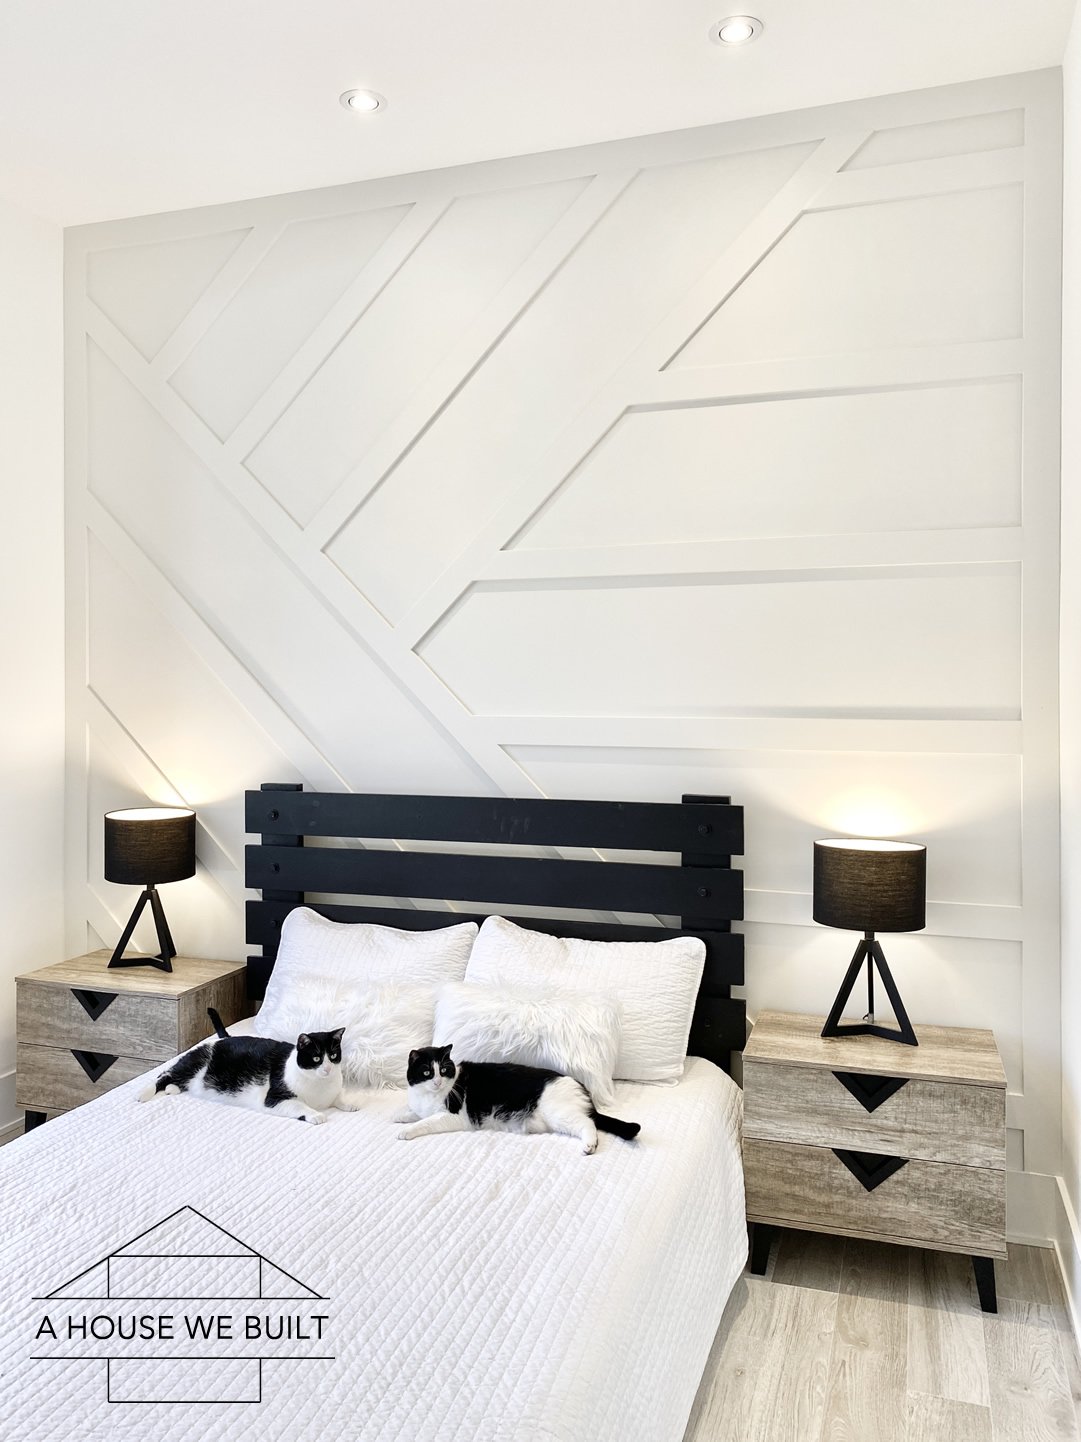
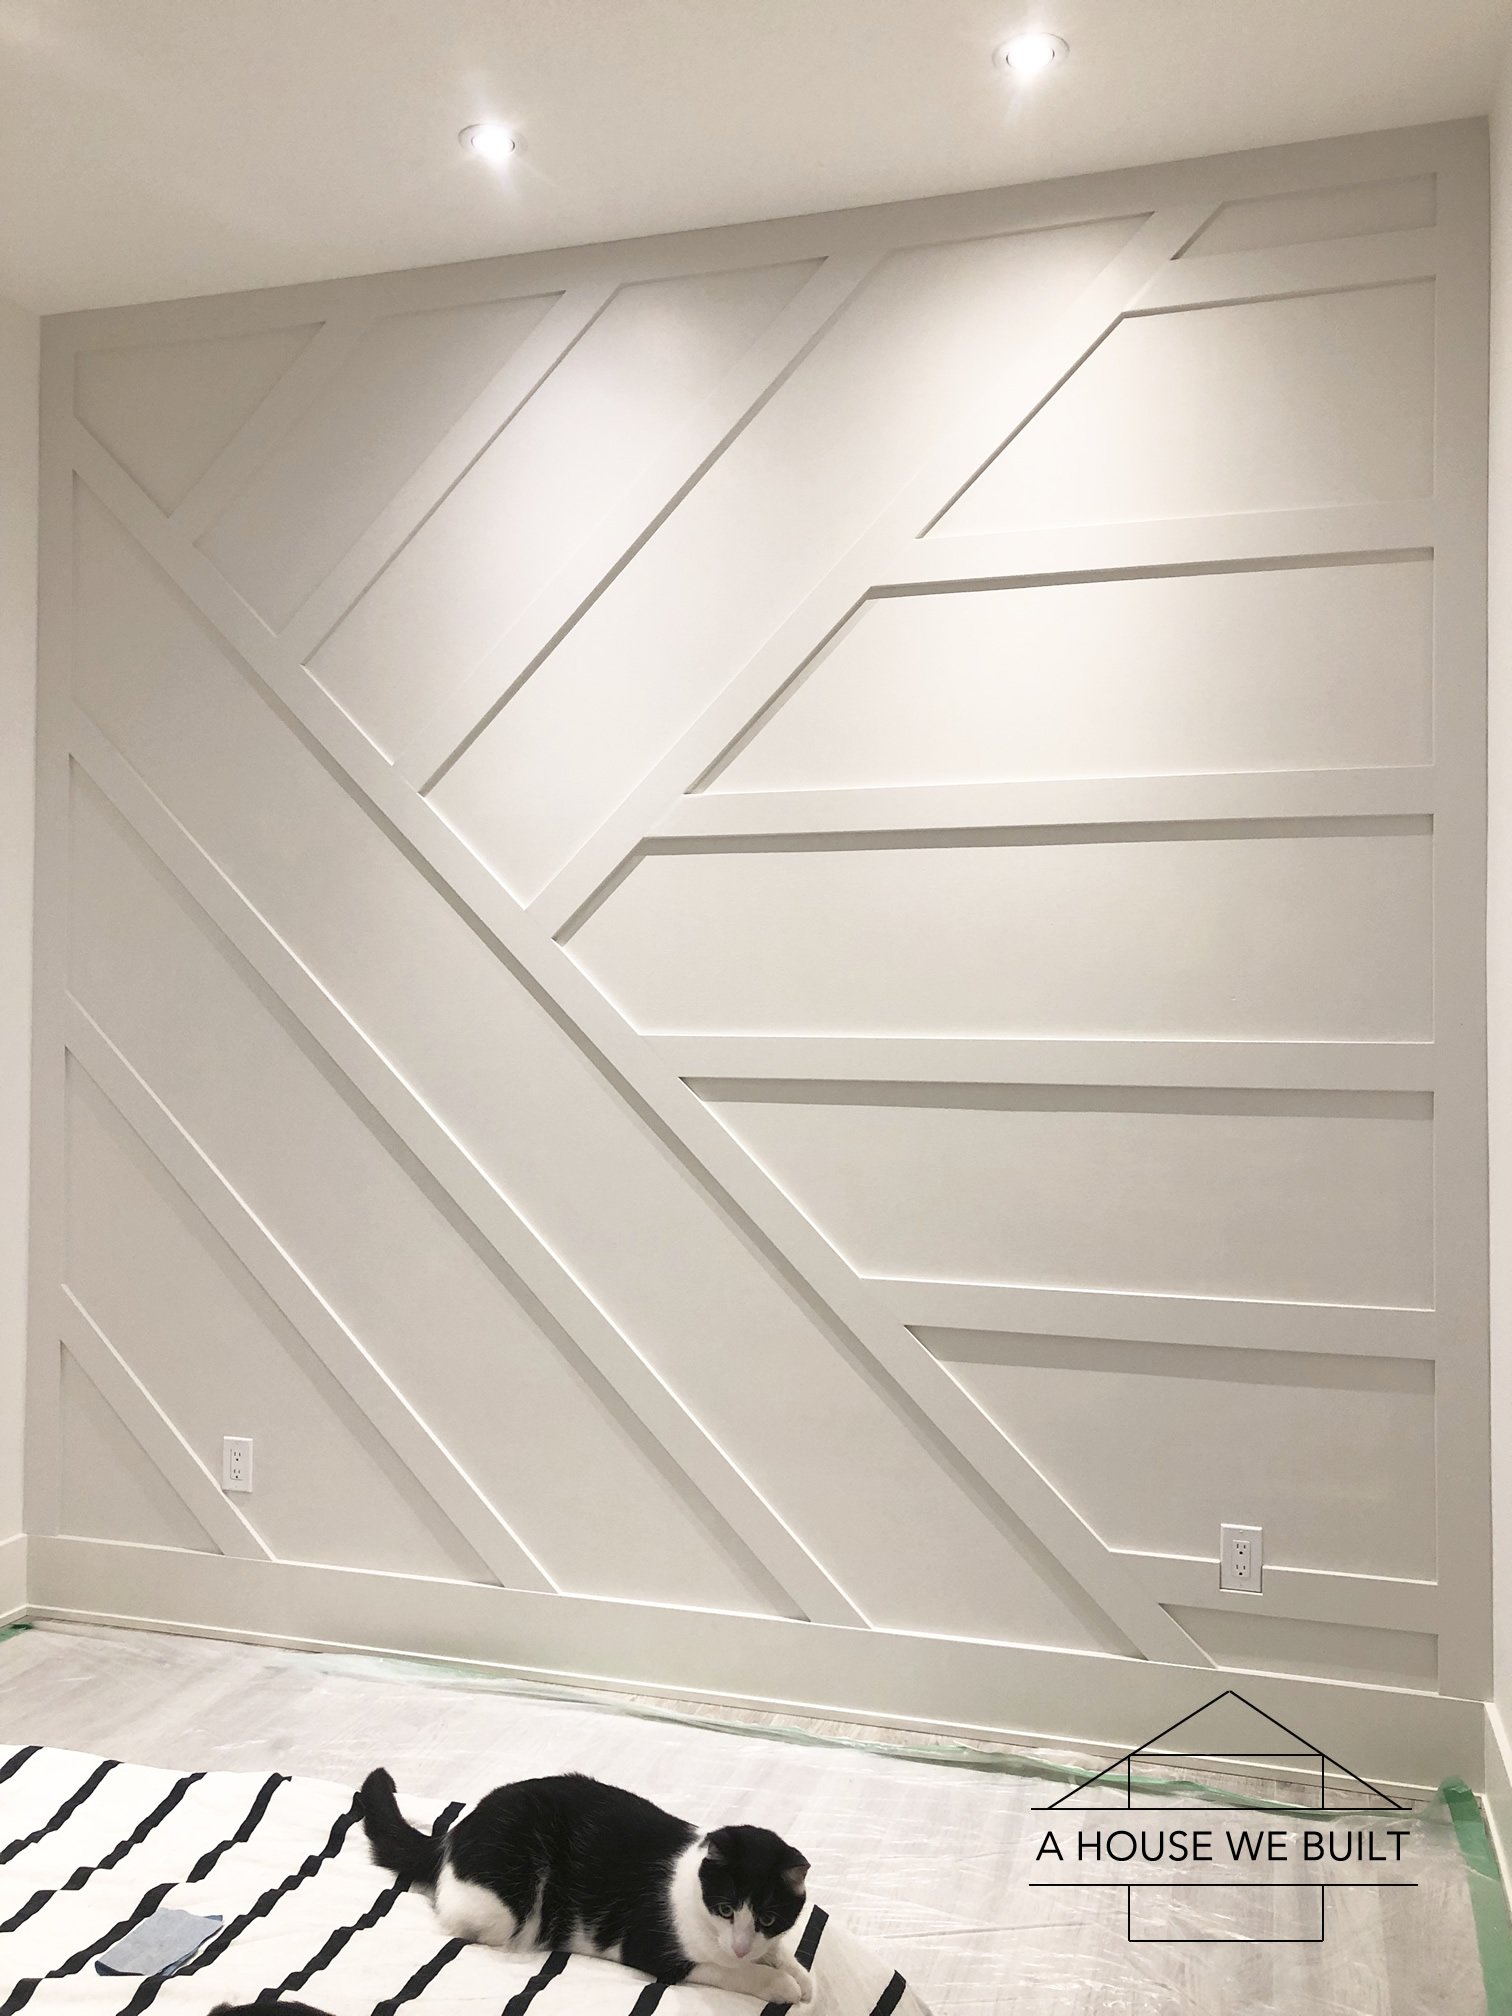
We built this accent wall our guest bedroom so I thought I’d share how we did it along with some tips & tricks. I love accent walls and have wanted to do them ever since we first designed this house but I couldn’t decide which pattern to do on this wall — a grid, herringbone, random pattern, board & batten, etc so I drew up over a dozen different design variations before deciding on this one. It took us one night to put up the boards, another night to fill the holes and sand, then another night to paint it.
Note: these instructions can be used for any pattern of wall paneling – they are not specific to my particular paneling design. So, no matter what type of paneling you want to do (squares, straight board and batten, herringbone, something completely different) the basic “how-to” instructions are the same.
PANELING SUPPLIES:
- Pre-primed boards: Home Depot (you can use any size you want but this is what we went with)
- Miter saw: Home Depot | Amazon (to cut the boards)
- Carpenter’s square: Home Depot | Amazon (to draw straight lines where to saw the boards)
- Nail gun (+ nails): Home Depot | Amazon (to attach boards to the wall)
- Paneling adhesive: Home Depot (to attach boards to the wall)
- Measuring tape: Home Depot | Amazon (I hope this one is self-explanatory)
- Painter’s tape: Home Depot | Amazon (if you’re using 1x2s like I did, then I suggest getting ~1.5″ painter’s tape as it is close to the size of the 1x2s and you can use it for templating)
FINISHING SUPPLIES:
- Caulk: Home Depot | Amazon (to fill in seams after installation)
- Caulk gun: Home Depot (for your adhesive and caulk)
- Wood filler: Home Depot | Amazon (to fill in nail holes)
- Putty knife: Home Depot | Amazon (to apply wood filler to nail holes)
- Sandpaper: Home Depot | Amazon (to sand wood filler after nail holes are filled)
PAINTING SUPPLIES:
- Microfiber roller: Home Depot (though I got a kit like this one: Home Depot)
- Angled paint brush: Home Depot
- Paint: I chose BM Classic Gray in satin, but you can do any color you like
INSTRUCTIONS:
- Design. My goal was to design a wall with a distinct but simple pattern that could work well with different room configurations. I came up with about a dozen variations and this one was my favorite.
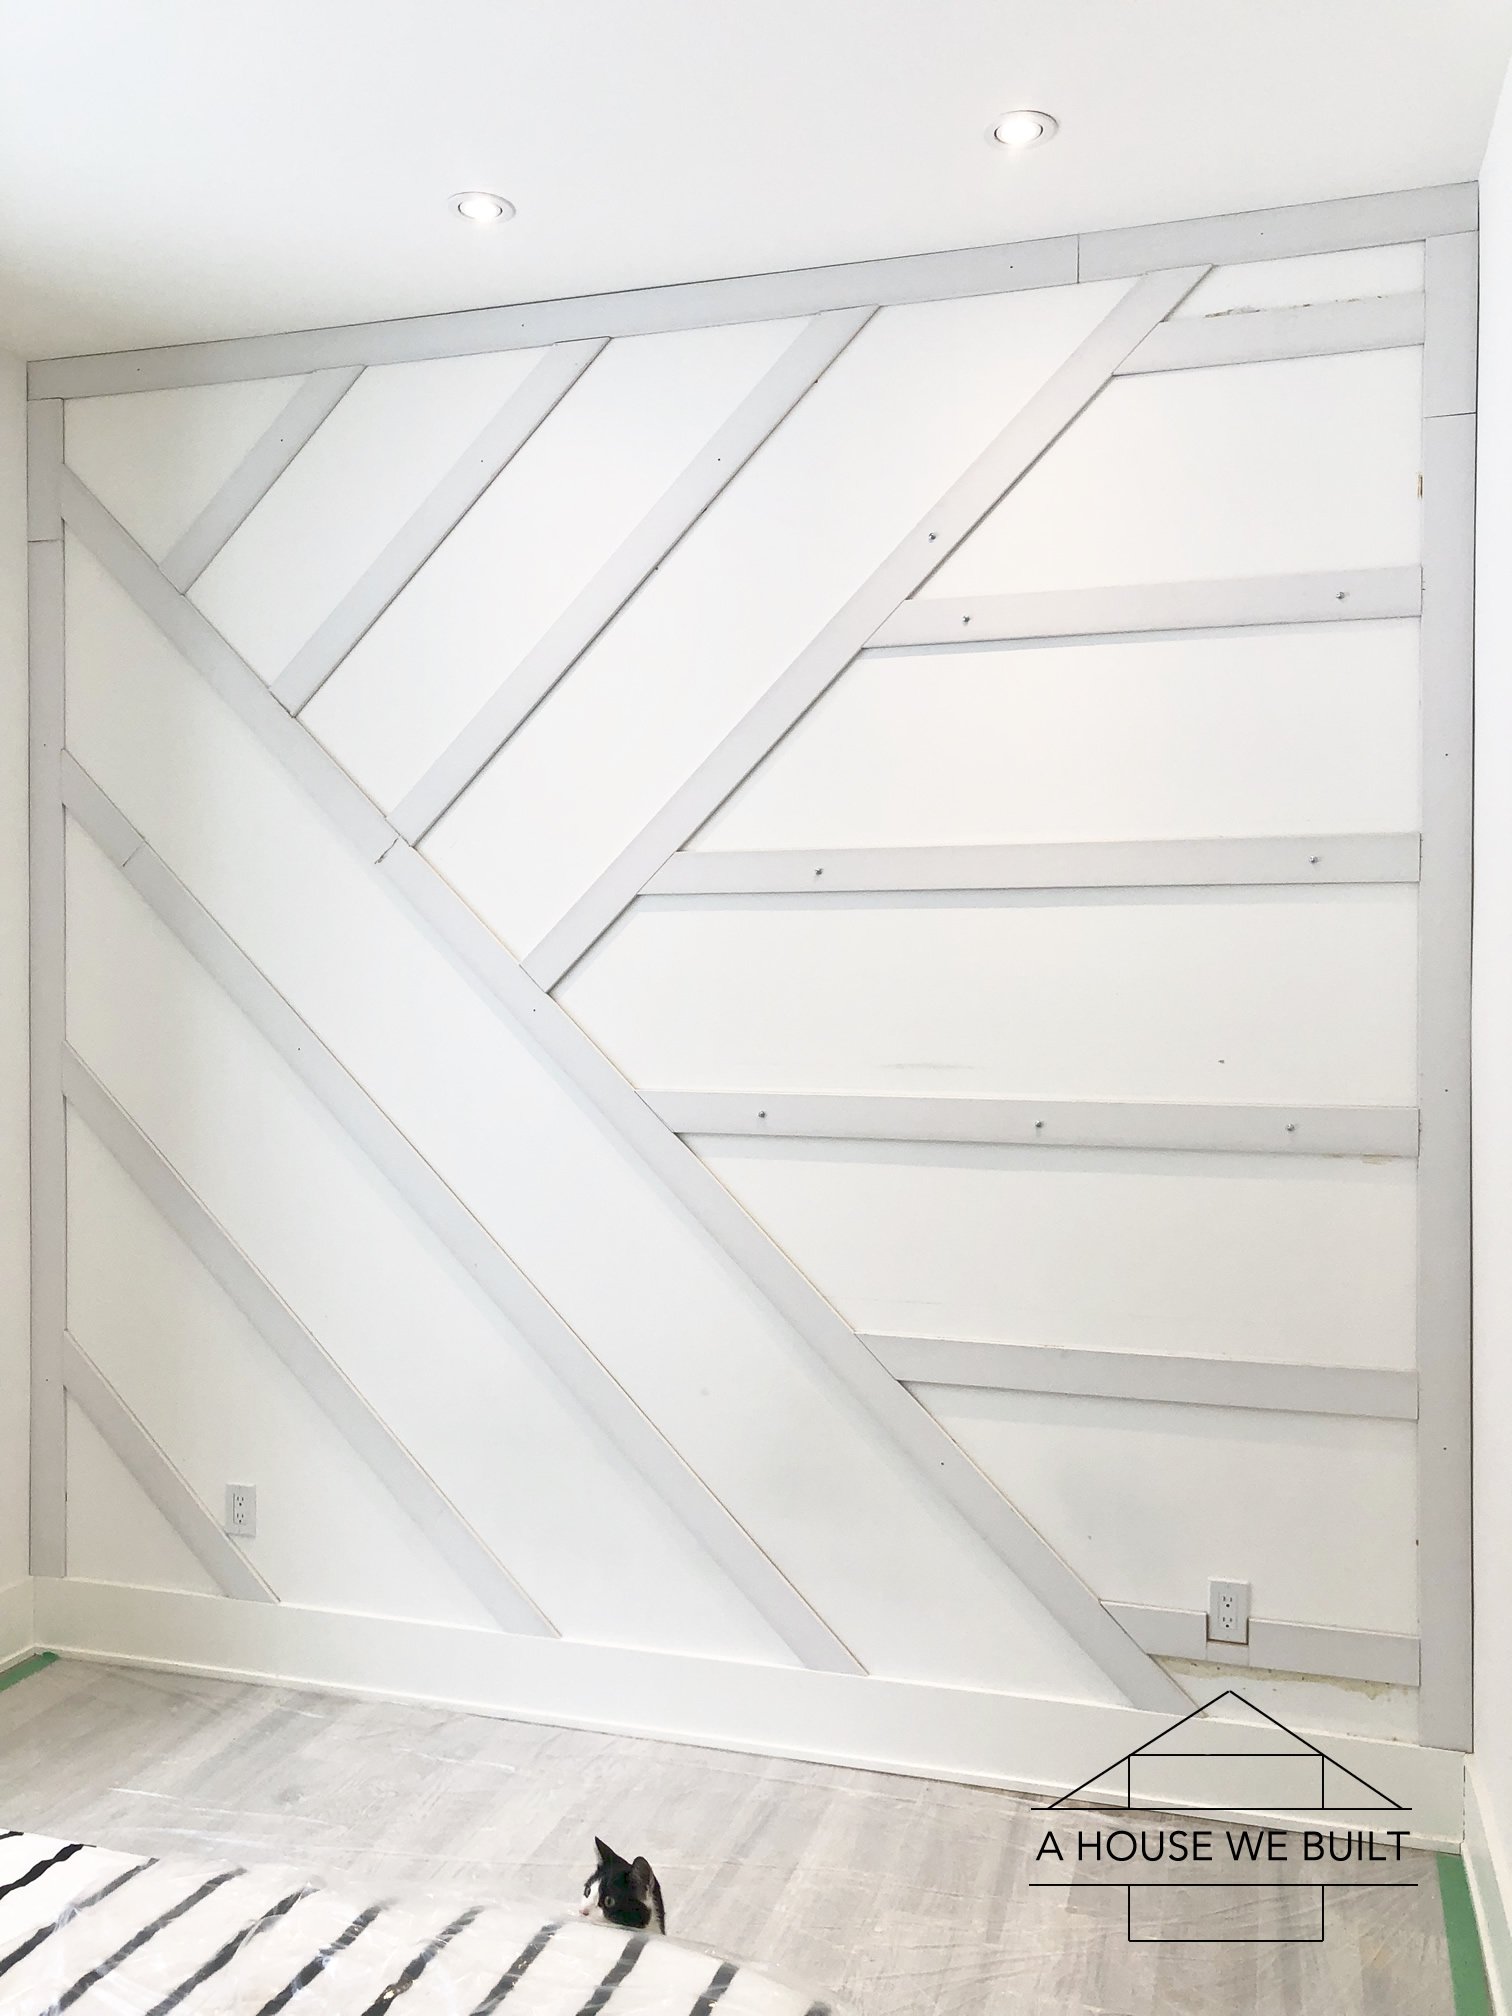
- Plan your wall. This was the hardest part. It involves a lot of math and patience. We decided to start with out perimeter trim first. Then the longest diagonal on the left next and worked down from there. Then the upper diagonal section (starting with the longest piece first). And finally we ended with the horizontal pieces on the right (where we also had to work around an outlet).
- Cut boards and attach them to the wall. Use a line of construction adhesive on the backs of the boards AND some kind of fastener (either screws or nails, depending on how you want to do it). Start with the perimeter and then strategically work through your pattern. Cut as you go so that you can adjust any measurements needed along the way. (Note: Our accent wall was on an exterior wall and we didn’t want any penetrations in our vapor barrier so we didn’t want to nail/screw the boards to studs so we came up with a creative solution where we predrilled holes in our boards and found screws that were less than the thickness of the board + drywall. After applying the adhesive, we then screwed the boards into place for about a day to dry, then removed the screws and filled the holes. This way our exterior wall assembly remained completely in tact.)
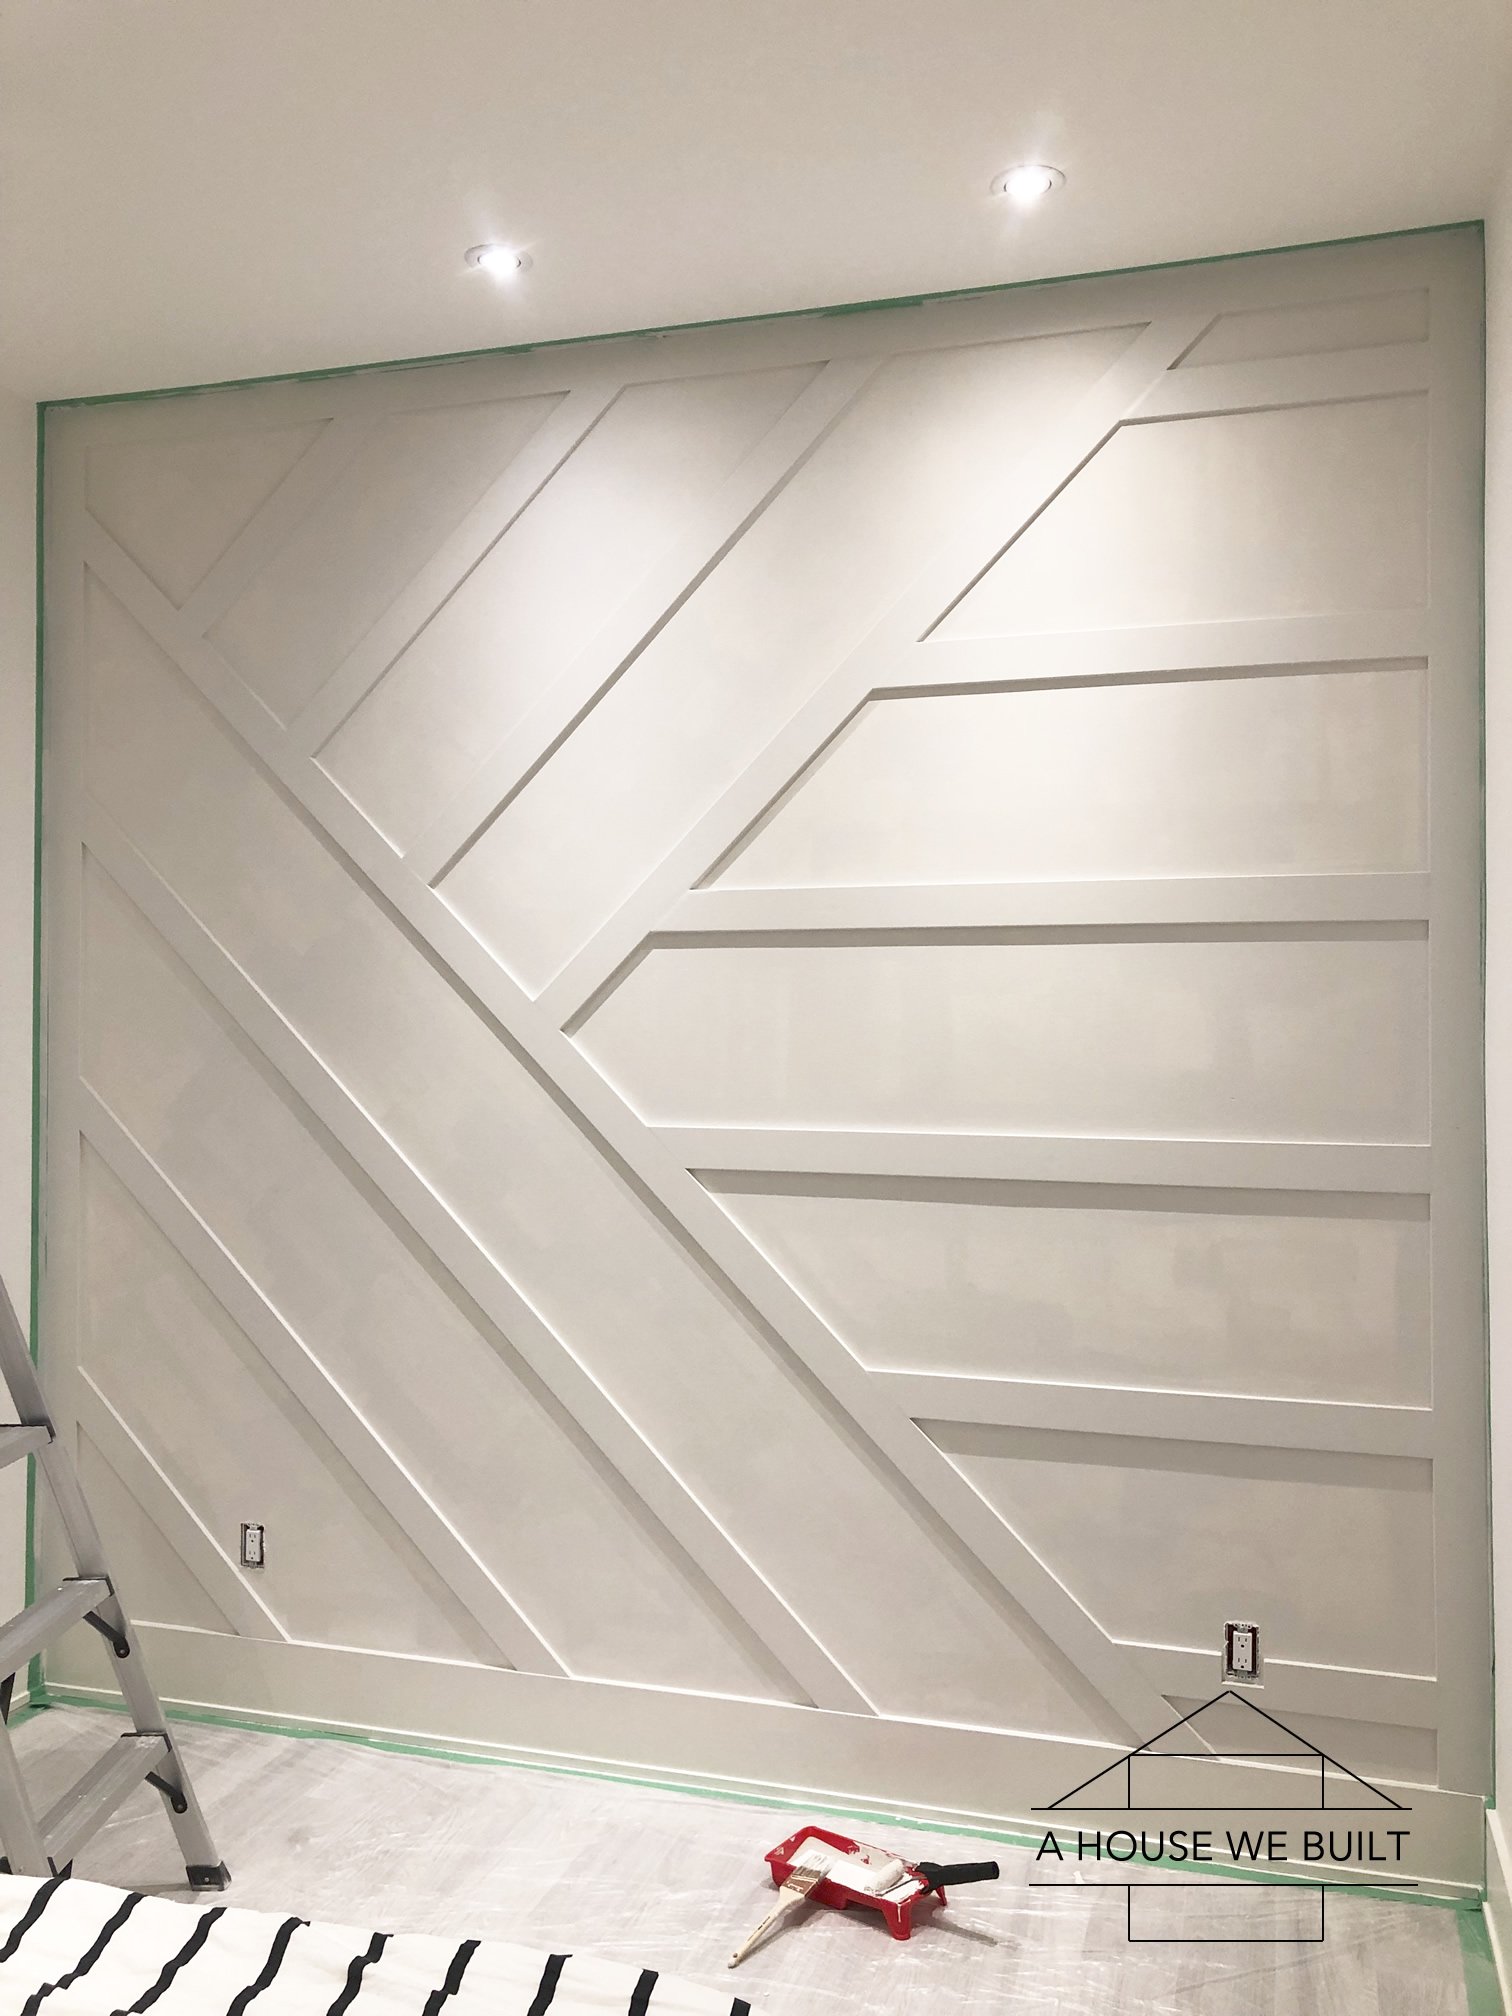
- Sand down anything uneven with a heavier sandpaper.
- Fill all nail holes and joins between boards with wood filler using a putty knife.
- Caulk every place were the board meets the wall by running a line of caulk down each join, then run your finger over it to smooth it out. Have a damp towel on hand to wipe your finger.
- Sand everything you used wood filler on. You have to get this pretty smooth or it will show through once you’ve painted it.
- Paint. Be sure to either use primed boards or prime before painting. I used an angled paint brush for the edges first, then a microfiber roller for all the boards and drywall.
RANDOM THOUGHTS:
- If you’re kinda thinking this all sounds a bit too hard I recommend trying a board & batten look or a simple grid wall since it’ll all be 90 angle cuts and should generally be easier to tackle.
- Paint the wall first if you can. I mean, why not?? I didn’t because at the time we started putting up the boards I still hadn’t decided on my final color. But it would have made painting sooooo much faster to at least have the first coat on the wall done.
- I highly recommend trying to work “around” outlets etc instead of incorporating them into the design. It’s just easier. Personally I’m not a fan of trimming them out as it just draws even more attention to them. In our case, we unfortunately couldn’t go around one of our outlets so I kind of got creative around it but in a perfect world, we would have just avoided it. I wasn’t too worried about ours though since eventually it’ll be behind furniture anyway so it’s not like it would be visible.
Note regarding the paint color: I’ve included pictures taken at several different times of day and night, and both in direct sunlight and on a cloudy day so you can really see how different this paint color can look!
Below are finished pictures of this wall. More details on our guest bedroom page

For more sources from our Guest Bedroom, click here.
For more of our DIY tutorials, click here.
To explore the other rooms in our house, click here.
Melissa says
My boyfriend and I recently bought a new home and want to add this accent wall to our dining room! I had a couple questions. 1. What if you have textured walls? Yours seem to be all smooth. 2. What if your bottom base board isn’t flat, but has ridges or curves? 3. Did you have to find studs to screw the lumber into the wall?
admin says
Hi 🙂 I’m not a building expert so I don’t really have the answers. Our walls are smooth and are baseboards are flat. But I do know that yes, you should always screw everything into a stud otherwise it won’t hold.
Jose says
If your baseboards aren’t flat at the top you can rip it out and replace it with a flat board, miter your cuts near the baseboards down to the thickness of the top of your baseboard, or live with it. You could also use really thin boards. If you have textured walls you can use a power sander and try to get the texture as flat as possible. And if you use construction adhesive and tape or nails no you don’t need to find studs but the adhesive WILL rip your drywall off when you go to remove the board of you don’t like it in the future. I framed my windows with nails and adhesive only and they have lasted years.
Dana says
I also have textured walls. Let me know how yours turned out.
Leslie says
Good Q! Every post I see online never mentions textured walls. I know the technical answer would be to skim coat the wall but what a pain in the you know what! There’s got to be a way around that
admin says
I’ve since seen many people do accent walls over textured drywall and it works. Obviously, it’s a slightly different look, but there’s nothing wrong with different 🙂
If you have heavy texture, I suppose you could caulk the seam between the new board and the wall to fill in any gaps. But I’ve never personally done that I’m just thinking out loud.
kristen says
If you dont like the look of the textured walls, you could put up paneling before, and this will give you the look of a smooth surface. Just a thought
Bailey says
I just wanted to say I stumbled across your blog, and so glad I did. We’re attempting this in our dining room next weekend! Thanks for the inspo! Wish us luck!
admin says
Welcome to our page! And good luck 🙂
Nikki says
In response to your Random Thoughts, I’m wondering if this look would be achieved well if you fully painted the wall AND the boards first and then just installed from there? I’ve never DIY’d anything, so forgive me if that’s a dumb question.
admin says
Yes and no. It could work, but it’s usually better to do a final coat once it’s finished. It’s also surprisingly annoying to paint boards that aren’t installed. You need a lot of space and set up.
Gladys LASTENNET says
Hi there, this is absolutely beautiful – very well done! I have a question for you… would you be able to kinda explain how to measure the angles of the boards and calculate how to cut them using the carpenter square? I am having a hard time picturing how to do it… In my mind, I was thinking I would place an uncut board on the wall first, mark it down and then cut it… But I am sure there is another more efficient way… That would be very helpful if you could explain, please.. thanks a lot for the tips! 🙂
admin says
Hi – thank you 🙂 The way you’re suggesting is a possible way, or you can take a smaller scrap piece to determine your angle and use that as your guide so you’re not hauling around a full 8-ft board.
Gladys Lastennet says
Thank you so much! That’s a great idea 🙂
Vicki says
What was the size of your wall? We have a small dining room wall in a condo so wondering if the larger or smaller trim pieces would look better? Thank you
admin says
The ceilings are 10′ for reference 🙂
Toni says
Is that really bm grey???? It looks white??
admin says
It is the color I listed in the post 🙂
Mariah Decatur says
I am on Home Depot and can’t find this color. Is this Behr Marquee classic Silver? I cannot find it even on google.
admin says
The paint color we used is listed in the post.
Estela says
Home Depot does not carry Benjamin Moore paint. You need to go to a BM store.
Oli says
What angle are your cuts cut at? Not the obvious straight cuts.
admin says
The purpose of this tutorial is to show how to make an accent wall, not specifically so my particular design can be replicated exactly so you just have to make the angles at whatever works for your wall.
Ajay says
This looks amazing! We have been playing around with colors for our accent wall. I love your grey. By any chance is it flat/eggshell/ or semi gloss? Thank you!
admin says
Satin 🙂
Loring Branch says
How did you determine the placement of the first 2 boards? Is everything at 45 degree angles?
admin says
However you want 🙂 There is no right or wrong way to do this wall, or any other accent wall – it’s just about whatever looks best to your eye.
Kas says
Hi there!
I love this look … approximately how much did it cost you in supplies?
Thanks!
admin says
Hi! Costs will vary depending on what type of materials are available to you locally and what tools you do/don’t have on hand. I’ve sourced supplies in my post to help you assess that 🙂
Paulette says
I really love what you did here! I was wondering whether those boards are 2in wide or 4in?
admin says
Thank you. 🙂 They’re somewhere in the middle
Melissa Bodine says
Hello! I just want to say that you did a fantastic job and the finished product is amazing! I feel like this would take me weeks, haha. Super impressive, thank you for all of the great tips as well as the links!
admin says
Thank you! I promise it’s easier than it seems 😉
Willy Banjo says
Hi there – we really love this and are having it done in our living room – thanks so much for the inspiration!
Did you use the satin finish on the wall and the trim? Or is the wall finish different to the trim?
admin says
Hi – We used the same finish everywhere but it doesn’t have to be done that way.
Willy Banjo says
That’s great – that’s what we’d like to do too as it will simplify the painting 😆😆😆
Are the surrounding walls also satin finish? We’ve got eggshell on our walls at the moment so I’m a little cautious about putting satin on the accent wall and leaving eggshell on the others.
Tanya says
I used your post on Pinterest as inspiration for a feature wall in my son’s bedroom (taking it from young child to preteen. It turned out so beautiful! So thank you! It is the first DIY project I have taken on. I requested a finishing nail gun for Christmas because I hand nailed in all of the boards and then set them with a nail setter (Old school). In the future I would definitely use wood screws! It would have been much faster!
admin says
I’m so glad it worked out for you! And yep, I can relate. In the beginning, we started all our projects borrowing tools from my dad and over time we’ve built up a larger tool collection as we got more skilled. It’s a process! Best of luck with your next project 🙂
Taylor says
Can you give me insight as to how you drew this up on paper and figured out the angles and what not?
admin says
For the design, I just doodled a bunch of designs until I created one I was happy with.
For the build, once we figured out the design, we just broke it down into steps (as shown in my pics) and cut each piece to size as we built.
Gab says
Hi guys! LOVE the accent wall and am itching to do this for my bedroom!!
Question…and please be blunt… How is cleaning a wall like this? I imagine dust collects but I am curious as to how often you tend to it?
admin says
Ha! Well, I’ve literally never had to clean ours. That said, I think that it will depend house to house. We have an unusually dust-free home (we have whole house fine particulate filters in place that help with our cat allergies) and we never open our windows so if you live in a very dusty climate and often have open windows that might affect things.
Shanna says
Love this wall! I know you have the source posted for the trim pieces. How do you feel about using the nearly 3/4 inch wood? I have left over wood that will work wonderfully. It’s 1×4 primed finger jointed pine with nearly a 3/4 inch thickness. Could you link the baseboard you use in your home? They are the look I’m going for! I just thought maybe 3/4 would be too thick as a traditional trim is found in 1/2inch thickness.
admin says
I think there’s a lot of different ways paneling can look good and I see no reason that 3/4 would be a problem. In fact I haven’t even announced it anywhere yet but I’m right now in the middle of doing another small accent wall and the wood I’m using is 3/4. Our baseboards are literally just planks – they’re not specifically baseboards, we’re just using them for this purpose. So granted different depths will give different looks but there’s really no reason why you have to use any particular sizes – it’s all just personal preference 🙂
Andy says
Thank you so much for sharing the project. It looks really awesome. I am trying to do this in one of my room and I not sure about the size of trim width. Did you use 1 by 2 or 1 by 3 ? 1 by 2 are 1.5 inch wide and 1 by 3 are 2.5 inch wide. My room is 9ft high by 10ft wide. Thank you.
admin says
Welcome. The boards I used are listed above under “Paneling Supplies” in my post ^. Best of luck with the project!
Brigitte says
I just wanted to clarify step 3. Cut boards and attach them to the wall.
I note you pre-drilled holes, screwed the panelling in and then unscrewed them after they were dry. Was this to secure the panelling adhesive in place with the wall? Why not just leave the screws in place given the holes were already created?
We’re going to work on a panelling piece too and our concern is putting in screws/nails too far so really interested in your technique!
admin says
Correct, it was to secure the adhesive while it dried. We only did the screws/fill because we didn’t want any penetrations in our vapor barrier on an exterior wall. Normally, you’d just nail the boards into studs and be done with it, but since we didn’t want any holes of any kind in our vapor barrier (even a small nail hole), this was just our way of making sure they stayed perfectly in place as they dried. We used short screws and removed them/filled the holes because you can’t leave a surface mounted screw in your paneling and we didn’t want to countersink them (and risk accidentally making a hole in the VB), so removing them and filling the hole was an easy solution. A normal interior wall wouldn’t have these challenges, and also not everyone might care quite so much about holes in the vapor barrier. You could also use a fast drying adhesive if you’re feeling bold lol but it’s a little scary to have so little play so you have to be very very sure about your board placement.
Also it depends on the angle of your boards. For example – I just finished doing a board and batten wall (vertical boards) on an exterior wall in our bedroom and since the boards were vertical they’ll stay in place more easily as they dried so I just used adhesive and 3/4″ nails (1/2″ through the board, 1/4″ into the drywall, never going through the back of the drywall) to secure them and that was fine.
Brigitte says
Thank you heaps! Big fan of your kitty cats too.
LB says
I did this and used 40 degrees
Christy says
Love this look. For this wall and the stairwell landing, a few questions
1. what is the measurement of the guestroom wall?
2. how much space between slats did you leave?
3. For stairwell slat wall- what is the measurements of that wall?
4. how much space is between each slat?
admin says
Thank you 🙂 We don’t list specific dimensions for any of our rooms, but all ceiling heights are listed on our website. The spacing of the guest room wall is just what we felt looked good, honestly I don’t remember off hand. The spacing of the slat wall is explained in that tutorial.