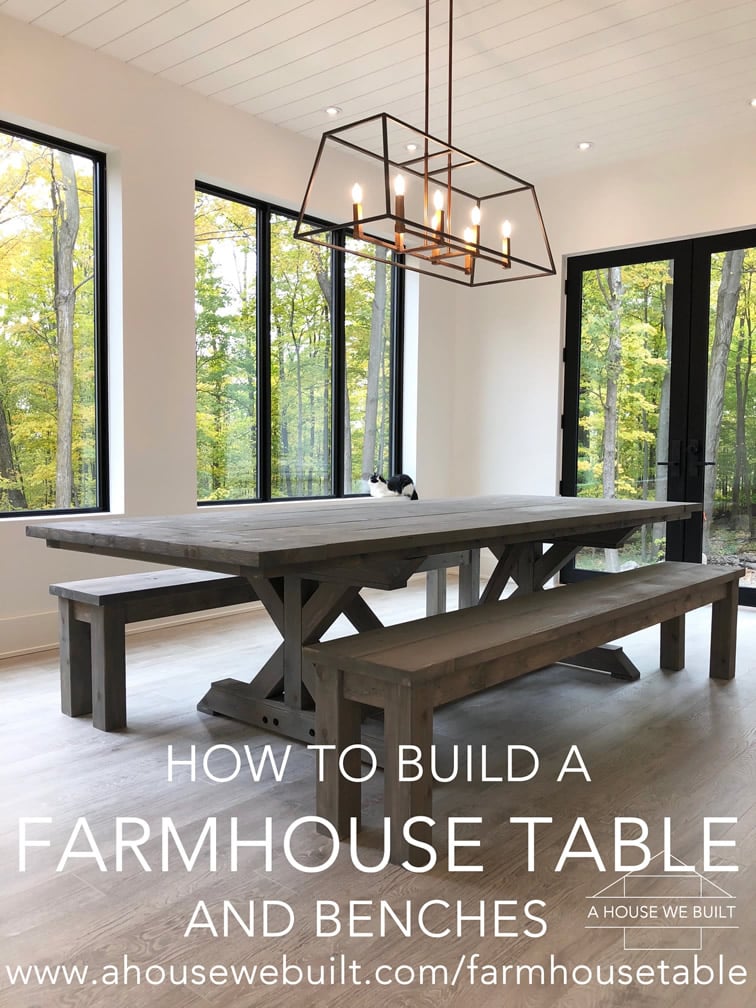
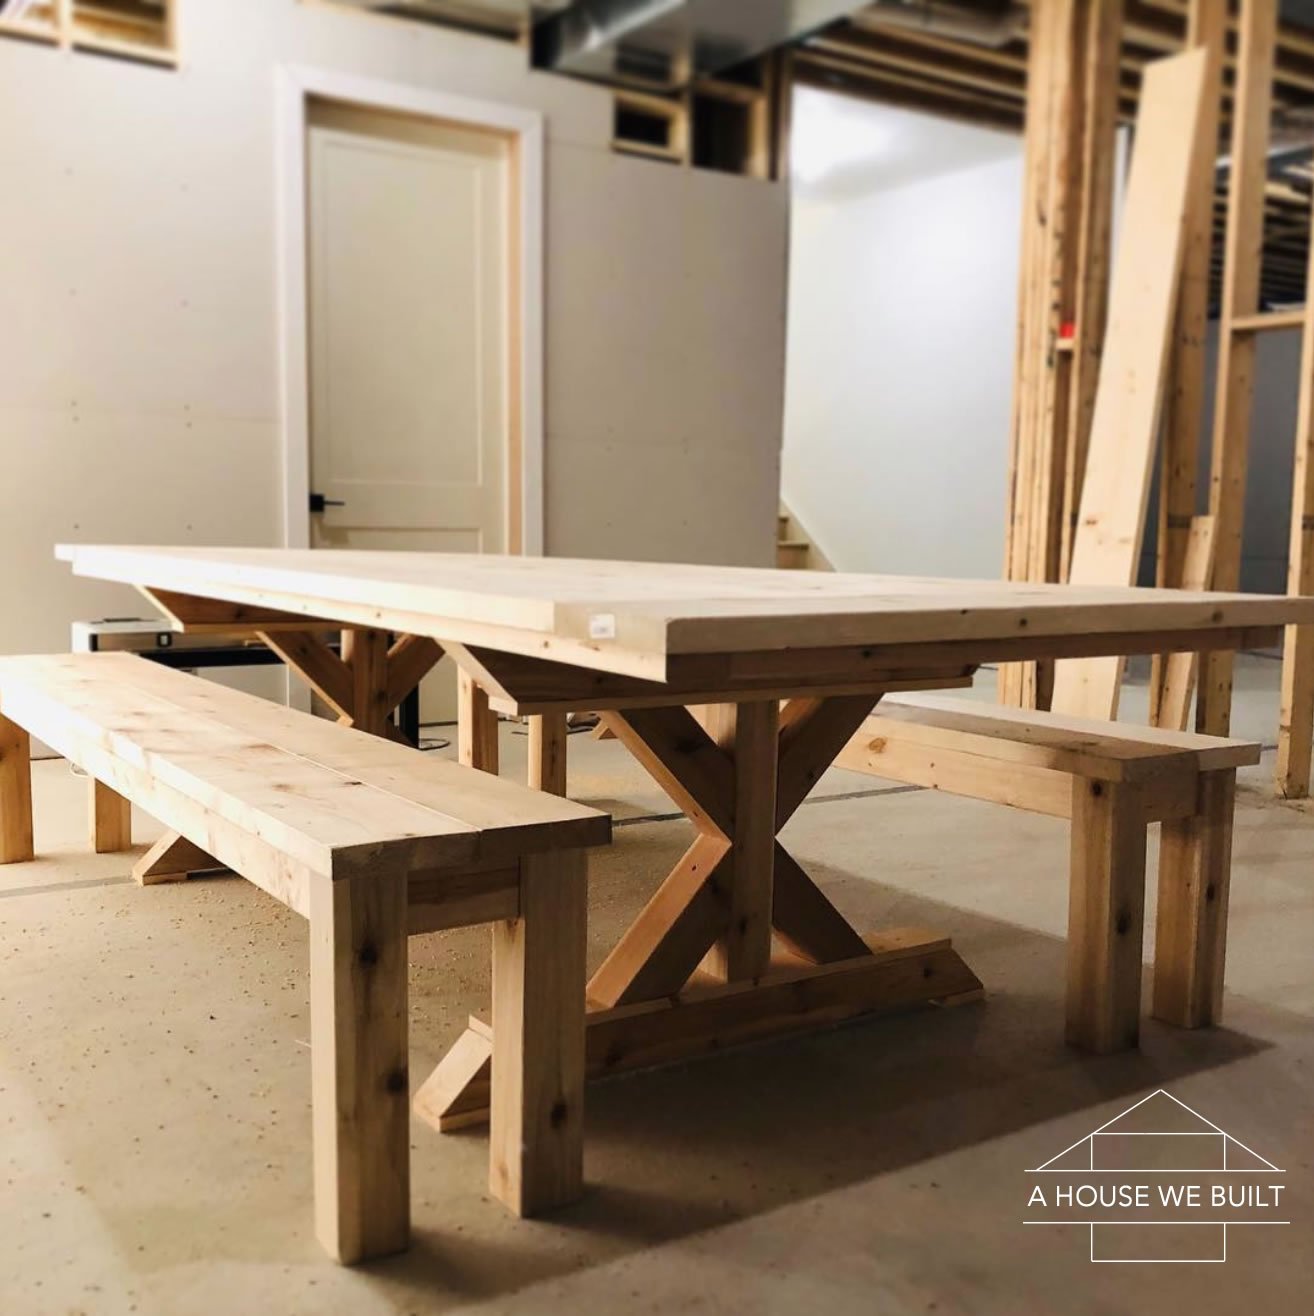
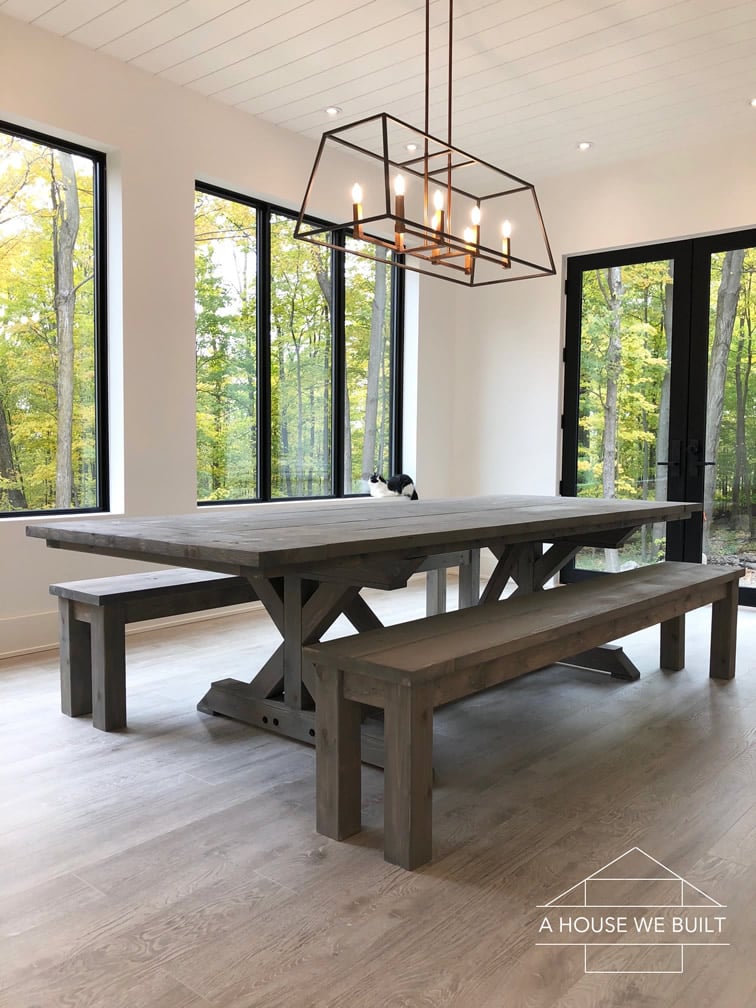
WE BUILT A TABLE!! AND BENCHES!! And we’d never done this before but it kinda turned out awesome so I thought I’d share as much as I could in case you might want to try something like this yourself!!
So we built them out of standard lumber from Home Depot, a couple of non-fancy tools, and plans we drew up ourselves. It took us about a week of building it on-and-off in our spare time. It’s level, strong, and sturdy!! Plus it’s disassemble-able (is that a word??) so we can dismantle it if we need to move it.
Please bear in mind that we’ve never built anything like this before. We’re total amateurs who just really took our time to come up with the best possible design we could with the limited tools we had, so if you’re a master carpenter or something, please don’t judge it too harshly.
Our table is imperfect but we absolutely LOVE IT and fully embrace its imperfections as part of its charm. Because we’re not professional furniture builders, we basically had 2 directions we could take this build: either try to somehow make it absolutely perfect (which was just unreasonable for us given our limited skills and tools) or just embrace any imperfections and do the very best we could — and this was the direction we went. We like to call it RUSTIC!! It’s funny but while we were building, anytime something wasn’t totally perfect and we’d be considering if we were okay with it, we’d mostly just look at each other and shrug and be like “It’s rustic!!!!” and go with it. I mean, we did redo a few things along the way (there’s an entire 4×4 chopped into itty bitty bits in our garage where we failed a bunch of times while learning to do 45 degree cuts on an old saw but hey — we got it in the end! Sure, some of the bolts don’t perrrrrrfectly line up, and some of the joins could be a little straighter BUT like I said it is 100% level, and is strong and sturdy beyond all reason!! And most importantly, we have the memory of building it together and the satisfaction of building something that we’ll use everyday, and we learned a lot!
[For more updates from this room in our house, please visit our our dining room page.]
The original reason we chose to build this table rather than buy one was that that size we wanted was really hard to find anywhere at a reasonable price. The closest we found to what we wanted was at Restoration Hardware, but it wasn’t “exactly” what we wanted and we also didn’t feel like spending ten thousand dollars on a table set and I’ve wanted to try our hand at building one ourselves forever so we ended up finding a few different tables we liked the look of from different places and then we spent a couple hours figuring out a plan for how to build it, as well as how to reinforce it from underneath — actually this was super important because the biggest thing we heard about building out of regular lumber is that it can warp and crack over time so we really took a lot of precautions to try and avoid that.
All in all I’m going to guess that our total build cost (lumber & tools) was somewhere under $500.
TOOL SUPPLY LIST FOR BUILDING
- Kreg Jig: Amazon | Home Depot (THIS TOOL WAS A GAME CHANGER!!! But seriously though, it saved us SO MUCH TIME. I’ve heard people raving about these and wasn’t too sure if they were worth the hype but they TOTALLY ARE. And no, this post isn’t sponsored by them lol. I’m just truly telling you that you need one of these if you’re going to build this table and don’t have a bajillion other fancy tools or don’t know how to do dowels or mortis and tenon joins etc. This is the ultimate cheat tool. It basically allows you to drill “pocket holes” which are perfectly angled holes on your boards which allows you to connect them together without overly visible joins. Seriously, I wouldn’t even consider attempting to do this build without it. This Kreg Jig Master System is the one we bought, but honestly, we didn’t use the clamp that our kit came with as much so if you want to save some money, you could totally just buy this basic Kreg Jig Pocket Hole System instead.)
- 150 x 2 1/2″ pocket hole screws – approx (for Kreg Jig holes): Amazon
- 50 x 2″ wood screws
- 100 x 3 1/2″ wood screws
- 25 x 4″ No.2 10×4″ construction screws
- 8 x L-brackets, 6″ long both directions
- 24 x 5″ bolts
- 24 x nuts to fit those bolts
- 24 washers to fit those bolts/nuts
- Cordless power drill: Amazon | Home Depot
- Cordless impact driver: Amazon | Home Depot
- Wood glue
- Miter saw: Amazon | Home Depot (we just used my dad’s miter saw)
- Carpenter’s square: Amazon | Home Depot
- Level
- Measuring tape
- Socket wrench
SUPPLY LIST FOR STAINING/FINISHING
- Pre-stain conditioner: Amazon | Home Depot
- Gray stain (one coat): Amazon | Home Depot
- Matte top coat: Amazon | Home Depot
- Bunch of old rags
- Gloves
- 150 grit sandpaper (to do it properly, you’d start with a 150 then maybe do a 320 or something softer over it, but I’m lazy and just did the 150. Don’t judge.)
- Patience & snacks
About the dimensions — we’re a family of tall people so we built this table and bench set a bit higher than normal heights. If you want them to be lower, just shorten the respective leg pieces accordingly.
TABLE DIMENSIONS: 115″ long x 46 1/4″ wide x 30 1/2″ high
BENCH DIMENSIONS: 96″ long x 14 1/2″ wide x 19 3/4″ high
IMPORTANT TIP WHEN BUYING LUMBER FROM THE HARDWARE STORE:
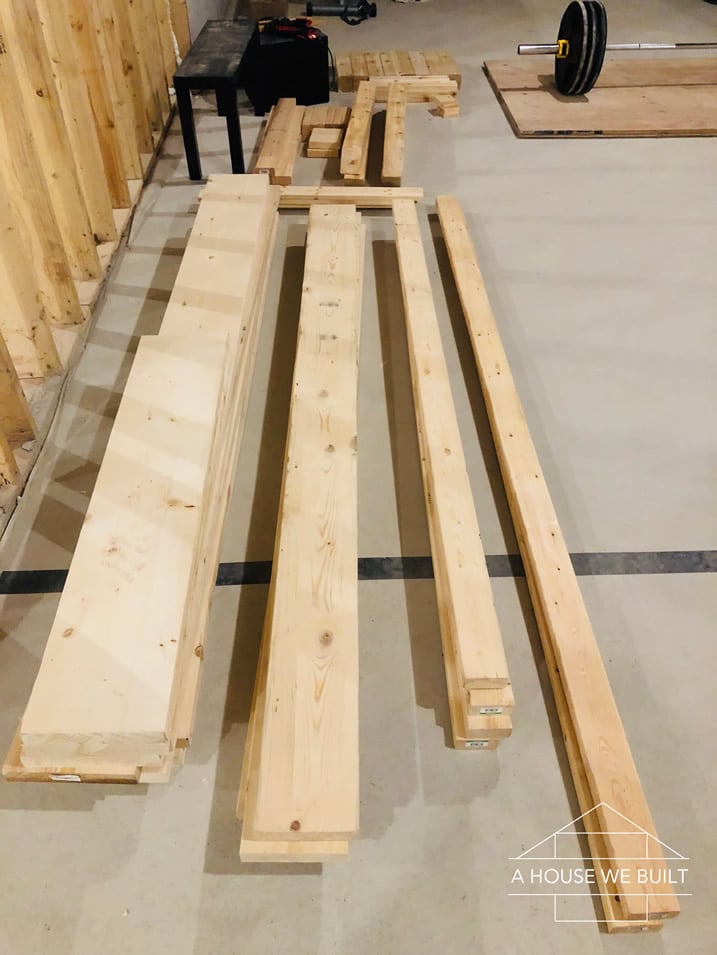
You have to find the straightest boards possible. We spent over 2 hours in the store sifting through ALL their lumber. The boards need to be straight and not warped and have no cracks if possible. Once you’ve found all your pieces, lay all the “top boards” (table top and bench top) on the floor together BEFORE you buy them and make sure that they fit together well. Sometimes two straight-ish boards won’t line up together well so you HAVE to make sure they do otherwise your table/benches will be crooked. This is the ONLY way you can use standard lumber so you absolutely can’t grab the first pieces on the shelf.
LUMBER SUPPLY LIST
- 7 x 2x10x8 (for table top)
- 4 x 2x8x8 (for bench tops)
- 2 x 2x4x10 (for under frame)
- 9 x 2x4x8 (for more frames and cross brace)
- 7 x 4x4x8 (for bench and table legs, I think we only used 6 but we messed up a few times so we got an extra one just in case and were really glad we did)
- 2 x 1x4x8
CUT LIST
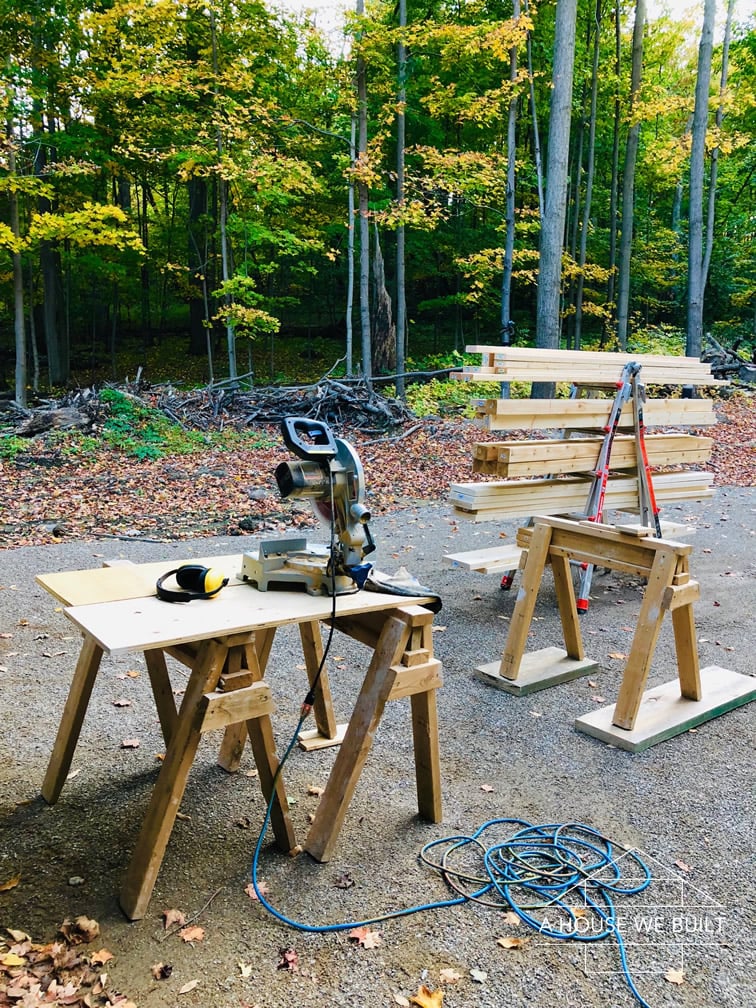
We made as many cuts as we could all at once at the beginning of our build so that we didn’t have to keep running back and forth to the saw. We did have to make more cuts along the way especially ones that had to be measured ‘on site’ but we did as many as possible up front.
- 2 pieces of 2x10x8 cut to 46.5″
- 2 pieces of 2x4x10 cut to 111″
- 5 pieces of 2x4x8 cut to 36.5″
- 4 pieces of 2x4x8 cut to 87″
- 6 pieces of 2x4x8 cut to 9″
- 4 pieces of 2x4x8 cut to 6″
- 6 pieces of 2x4x8 cut to 10″
- 8 pieces of 4x4x8 cut to 18 1/4″
- 2 pieces of 4x4x8 cut to 18″
- 4 pieces of 4x4x8 cut to 43 1/2″ with 45 degree back cuts
- 4 pieces of 1x4x8 cut to the length of the small side of the 45 degree cuts in the 4x4s above this
- 4 pieces of 1x4x8 cut to 4″
Ok I’m going to try to explain how to build everything now – step by step. Bear with me because I’ve never done this before…
STAGE 1: PLANNING & GETTING MATERIALS
There’s a surprising amount of variety in table designs – not something we ever considered until we sat down to make one. How high should it be? How about the chairs? What’s the best width and length?
The first thing we did was find an adjustable office chair and fiddle with the height until we found a good middle ground that worked for both of us. This became the height measurement for our benches. Once we had that, we used a flat piece of wood to simulate a tabletop and figured out the perfect tabletop height for us. This will vary from person to person!
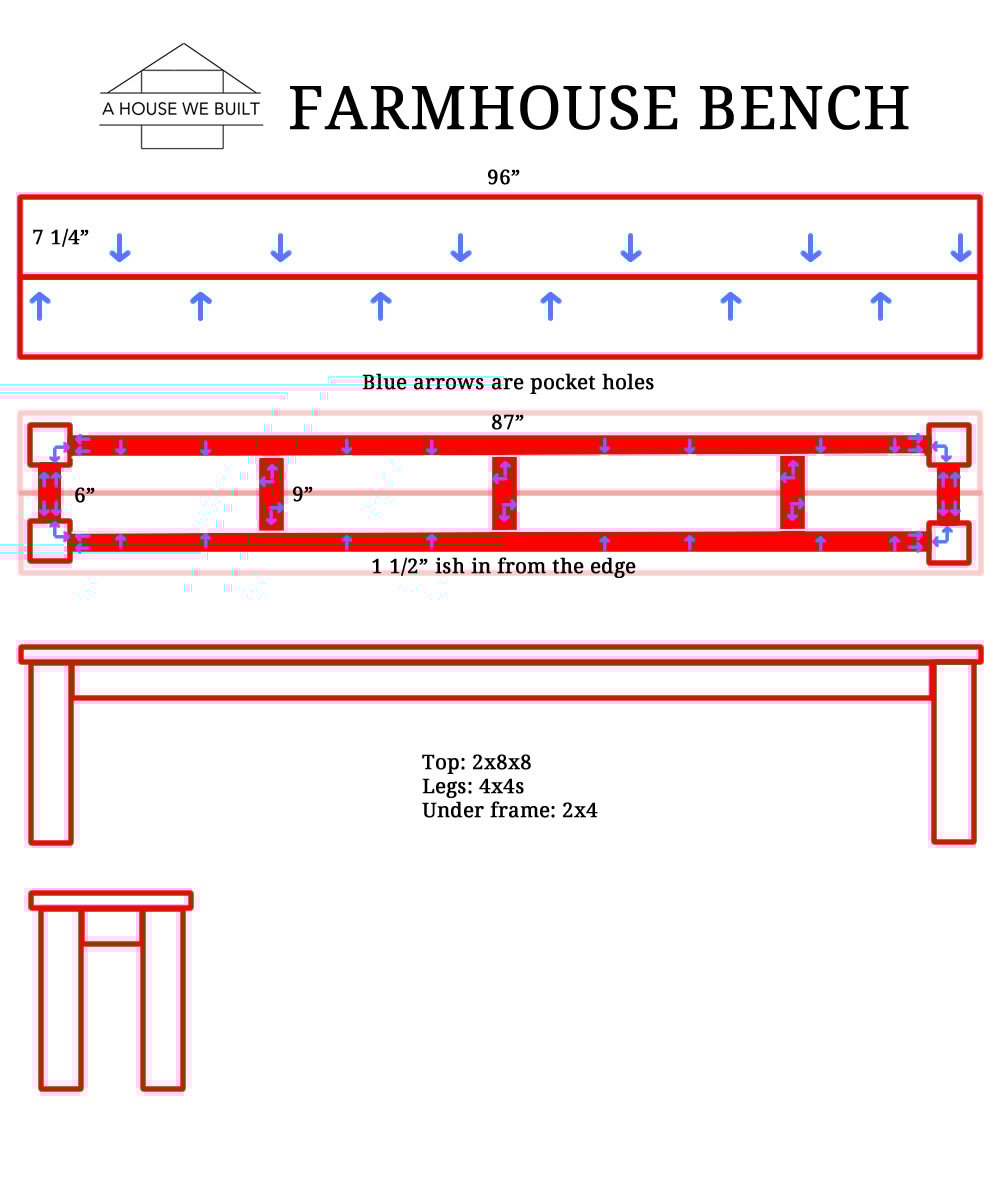
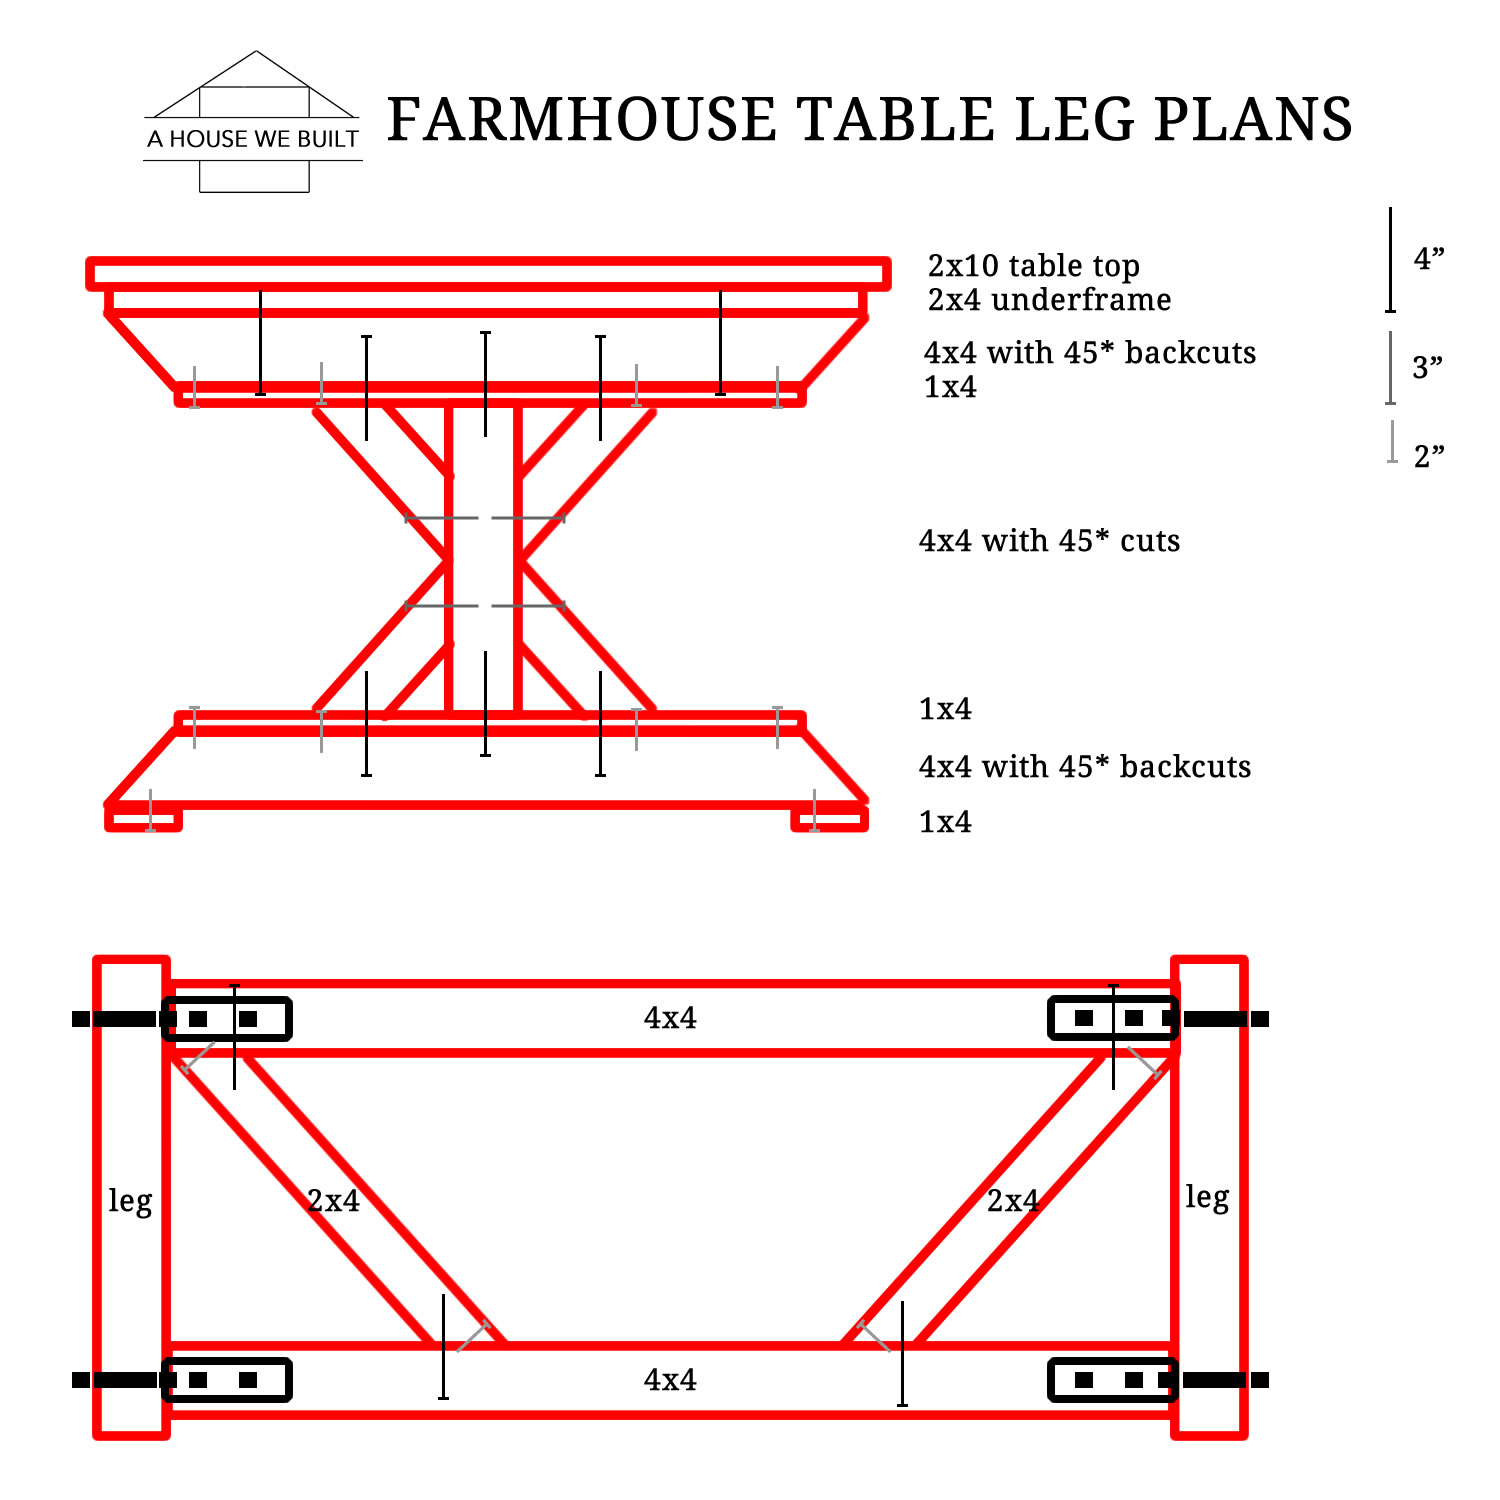
With our key measurements decided, we drew out our plans. This REALLY helps make sure you haven’t forgotten anything and keep track of big each piece should be. We also drew the table from the top-down AND the side – this is incredibly helpful as a reference while buying materials and assembling.
We’ll share the plans we came up with below.
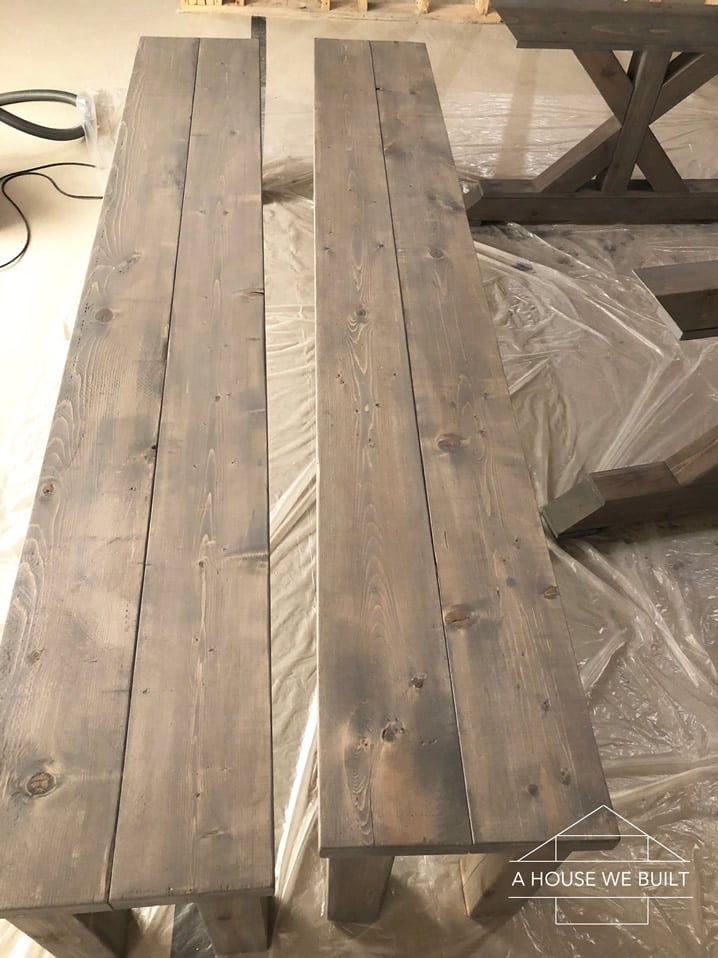
STAGE 2: BUILDING THE BENCHES
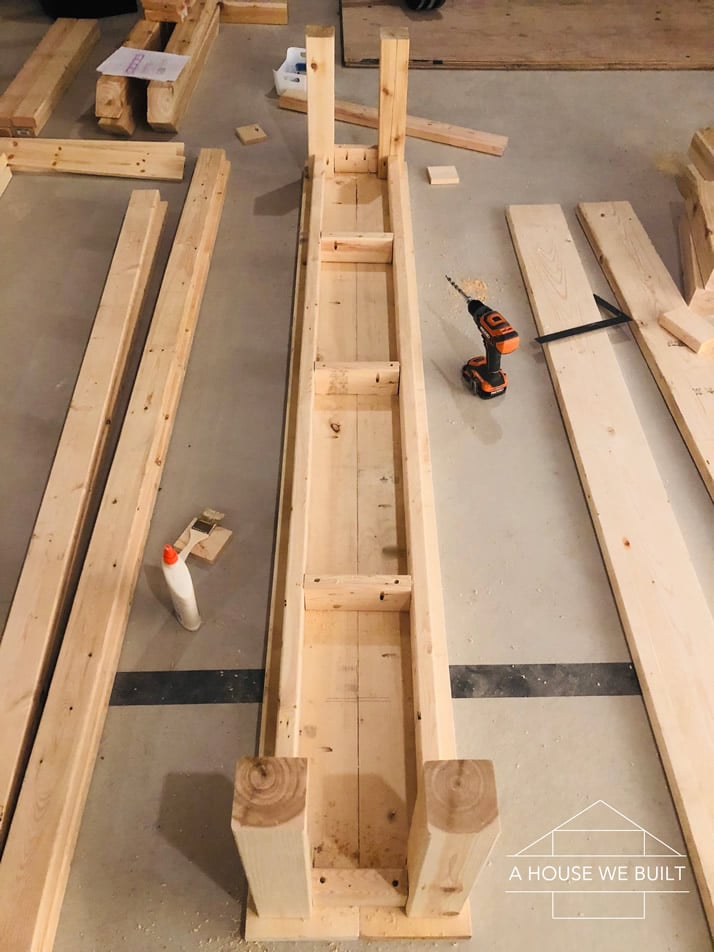
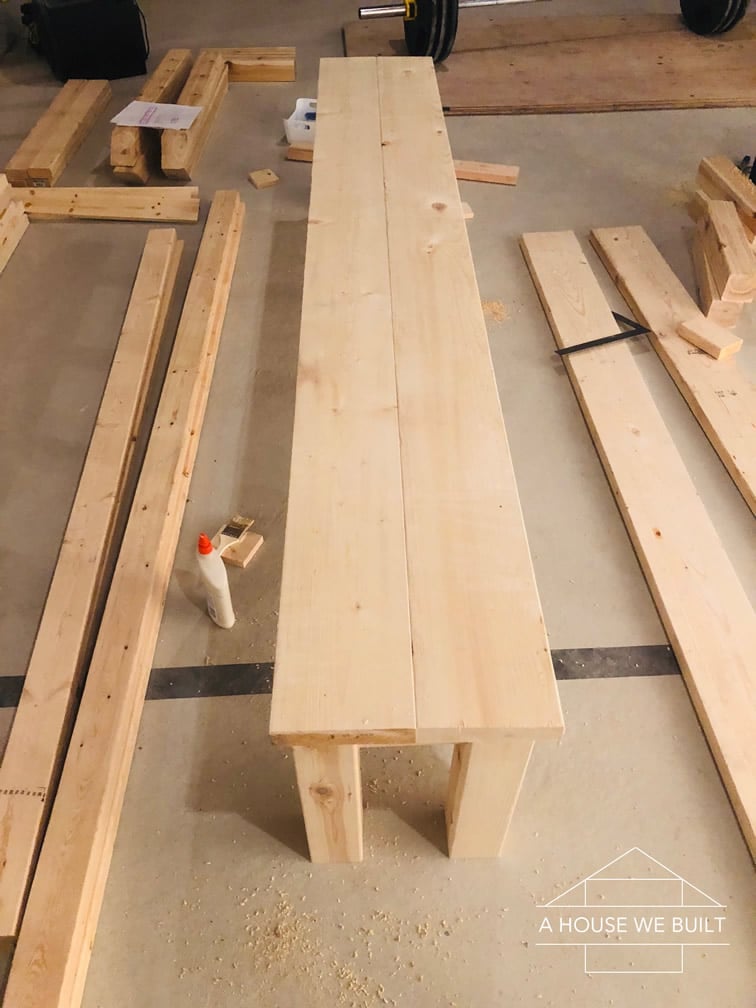
We figured that the benches were like simple, miniature tables, so we decided to start with them as a way to get our process figured out. It was also VERY nice to be able to use the benches as work surfaces during the rest of the process!
We started with the benchtop: just two 2x8s cut to the same length and joined with Kreg Jig screws and some wood glue between the boards. We did find it easiest to do this on the ground and stood on the boards while we screwed them together to keep everything flat and even.
With the benchtop built and laying on the ground, we attached the bench legs next. We put the legs in place and re-measured everything to make sure our cuts and math were correct, then marked the placement of the legs with pencil. The legs were 4×4 cedar, attached with Kreg Jig screws on the two inside faces where they wouldn’t show. We then attached the 2×4 pieces between the legs with Kreg Jig screws into the legs and down into the underside of the benchtop. These 2×4 pieces are important for the bench’s strength, as they anchor the legs against each other, as well as to the benchtop.
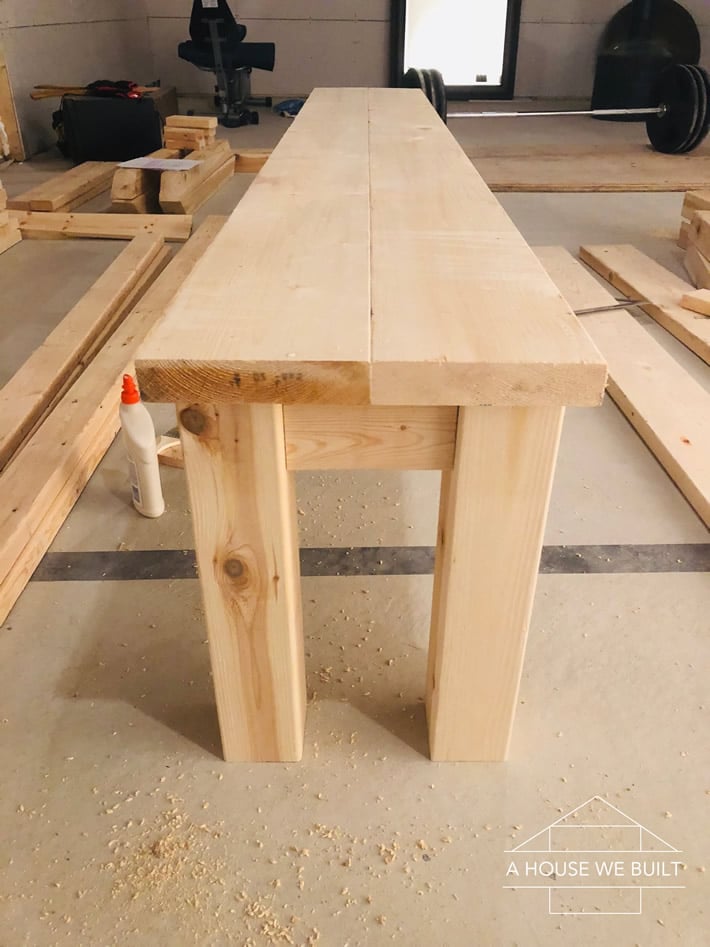
We completed the first bench, and then did the second – we found this was a good way to do things in general, as we’d figure out a good work process the first time and the second one went much faster.
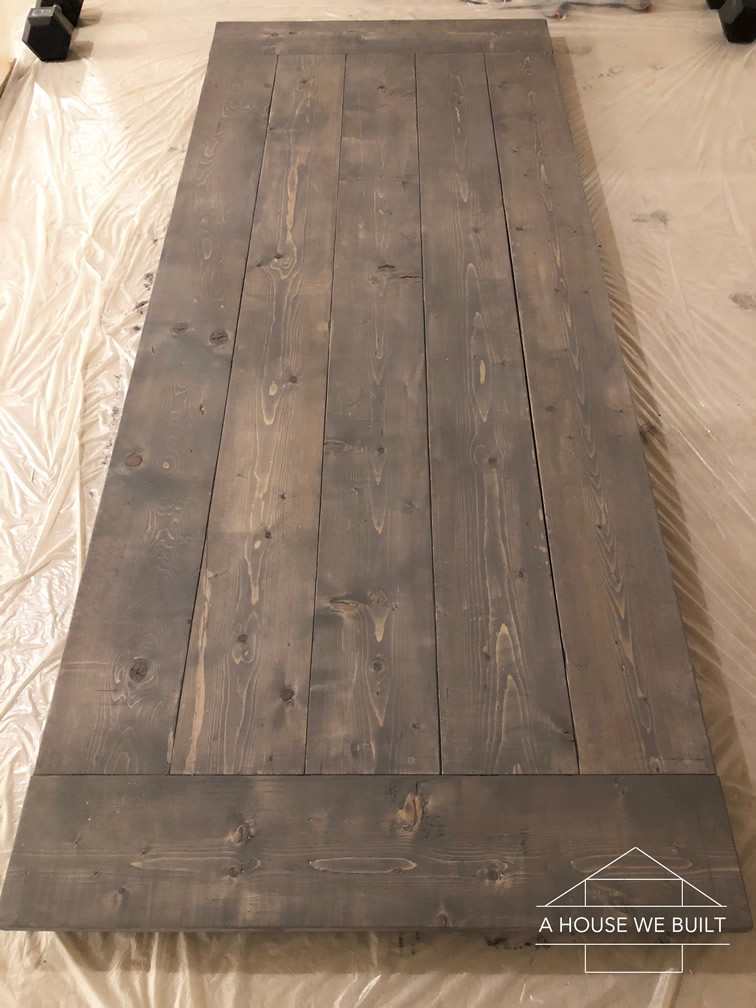
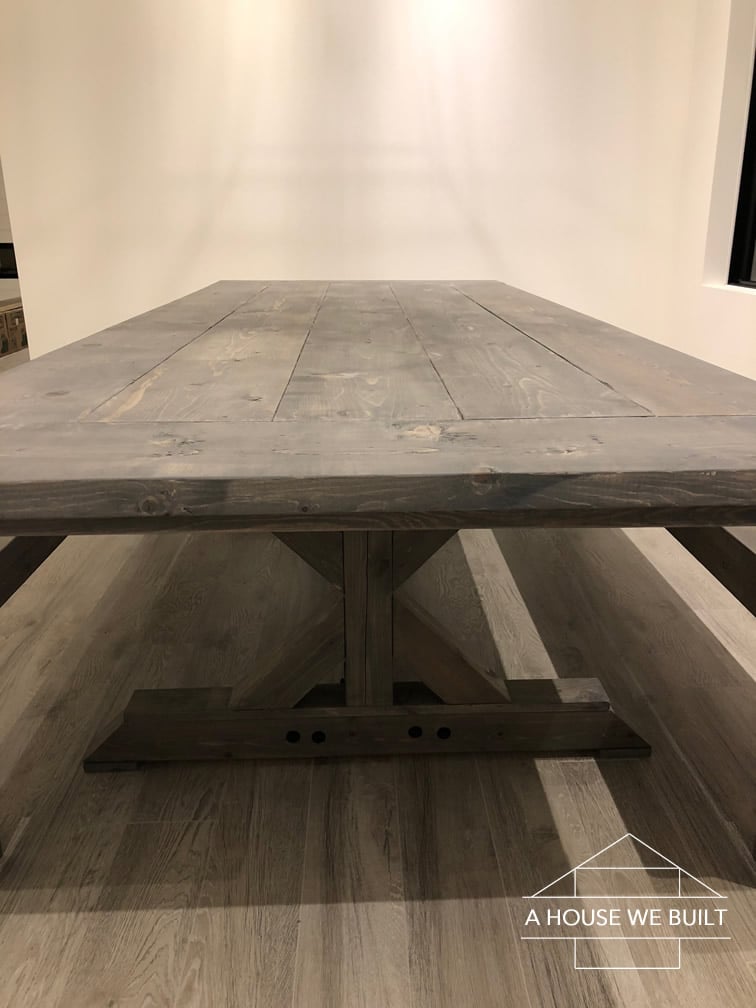
STAGE 3: BUILDING THE TABLE TOP
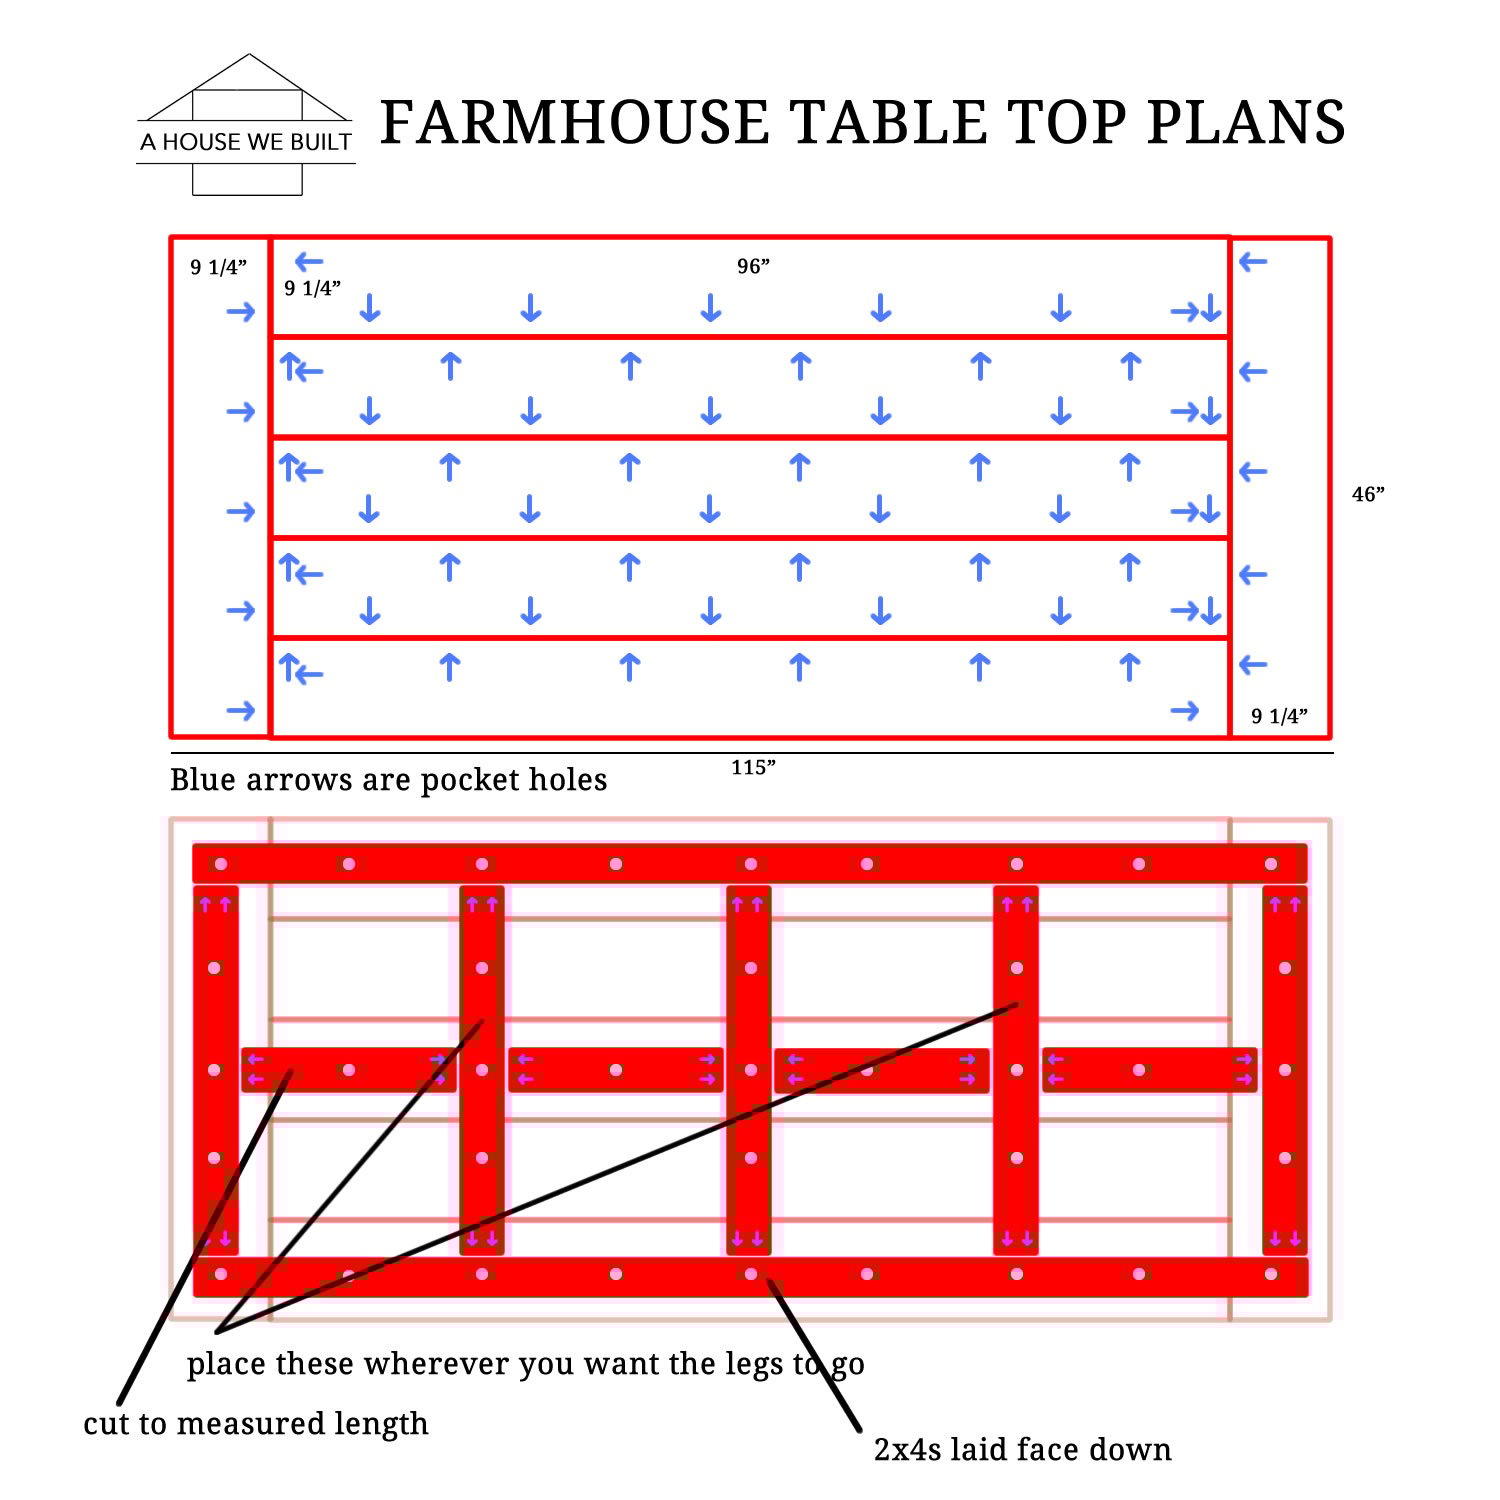
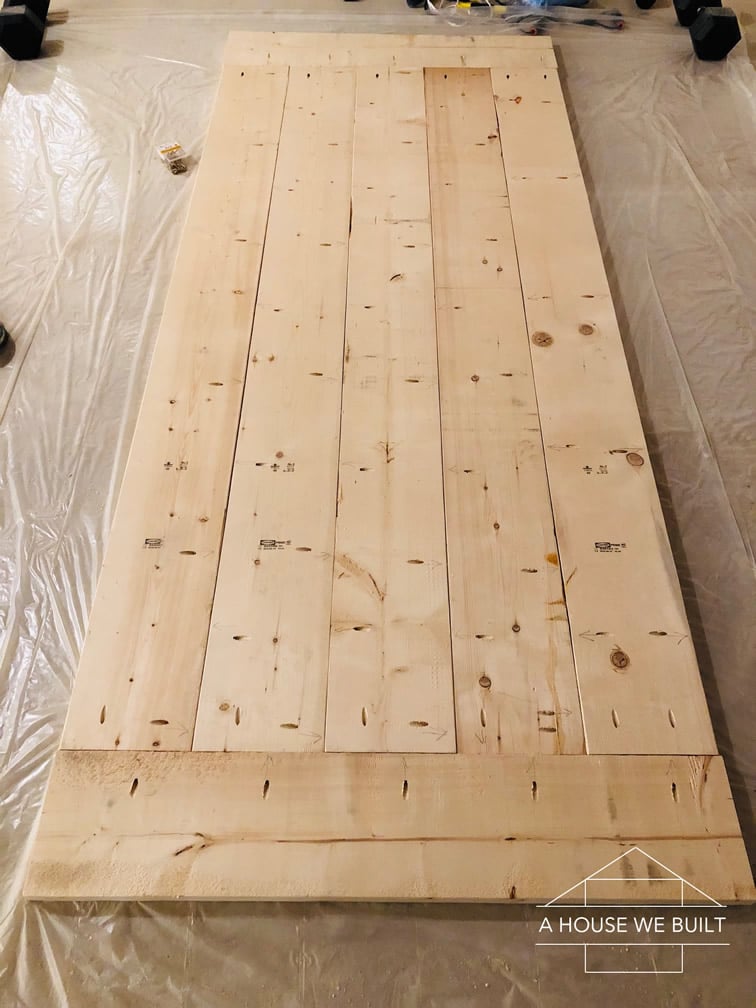
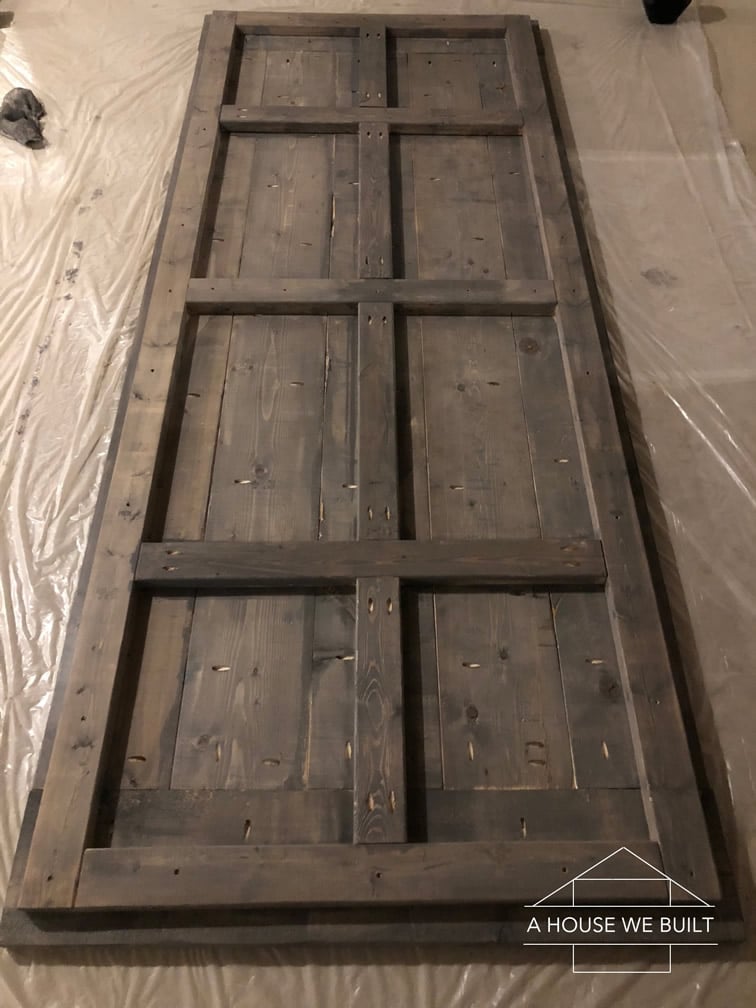
Having built the benchtops, we were well-prepared for the table-top. We spent a lot of time laying out the boards in different orders and orientations to find the best look and most even fit. When we had the order figured out, we numbered each board, and marked all the Kreg Jig screw spots, placing the screws so that there was one every six inches, alternating sides.
Make sure you do your pocket holes on the UNDERSIDE of the table top!
At this point we also placed the breadboards, and trimmed them so that everything fit snugly.
With everything fitted and labled, we drilled all of the Kreg Jig holes, then started assembling. We started with the middle board, and then worked outwards, alternating sides. Each board would get a smear of glue, we would stand on the boards to get them straight, and then screwed the board into its neighbor with a few screws in the center of the board. We did the whole tabletop that way, and attached the breadboards last. This way main planks could be fitted to the breadboards much more tightly.
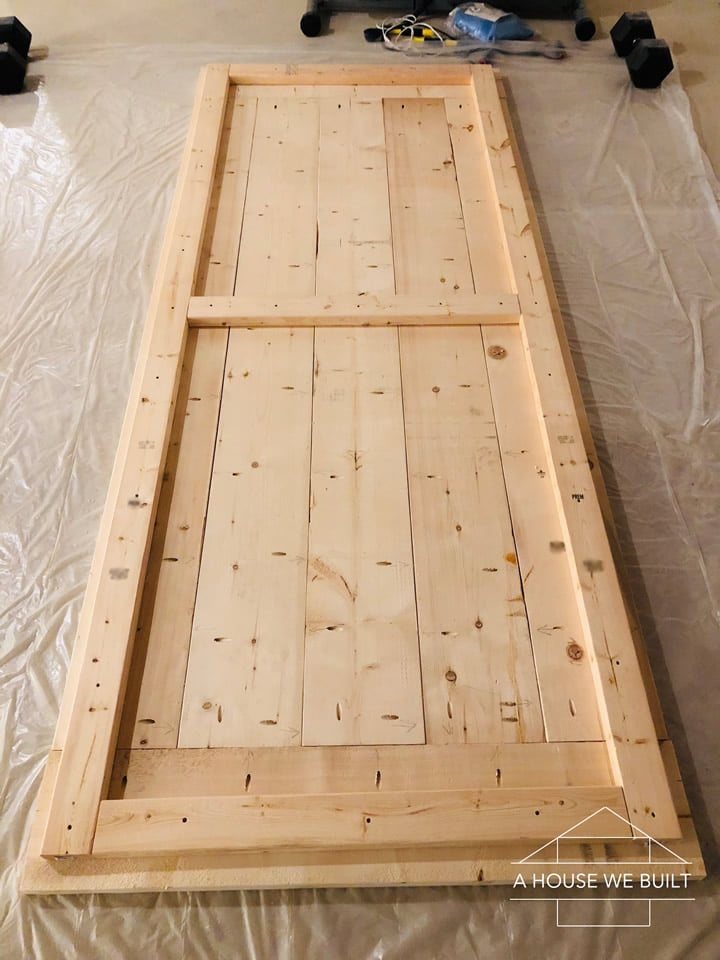
The next thing we did was assemble the tabletop’s 2×4 underframe. This was done separately, again on a level floor, and again using glue and Kreg Jig screws. Two long 2x4x10s cut to 111″ pieces formed the sides, designed to support full length of the tabletop from breadboard to breadboard. The cross pieces between the 2x4x10s link the tabletop planks together, and two of them are placed exactly where the two base crosspieces will go. The pieces along the centerline give the base centerpiece a place to rest on. We laid everything out beforehand and measured for squareness and levelness, as well as measurement accuracy. Once assembled, we laid the underframe on underside of the main tabletop and screwed it into the underside of the tabletop.
The underframe is super-important as it gives the tabletop a ton of structural strength, gives a secure place to attach the base, and prevents the long planks from warping.
With the floor as a level surface and all the screw holes down beforehand, assembly went pretty quickly. We wiped away excess glue, but left the tabletop on the floor overnight while the glue dried.
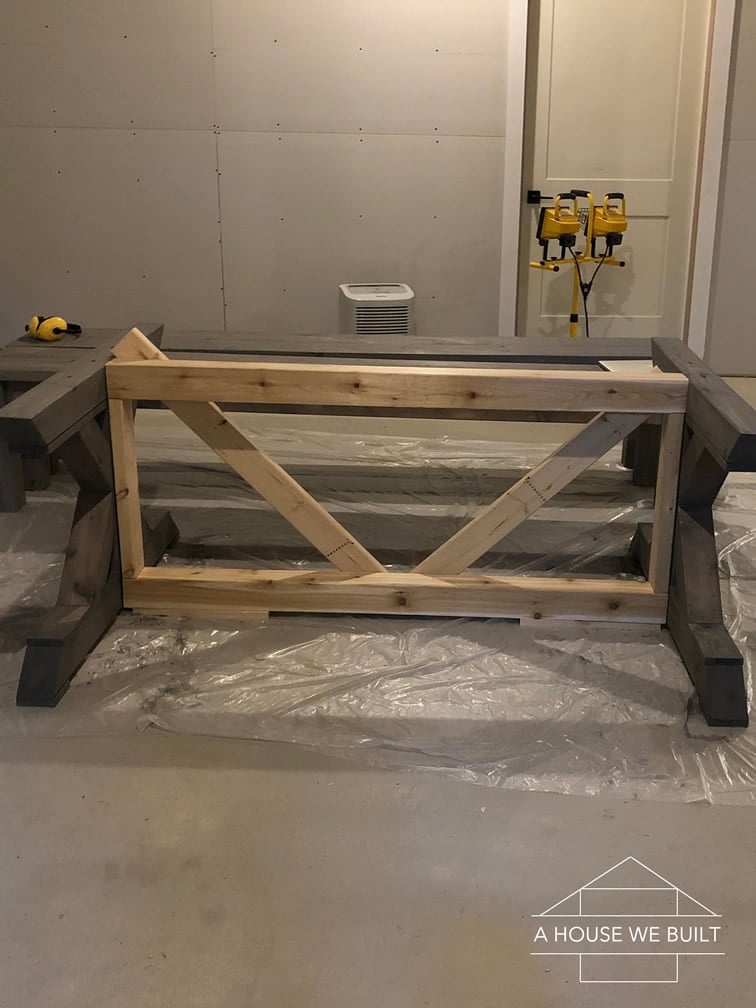
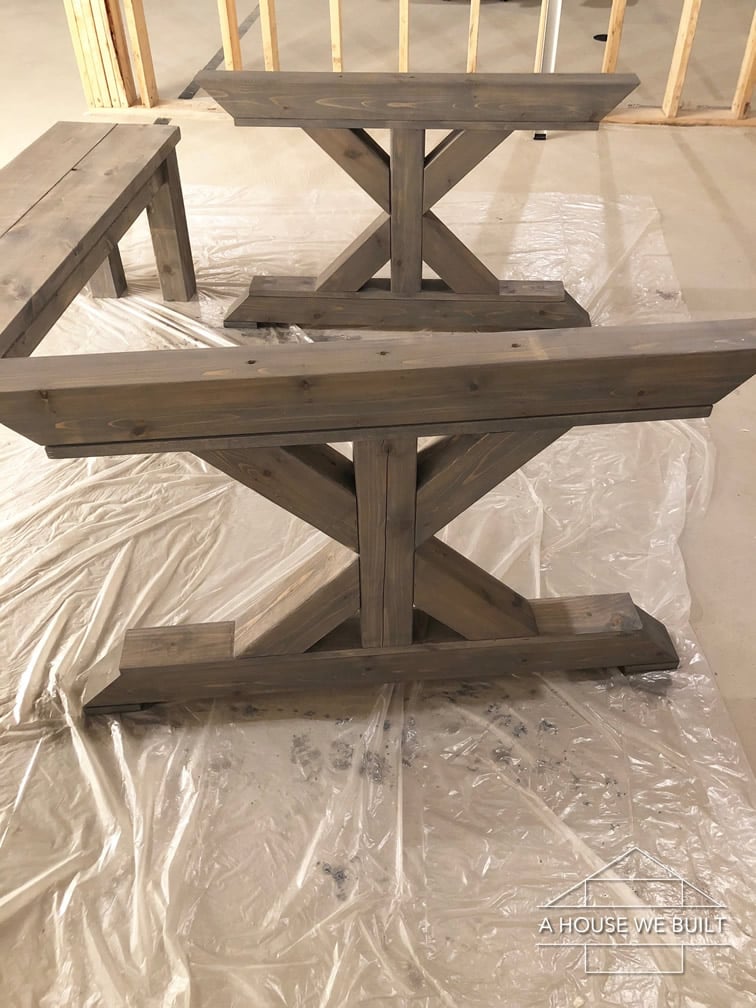
STAGE 4: BUILDING THE BASE CROSSPIECES

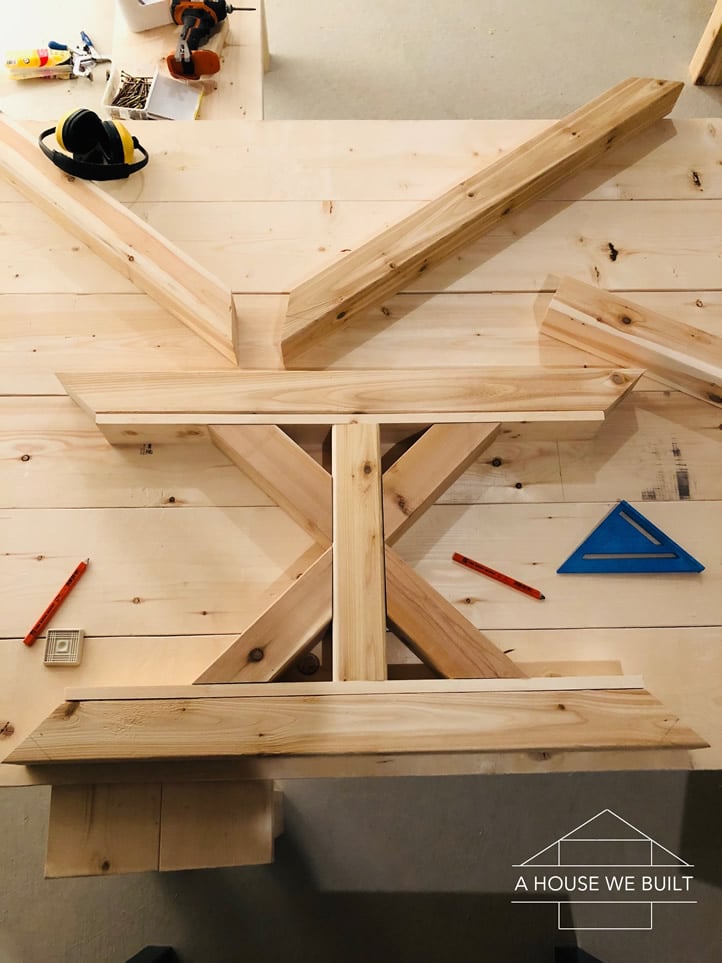
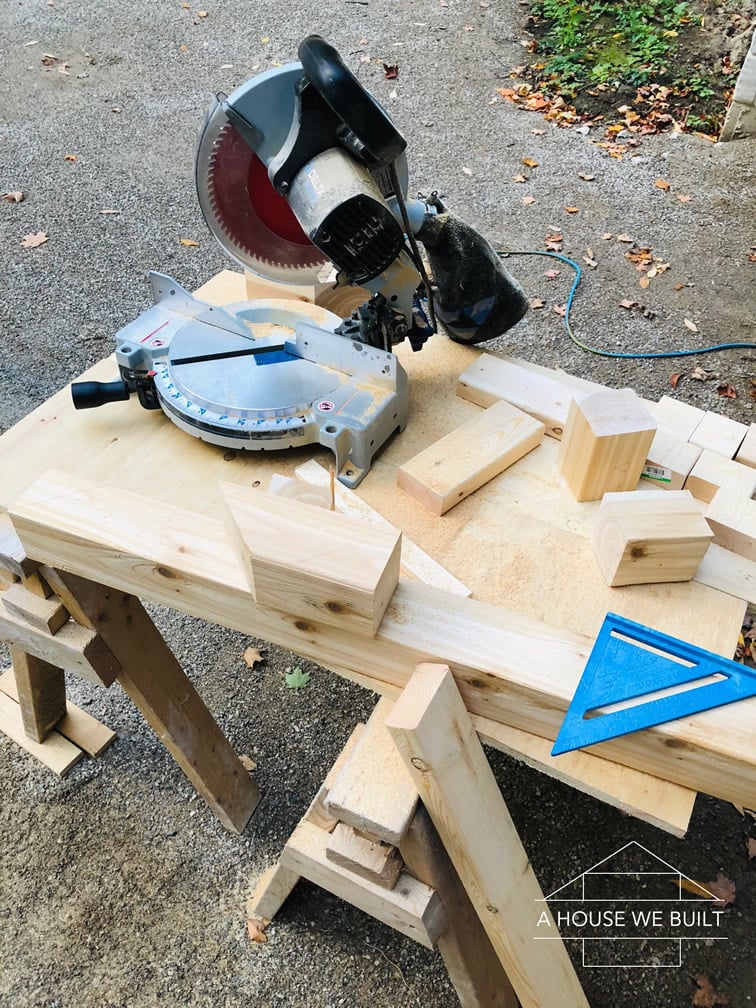
The base crosspieces were probably the most complicated part of the whole build process. It was difficult to cut the 4x4s at a precise angle with our old saw, and everything needed to fit together quite snugly as these were a very visible part of the table. The top left pic shows how we determined the size of the 4×4 X-pieces.
We built the horizontal tops and bottoms of the crosspieces first, gluing and screwing in the pine planks to the cedar posts first, and then attaching the vertical 4×4 posts from the top and bottom using more glue and deeply-sunk 4″ screws. With that done, we fit in the 4 diagonal pieces of 4×4. These were glued and screwed directly into the center post through their face (we later covered the holes with wood filler but that’s optional), and attached them to the top and bottom pieces using glue and more deep-sunk 4″ screws from the tops and bottoms.
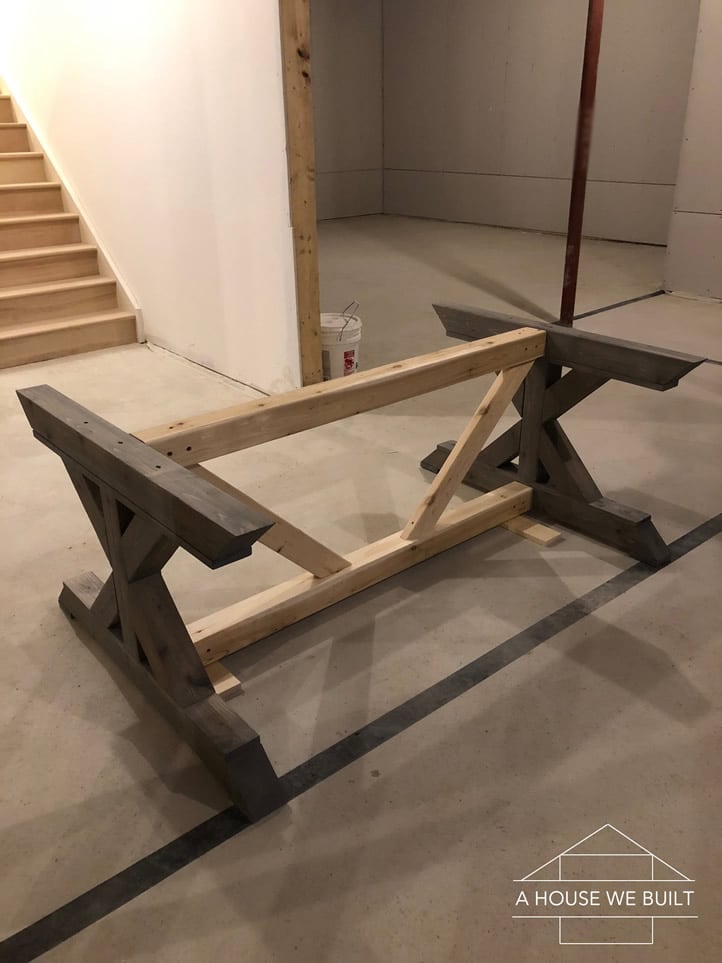
Then just for fun, we put the pieces we had together — just propped up — to see what they’d look like and to verify how far apart we wanted the table legs to be.
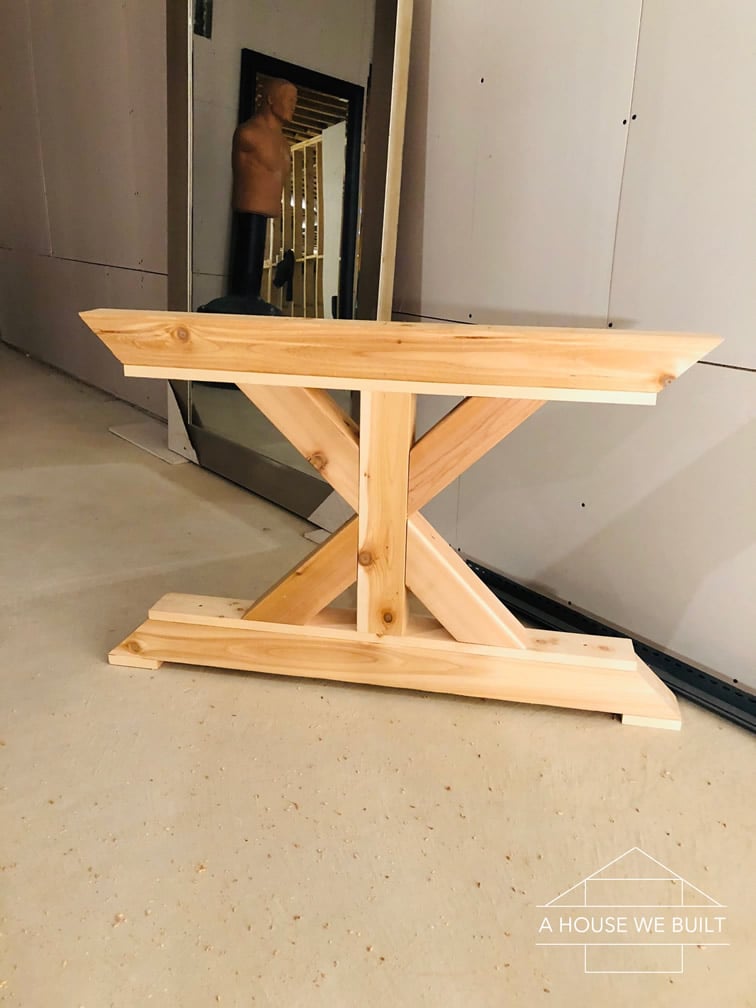
STAGE 5: BUILDING THE BASE CENTERPIECE
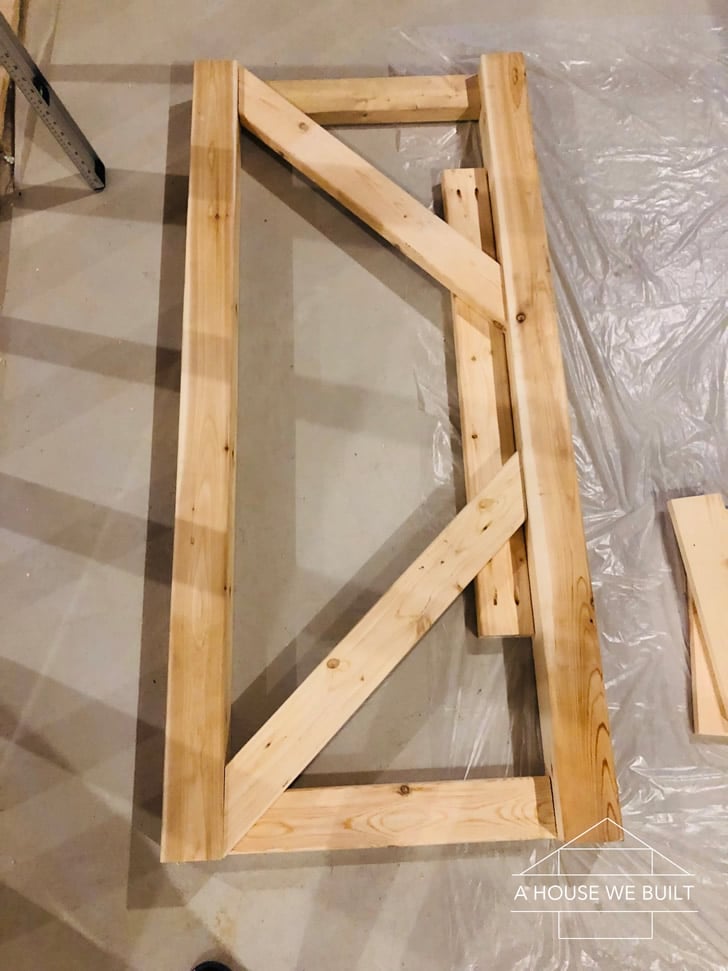
The base centerpiece’s top and bottom members were literally just straight-cut pieces of 4×4 cedar, and angled members were 2x4s cut at 45 degree angles on both ends and they go basically where they fit. We attached them to the center of the 4x4s with screws as shown in the plans.
We glued the vertical members in place and then screwed them first from the face down/up into the 4x4s, and then from the top and bottom through the 4x4s using deep-sunk 4″ screws.
STAGE 6: SANDING, STAINING, FINISHING
You’ll notice these pictures don’t quite line up with the timeline of the “Stages” and that’s because we got a head-start on sanding and staining after building the benches, table top, and legs, but before the centerpiece. We then stained the centerpiece right after we built it.
But basically, to begin we sanded absolutely everything down with 150 grit sandpaper. We used an old electric sander for just a few places where there was writing stamped into the wood so that was just an easier way to get it off but not necessary — you could totally do that by hand too.
We then conditioned it with this pre-stain conditioner (Amazon) and allowed it to dry for about 2 hours. Then using old (but clean) rags, we stained it with Classic Gray (Amazon) and let the stain sit for about 10 mins before wiping off all the excess, then allowing everything to dry overnight. Tip: use an old paintbrush to get the stain into hard-to-reach corners.
Finally, we top coated it with this Amazon totally matte product with no sheen.
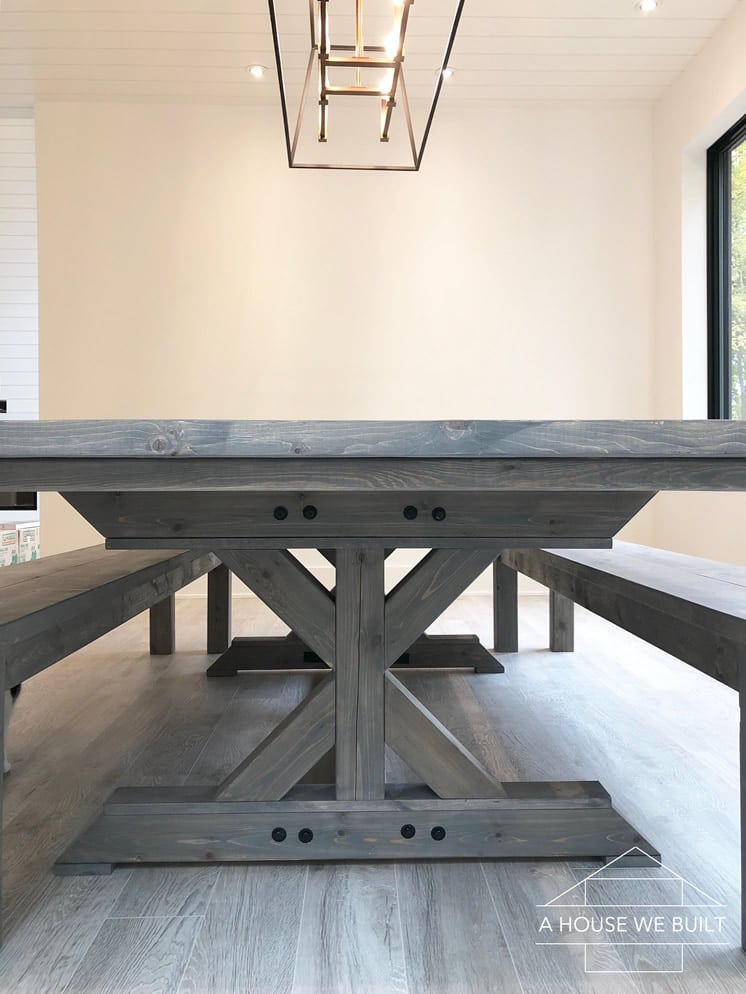
STAGE 7: BUILDING THE BASE BRACKETS
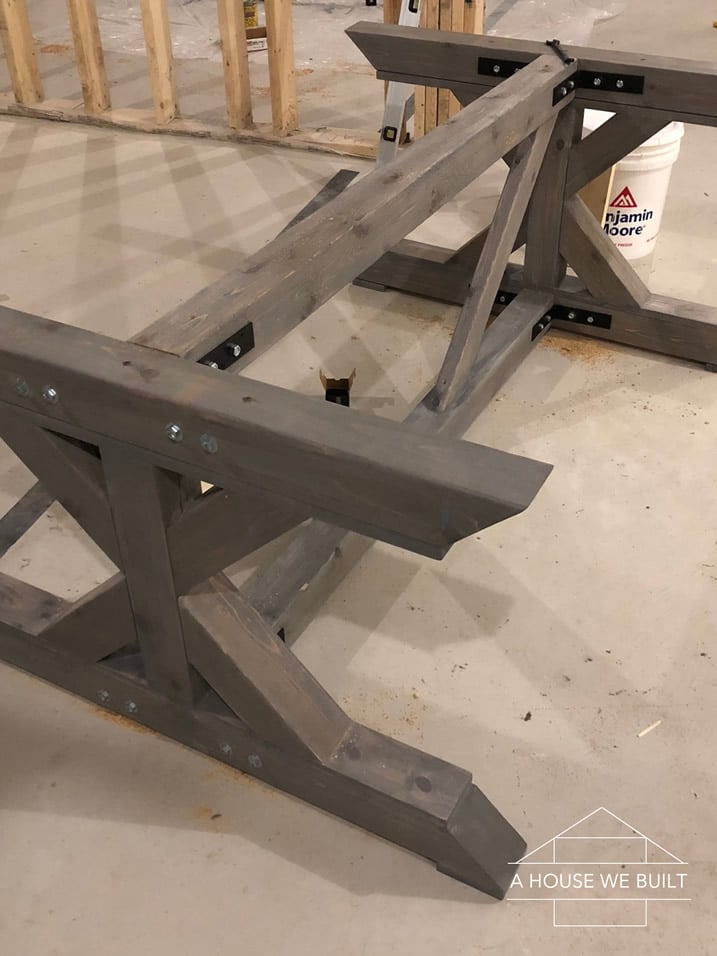
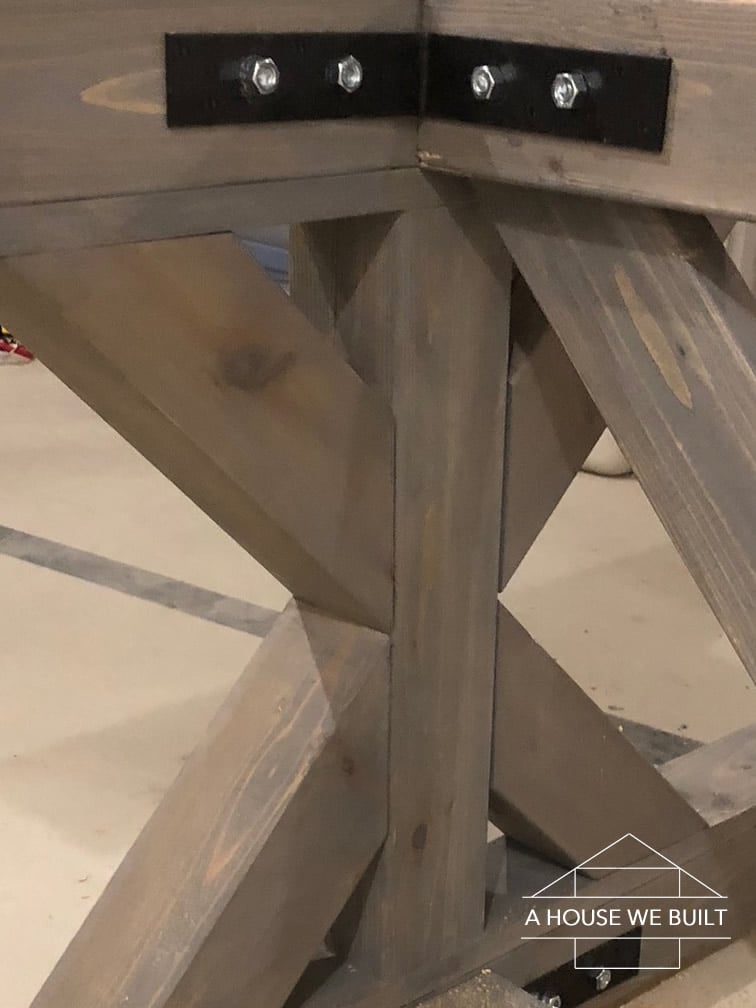
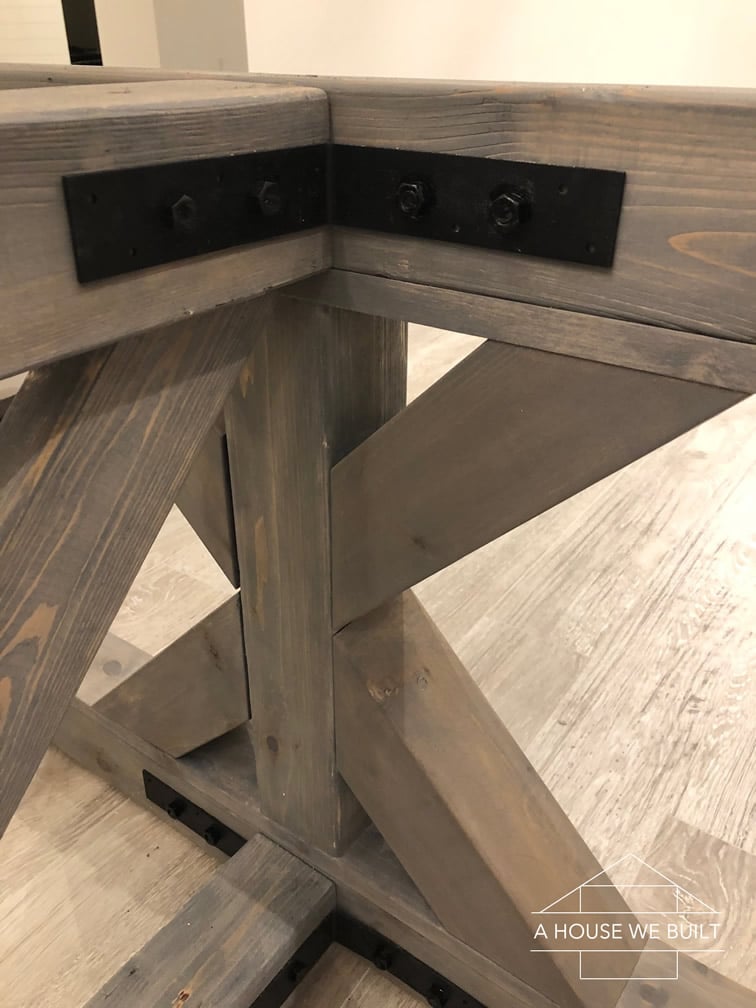
We decided to use bolts and structural steel brackets for connecting the crosspieces to the centerpiece, since this is a pretty heavy table and the “side-to-side” wiggle is the one weak point in the structure. Just screwing probably wouldn’t be enough in the long run, since screws don’t do well with wiggle strain.
We first painted the bolts and brackets with spray-on matte black metal paint (optional because if you like the metal look then this is not necessary). Once those dried, we placed the brackets on the base centerpiece first, and marked the holes on both sides. We drilled the holes through, making sure that the holes came out at the right place on both sides of the 4x4s, and then bolted them on. With metal bracket on both sides, we only ended up using washers on the outside sides.
With the centerpiece’s brackets attached, we then stood up the crosspieces and centerpiece, made sure everything was square, level, and snug, then marked where the bracket holes fell on the crosspieces’ horizontal members. We then took everything down and drilled the holes we’d marked in the crosspieces.
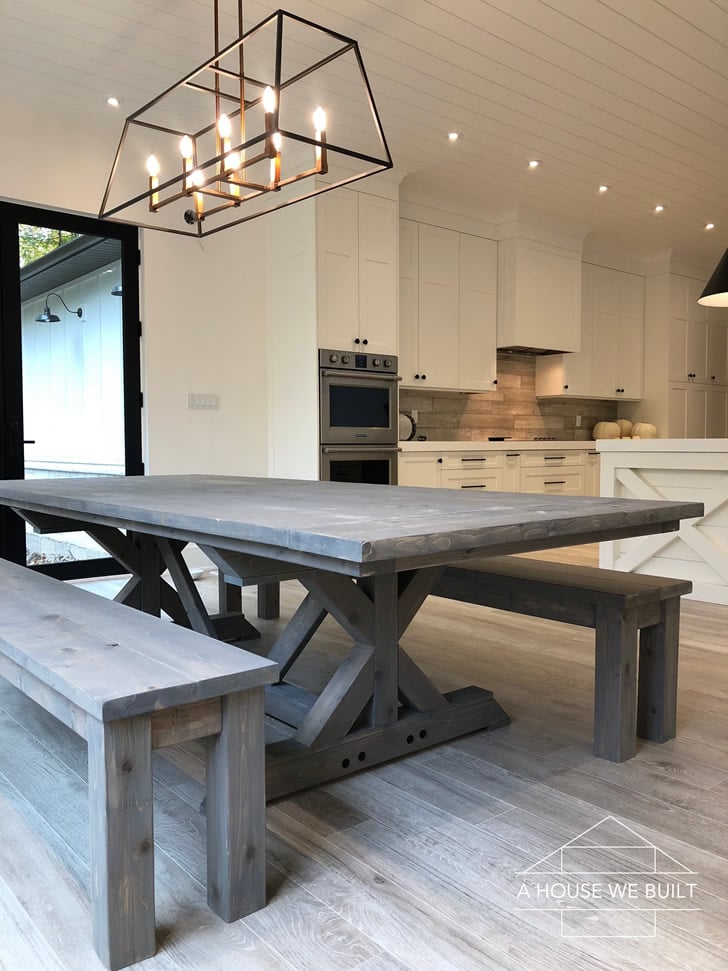
STAGE 8: TABLE ASSEMBLY
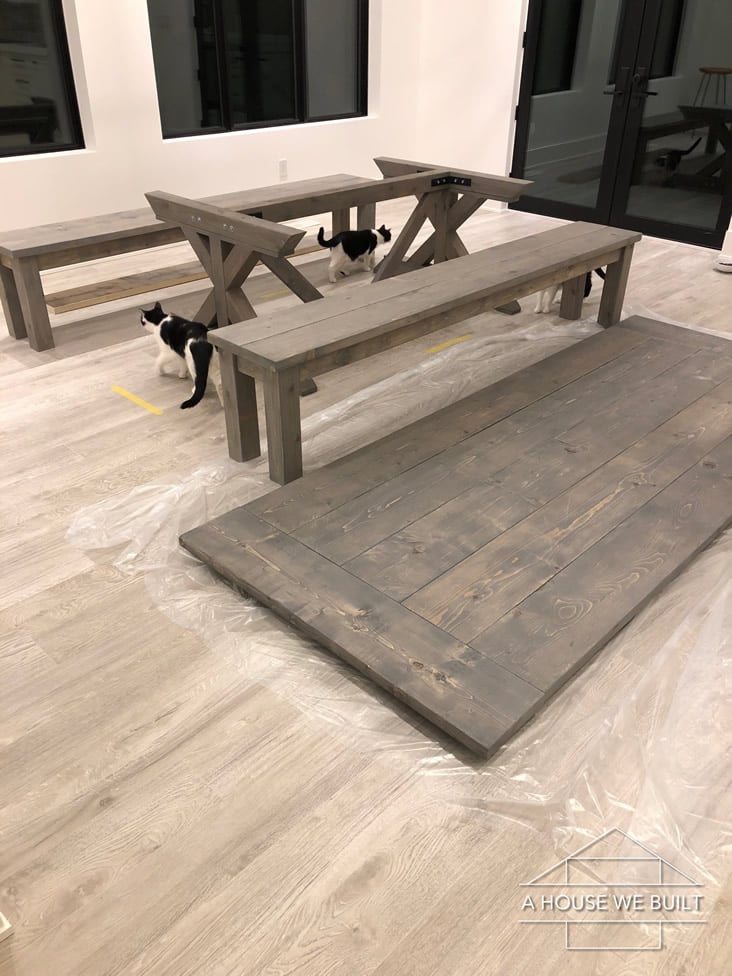
With the tabletop, the base crosspieces, and the base centerpiece all assembled, we moved all the components into our dining room and assembled the table “in place.”
First, we stood up one base crosspiece and bolted it to the brackets on the base centerpiece. At this point, the base could stand up on its own, so it was easy to attach the other base crosspiece. (Tip: since the base crosspiece is exactly off the ground the same height as the 1×4, we used scrap 1×4 to prop it up while we drilled). Since we’d squared and measured everything before drilling the bolts, when we tightened the bolts with a socket wrench, the base “squared and leveled itself.”
With the base assembled, we lifted the tabletop up and placed it atop the base. Our measurements turned out to be pretty accurate, and the tabletop’s 2×4 underframe lined up almost exactly with the base’s centerpiece and crosspieces.
We secured the tabletop from below with 5 deep-sunk 4″ screws up through the base’s horizontal members: one in center of the centerpiece and one on either side of each cross-piece’s centerpost. We used some electrical tape to mark the right depth on bit we used for driving the screws, ensuring that the screw went all the way into the 2×4 frame.
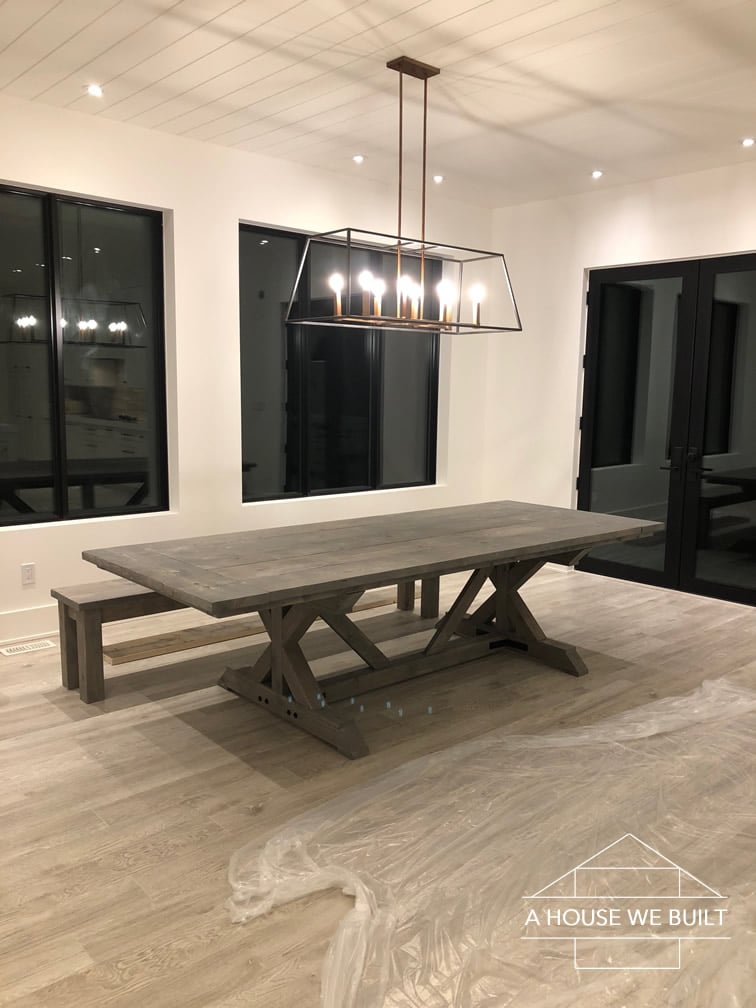
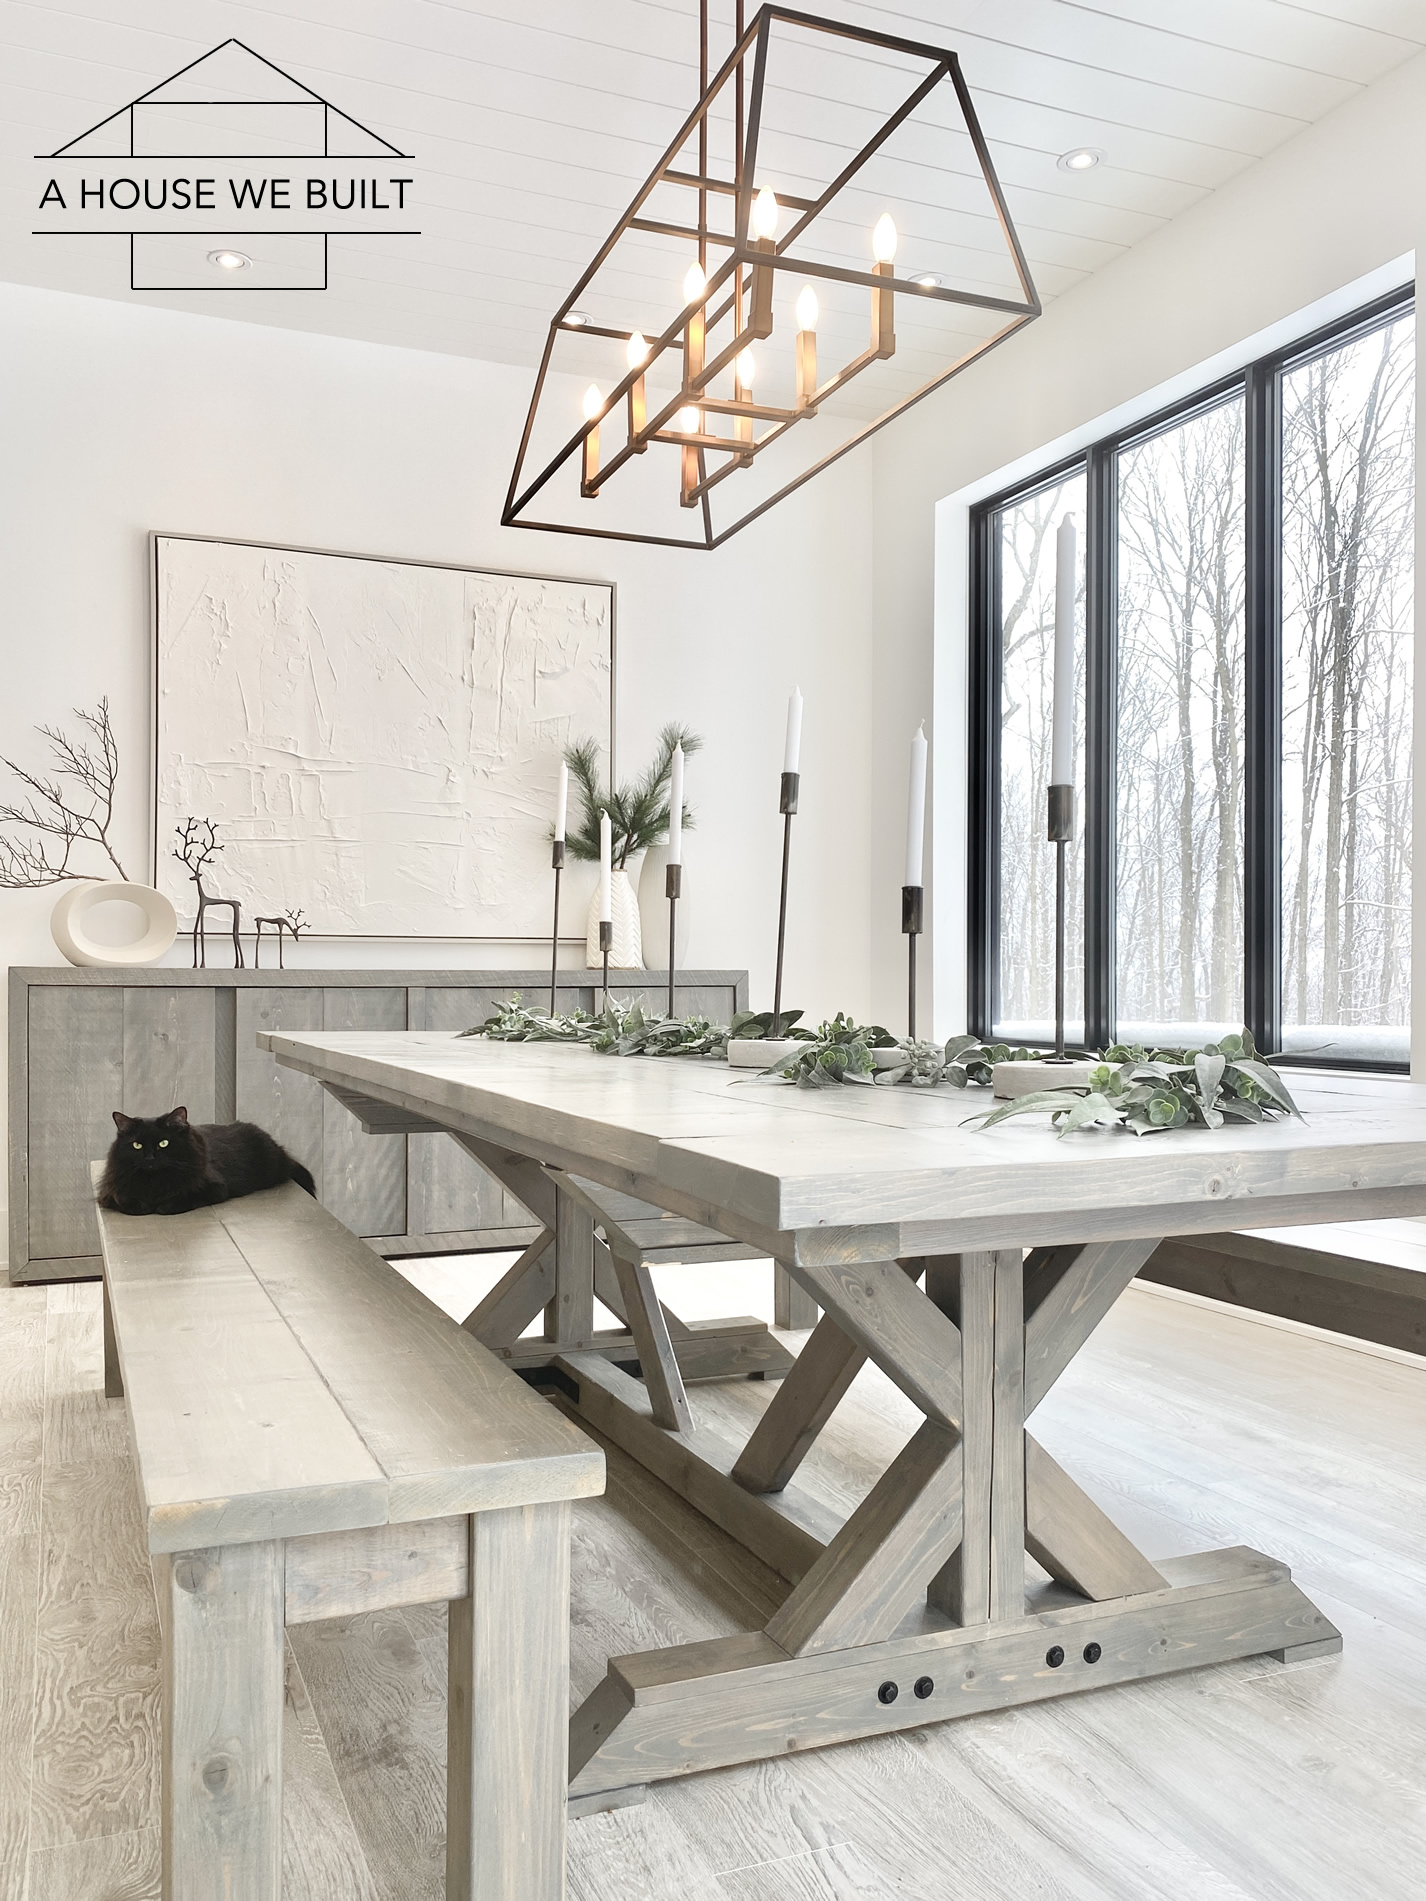
And that’s pretty much it!!!
DISCLAIMER: Please be careful! Power tools, screws, saws, and improperly-built furniture can all be dangerous. Be careful, and consult with an expert when appropriate. All content provided here is for entertainment purposes only and is not expert advice. We make no claims as to the accuracy or completeness of any information here. We shall not liable for any errors or omissions in this information, nor for any losses, injuries, or damages from the use of this information. Anyone who uses these instructions or the resulting items does so at their own risk.
And again — if you’re a master carpenter, please don’t judge this harshly. I’m sure there are a lot of better ways to build a table, but this way is sturdy and level and we were able to build it without buying any crazy tools and without any special skills so we’re very happy with it!
If you plan to build one of these tables, GOOD LUCK!!
If you post a picture, please tag us on Instagram (@ahousewebuilt) so we can see!!
Or if you’re kinda thinking that this is wayyyy too much effort, here are some similar tables you can buy online: McGee & Co | McGee & Co | Wayfair | Wayfair | Pottery Barn | Overstock | Overstock.
If you have any more questions, leave me a COMMENT down below!
I’ll end with an updated picture of our table:
Our sideboard tutorial: click here
Our canvas art tutorial: click here
Our dining room sources: click here
Our DIY tutorials: click here
Explore our house: click here
Follow us on Instagram: @ahousewebuilt
J says
Wow! I love it
admin says
Thanks!
Brittany says
You’re house is so beautiful! I love this table, so unique! What would you say the estimated cost is to build this table? Including all power tools needed, lumber, paint/stains, etc.
admin says
It’s all is the post 🙂
brittany says
Commenting again because I referred back to the post and saw the answer to my question. no need to reply, again just love the table.
admin says
Haha no worries! Glad you love the table 🙂
Kimberly says
Gorgeous!! Is there anything on the feet of the benches to prevent scratching the floor?
admin says
Thank you 🙂 No but they are very well sanded (I did it myself) and we have laminate floors so they don’t really scratch. I do plan to add felt feet but haven’t gotten to it yet.
Emma says
Does the top have tiny grooves in it or were you able to get the boards close enough to each other that food crumbs won’t get caught in them?
admin says
A little, you could rip down the boards but we didn’t want to. The table is very easy to clean though.
Freddy A says
Hi, currently building this table and it’s going great from y’alls instructions. Quick question, those 4 inch wood screws use to sink into the base cross pieces…did you first drill out a few inches and then sink the 4 inch screws. Based off your drawing it appears as if the screws start about an inch or 2 into the 4×4 so they reach the other side
admin says
We didn’t predrill, hubby just pushed them all the way through. That said, predrilling would probably be a good idea lol
Jason says
Can you please provide a link to these types of screws. For some reason I cannot interpret what kind of screws they are on Lowe’s/Home Depot. It’s one of the screws required on the supply list.
25 x 4″ No.2 10×4″ construction screws
admin says
Unfortunately I no longer have the box but that was what was written on it but as long as you can functionally find something structurally equivalent it should be fine (I’m guessing). We’re not pros so we were kinda just winging it so what we specifically used isn’t the only way to built this table.
Scott Simmons says
Awesome table!! My wife and I have decided to build this for our dining room, but with a distressed finish.
Thanks so much for posting!! Will comment again when it’s done.
admin says
Oh cool! You’re very welcome 🙂
Scott Simmons says
Construction is going well so far, you guys did a great job explaining everything…couple corrections to the material and cut list though…
Actually need 2 – 1x4x8
And the 6 cuts of 2×4 @ 10″ for bench support — actually needs to read 9″ like it does in the drawing.
Has been a great learning process, love the kreg jig!!
admin says
Glad you’re enjoying the kreg jig! It really was a game changer for us too.
Mindy says
Your plans don’t go into detail about how you finished the table. What did you use for a top coat and how many coats. I’m curious as to the best way to protect this table from all the wear/tear, hot/cold or moisture. Thanks so much.
admin says
The top coat we used is listed under the SUPPLY LIST FOR STAINING/FINISHING section 🙂 That is the only thing we coated it with.
Casey says
If you don’t mind my asking what did it roughly cost you in materials? We’re now considering making it.
admin says
That information is answered in the post above.
Scott Simmons says
I have a finished product!!! Thank you again so much for posting. My wife took pics and posted to Facebook:
https://m.facebook.com/story.php?story_fbid=10157588632063118&id=504078117
admin says
Hey – that’s awesome! Unfortunately I don’t have access to see that link since it’s a “story” but I’m happy to hear that the table was a success. If you can link me to somewhere the table pics are posted that isn’t a “story” I can probably see them there.
Scott Simmons says
Let’s try Instagram
https://www.instagram.com/p/B1kCQVbpDp2Oex2Khb_4LPlYS6G9kyKVDZWa500/?igshid=1ptbo5430fo55
admin says
Heyyy that’s awesome! It’s so fun to see – thanks for sharing!
Roman Kushnir says
What type of wood did you use? Looks like Home Depot/Lowe’s wood?
admin says
Correct, just standard lumber.
Roman Kushnir says
As in SYP (southern yellow pine)?
admin says
I don’t know – whatever their standard lumber is, really it doesn’t matter what you use.
Tara says
I’m looking for the total about cost and I’m not finding it. Could you point me in that direction please?
admin says
That’s in the post right above the supply list.
Turner says
Hello,
I have a couple questions about the screws.
1) I assume you’re using the 2″ screws to attache the under frame to the table top? 50 of those makes sense
2) Where are you using 100 3 1/2 screws? I only see a few being used in the table legs.
Thanks!
admin says
Honestly it’s been over a year since we built this table so I don’t remember exactly. We made this tutorial after the build so the exact number of screws might be off a little, we were trying to just think back on what we used.
Eric Marshallu says
I must say that your house is beautiful, and the information you shared about the tables is quite interesting and beneficial not only for me but for all the views. I really appreciate your calculations mentioned above about tables.
Carissa says
What kind of wood did you use?
D Jones says
Were your bread boards 2×10 as well as the rest of the table top? They look to be a bit wider like a 2×12. Just making sure before I purchase the lumbar. Looks great btw!
admin says
Yes. Though you could probably use x12s for bread boards if you wanted.
Tommy says
Just curious as to how far the ends of the table hang over the legs? Is that 10-12” or more!
admin says
I don’t really remember off-hand, I’d have to go back and measure. We kinda just situated them until it looked good to our eye.
Alexis says
Just curious how your tables holding up so far after having it for so long. And do you wish you have done anything different?? I plan on trying to build this table but I want to be sure and cover all my bases cause this is a big investment for me.
admin says
It’s the same now as the day we built it!
Ramze says
Hey guys, amazing table and awesome info. Did u guys for sure use 5″ bolts for the braces? 5″ Seems a bit long?
admin says
It has to be greater than the width of the lumber so that you can secure it on the other side.
Scott says
what size are the 8 4x4s for the cross
admin says
STAGE 4: BUILDING THE BASE CROSSPIECES explains this.
Jessica says
Hey I don’t believe they are listed in the post either. I’ve read over this thing what feels like 100 times! The 8 4x4s you have in the cut section at 18.25 inches is for the benches. But what about the cross beams in the legs. If you could be more specific that would be great thanks!
admin says
In the Stage 4 section, I explain how we determined the size for those pieces (see top left pic in that section). We didn’t pre-cut those pieces, we cut them as we built the table according to the size they needed to be for the height of our table. They’ll be a different size for each table height. I believe ours were 12.5 long-to-long side but double check with what height works on your table.
Charley Parker says
Quick question, the 18.25” precut 4x4s.
Are those for the the legs to the bench?
And the the two 18” cuts are they for the center post of the leg?
Trying to make sure I get the height correct
Charley Parker says
The 4×4 cuts.
Are the 18 1/4” for the Bench legs
And the 18” for the center post of the legs?
Can’t wait to post pictures. My wife is having me do this In Shou Sugi Ban style 😎
admin says
Yes, but that’s for the table and bench heights we chose (we’re on the tall side so this is what was comfortable for us). If I recall correctly, there’s only one place each cut piece will work.
Good luck!
Emma says
Hi! Your table is absolutely beautiful! I am wanting to re-create it for my home. My question is, do you feel like using the corner brackets were worth it? Have they held up over time? And does it make it so wobbly that you notice it while using it? I rent, and could possibly move, so I would like to be able to disassemble it if need be. Also, I haven’t been able to find the same brackets you used. Do you remember where you got them?
admin says
Thank you 🙂 No, it’s not wobbly at all. Brackets are from a local hardware store, though any similar ones would work – they don’t have to be identical, it’s more about the concept of the support they give. One note regarding moving though… this table (even disassembled) is insanely heavy. So just something to consider.
Angela Walter says
I am loving this table and want to make it but my space won’t let me go that wide. Can I modify the width of the table top? Would I also have to do the legs then? Thanks!
admin says
Thank you! Yes, you probably can can make the top less wide but you’d also have to modify the legs since the top and bottoms of the leg pieces are about as wide as the table top. You could probably get away with taking about 4″ ish off each side of the legs though which would make the table about 8″ ish less wide but I don’t necessarily know how that would affect the balance of the table. My concern would be that if it’s too tall/narrow, it might tip over and the table is VERY heavy so that wouldn’t be safe. I haven’t built a narrower version so I just don’t know.
Alternatively, I have several ready-made tables linked in my post – you can try checking them to see if some of them are narrower (the specs/dimensions are usually listed somewhere on each table’s page). Might be less hassle than modifying the plans.
Either way, best of luck!
Mike says
Hi, the table is beautiful and I am planning a building something very similar. Do you feel that the base centerpiece is necessary? Would just the leg assemblies be sufficient without that centerpiece?
admin says
It absolutely needs the center pieces. They stabilize everything.
Lacey says
It’s beautiful! Nice work!
How heavy do you think the table is?
admin says
I’m not sure exactly but it’s very, very heavy. It’s as heavy as if you can imagine trying to lift all the wood in my Lumber Supply List plus a box of screws and some metal brackets all at once.
Lacey says
My husband and I just built the wood yesterday to build this and I am so excited!
We could not find the 6″ L-brackets like your though. Can I ask where you purchased them?
admin says
Hi 🙂 We got them at our local hardware store. You don’t have to use identical brackets – anything similar but strong would work!
Dave says
On the crosspieces how long is the center post? I’ve read directions a couple times, not seeing it, I’m ready to start putting it together.
Thanks
admin says
Its length depends on how far apart you place the two main X/leg supports. Within reason, it can be however long you choose.
Dave says
What I thought, thank you
Diana Sessions says
Will a chair fit at the ends?
admin says
That kinda depends on the chair and how big you build the table.
Jill says
What kind of wood did you use? Just common wood?
admin says
Yep. Literally framing lumber from the hardware store. Nothing fancy.
John says
Just finished. Great project and thank you for sharing the knowledge. Couple of things I learned… it is useful to have a long drill bit, i.e. 1/4”X12”, for drilling through the 4X4’s. Also useful to have a long (6”) T25 bit tip for drilling in those deeply sunk screws.
Mike says
I’ve seen on many forums that if the breadboards aren’t done properly that the wood will shift and mess up the table. Have you seen this with this particular plan?
admin says
I’m not an expert carpenter but we were careful with our measurements and haven’t had issue with this. We typically let all the wood we use sit in the environment we plan to use it in for a little while before using it so that it has time to adjust/warp etc if needed.
Lia says
Hey guys, just wondering how many people you can seat on the benches? 😊
admin says
The length is listed in my post, so it’s really a question of how big/small the people are and how comfortable they are with each other. Generally I’d say 4-5 comfortably per bench though but it could be as little as 3 or as many as 7. 🙂
Paul says
Beautiful Table
One question . Buy list states as follows:
8 x L-brackets, 6″ long both directions
16 x 5″ bolts
16 x nuts to fit those bolts
16 washers to fit those bolts/nuts
8 brackets with 4 holes each – 8 holes that share a bolt = 24 bolts and nuts
Am I overlooking something?
admin says
No, you’re right. I think I just forgot about the inside bolts when I made the list.
Dan says
Thank you for the plans! Just finished mine, minus the staining and it took 4 hours to shop and 23 hours to build it!
Dan says
Correction, 12 hours to build!
admin says
That’s awesome! Very welcome!
Jason says
Hi I am in the process of making this. 8’ in total length. I’ve got the table top and legs made. On the underside of the table I located my cross pieces that the legs will sit on 2’ in from each end. So my base centerpiece will only be about 4’ long. Do u feel that’s long enough to be stable? I guess I could always add another crosspiece on the underside closer to each end and increase the length of my base?
Love the table. Thanks for all your help!
admin says
Personally, I would personally not skip any of the centerpiece support pieces we specified regardless of the length of the table. However, you could modify them to look different as there are many ways to provide center support that don’t have to look the same as our design. But with a table this heavy I think it’s important to be sure it’s property stabilized with some kind of centerpiece supports. That said, your placement of the crosspieces relative to the length of the table seems fine as long as you also have the stabilizing centerpiece supports in place too. Hope that helps!
Jason says
Absolutely thank you
Bethany says
My dad is building this table for me and he would like to know if y’all might have a youtube video with y’all making it?
admin says
We don’t, but several people have successfully made this table off this tutorial so I know it can be followed. 🙂
Jason says
Hello! Well I’ve gotten this table built and now in the finishing stages. I’ve put the wood conditioner on and tried the classic gray stain on a scrap piece. Unfortunately it is extremely light. I even left it on for 25 min before wiping off. My question would be how many coats of stain did you apply? It seems that I would need 3 to 4 coats to get it as dark as your table. Thanks again for all the help you provided in this thread
admin says
A few different brands have a stain called “Classic Gray” so be sure it’s the same brand I used for the same results and it should be used in combination with the conditioner I mention. I only ever do one coat of this stain, but you need to stir any stain very thoroughly or it will be almost unusably light.
Jason says
Yes thanks. I used the link you provided. I think I will also use the top coat you used. Did you apply with a brush or and roller?
Taylor says
Have you had any problems with the wood expanding or contracting on you table top?
admin says
No, because of the way we made the under-frame. If you’re concerned about this though, an easy solution is to allow your wood boards to sit flat on the ground inside your home for a couple weeks to adjust fully to your indoor climate.