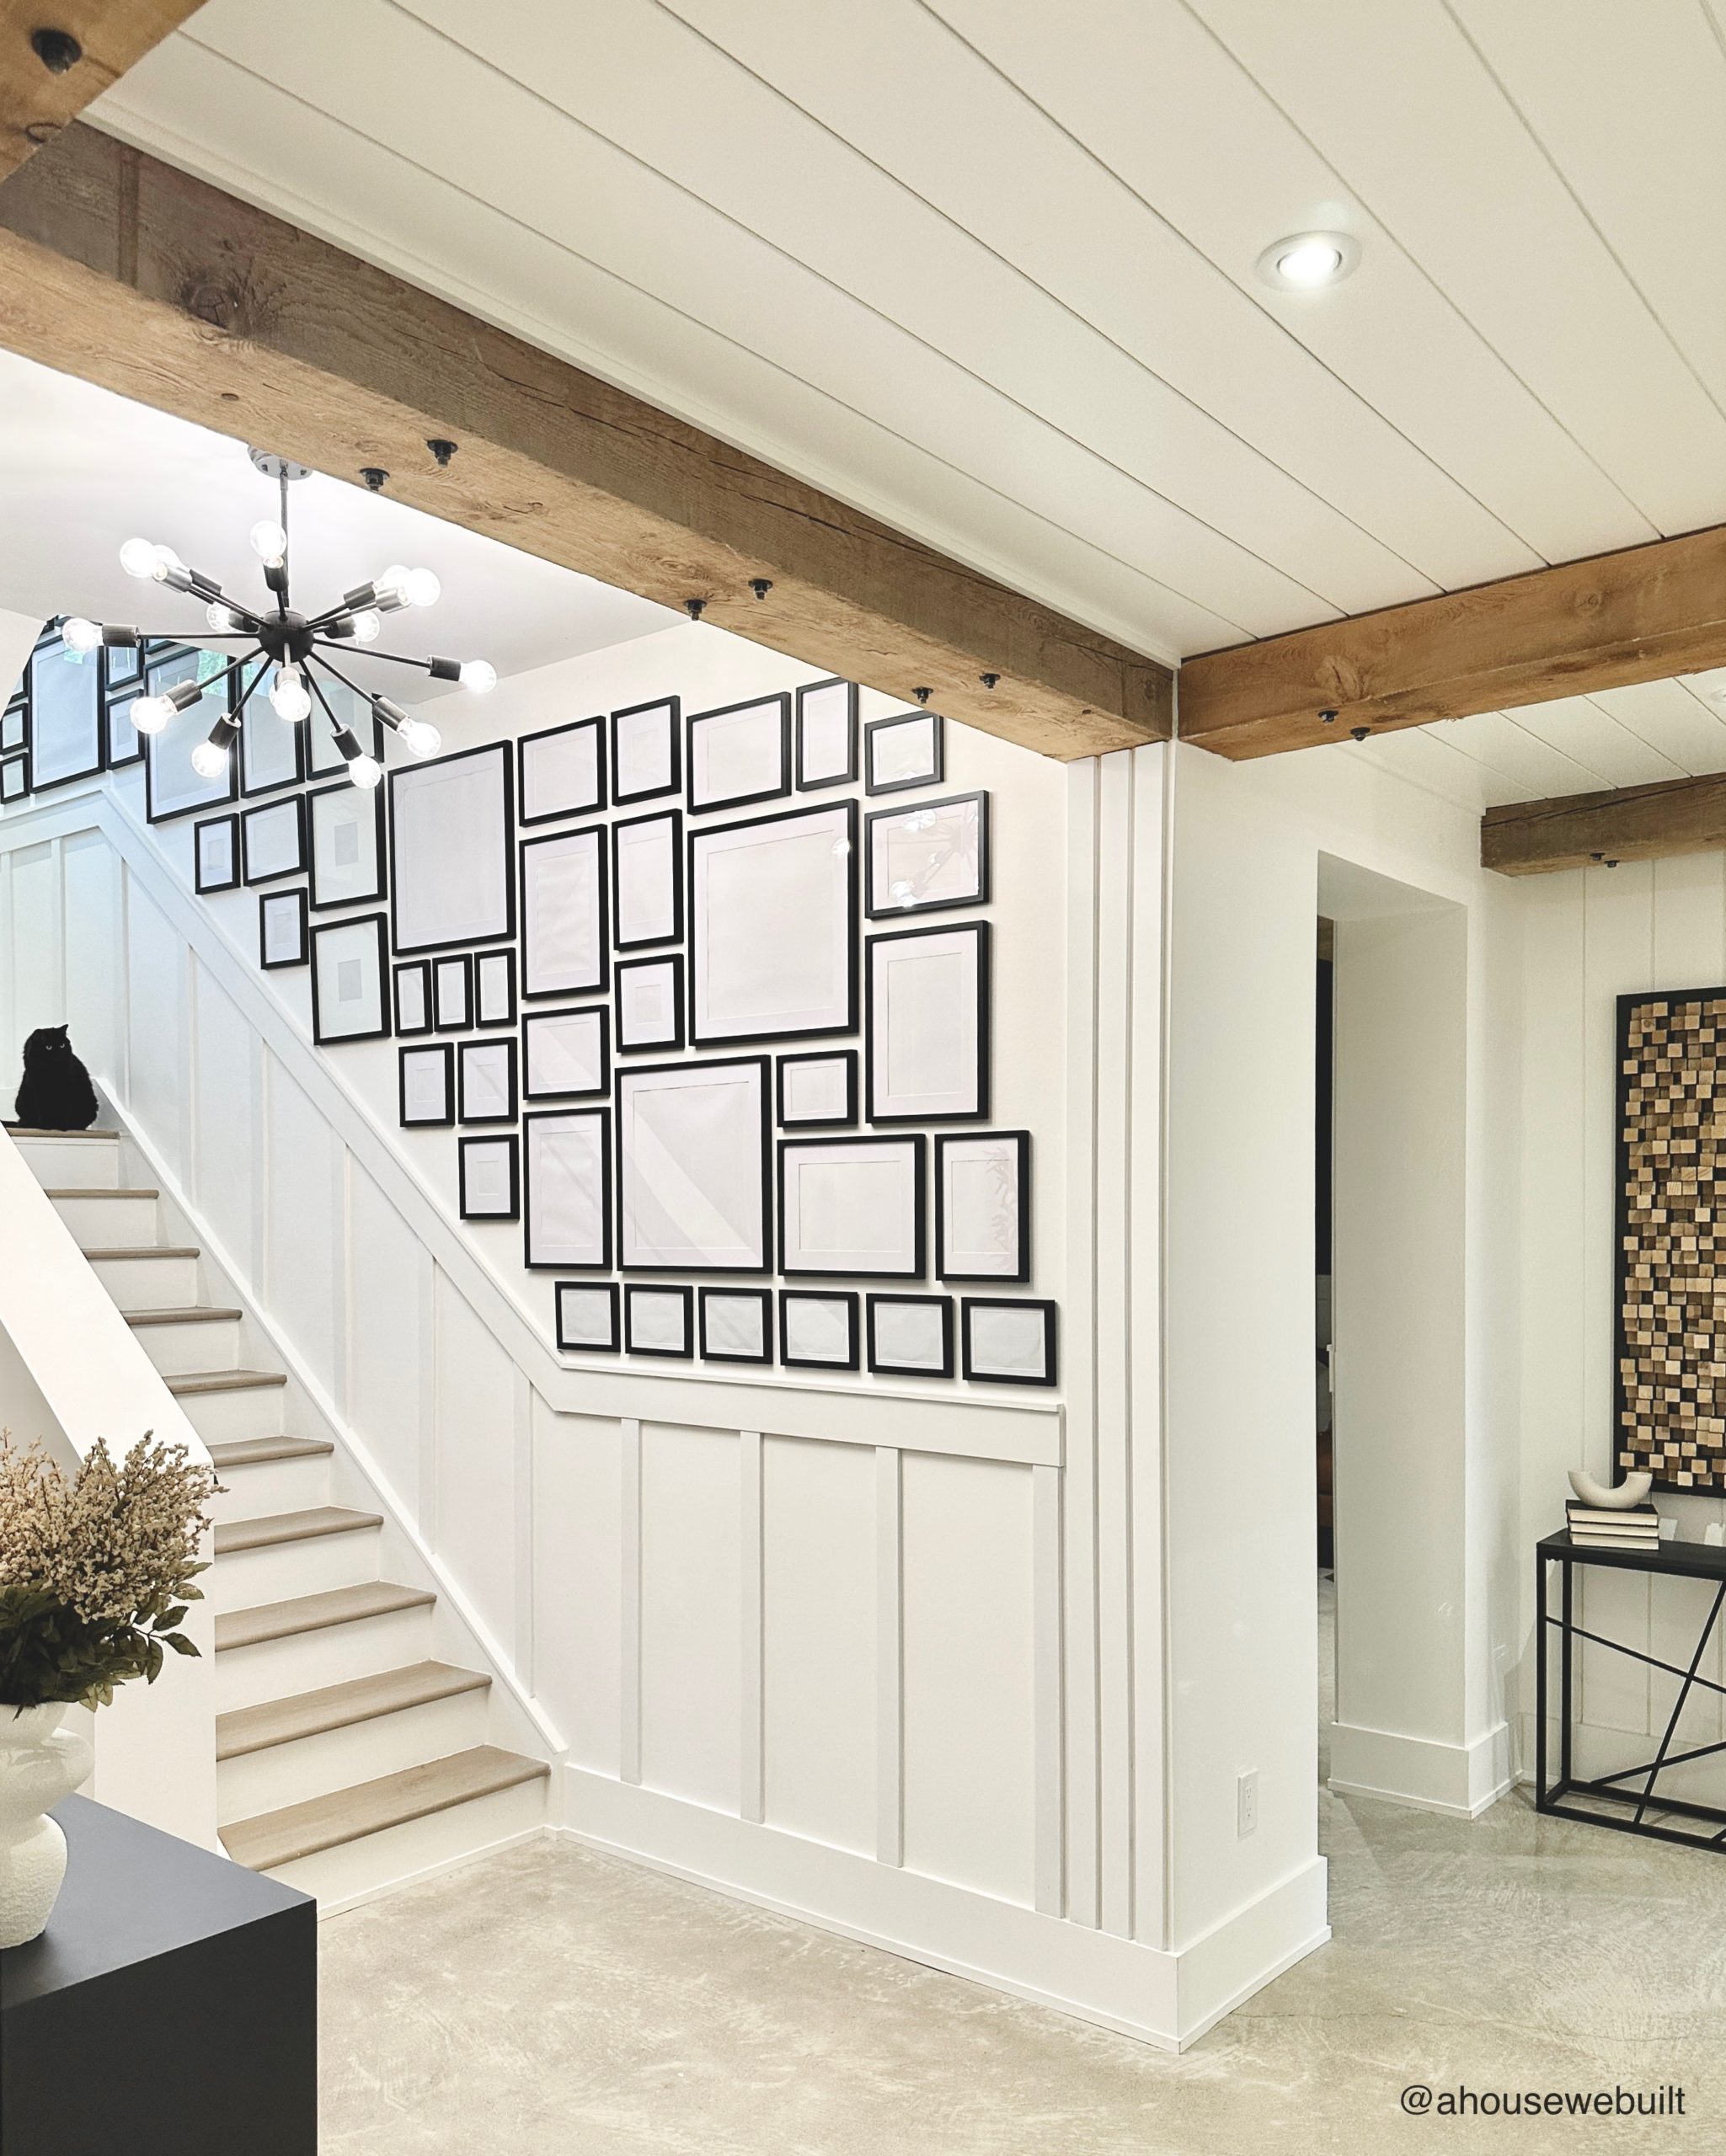
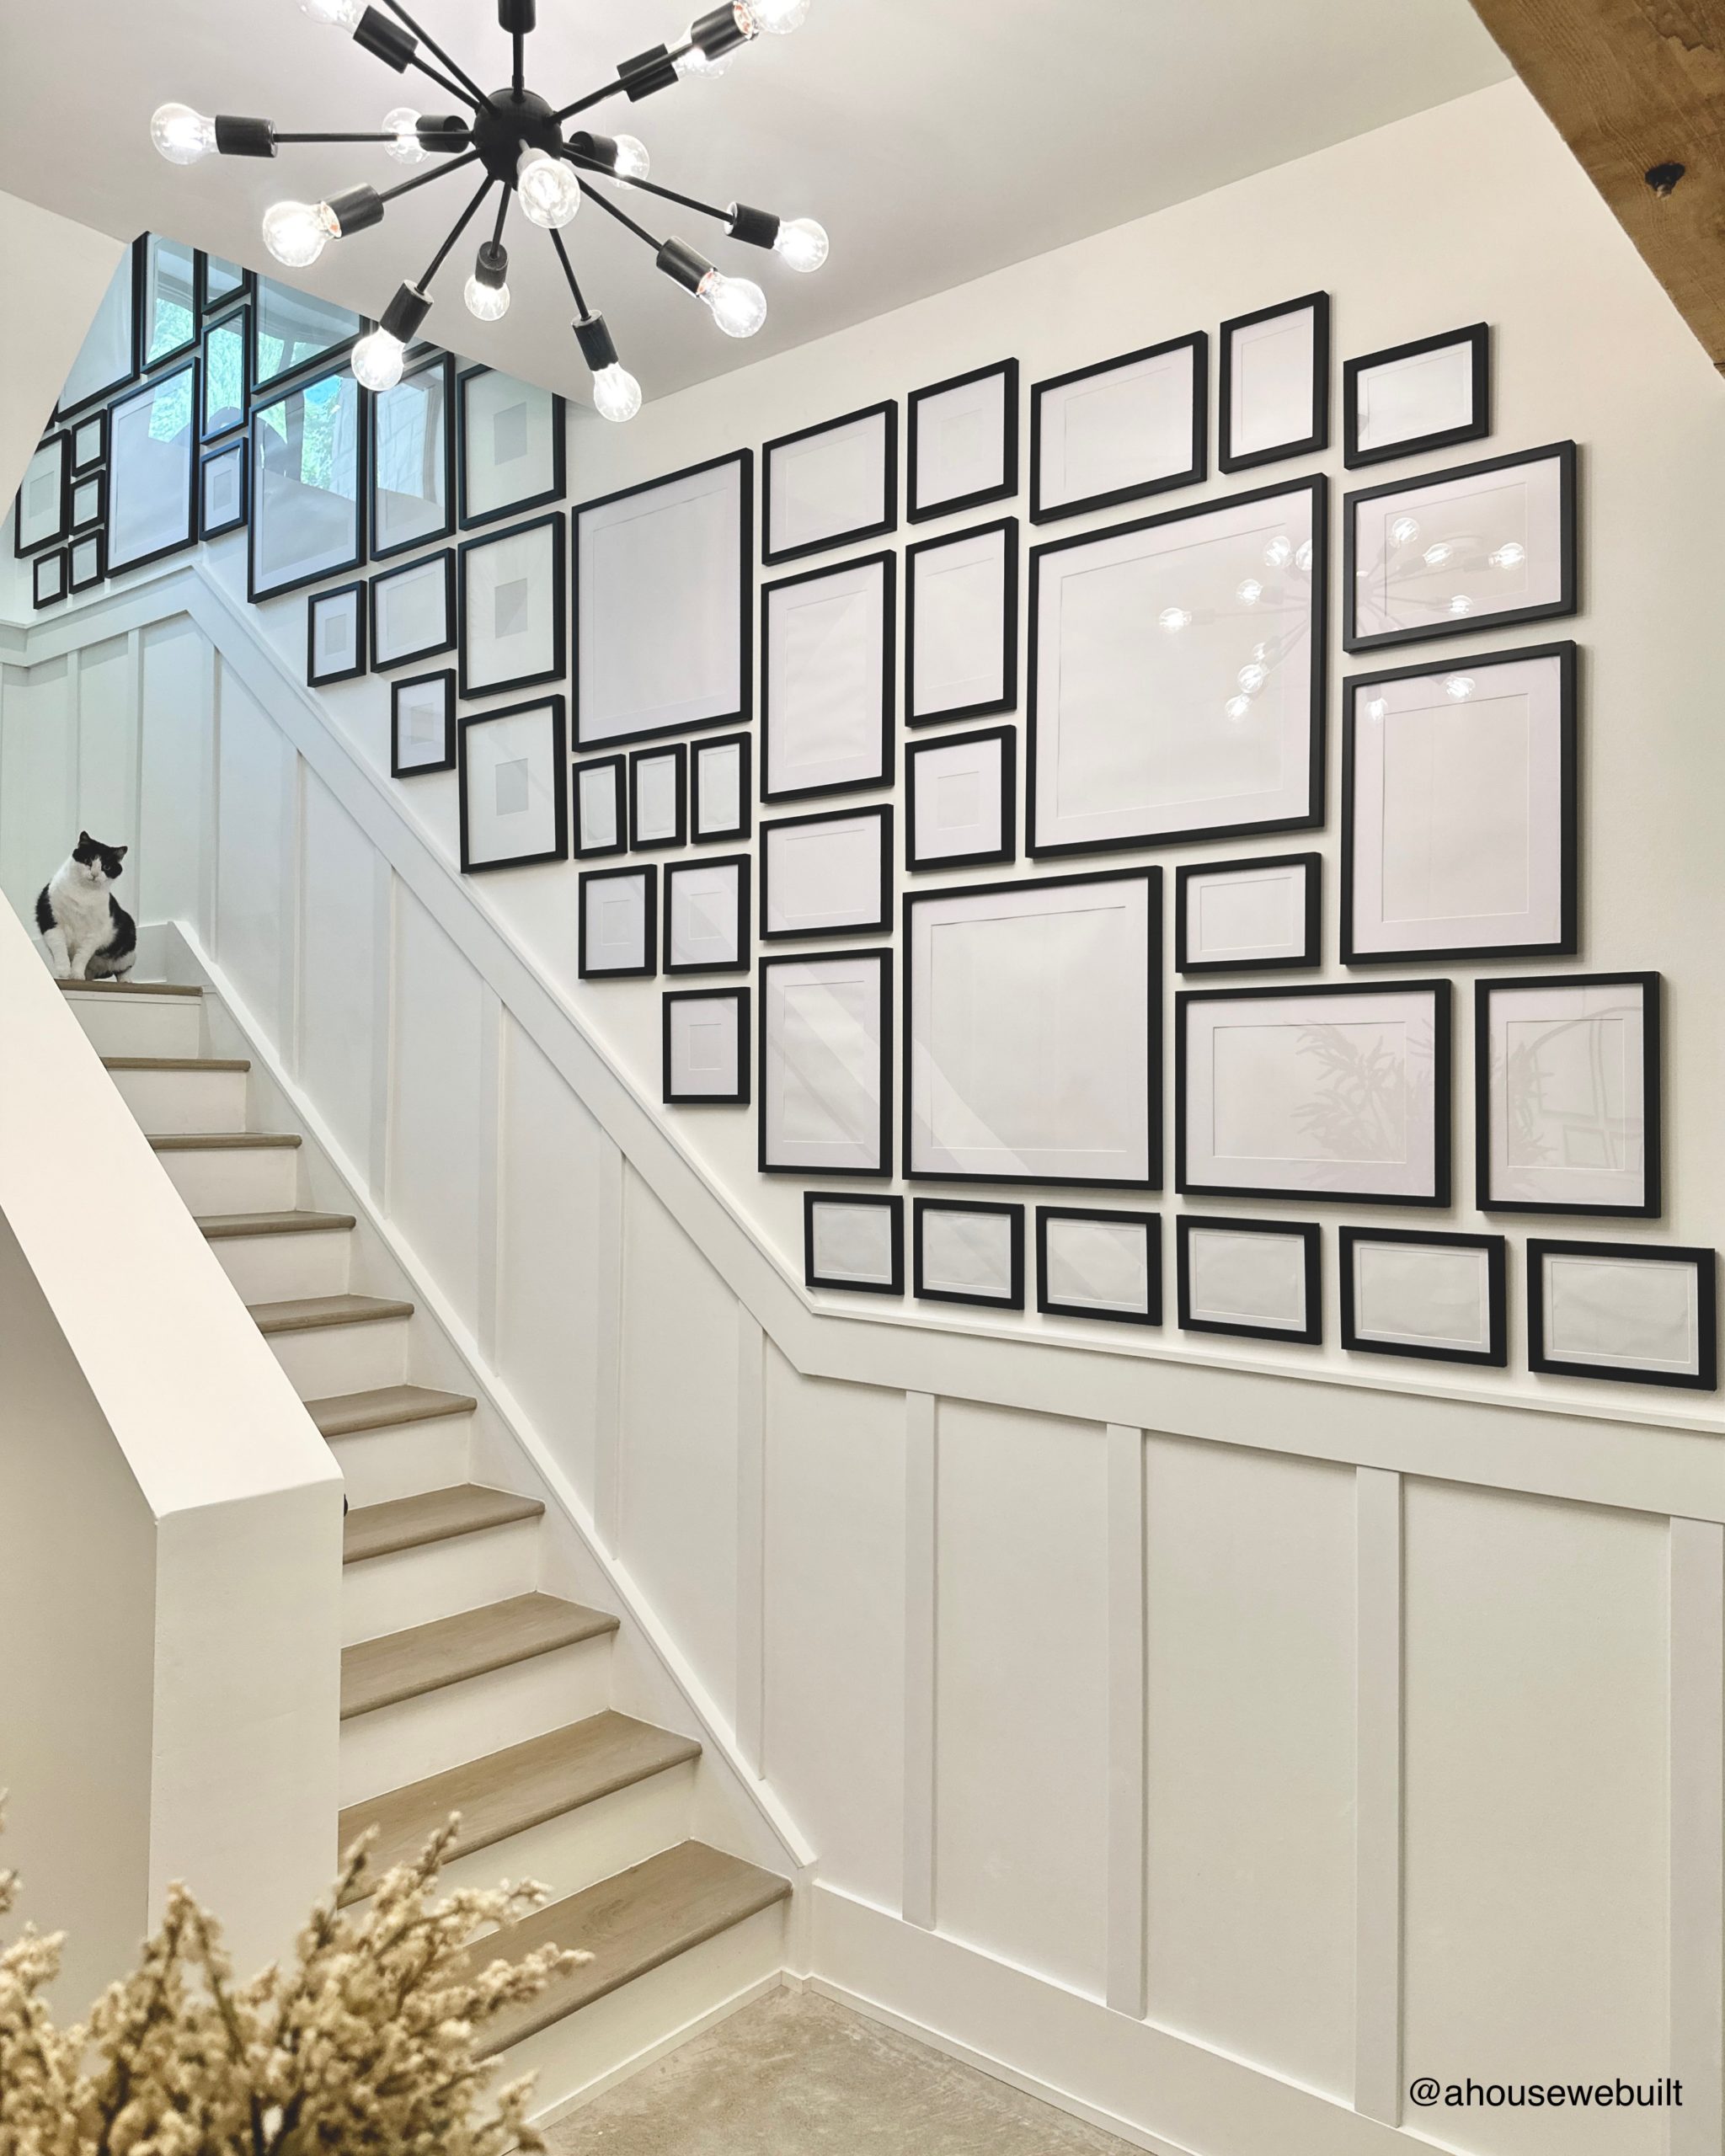
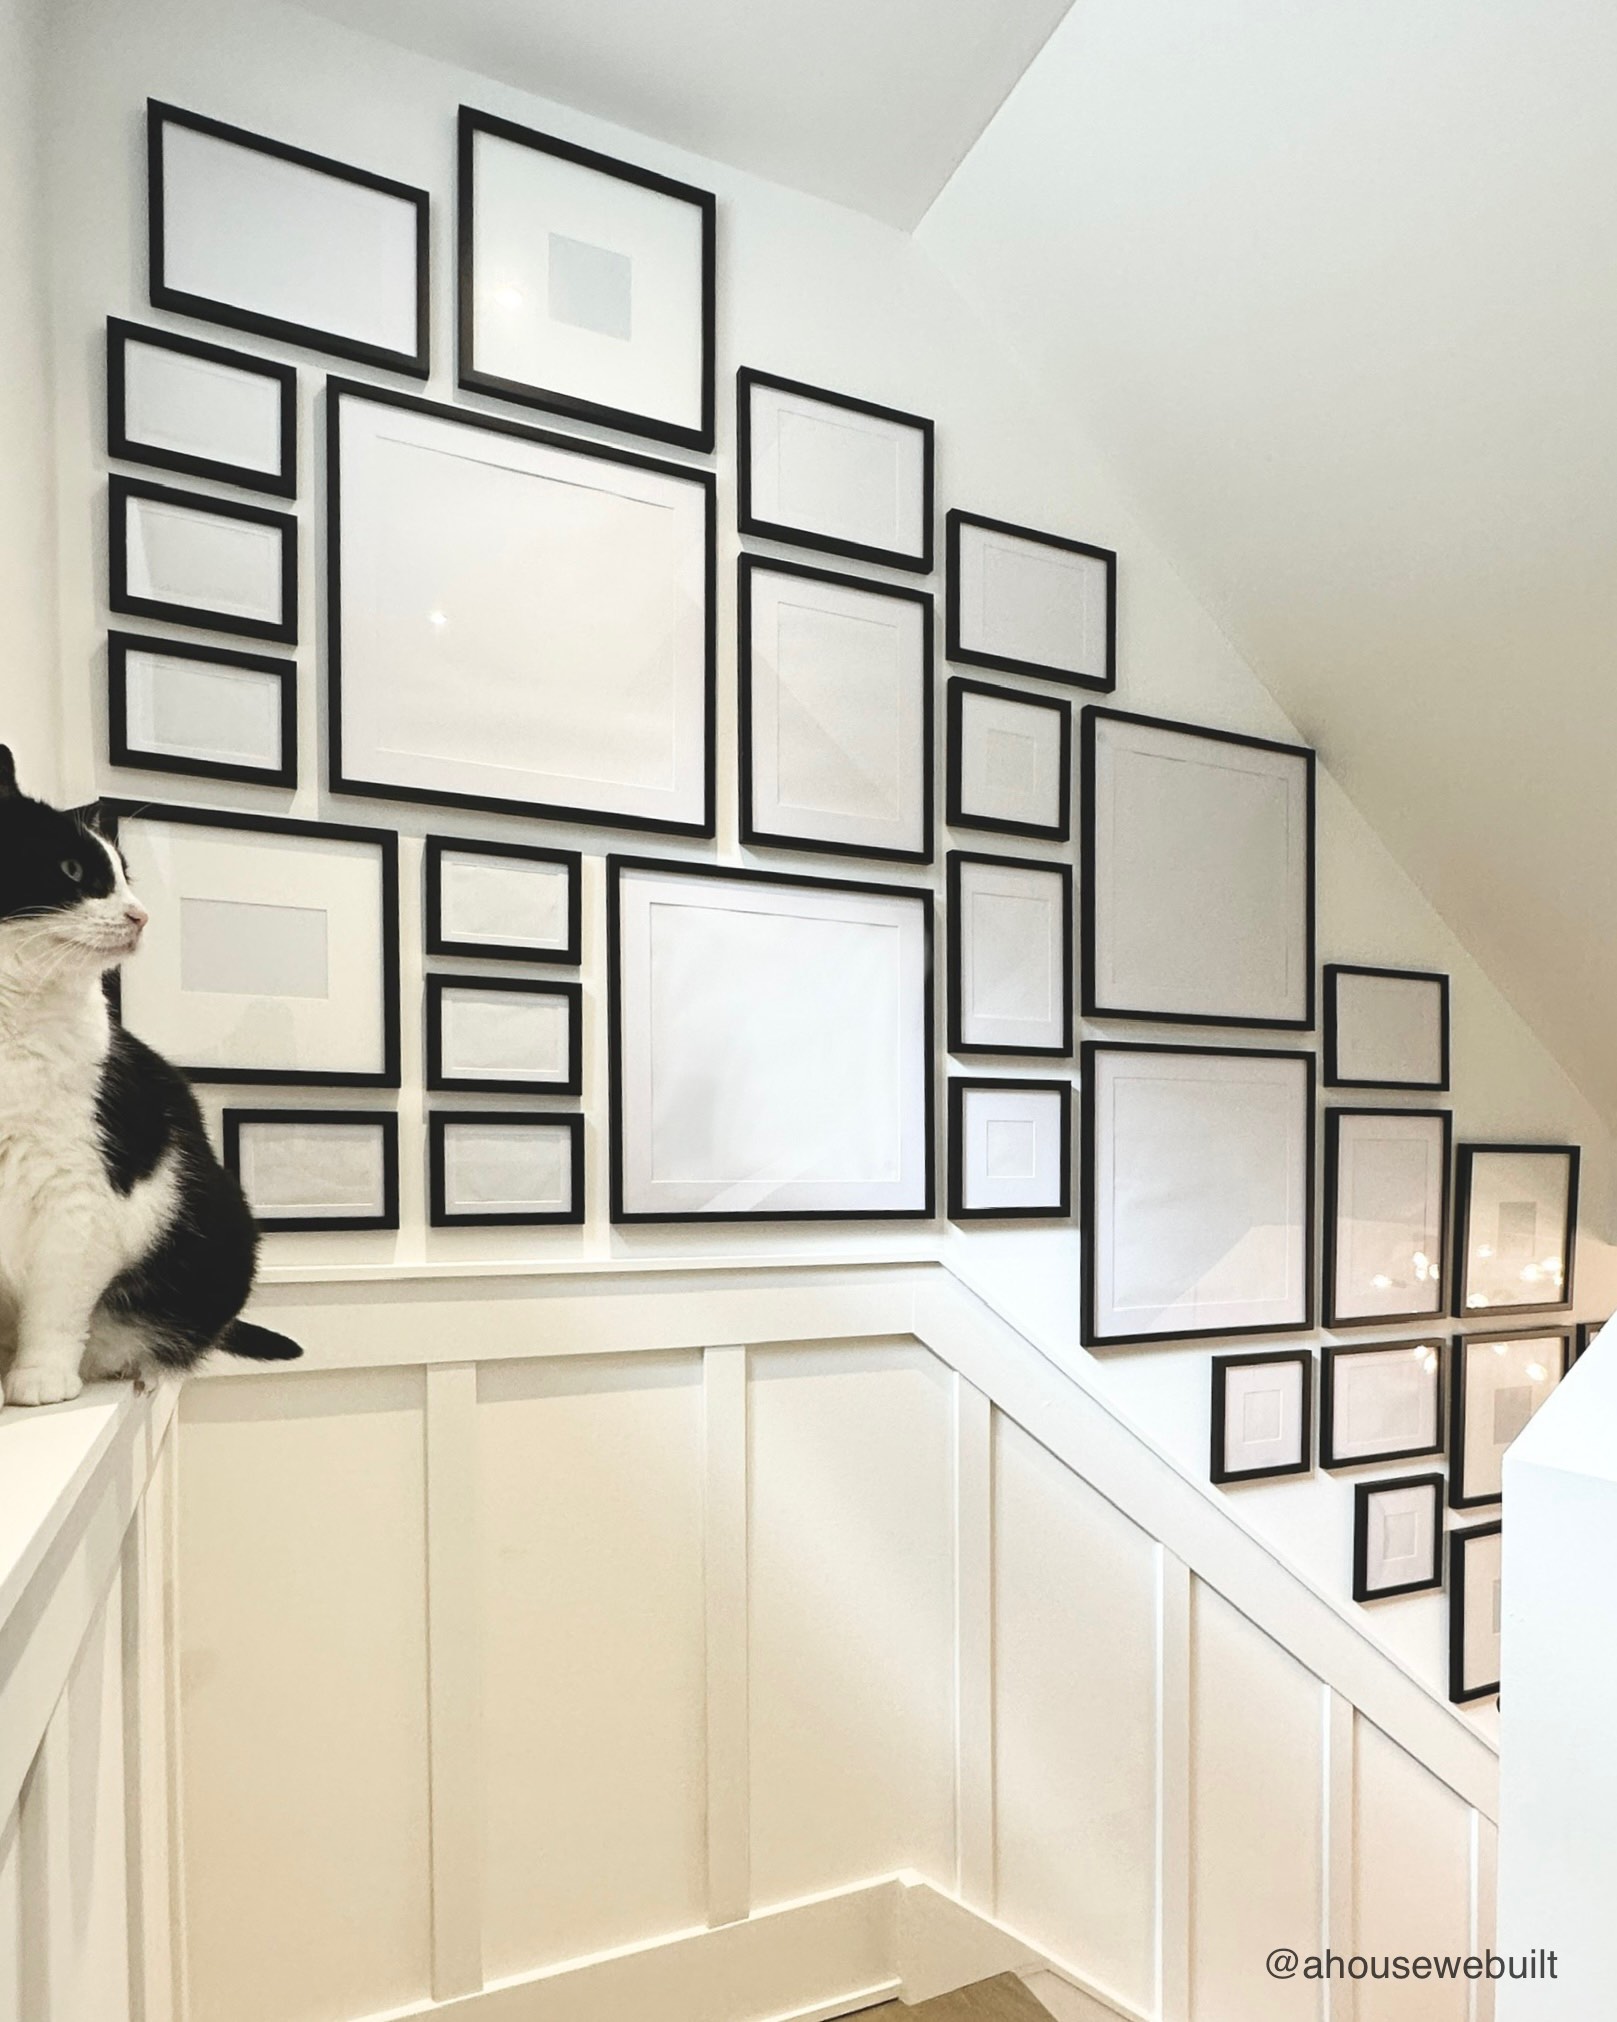
I hung a massive family gallery wall on our staircase and decided to share all my tips here!
I used almost 60 frames for this gallery wall in our basement and, while I’ve always loved gallery walls, the really big ones can feel a little daunting so hopefully this post will help simplify the process, answer any questions you might have, and encourage you to make a unique gallery wall of your very own too!
MATERIALS LIST
I’ll explain the uses for each of these items in the steps below, but this is a recap of everything I used:
- Frames: Crate & Barrel | Pottery Barn | West Elm | H&M Home | Target | Amazon | Walmart
- Laser level: Home Depot | Amazon
- Tripod (for laser level): Walmart | Amazon
- Large poster board / cardstock: Walmart | Amazon (width as long than your biggest frame)
- Large kraft paper: Walmart | Amazon (width as long than your biggest frame)
- Painter’s tape: Home Depot | Amazon
- Drill: Home Depot
- Drywall screws: Home Depot

STEP 1: PANELING (optional)
Before you choose your frames, you should decide if you’re going to do any paneling on your wall and use painter’s tape to layout the general plan so that you can get a visual in place on your wall. Paneling is not necessary, but in some cases it can add beautiful definition to your wall.
If you don’t plan to do any paneling, skip to Step 2!
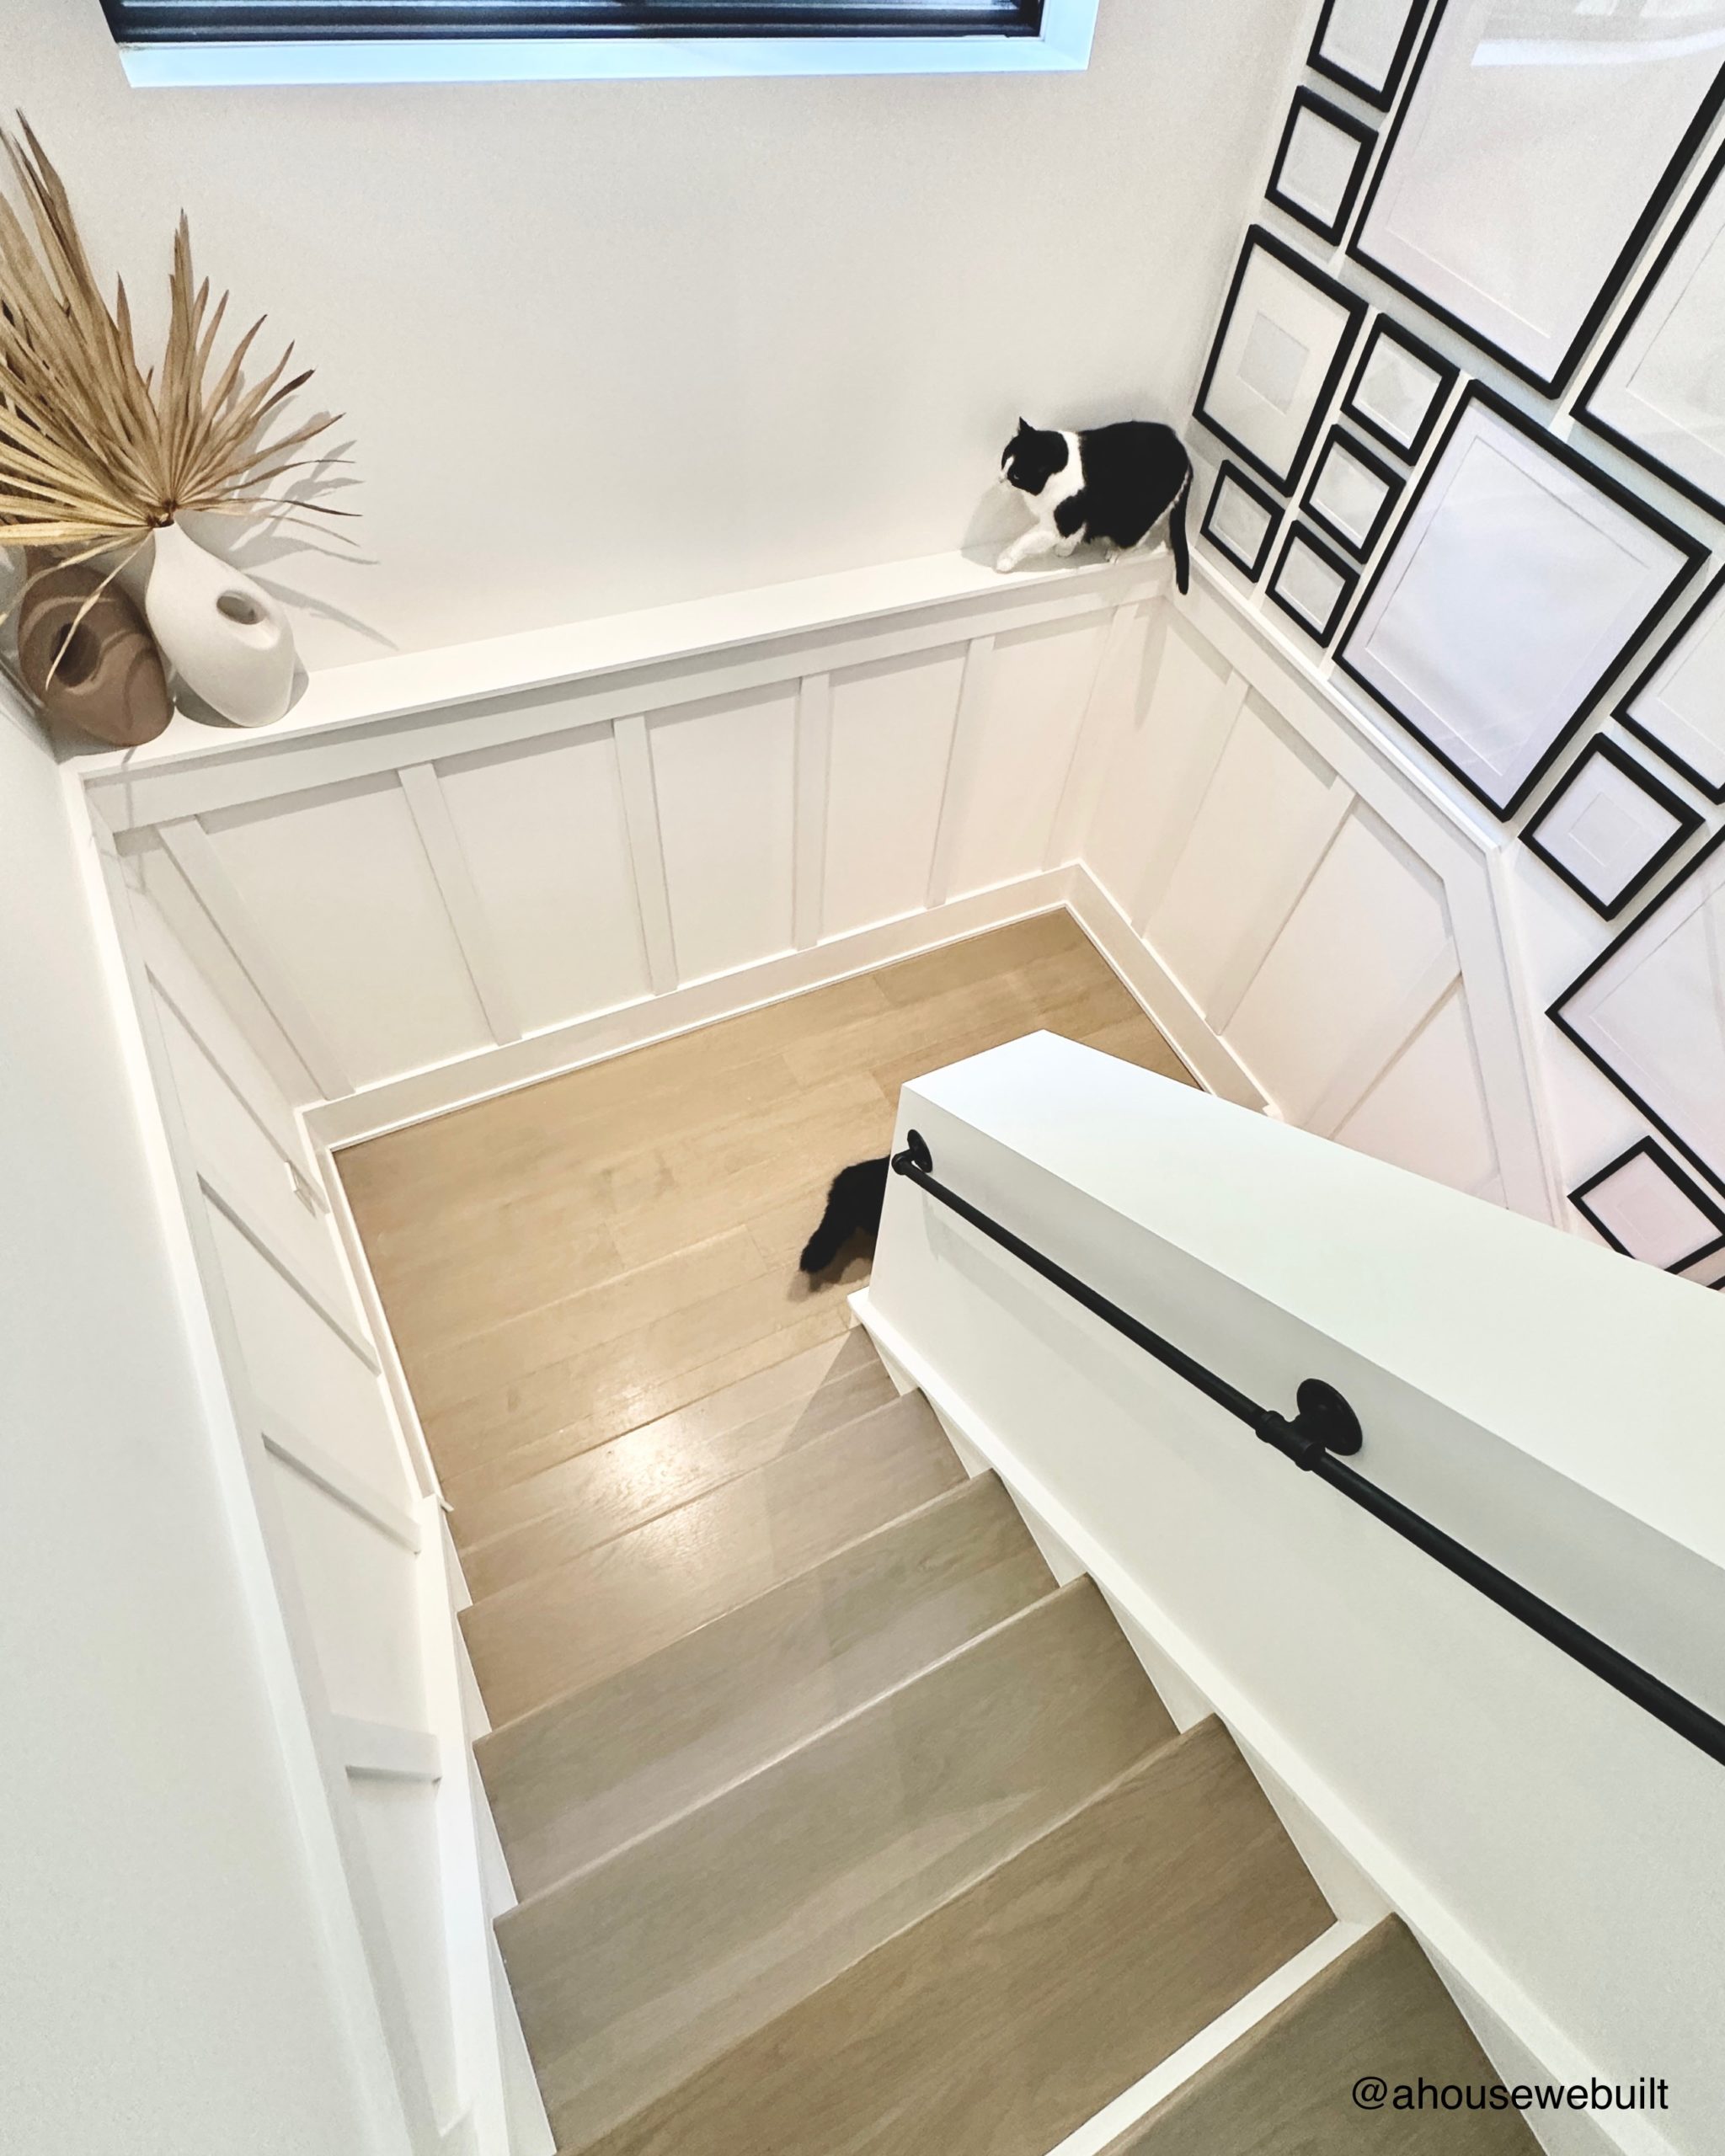
I chose to install wainscoting paneling (meaning partial-height of the wall) down the whole staircase and landing area where I planned to do the gallery wall, and I chose a simple board and batten style of paneling.
My reasons for doing wainscoting were: (1) I didn’t want to hang frames too low on the wall so that they wouldn’t get accidentally knocked about as people went up and down the stairs, (2) I wanted to define the space a little – it was a huge wall and I felt it needed something to give it shape.
These are the exact sizes of boards I used:
- Horizontal board (1x6x8): Home Depot
- Vertical battens (1x3x8): Home Depot
- Top board (1x2x8): Home Depot — Note: I ripped mine down to 1″ widths on a table saw (Home Depot) but you don’t have to, I just wanted a slightly narrower width than I could find in store
I installed this by nailing it to the wall, caulking the seams, and painting it. Note that if you want to nail the boards without using any adhesive too, be sure you angle your nails in alternating directions to get a good hold – if you just put them straight in, the boards won’t hold without glue too. Materials for installation:
- Brad nailer: Home Depot
- Nails: Home Depot
- Caulk: Home Depot
- Caulk gun: Home Depot
- Wood filler: Home Depot
- Putty knife: Home Depot
- Sandpaper: Home Depot
Finally, I painted it all the same white color we’ve used in our whole house: BM Simply White.
(Note: While I did do a rough template of my frame layout at the beginning of this project, I had to redo it all from scratch after installing my paneling because I wasn’t happy with the spacing. So I got ahead of myself there. If I was doing it again, I’d wait until I was finished my paneling to plan the frame layout.)

STEP 2: CHOOSING & PURCHASING FRAMES
You might think this step should come later (after your wall is planned out) but it actually *needs* to come first because you have to make sure that the exact frames you choose work together cohesively.
You’re looking for frames with at least one side’s length in common. For example: 9×9, 9×12, 12×16, and 12×12 sizes will work together very well because there are common sides (9 and 12) between them.
There are two main reasons you must purchase your frames before you design your gallery layout:
(1) it would suck to go through all this planning only to find that the frames you wanted had sold out,
(2) it lets you verify in person that the exterior dimensions listed online match the actual dimensions.
IMPORTANT NOTE: Do not assume that you can just order any (for example) 9×9 and 9×12 frames and they will line up because every single frame manufacturer has a slightly different exterior dimension depending on the size of their mats and frames. The dimensions you care about matching are the exterior dimensions of the frame – and these are often (but not always *sigh*) listed in the product description, you sometimes have to really dig for this info. Not to mention that the frame depths and profiles are often also different between manufacturers. So this is why you need to do this step before you plan the layout.
My advice is to choose a variety of sizes including a few very large and very small frames.
You can totally mix and match frames from different vendors (I used frames from 6 different manufacturers for this wall!) you just need to do your homework and make sure that they look cohesive together.
Some of my favorite frames that I’ve used here and in other Gallery Walls around our home:
- H&M Home Wooden Frames (amazing value and most have one side that matches in sizing)
- Crate & Barrel Icon Frames (also used in both our Living Room gallery and Slat Wall gallery walls)
- West Elm Multi-Mat Gallery Frames (also used in our Entryway gallery)
- Pottery Barn Wood Gallery Frames
- Amazon (also used in our main hallway and basement hall gallery)
- Target
- Walmart
How do you know how many to get? You kinda just have to make an educated guess. Sorry, I wish I had a better answer. Most places have pretty good return policies in case you overbuy, but you just have to look at your wall and generally imagine your plan, then approximate how many of each you need. Personally, I’d rather overbuy and have to return a few than not buy enough and risk the frames selling out. Note: once you buy the frames, you will need to complete your project within their return window!
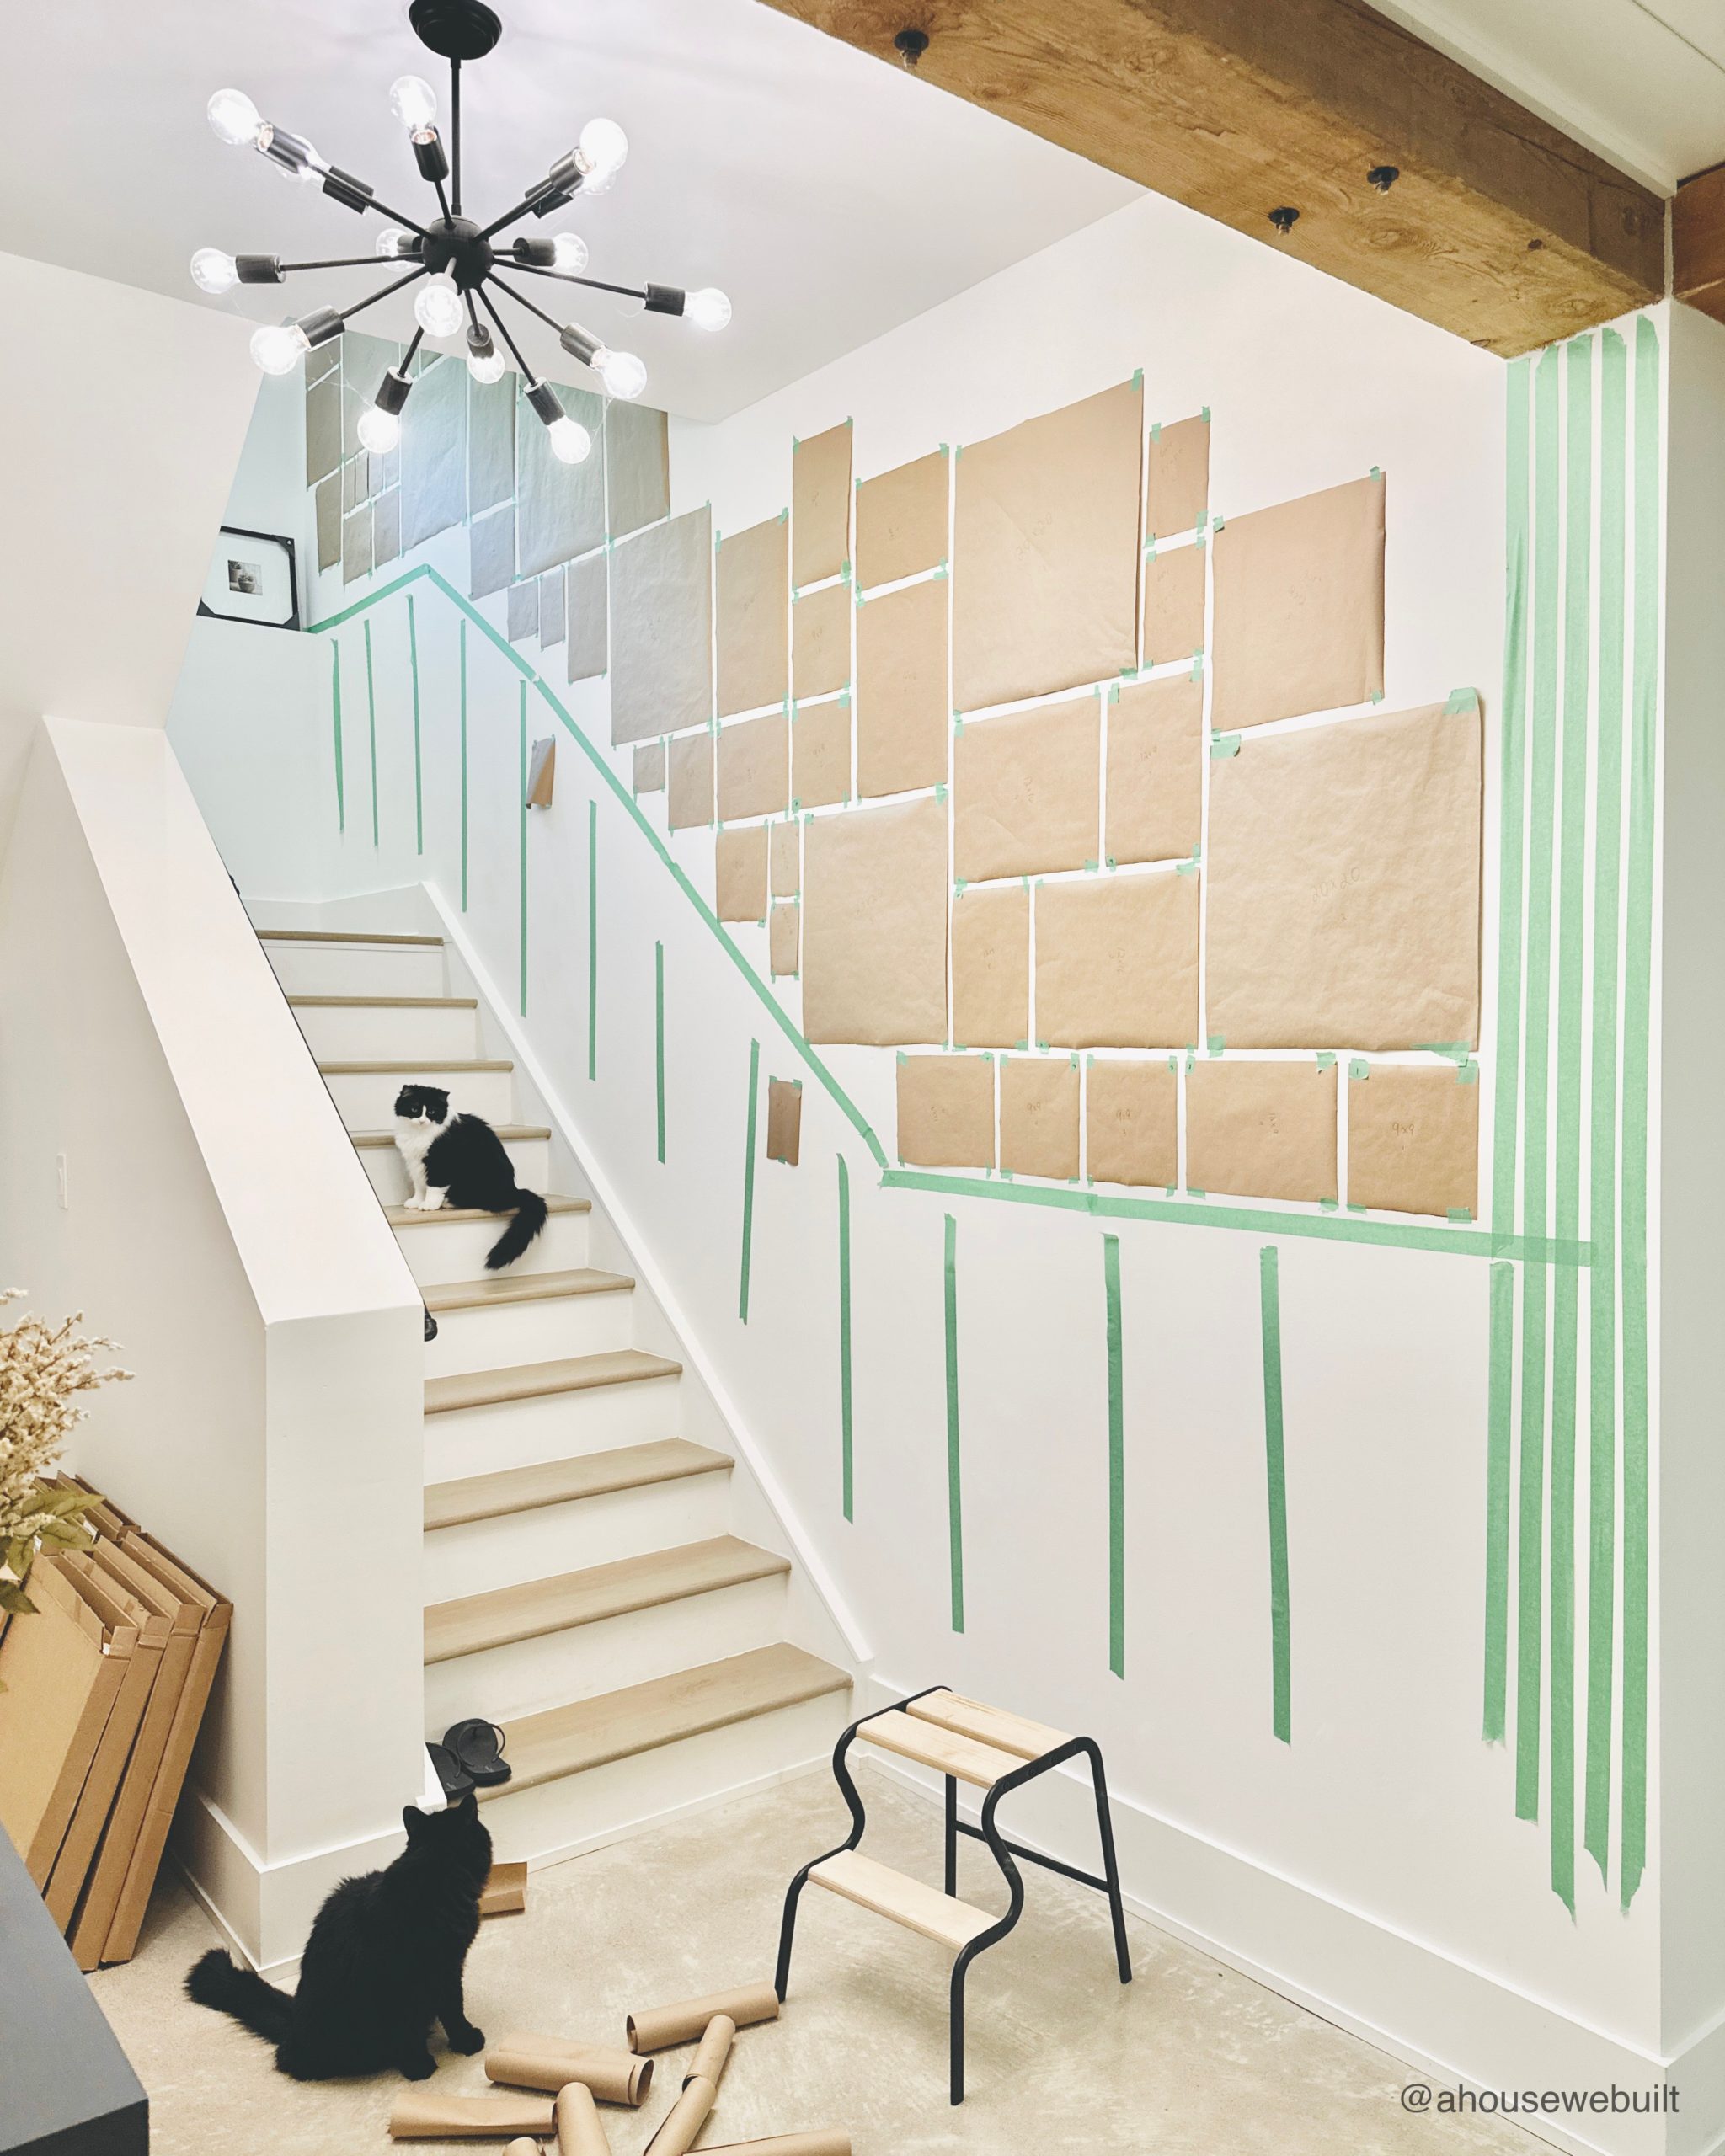
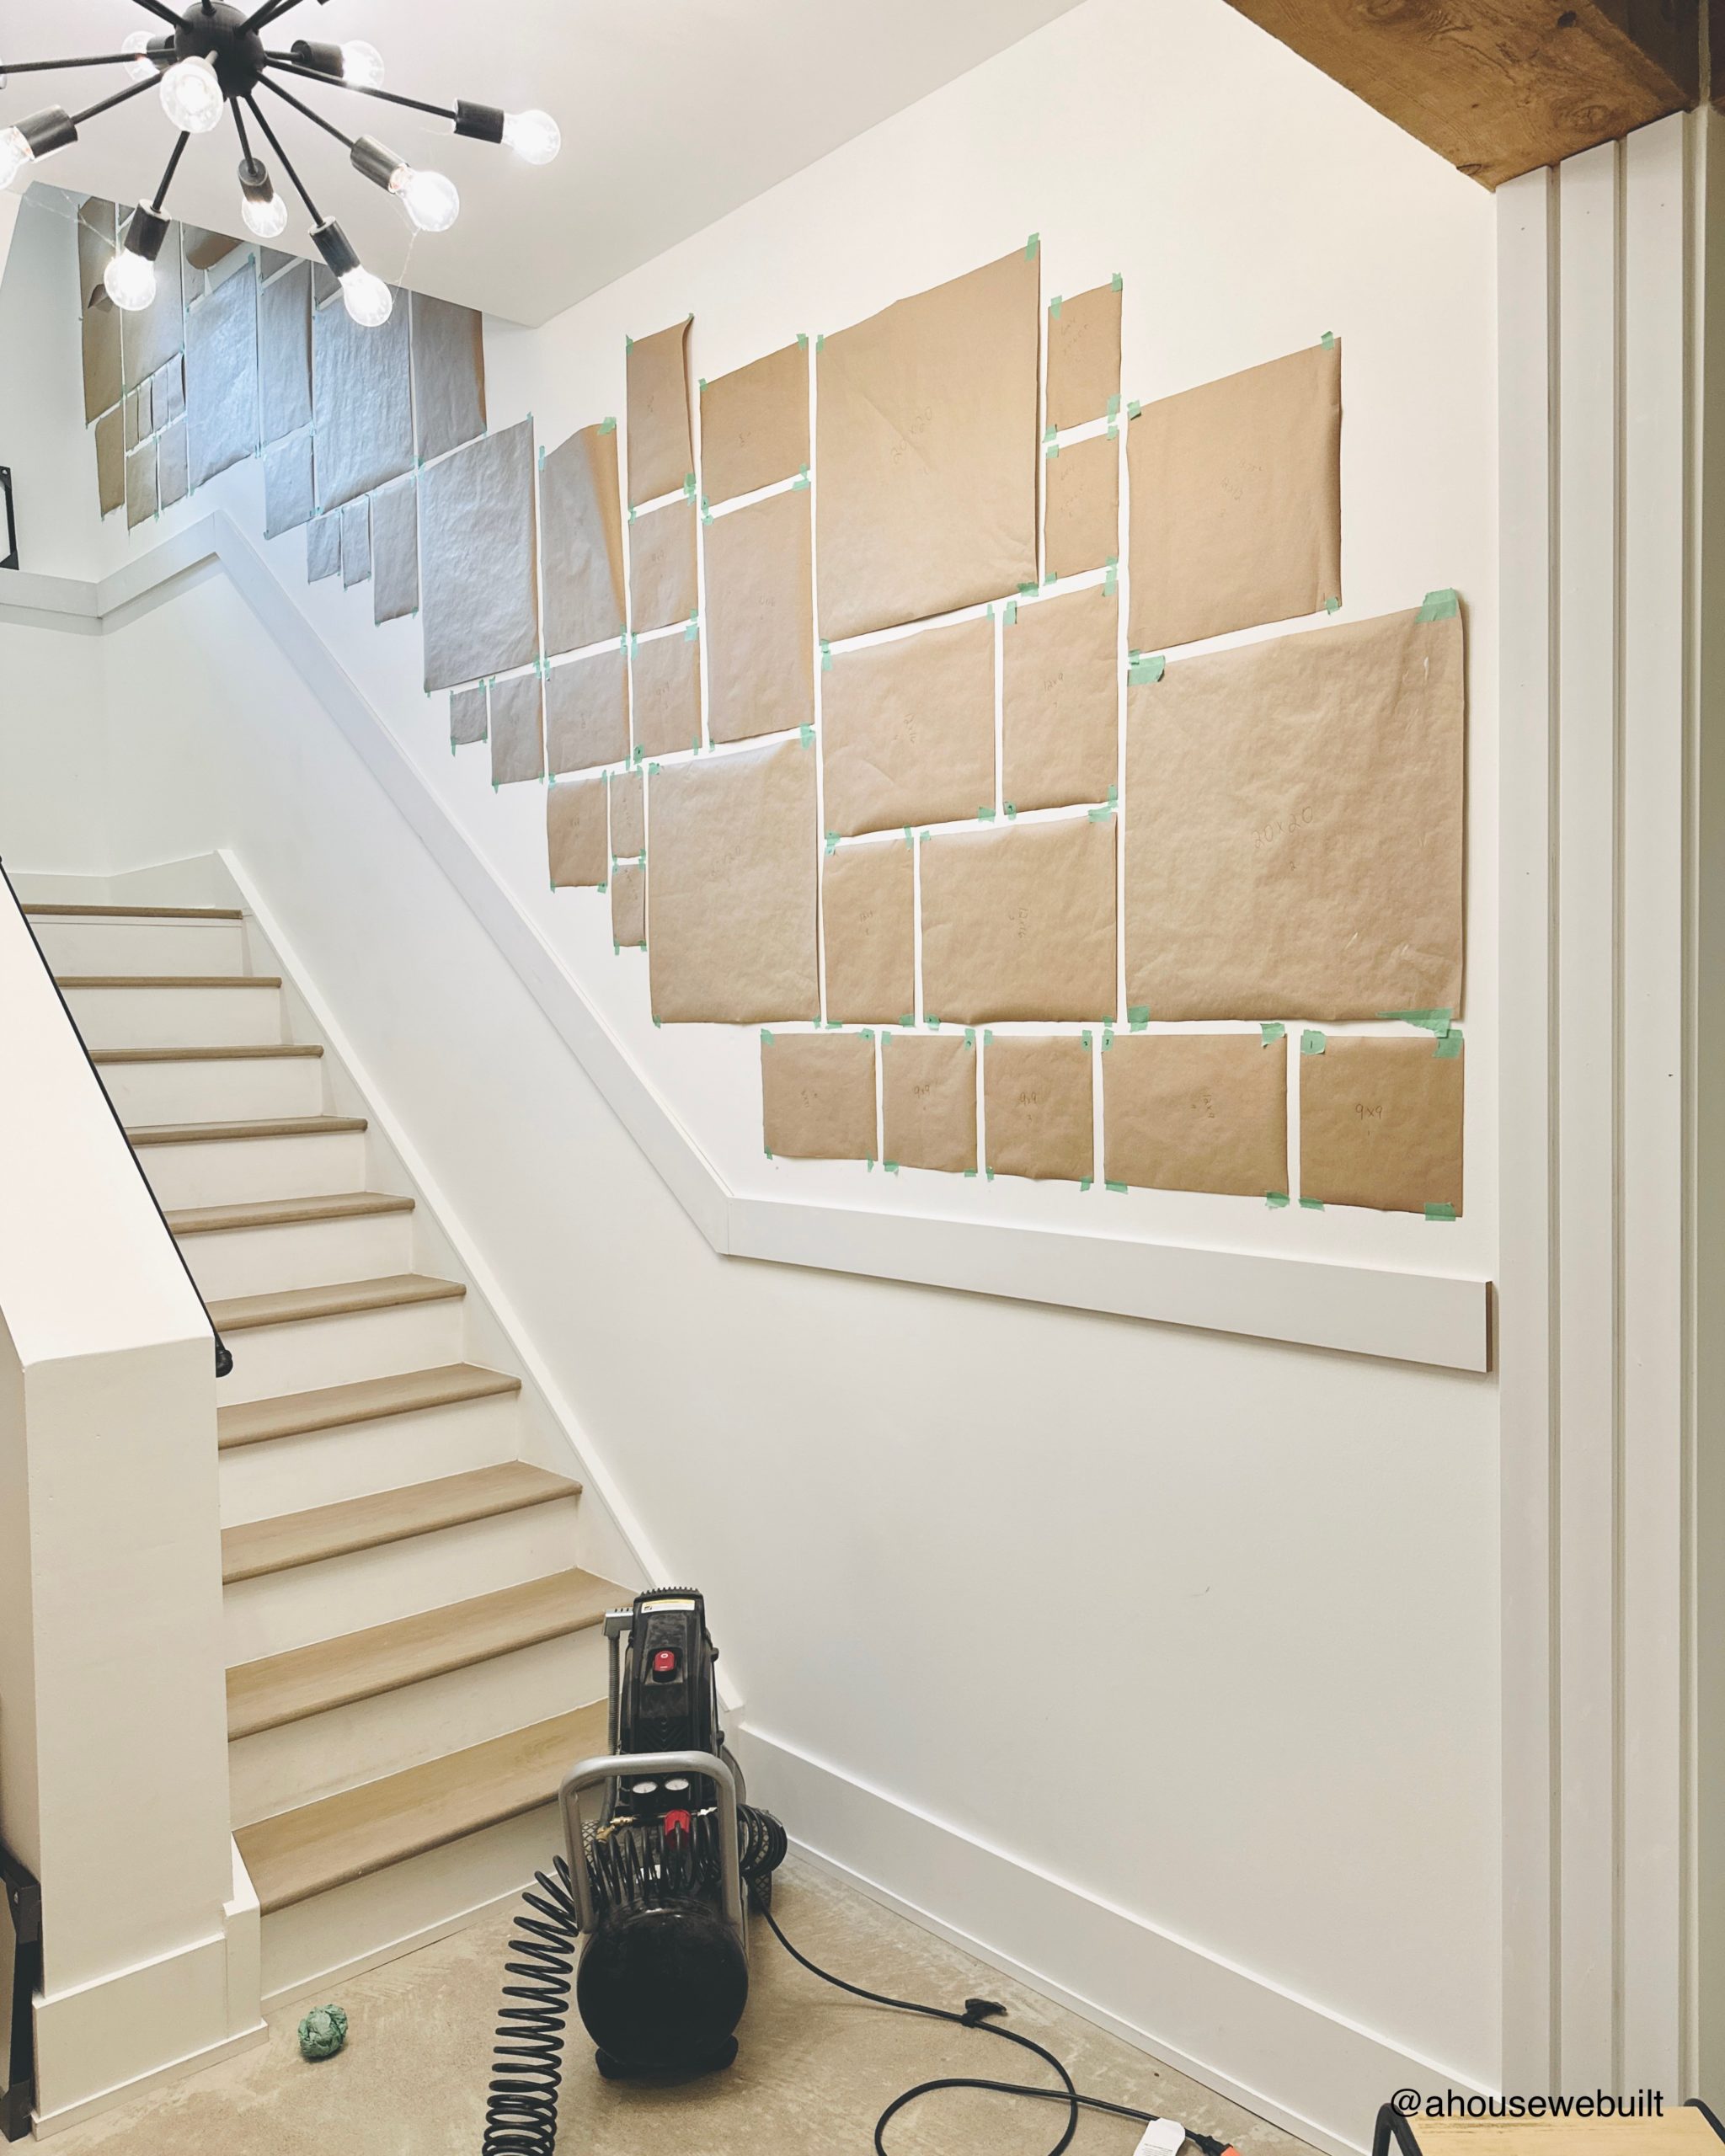
STEP 3: CREATE TEMPLATES
These templates are just to give you something easy to tape to your wall and rearrange a whole bunch of times while you design the layout of your frames. Templates give you a visual placeholder for the physical frames that I find to be really helpful.
I used Kraft Paper (Target | Amazon) – the same kind I use every year for my Christmas wrapping so I always have a big roll of it on hand. You’ll also need scissors, a measuring tape or ruler, and a pencil.
To make the templates simply place your frame on the paper, trace the outline, and cut it out. Do not make the templates before you have the physical frames in your hand because you need to make sure the templates are an exact match for the real frame sizes.
STEP 4: DESIGN YOUR FRAME LAYOUT USING TEMPLATES
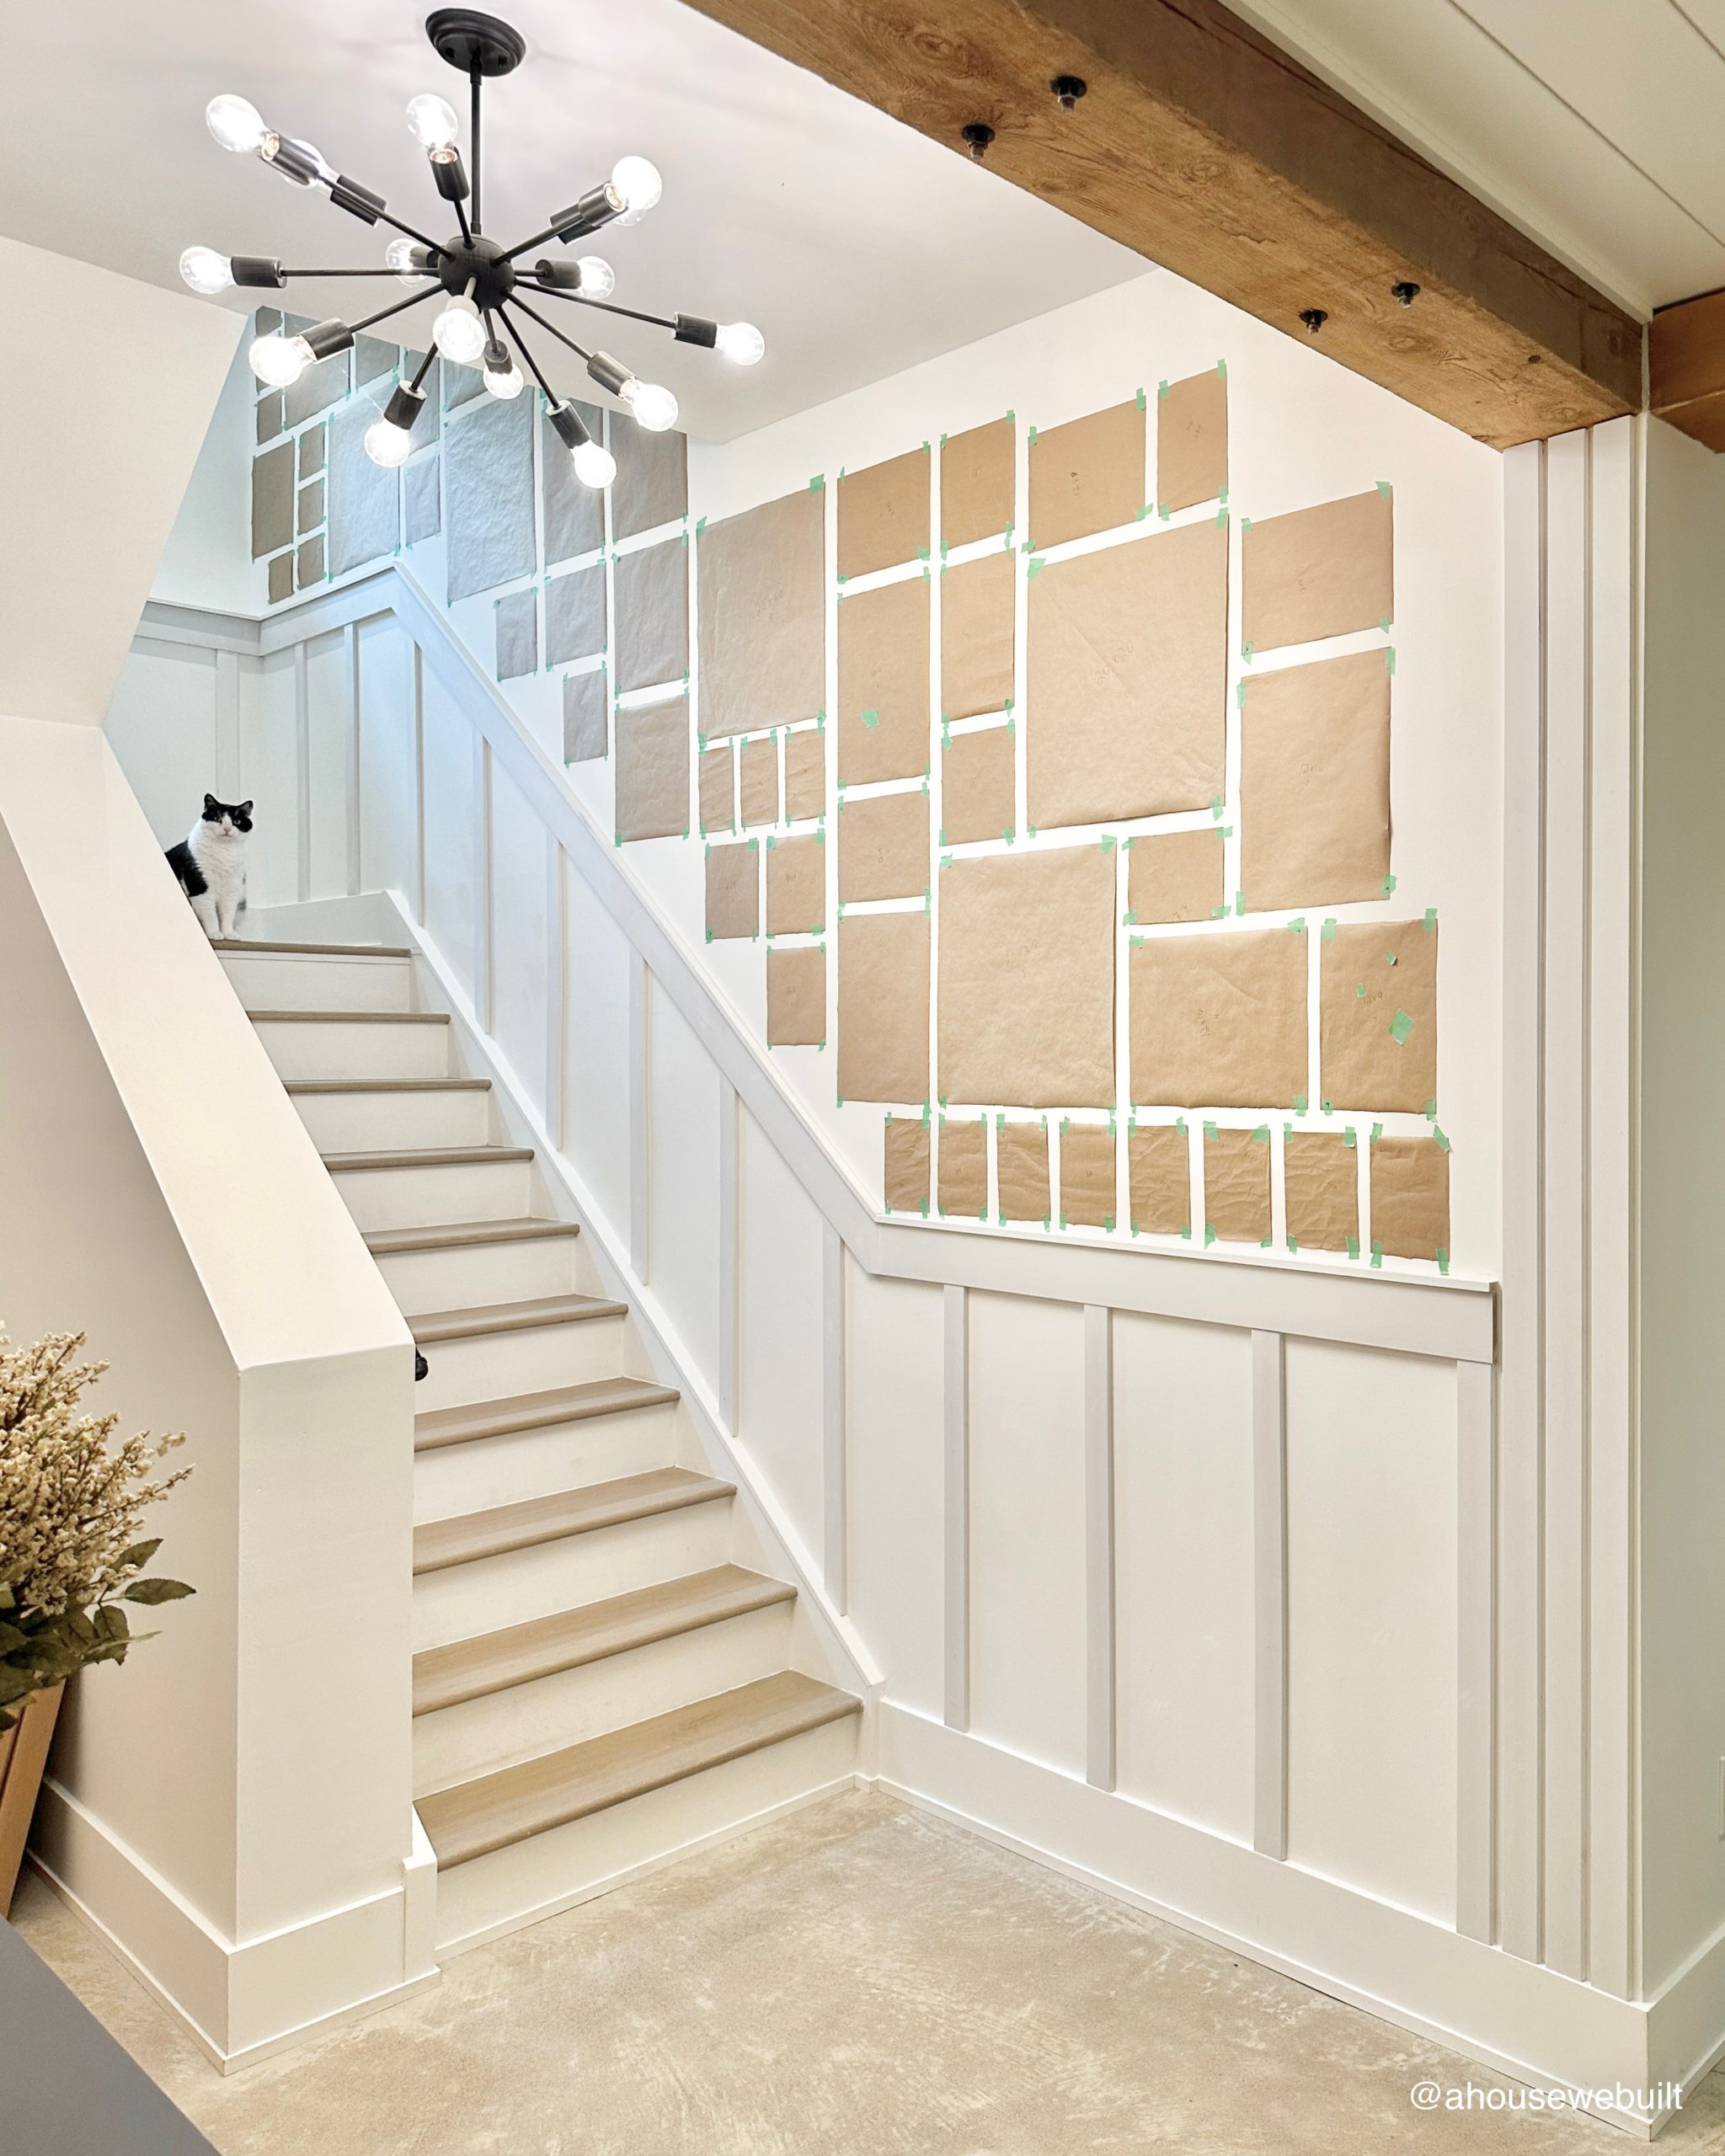
Using the templates you just made and some painter’s tape, design the layout of your frames on your wall. Keep moving them around and around until you have a layout you’re happy with. Not only did I redo my layout (from scratch) twice, but I also moved templates around multiple times throughout the process. Be patient, this might take a while but it’s worth the wait to get it right.
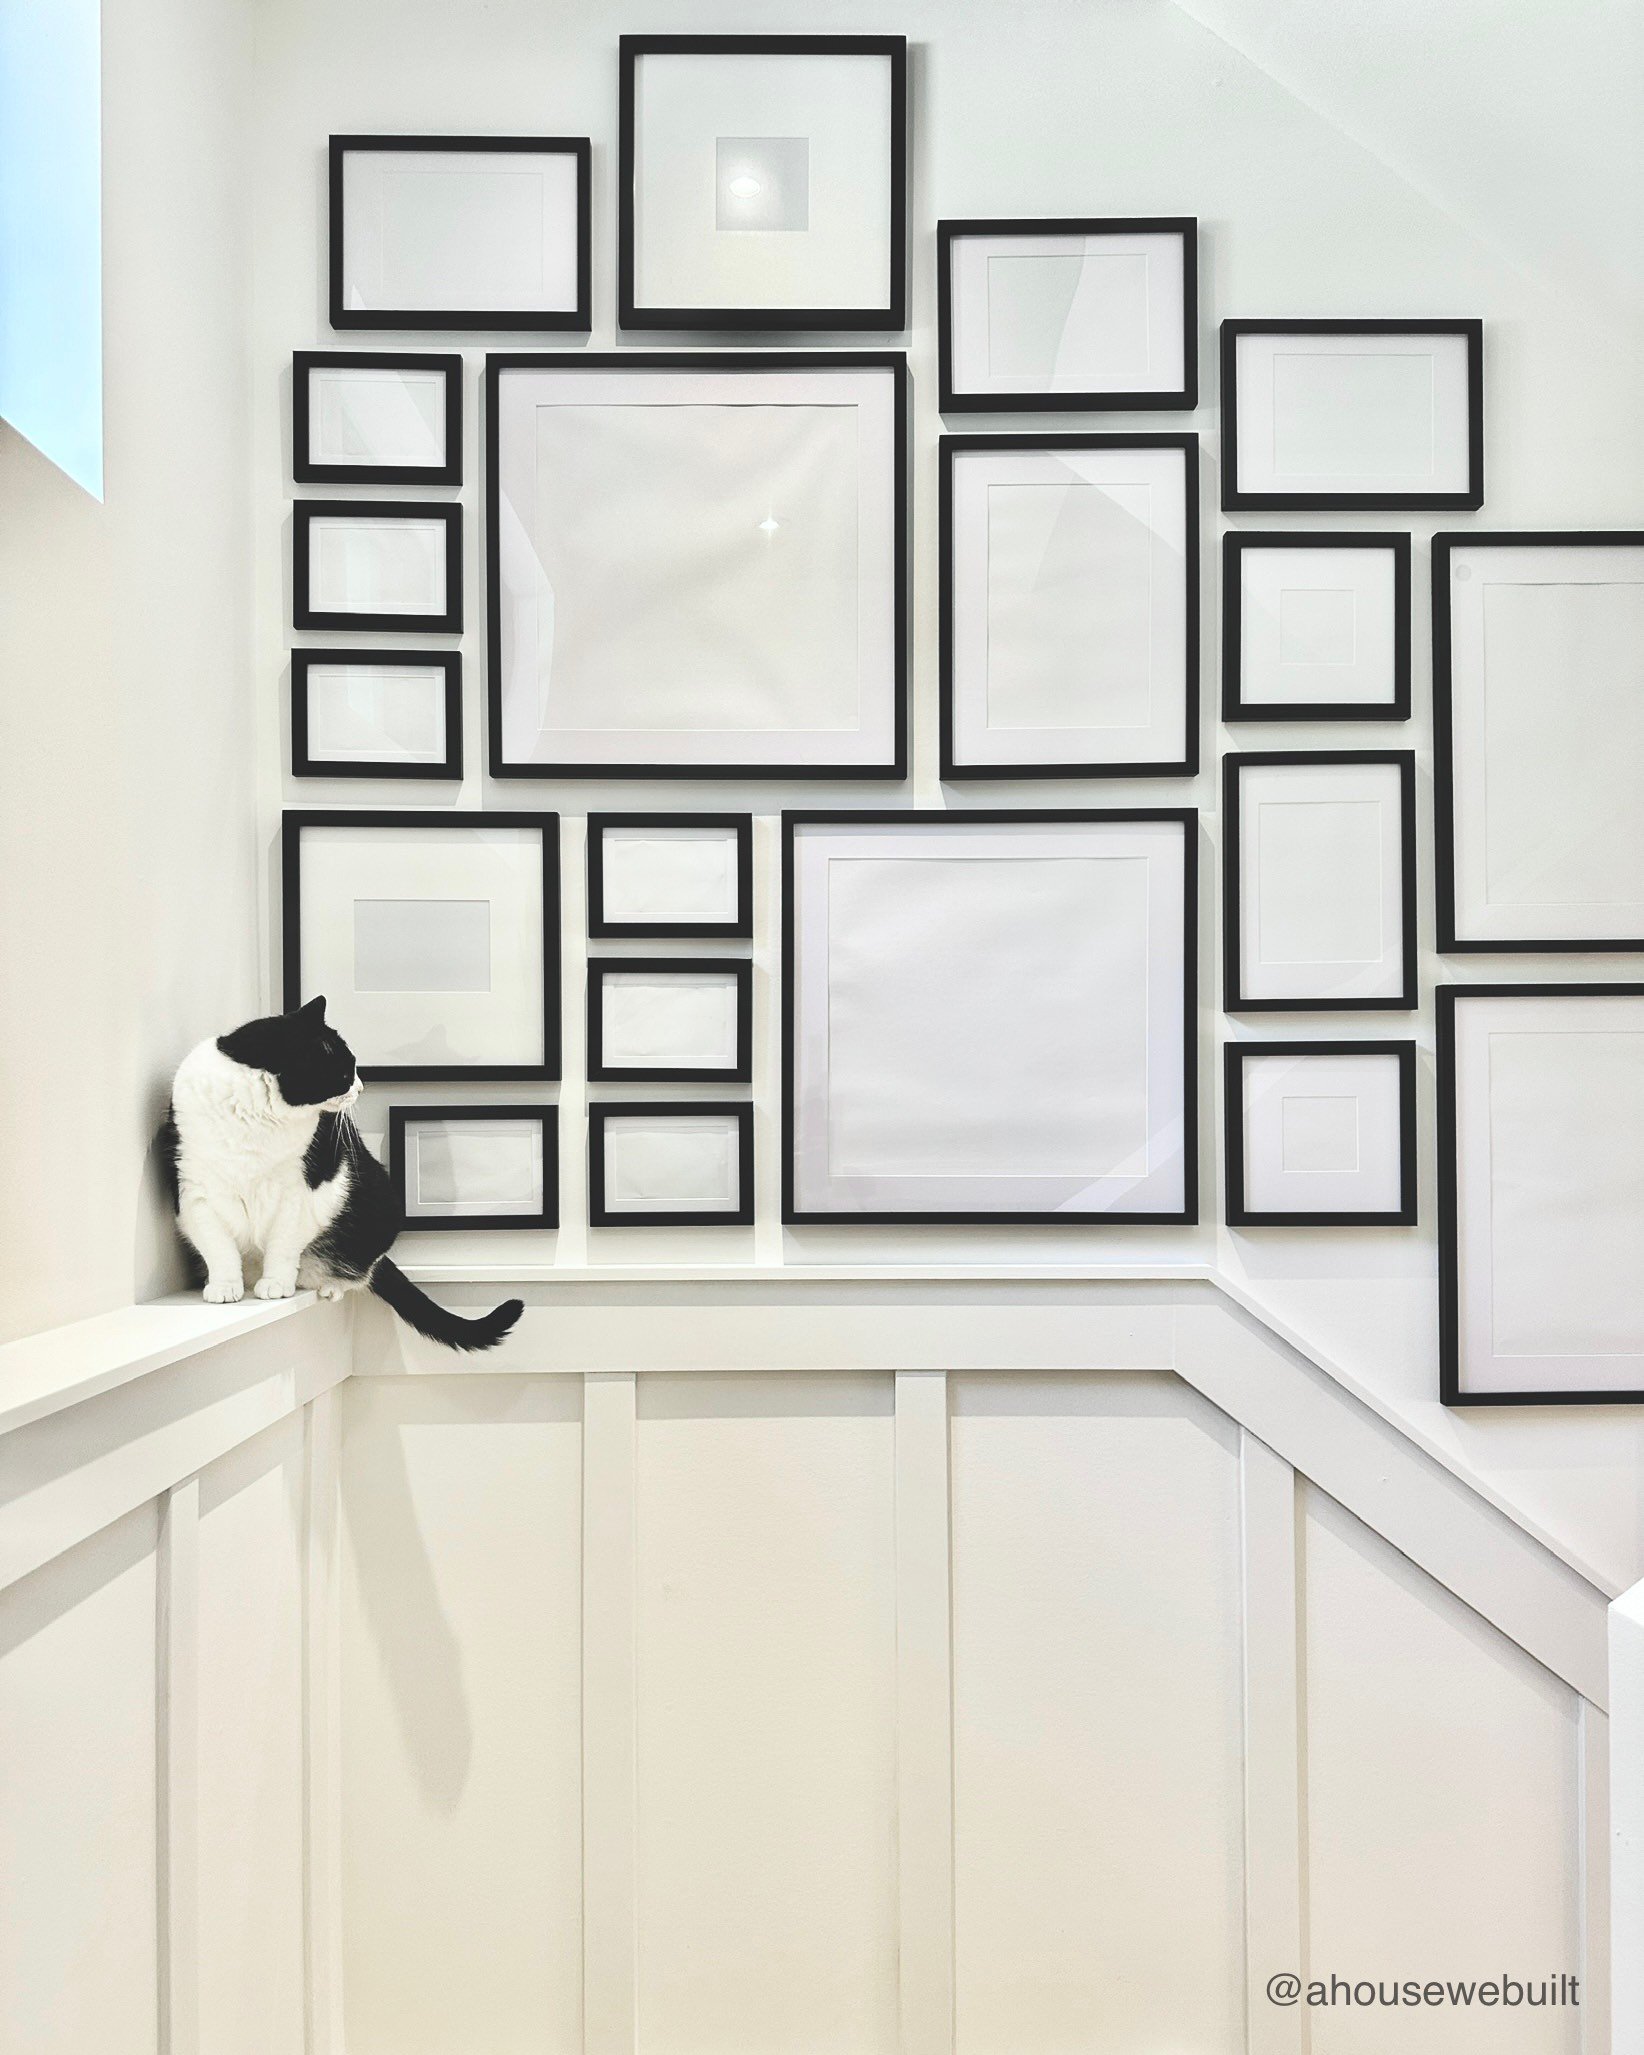
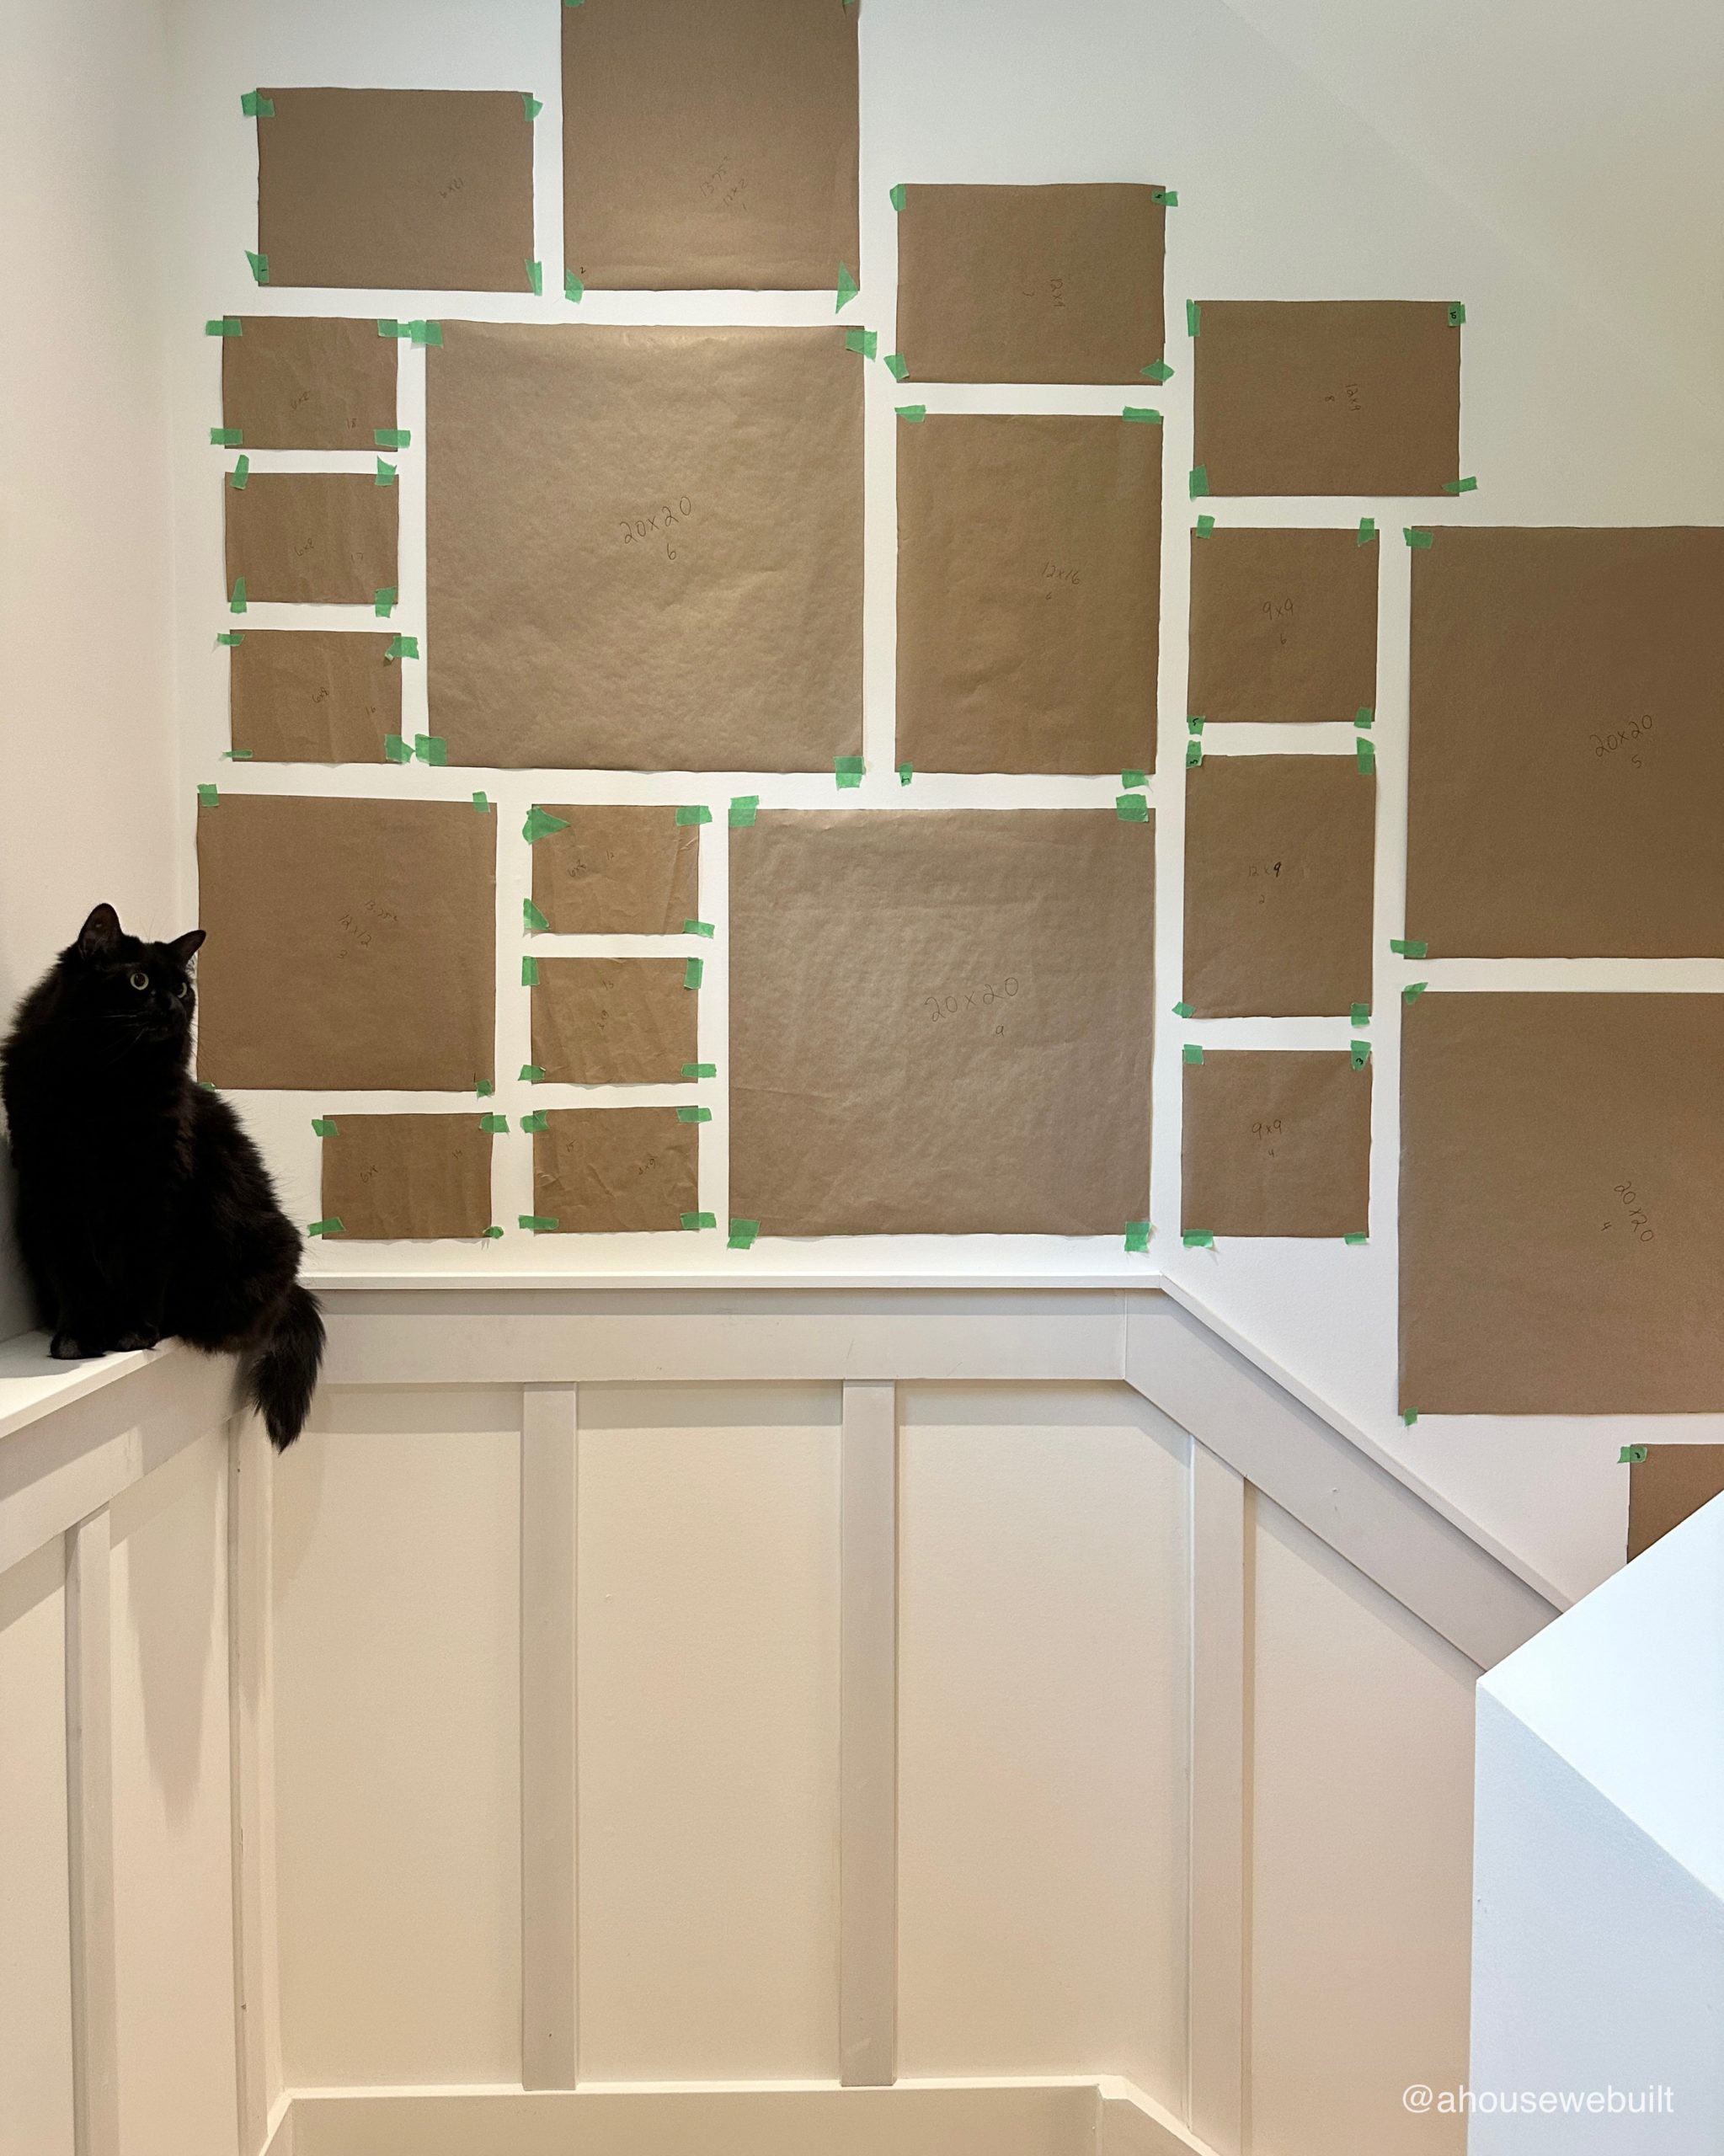
Tip #1: Leave 1.25 – 1.5 inches of space between your frames. This isn’t a rule of thumb for all gallery walls, in some of my other ones (like our Living Room gallery) I’ve left up to 3″ between frames, but it all depends on the scale of your frames and wall. For a close-knit gallery wall with an “interlocking” layout on my staircase, I wanted no more than 1.5″ between the frames so that they felt cohesive and connected. Beware that leaving too much space between frames can make them look like they’re just floating without a purpose so think of that space almost like a tether between them. You want it large enough that you can see between the frames, but small enough that the frame placement together feels intentional.
Tip #2: Use a laser level and tripod to place your templates as straight as you can. I *strongly* advise using a laser level on a tripod instead of a traditional stick level because you need to be able to step back and see your wall. When you’re putting together a grid of interconnected frames like this, it is so much easier to have the level line projected on the wall. And if you’re doing this project on your own (like I did), then a laser level is like having a whole other person there with you. It’s beyond useful!! Now, regarding the tripod, it’s a must-have especially for taller ceilings and I actually bought a cheap one first and it literally broke five minutes into using it so I got this tripod instead that’s much better and heavy duty, and also doubles as a fantastic way to get family photos too if you get a phone holder attachment for it!
Tip #3: Create intentional “pathways” between your frames. Before starting this gallery wall, I did a deep dive all over the internet of all gallery walls I could find pictures of and I determined that all my favorite ones had one thing in common: the pathways between the frames had structure and intention, and there was nothing random about the frame placement. The best way I can describe it is to think of the gaps between frames like roads on a city map. Each one has to lead somewhere, each one has to connect with another one in a way that makes sense. And there should be big strong horizontal and vertical lines as much as possible, with some offshoots throughout. See an example below.

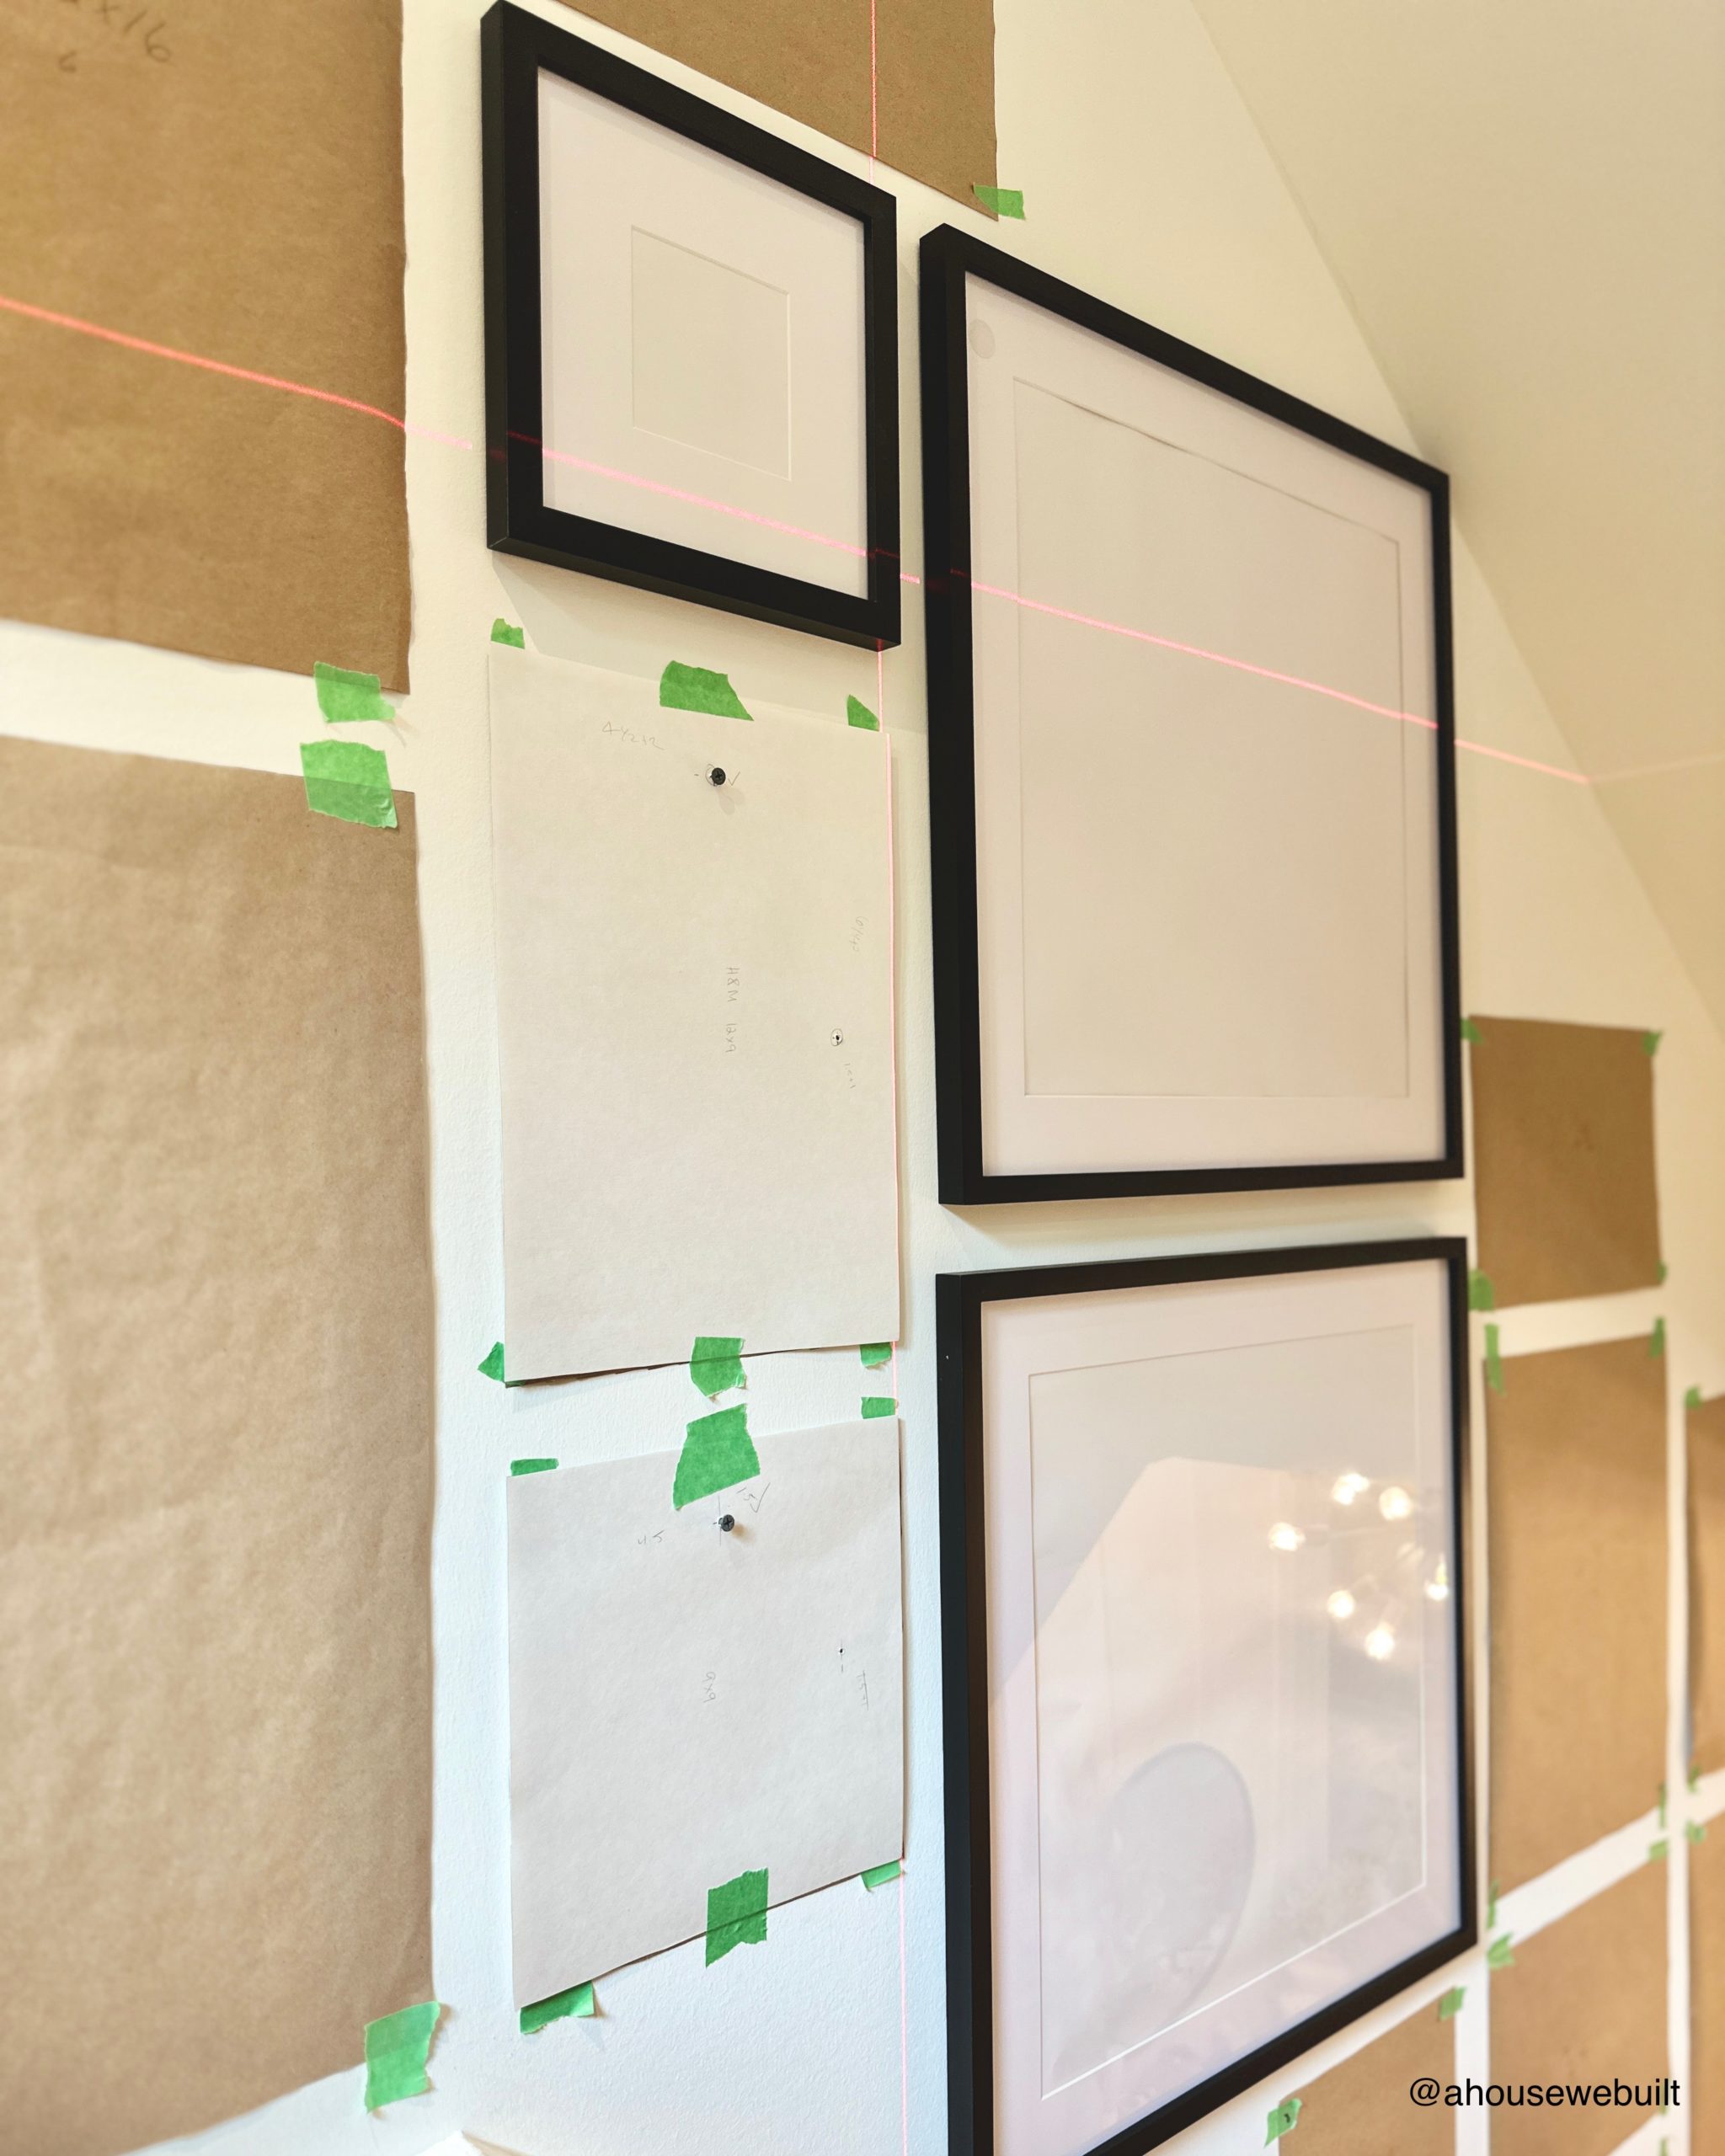
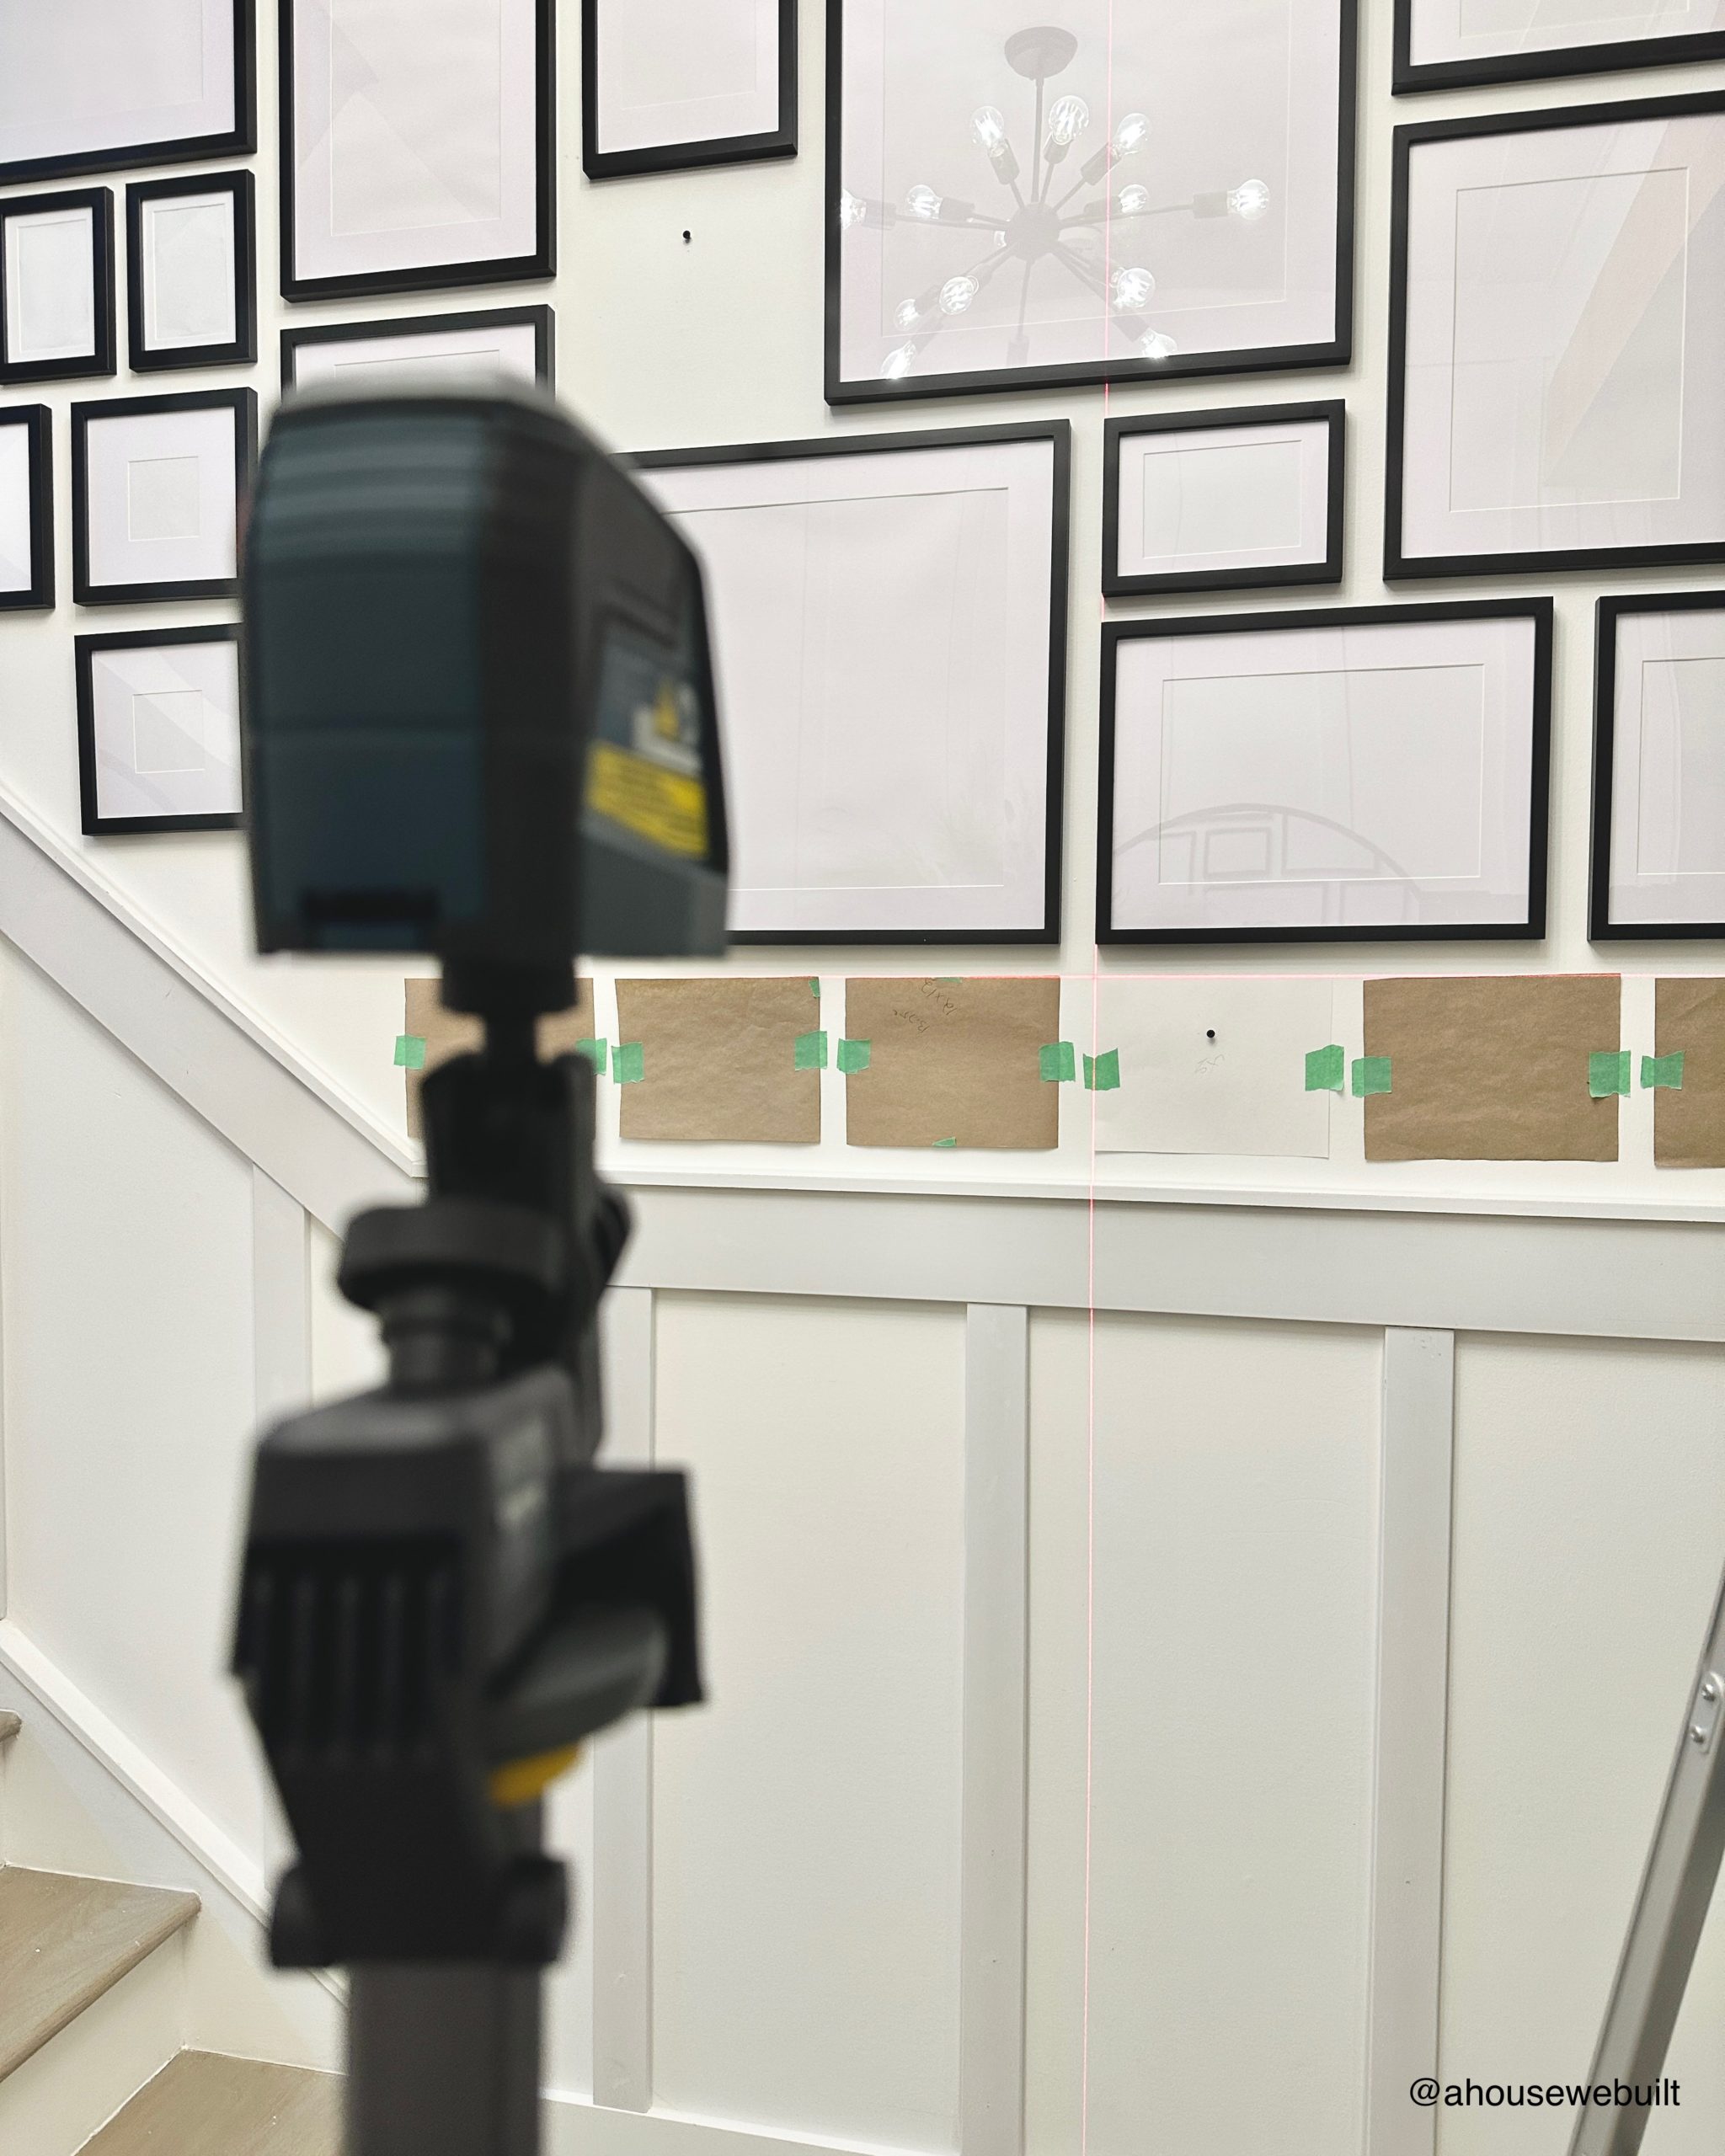
STEP 5: CREATE HOLE-PLACEMENT TEMPLATES
Before you start actually hanging your frames, you will need to figure out a way to know exactly where to drill the holes. My walls are drywall so I decided to use drywall screws to hang my frames. But every frame has a different hole placement and on a wall with almost 60 frames, the best way to figure out where to drill without and without measuring every single time is to create “hole-placement-templates”.
You will need to create one Hole Placement template for every size frame you’re using.
To make Hole Placement Templates, I used cardstock or poster board (Target | Amazon) but you can use any thicker paper that you can cut *very* precisely and that is at least as wide as your biggest frame’s longest side.
- Get one of each size frame you’re using, trace the outline of each frame onto your cardstock one at a time, and cut it out as accurately as possible. It’s very important that this template be precise.
- Measure where the center of the hole is on the back of the frame and transfer that spot onto the template. Mark it with a “+” sign. Note: for rectangular frames, mark holes for both vertical *and* horizontal placement.
- The best way to check that you marked the hole correctly before you start drilling holes in your pretty wall is to test it out somewhere else first (I used a random wall in an unfinished part of our house where a few extra holes wouldn’t matter). So you want to use painter’s tape to stick your Hole Placement Template to the wall and then screw a drywall screw into the X that marks the hole. Then (without removing the template), hang your frame up. If the outer edges of the frame sit exactly over the template (no overlap), then you have marked the hole correctly. If not, then you have to remeasure until you get it right. Do not move forward until you have marked *and tested* the correct hole placement for *each* frame size you plan to use.
(Note: I don’t have specific pictures of these Hole Placement Templates because I wasn’t planning to do a blog post, but in the pics below, they are the white-colored templates you’ll see in various places.)
STEP 6: HANGING YOUR FRAMES
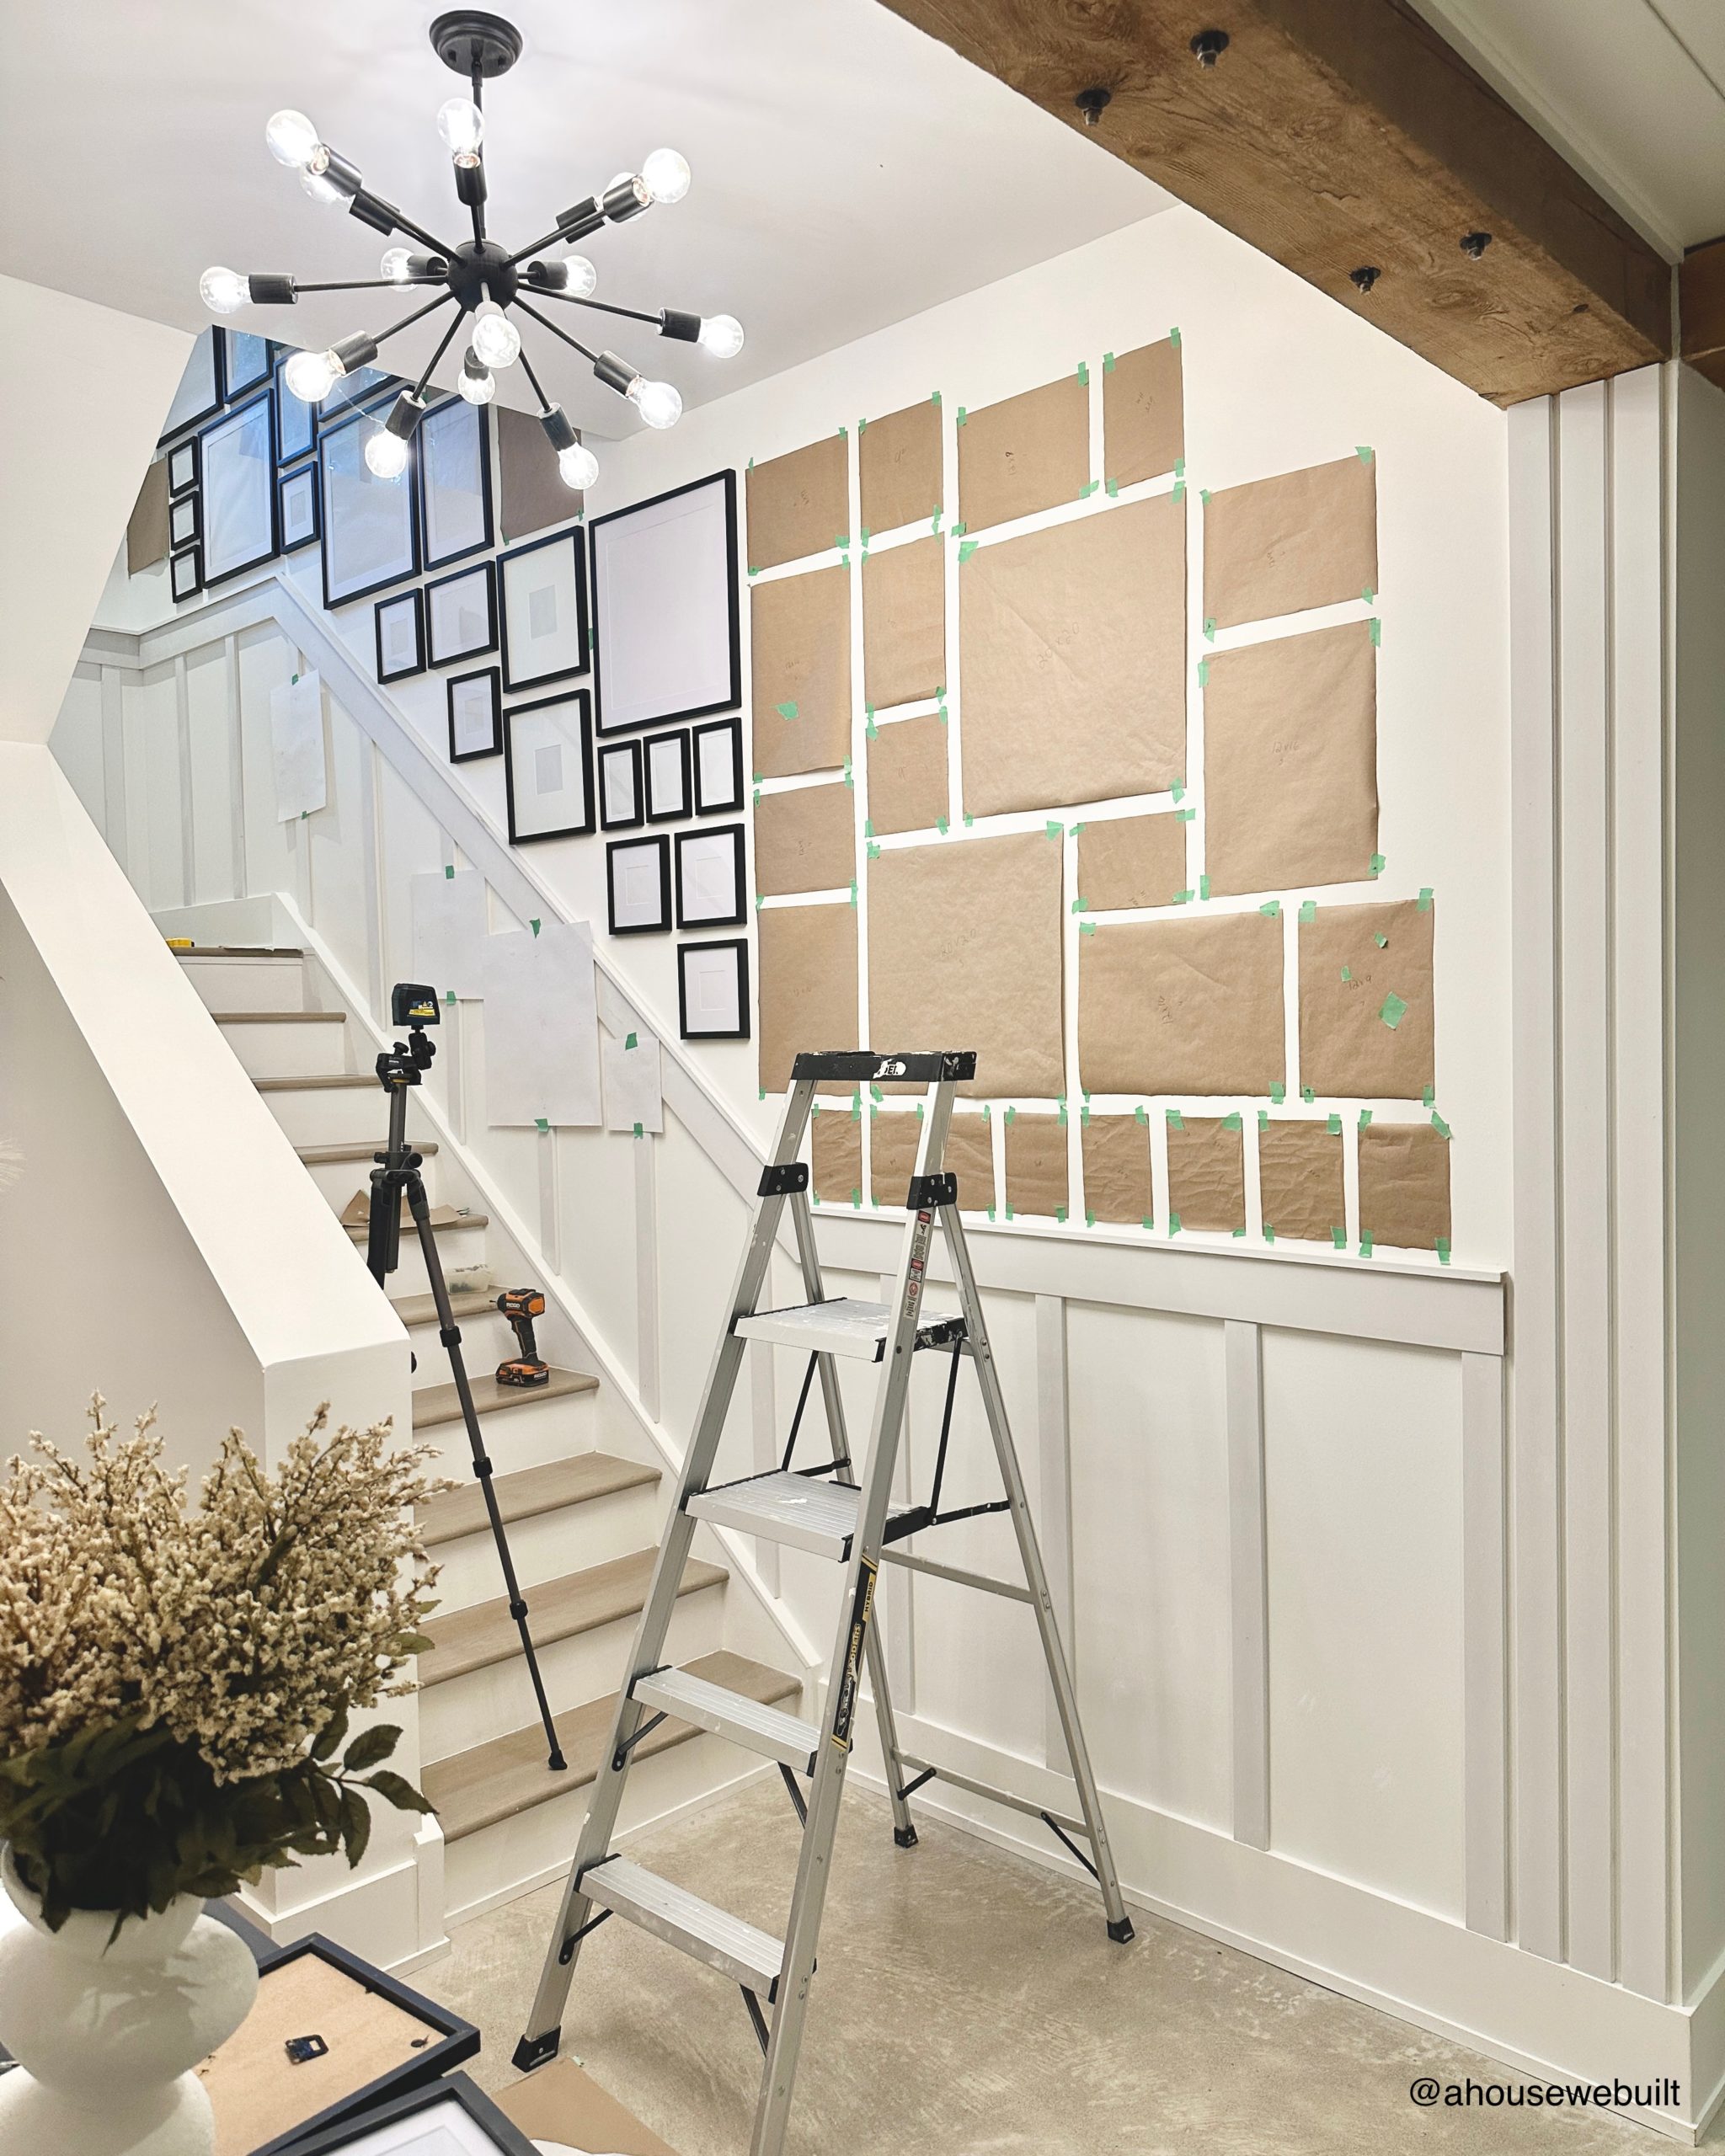
Now you’re finally ready to start hanging frames! To do this, I *strongly* advise hanging ONE frame at a time. Do not pre-drill all your holes because you may need to make subtle adjustments along the way.
For the first frame, I suggest starting with one of your largest frames that’s somewhere in the middle-ish of your wall and working your way outward.
The process I used for hanging frames is below. This method had 100% accuracy – so even though it was slow, every hole I made was in precisely the right spot with no mistakes!
- Line your laser level up with the spot where you plan to hang your frame.
- Tape your Hole Placement Template up *over* your original template.
- Drill the hole (I did not pre-drill, I just screwed the drywall screw right into the wall.)
- Temporarily hang your frame on the wall and double check that it fits over the template *precisely*.
- Remove the frame, unscrew the drywall screw, remove both templates, screw the drywall screw back in, then hang your frame up. It should be in the exact right spot.
Rinse and repeat this process with the next most logical frame, and work your way across your wall ONE BY ONE. For context, it took me about 4-5 hours in total to hang almost 60 frames.


Tip: If you don’t plan to fill your frames with pictures or artwork right away, then I recommend opening each of the frames up and turning whatever graphic they come with (sometimes it’s a brand logo, sometimes it’s a stock image) over backwards so that your frame just shows a blank white image. Also if your frame has plexiglass instead of glass, then you’ll want to remove any protective plastic layers that cover the plexiglass. This way your wall will look cohesive and put together even if the actual frames are all blank. Personally, I plan to leave my frames empty for a while. My plan for this gallery wall is to do a bunch of family pictures so choosing and printing all of them is going to be whole other (biiiiig!) project and while I’m not ready to commit to doing that right now, I love having even just the empty frames on our wall. They have totally transformed our staircase and I couldn’t be happier with how they turned out!
Finally, here’s a before and after of the wall where I did the gallery:
I hope this blog post has encouraged you to try a gallery wall of your own!
If you have any questions, please comment below and I’ll get back to you.
Kelly Yager says
Do you think this idea is possible without the wains coating? Would it be possible to create a “line” you don’t hang past or would that look strange?
admin says
Yes, you can absolutely do this without the paneling! My choice here was a practical one. We store our big Christmas trees in our basement so every year we have to lug the huge bags up and down the stairs so I wanted some protection along the bottom half of the wall. It’s totally not necessary though 🙂