• Skip to primary navigation
  • Skip to main content
  • Skip to primary sidebar
  • Skip to footer

A House We Built

Custom House Designed by Husband & Wife Team | Modern Farmhouse Inspired

  • Shop Our Home
  • Sources by Room
    • All Sources & FAQs
    • Kitchen Sources
    • Pantry Sources
    • Living Room Sources
    • Dining Room Sources
    • Home Office Sources
    • Laundry Room Sources
    • Entryway Sources
    • Mudroom Sources
    • Gallery Wall Sources
    • Reading Room Sources
    • Theater Room Sources
    • Game Room Sources
    • Guest Bedroom Sources
    • Primary Bedroom Sources
    • Primary Closet Sources
    • Primary Bathroom Sources
    • Powder Bathroom Sources
    • Buffalo Check Bathroom Sources
    • Basement Bathroom Sources
    • Basement Sources
    • Stairs, Landings & Hallways
    • Paint Colors and Stain Recap
    • Cleaning Sources & Routines
  • Tutorials
    • How to Make a Staircase Gallery Wall
    • How to Make Textured Canvas Art
    • How to Install Shiplap
    • How to Build a Slat Wall
    • How to Paint an Ikea Dresser
    • How to Build Bypass Barn Doors
    • How to Build a Farmhouse Table and Benches
    • How to Build a Rustic Sideboard
    • How to Build a Slat Sideboard
    • How to Make a Sofa Pit
    • How to DIY a Faux Brick Wall
    • How to Build a Window Seat
    • How to Build a Paneled Accent Wall
    • How to DIY a Functional Play Kitchen
    • How to Stencil a Wall
    • How to Build a Round Table
    • How to Build a Console Table
    • How to Make Paper Stars
    • How to Make Paper Mache Bowls
    • How to Make Clay Links
    • How to Texture Bowls & Vases
    • How to Install Open Shelves
    • How to Make Wood Block Art
    • How to Make a Wood Bead Garland
    • How to Build Cabinet Doors
    • How to Build a Wood Countertop
    • How to DIY a Nightstand Charging Drawer
    • How to Make a Wheat Wreath
    • How to Hang Gallery Wall Frames
    • How to Stain Stairs and Paint Risers
    • How to Make Industrial Stair Railings
    • How to Build a Window Seat Cushion
    • How to Make Salt Dough Ornaments
    • How to DIY a Modern Mantel Christmas Tree
    • How to DIY a Wooden Christmas Village
    • How to Build a Wood Christmas Tree Collar Box
    • How to Make Paper Christmas Trees
  • Cats
    • Cat Room Tour & Litterboxes
    • Cat-Related Sources & Cleaning Tips
    • How to Cat-Proof Christmas Trees & Decor
    • How to Stop Cats from Scratching Furniture
    • How to Stop Cats from Playing with Decor
    • How to Train Cats and Kittens
    • How to Cope with Cat Allergies
    • How to Introduce New Kittens to Older Cats
  • Christmas
    • Christmas Decor Favorites 2023
    • How to Build a Wood Christmas Tree Collar Box
    • Neutral Christmas Present Wrapping
    • How to Make Paper Christmas Stars
    • How to Make Paper Christmas Trees
    • How to Make Salt Dough Ornaments
    • DIY Holiday Art Ideas
    • How to Cat-Proof Christmas Trees & Decor
    • How to Make Modern Tabletop Trees
    • How to Make a Wooden Christmas Village
    • Holiday Cheese & Snack Boards
    • Christmas Decor 2021
    • Christmas Decor 2020
    • Christmas Decor 2019
    • Gingerbread House & Cookies Recipe
    • Puff Tastry Christmas Tree Recipe
    • Christmas Decor 2018
  • Cleaning
    • Cleaning Sources & Routines
    • Minimalism: How To Get Started
    • Cat-Related Cleaning Tips
  • Recipes
    • Apple Turnovers Recipe
    • Baked Pumpkin Donuts Recipe
    • Banana Chocolate Chip Bread Recipe
    • Blueberry Lemon Cake Recipe
    • Cheese & Cracker Snack Boards
    • Chocolate Chip Cookie Recipe
    • Christmas Crack Recipe
    • Chocolate Crinkle Cookies Recipe
    • Cinnamon Rolls Recipe
    • Cinnamon Star Pastry Recipe
    • Coconut Curry Squash Soup Recipe
    • Creamy No-Cheese Pasta Sauce Recipe
    • Crumble Recipe
    • Easy Veggie Pasta Recipe
    • Fresh Rolls Recipe
    • Garlic Flatbread Recipe
    • Gingerbread Biscotti Recipe
    • Gingerbread House & Cookies Recipe
    • Healthy Hearty Salad Recipe
    • Homemade Bread Recipe
    • Lasagna Recipe
    • Molasses Cookies Recipe
    • Oatmeal Raisin Cookies Recipe
    • Pad Thai Recipe
    • Pesto Pasta Recipe
    • Potato Curry + Naan Bread
    • Puff Pastry Christmas Tree Recipe
    • Pumpkin Donut Bites Recipe
    • Pumpkin Loaf Recipe
    • Pumpkin Oat Muffins Recipe
    • Roasted Red Pepper Pasta Recipe
    • Rocky Road Bars Recipe
    • Vegan Bolognese Pasta Sauce
    • Vegetable Soup Recipe
  • About
    • About Us
    • Website Roadmap
    • Shop Our Home
    • Minimalism: How To Get Started
    • Privacy Policy
  • Blog

How to Paint an Ikea Dresser

October 25, 2021 by admin 8 Comments

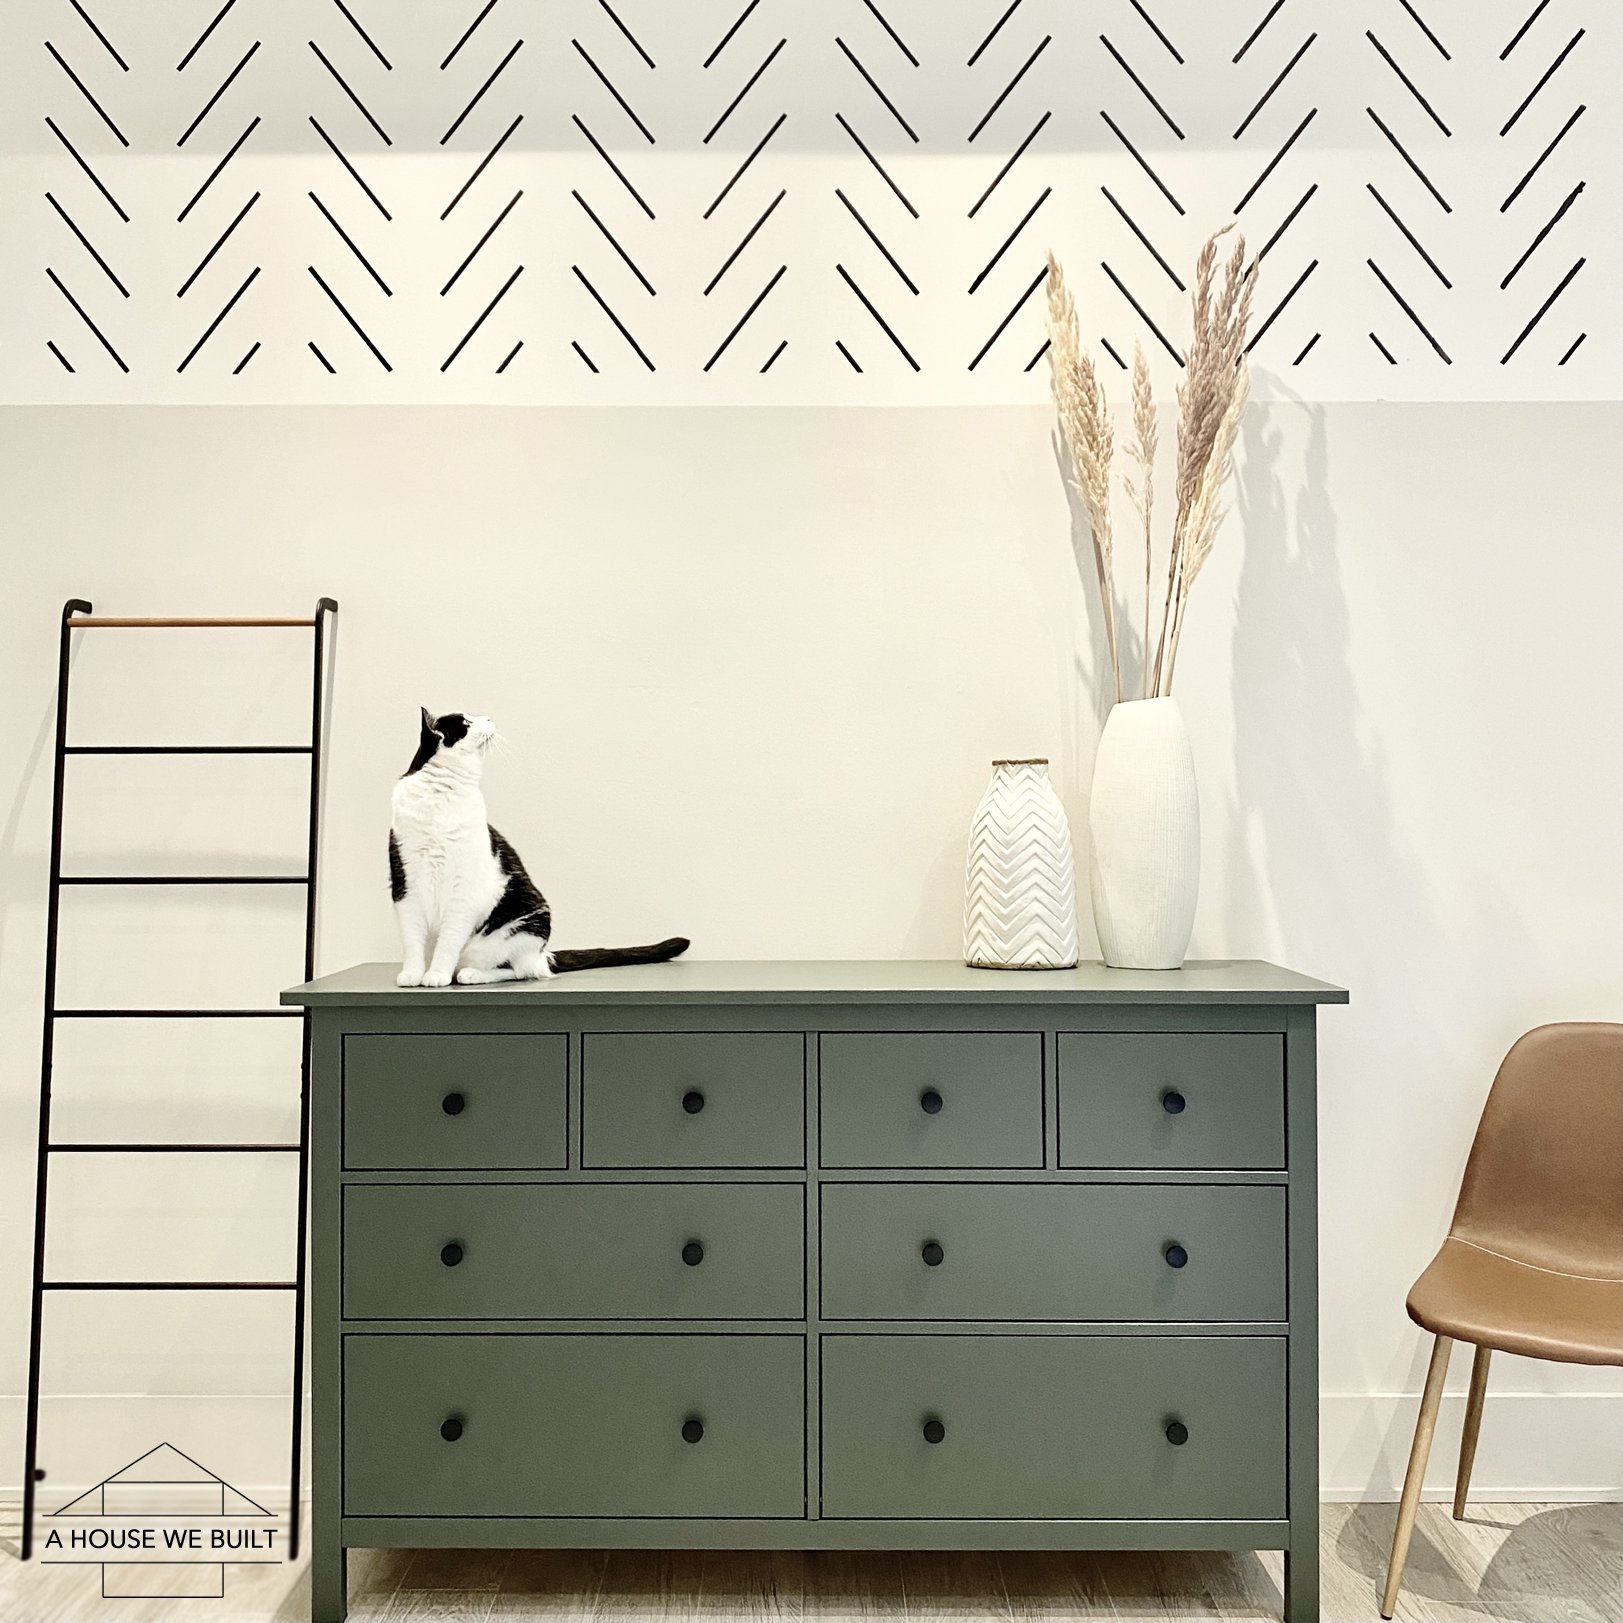
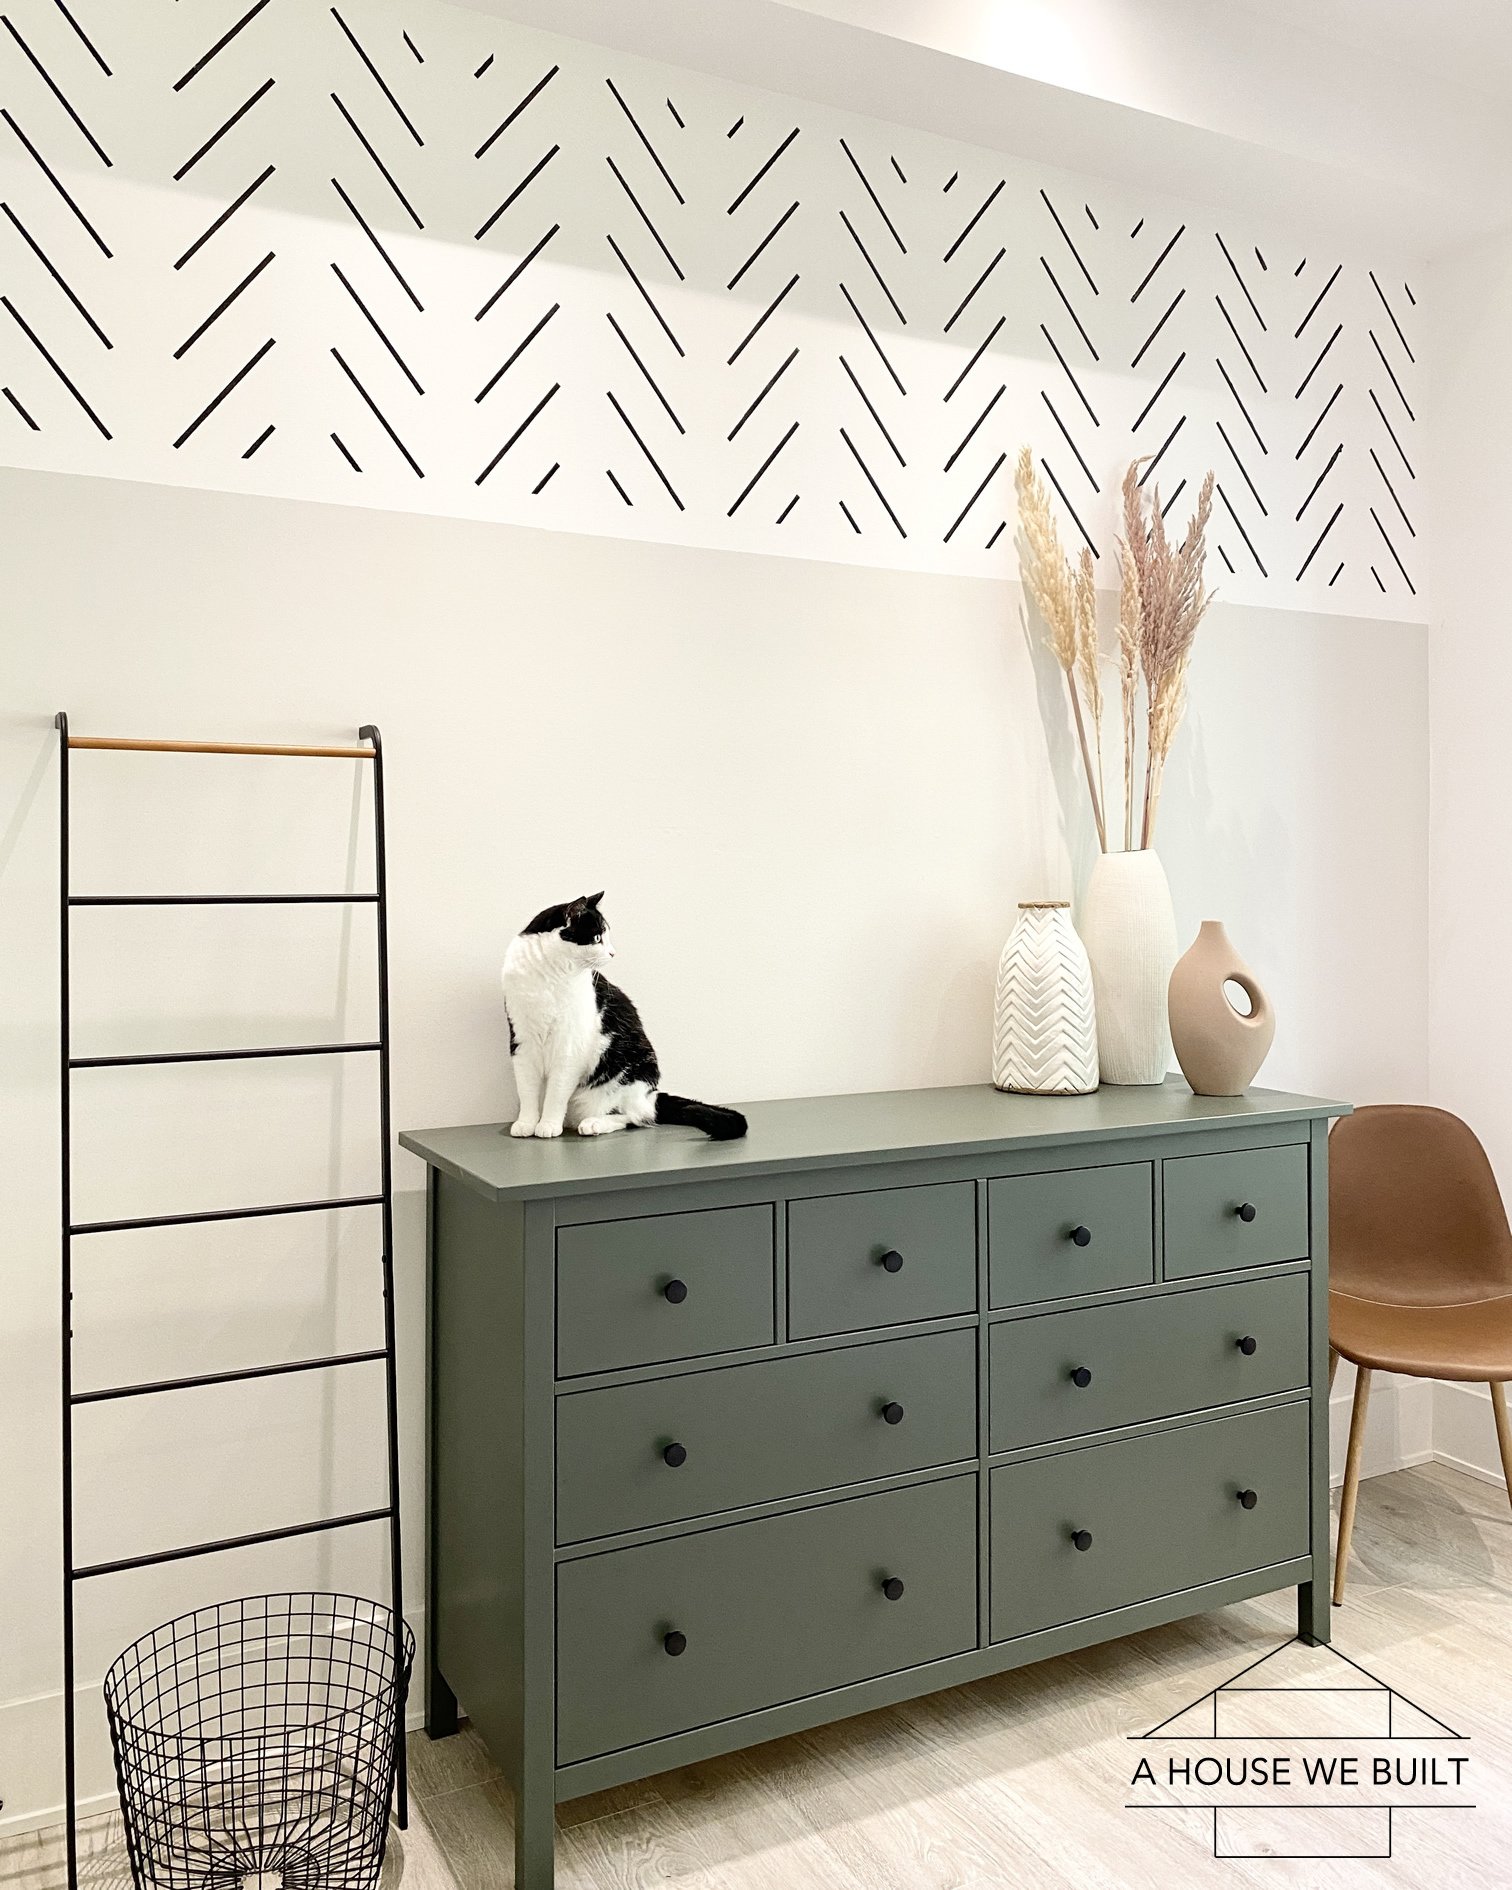
Repainting and refinishing an Ikea dresser is an easy project that can really elevate its look! We recently repainted the dresser shown above to this gorgeous deep muted green color and it totally transformed it.

This tutorial is specifically for the Ikea Hemnes line because this is the only line of their furniture I’ve ever repainted so I can’t know for sure if their other lines would have the same repainting process or not. But the reason I like this particular line is that the unit is made from real wood and is quite good quality.

It was so easy to refinish this dresser that I wasn’t planning to make a tutorial and didn’t take pics along the way, but I’ve been asked for the process so I’m going to share that here along with my tips and tricks.

WHAT YOU’LL NEED:

  • Sandpaper (one sheet): Home Depot | Amazon
  • Paint (half a quart): I used SW Ripe Olive in Satin *
  • Clear top coat (half a quart): Home Depot (matte) | Amazon (satin)
  • Microfiber roller (x2): Home Depot | Amazon
  • Paint tray (x1): Home Depot | Amazon
  • Chip brushes: Home Depot | Amazon
  • Ikea Hemnes dresser

*Paint note: I just used normal wall paint. Btw, Satin & Pearl are the same.

STEP ONE: ASSEMBLE THE UNIT

You want your dresser fully assembled (minus the knobs) before you start painting it. Build the frame and drawers, but don’t install the drawers. Lay them out somewhere to paint with the drawer fronts facing up.

STEP TWO: SANDING

The only parts of the dresser you need to paint are the body/frame (meaning: top, both sides, front, and feet) and drawer fronts, so those are also the only parts you’ll need to sand.

Using a 120 grit paper, just lightly sand over every surface you’ll be painting by hand. Don’t use an electric sander, don’t press too hard, don’t over-sand. The idea is just to lightly rough up the surface so that it’s more accepting of the paint. The whole process of sanding should take like 5-10 mins tops.

STEP THREE: PAINTING

In total, you’ll want to do 2 coats of paint, allowing at least a few hours between coats for drying.

I used a brush for the edges and corners, and a small microfiber roller for the flat surfaces. (Side note: I always use disposable paint brushes. I have a fancy paint brush but I honestly hate cleaning it so I prefer to use chip brushes. They’re a little harder to work with though if you’re new to painting so you might want to work with a better quality brush if you’re not yet as practiced with getting a smooth paint surface.)

You want to work on one surface at a time – meaning you should paint the edges and corners first, then immediately roller that flat surface. The goal is to use your brush to get into all the places that the roller can’t go, but the microfiber roller is what’s going to give you that lovely smooth finish so you want to paint as much as possible with the roller. Sometimes that means painting with the brush first to get the paint into the edges/corners, then going over it with the roller for that nice smooth texture. So don’t do aaaaaall your edging first, then aaaaaall your rollering next because it’ll dry as you work and instead you want your brush strokes and roller lines to meld into each other on each surface to create a perfectly smooth finish.

The goal of painting any cabinetry is to get the smoothest surface you can. A few tips:

  • Lightly feather all your brush strokes
  • Don’t use too much paint, you can always add more
  • Watch for drips and feather them out immediately
  • Always paint in the same direction with long even light brush/roller strokes
  • Aim for no streaks and even coverage

If there’s a side of your dresser that is going to be less visible, I recommend starting with painting that side since you can learn a bit on it and perfect your technique before moving to the more visible sides.

Paint the top surface last as it’s the hardest part to get perfectly smooth and painting the other smaller surfaces and getting them smooth will help you get the hang of the process.

After the first coat has dried, run your hand over the surfaces. If it feels smooth to the touch, you can do your second coat of paint without sanding. If it feels (or looks) rough, then consider doing a light sanding in between coats. Just use the same sandpaper as before, super light sand by hand over everything.

After the second coat, allow to dry overnight before moving forward.

STEP FOUR: TOP COAT

Technically, this is optional. You don’t “have” to top coat your dresser. I’ve built lots of cabinetry that I never top coated so it’s not something you’ll always need to do. However, I wanted this dresser to be easily wipeable and more hardy to bumps and scratches so I decided to top coat the whole thing.

The reason I top coated the entire dresser (instead of just the top surface for example) was to ensure an even finish over the whole unit, especially since my paint was Satin, but my top coat was Matte.

Top coats come in many different finishes, my preference is this triple thick matte one: Home Depot.

I always apply top coat with disposable paint brushes only. Same as with painting, I do one surface at a time in full and try to work fast so that I can get each surface fully covered before it starts to dry because you really want an even coating. (Note: it sometimes go on cloudy, but will dry clear.)

The hardest part will be the top of the dresser because it’s single biggest surface and you need to get an even coating on the whole thing. Once you’ve covered the whole thing, you should be able to lightly run your brush over your work, feathering your brush strokes into each other and ensuring it’s perfectly covered. Watch for drips along the sides too!

Allow this to dry overnight at least.

Next you can choose to either lightly sand and do another top coat, or just leave it. I chose to do a sand & second coat.
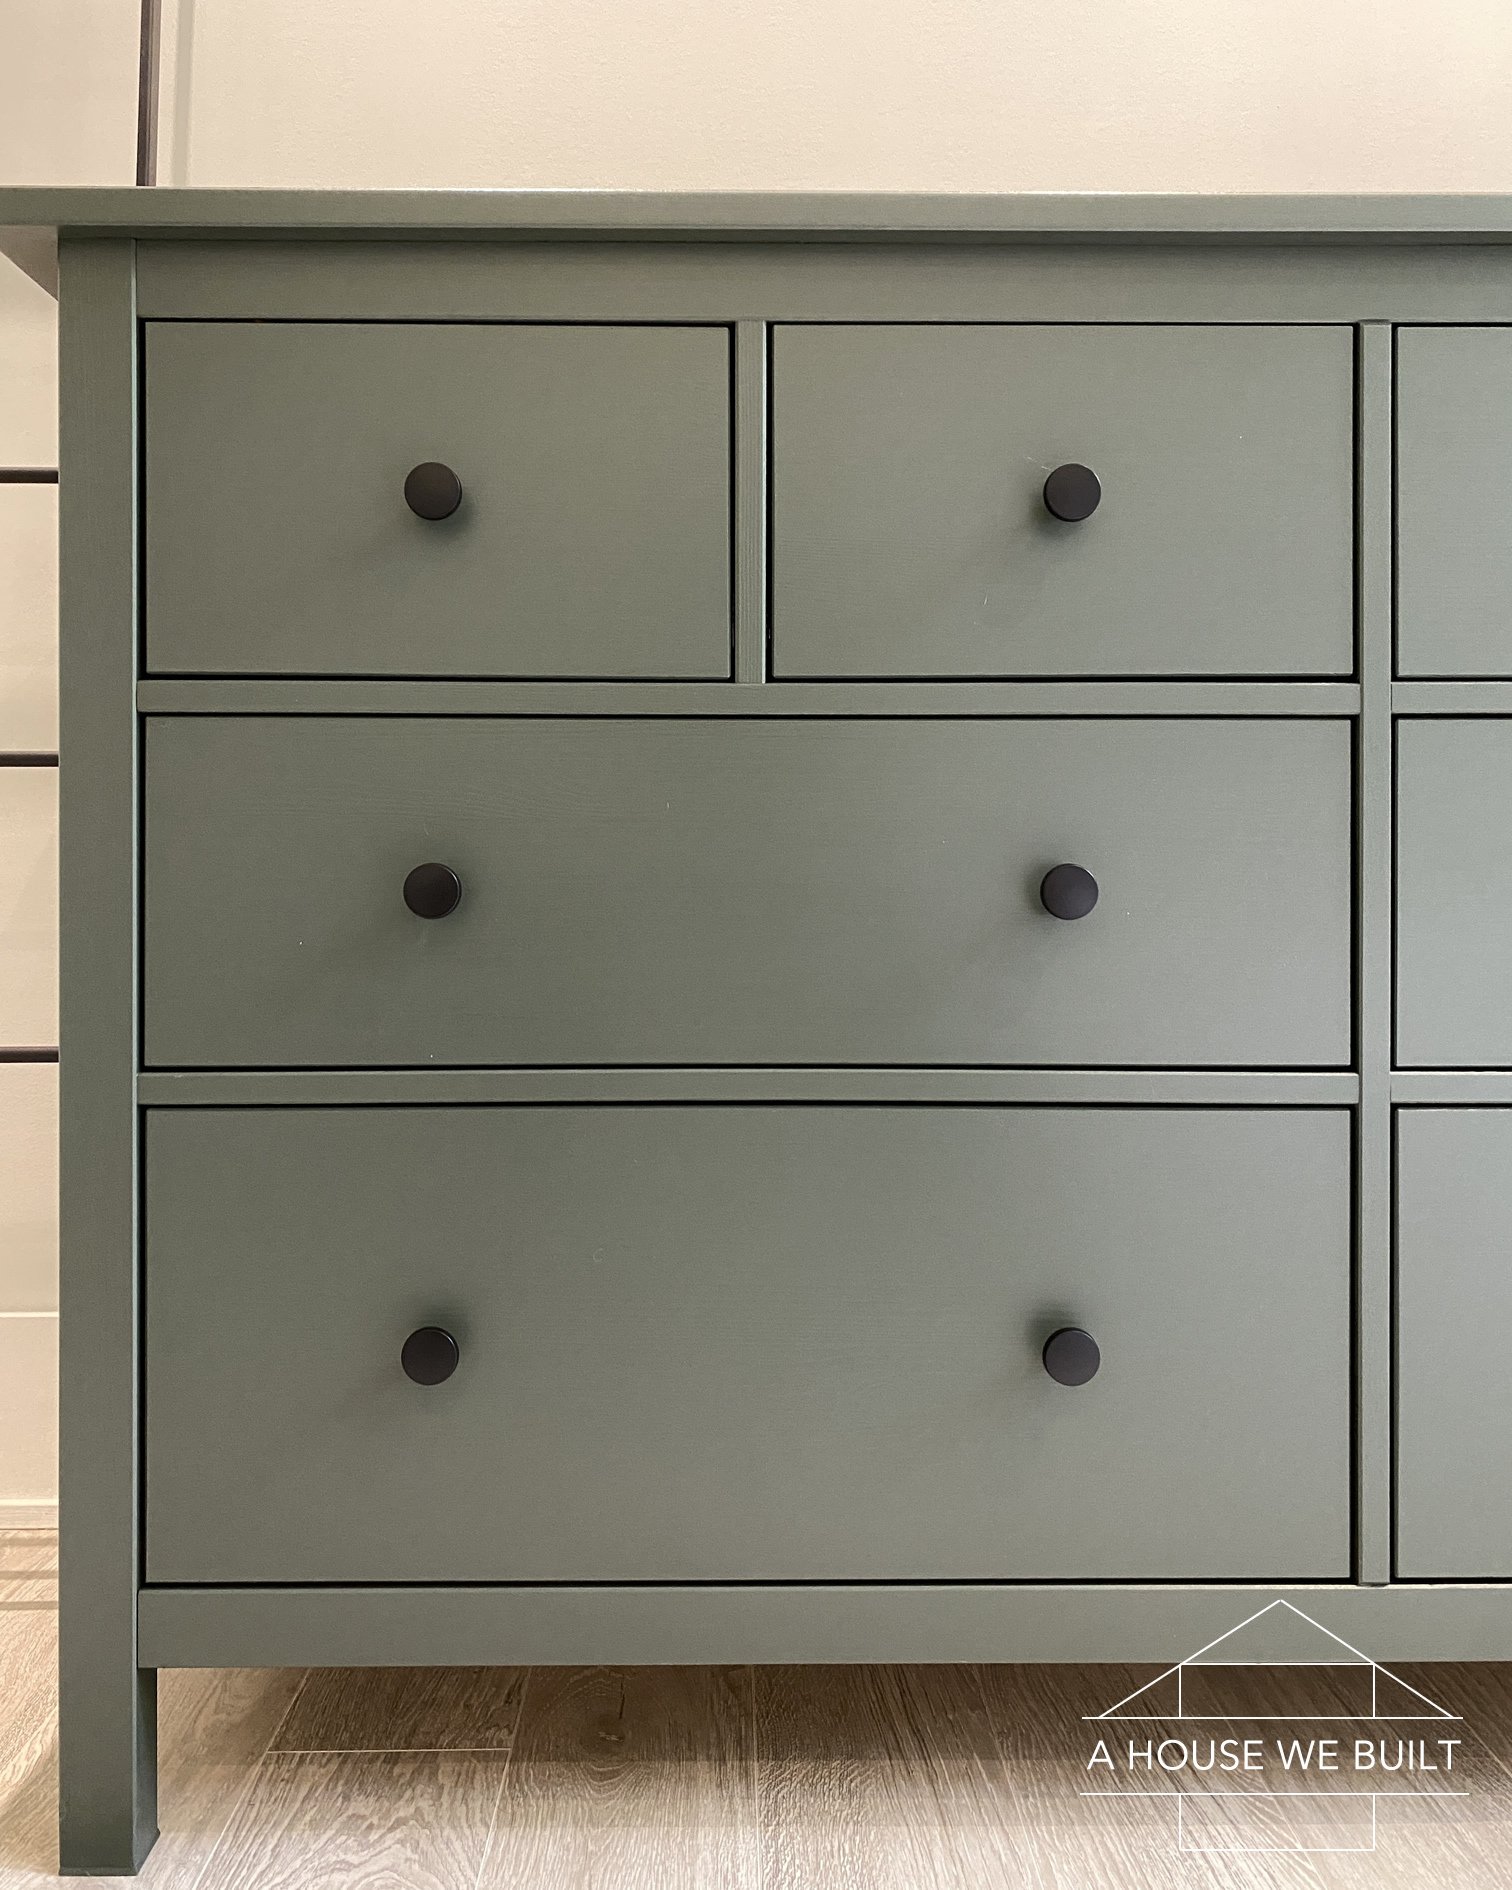
STEP FIVE: HARDWARE

If you’ve come this far, I suggest swapping out the hardware (knobs) for something unique and personal. There’s nothing wrong with the hardware this dresser comes with (in fact, they’re quite good quality) but I just think that hardware is kind of like jewelry and it’s a great and fun way to personalize your dresser.

A few styles/colors I love:

  • Black knobs: Amazon | CB2
  • Wood knobs: Amazon
  • Gold knobs: Amazon | CB2
  • Hex knobs: Amazon | CB2
  • Leather knobs: Amazon | CB2
  • Marble knobs: CB2 | CB2

Tip: If your hardware comes with screws that are too long, just add a few small washers on the screw from the inside of the drawer to take up the extra space without being seen. I needed 2 washers/knob.

SIMILAR DRESSER OPTIONS

If you like this look but are not into DIY, I found a few dresser options in a similar muted green color like the one I chose for this project: Crate & Barrel| Crate & Barrel | Crate & Barrel

STENCIL SOURCE & TUTORIAL

  • Stencil source: Amazon | Walmart
  • Stencil tutorial: How to Stencil a Wall

OTHER SOURCES FROM THIS ROOM

  • Blanket ladder: West Elm | Macy’s
  • Wire basket: H&M Home
  • Tall vase: Crate & Barrel
  • Dried stems: Crate & Barrel
  • Chevron vase: Crate & Barrel
  • Tan vase with hole: H&M Home
  • Chair: Wayfair | Similar: World Market
  • White wall paint color: BM Simply White
  • Gray wall paint color: BM Classic Gray

 
For more of our DIY tutorials, click here.
To explore the other rooms in our house, click here.

Filed Under: Tutorials

Reader Interactions

Comments

  1. Mary says

    November 10, 2021 at 8:53 pm

    Fabulous as always!! I will get around to updating my hemnes dresser soon. Thanks for the tutorial 💖

    Log in to Reply
    • admin says

      November 10, 2021 at 9:40 pm

      You’re very welcome! 🙂

      Log in to Reply
  2. Jenn says

    December 21, 2021 at 5:35 pm

    Question, did you start with the unpainted dresser? I have a black one that’s old and I’m hoping to repaint it. Do you think your technique will work on a black one?

    Log in to Reply
    • admin says

      December 21, 2021 at 7:57 pm

      No, I don’t think this dresser comes raw. You should be able to paint over any of its finishes. If you have a black one and you’re painting a light color, you may need either an extra coat of paint or a primer first.

      Log in to Reply
  3. Grace Mills says

    December 28, 2021 at 3:10 pm

    Hey – thanks for this! Did you use specific wood paint or wall paint? Thank you!

    Log in to Reply
    • admin says

      December 28, 2021 at 3:43 pm

      Hi – that info is in the post ^ 🙂

      Log in to Reply
  4. Kristina says

    January 9, 2022 at 8:55 pm

    Hi! Which finish of dresser did you have? I was hoping to order white but it’s out of stock, even for shipping. Would any of the finishes work?

    Log in to Reply
    • admin says

      January 10, 2022 at 1:43 am

      Any of the finishes should work fine – just don’t skip the light sanding step.

      Log in to Reply

Leave a Reply to Mary Cancel reply

You must be logged in to post a comment.

Primary Sidebar

SHOP OUR HOME

Click any image below for sources from our pics!

WEBSITE ROADMAP

  • Shop Our Home
  • Sources by Room
    • All Sources & FAQs
    • Kitchen Sources
    • Pantry Sources
    • Living Room Sources
    • Dining Room Sources
    • Home Office Sources
    • Laundry Room Sources
    • Entryway Sources
    • Mudroom Sources
    • Gallery Wall Sources
    • Reading Room Sources
    • Theater Room Sources
    • Game Room Sources
    • Guest Bedroom Sources
    • Primary Bedroom Sources
    • Primary Closet Sources
    • Primary Bathroom Sources
    • Powder Bathroom Sources
    • Buffalo Check Bathroom Sources
    • Basement Bathroom Sources
    • Basement Sources
    • Stairs, Landings & Hallways
    • Paint Colors and Stain Recap
    • Cleaning Sources & Routines
  • Tutorials
    • How to Make a Staircase Gallery Wall
    • How to Make Textured Canvas Art
    • How to Install Shiplap
    • How to Build a Slat Wall
    • How to Paint an Ikea Dresser
    • How to Build Bypass Barn Doors
    • How to Build a Farmhouse Table and Benches
    • How to Build a Rustic Sideboard
    • How to Build a Slat Sideboard
    • How to Make a Sofa Pit
    • How to DIY a Faux Brick Wall
    • How to Build a Window Seat
    • How to Build a Paneled Accent Wall
    • How to DIY a Functional Play Kitchen
    • How to Stencil a Wall
    • How to Build a Round Table
    • How to Build a Console Table
    • How to Make Paper Stars
    • How to Make Paper Mache Bowls
    • How to Make Clay Links
    • How to Texture Bowls & Vases
    • How to Install Open Shelves
    • How to Make Wood Block Art
    • How to Make a Wood Bead Garland
    • How to Build Cabinet Doors
    • How to Build a Wood Countertop
    • How to DIY a Nightstand Charging Drawer
    • How to Make a Wheat Wreath
    • How to Hang Gallery Wall Frames
    • How to Stain Stairs and Paint Risers
    • How to Make Industrial Stair Railings
    • How to Build a Window Seat Cushion
    • How to Make Salt Dough Ornaments
    • How to DIY a Modern Mantel Christmas Tree
    • How to DIY a Wooden Christmas Village
    • How to Build a Wood Christmas Tree Collar Box
    • How to Make Paper Christmas Trees
  • Cats
    • Cat Room Tour & Litterboxes
    • Cat-Related Sources & Cleaning Tips
    • How to Cat-Proof Christmas Trees & Decor
    • How to Stop Cats from Scratching Furniture
    • How to Stop Cats from Playing with Decor
    • How to Train Cats and Kittens
    • How to Cope with Cat Allergies
    • How to Introduce New Kittens to Older Cats
  • Christmas
    • Christmas Decor Favorites 2023
    • How to Build a Wood Christmas Tree Collar Box
    • Neutral Christmas Present Wrapping
    • How to Make Paper Christmas Stars
    • How to Make Paper Christmas Trees
    • How to Make Salt Dough Ornaments
    • DIY Holiday Art Ideas
    • How to Cat-Proof Christmas Trees & Decor
    • How to Make Modern Tabletop Trees
    • How to Make a Wooden Christmas Village
    • Holiday Cheese & Snack Boards
    • Christmas Decor 2021
    • Christmas Decor 2020
    • Christmas Decor 2019
    • Gingerbread House & Cookies Recipe
    • Puff Tastry Christmas Tree Recipe
    • Christmas Decor 2018
  • Cleaning
    • Cleaning Sources & Routines
    • Minimalism: How To Get Started
    • Cat-Related Cleaning Tips
  • Recipes
    • Apple Turnovers Recipe
    • Baked Pumpkin Donuts Recipe
    • Banana Chocolate Chip Bread Recipe
    • Blueberry Lemon Cake Recipe
    • Cheese & Cracker Snack Boards
    • Chocolate Chip Cookie Recipe
    • Christmas Crack Recipe
    • Chocolate Crinkle Cookies Recipe
    • Cinnamon Rolls Recipe
    • Cinnamon Star Pastry Recipe
    • Coconut Curry Squash Soup Recipe
    • Creamy No-Cheese Pasta Sauce Recipe
    • Crumble Recipe
    • Easy Veggie Pasta Recipe
    • Fresh Rolls Recipe
    • Garlic Flatbread Recipe
    • Gingerbread Biscotti Recipe
    • Gingerbread House & Cookies Recipe
    • Healthy Hearty Salad Recipe
    • Homemade Bread Recipe
    • Lasagna Recipe
    • Molasses Cookies Recipe
    • Oatmeal Raisin Cookies Recipe
    • Pad Thai Recipe
    • Pesto Pasta Recipe
    • Potato Curry + Naan Bread
    • Puff Pastry Christmas Tree Recipe
    • Pumpkin Donut Bites Recipe
    • Pumpkin Loaf Recipe
    • Pumpkin Oat Muffins Recipe
    • Roasted Red Pepper Pasta Recipe
    • Rocky Road Bars Recipe
    • Vegan Bolognese Pasta Sauce
    • Vegetable Soup Recipe
  • About
    • About Us
    • Website Roadmap
    • Shop Our Home
    • Minimalism: How To Get Started
    • Privacy Policy
  • Blog

WHERE WE SHOP

Amazon

Wayfair

West Elm

Crate & Barrel

CB2

Pottery Barn

McGee & Go

Overstock

Rejuvenation

Joss and Main

All Modern

Target

Home Depot

World Market

Etsy

H&M Home

Lulu and Georgia

Serena & Lily 

Schoolhouse

Anthropologie

RECENT POSTS

  • Christmas 2023
  • Christmas Decor Favorites 2023
  • How to Make a Staircase Gallery Wall
  • Functional Play Kitchen DIY
  • Christmas Decor 2022
  • Cinnamon Rolls Recipe

Meta

  • Log in
  • Entries feed
  • Comments feed
  • WordPress.org

Footer

RECENT POSTS

  • Christmas 2023
  • Christmas Decor Favorites 2023
  • How to Make a Staircase Gallery Wall
  • Functional Play Kitchen DIY
  • Christmas Decor 2022
  • Cinnamon Rolls Recipe
  • Christmas Decor 2021
  • Cinnamon Star Pastry Recipe

SHOP OUR HOME

FOLLOW US

ON INSTAGRAM

For daily updates on our house projects and rescue kitties, follow us on Instagram @ahousewebuilt

ON SHOP.LTK

To shop our home pics daily, follow ahousewebuilt in the free SHOP.LTK app (formerly LIKEtoKNOW.it) now available from the App Store to get product sources from our pics. With this app, you can instantly shop your screenshot of any of our Instagram pics! We always link exactly what we have when available and often offer similar options as well!

Copyright © 2025 · Metro Pro on Genesis Framework · WordPress · Log in