• Skip to primary navigation
  • Skip to main content
  • Skip to primary sidebar
  • Skip to footer

A House We Built

Custom House Designed by Husband & Wife Team | Modern Farmhouse Inspired

  • Shop Our Home
  • Sources by Room
    • All Sources & FAQs
    • Kitchen Sources
    • Pantry Sources
    • Living Room Sources
    • Dining Room Sources
    • Home Office Sources
    • Laundry Room Sources
    • Entryway Sources
    • Mudroom Sources
    • Gallery Wall Sources
    • Reading Room Sources
    • Theater Room Sources
    • Game Room Sources
    • Guest Bedroom Sources
    • Primary Bedroom Sources
    • Primary Closet Sources
    • Primary Bathroom Sources
    • Powder Bathroom Sources
    • Buffalo Check Bathroom Sources
    • Basement Bathroom Sources
    • Basement Sources
    • Stairs, Landings & Hallways
    • Paint Colors and Stain Recap
    • Cleaning Sources & Routines
  • Tutorials
    • How to Make a Staircase Gallery Wall
    • How to Make Textured Canvas Art
    • How to Install Shiplap
    • How to Build a Slat Wall
    • How to Paint an Ikea Dresser
    • How to Build Bypass Barn Doors
    • How to Build a Farmhouse Table and Benches
    • How to Build a Rustic Sideboard
    • How to Build a Slat Sideboard
    • How to Make a Sofa Pit
    • How to DIY a Faux Brick Wall
    • How to Build a Window Seat
    • How to Build a Paneled Accent Wall
    • How to DIY a Functional Play Kitchen
    • How to Stencil a Wall
    • How to Build a Round Table
    • How to Build a Console Table
    • How to Make Paper Stars
    • How to Make Paper Mache Bowls
    • How to Make Clay Links
    • How to Texture Bowls & Vases
    • How to Install Open Shelves
    • How to Make Wood Block Art
    • How to Make a Wood Bead Garland
    • How to Build Cabinet Doors
    • How to Build a Wood Countertop
    • How to DIY a Nightstand Charging Drawer
    • How to Make a Wheat Wreath
    • How to Hang Gallery Wall Frames
    • How to Stain Stairs and Paint Risers
    • How to Make Industrial Stair Railings
    • How to Build a Window Seat Cushion
    • How to Make Salt Dough Ornaments
    • How to DIY a Modern Mantel Christmas Tree
    • How to DIY a Wooden Christmas Village
    • How to Build a Wood Christmas Tree Collar Box
    • How to Make Paper Christmas Trees
  • Cats
    • Cat Room Tour & Litterboxes
    • Cat-Related Sources & Cleaning Tips
    • How to Cat-Proof Christmas Trees & Decor
    • How to Stop Cats from Scratching Furniture
    • How to Stop Cats from Playing with Decor
    • How to Train Cats and Kittens
    • How to Cope with Cat Allergies
    • How to Introduce New Kittens to Older Cats
  • Christmas
    • Christmas Decor Favorites 2023
    • How to Build a Wood Christmas Tree Collar Box
    • Neutral Christmas Present Wrapping
    • How to Make Paper Christmas Stars
    • How to Make Paper Christmas Trees
    • How to Make Salt Dough Ornaments
    • DIY Holiday Art Ideas
    • How to Cat-Proof Christmas Trees & Decor
    • How to Make Modern Tabletop Trees
    • How to Make a Wooden Christmas Village
    • Holiday Cheese & Snack Boards
    • Christmas Decor 2021
    • Christmas Decor 2020
    • Christmas Decor 2019
    • Gingerbread House & Cookies Recipe
    • Puff Tastry Christmas Tree Recipe
    • Christmas Decor 2018
  • Cleaning
    • Cleaning Sources & Routines
    • Minimalism: How To Get Started
    • Cat-Related Cleaning Tips
  • Recipes
    • Apple Turnovers Recipe
    • Baked Pumpkin Donuts Recipe
    • Banana Chocolate Chip Bread Recipe
    • Blueberry Lemon Cake Recipe
    • Cheese & Cracker Snack Boards
    • Chocolate Chip Cookie Recipe
    • Christmas Crack Recipe
    • Chocolate Crinkle Cookies Recipe
    • Cinnamon Rolls Recipe
    • Cinnamon Star Pastry Recipe
    • Coconut Curry Squash Soup Recipe
    • Creamy No-Cheese Pasta Sauce Recipe
    • Crumble Recipe
    • Easy Veggie Pasta Recipe
    • Fresh Rolls Recipe
    • Garlic Flatbread Recipe
    • Gingerbread Biscotti Recipe
    • Gingerbread House & Cookies Recipe
    • Healthy Hearty Salad Recipe
    • Homemade Bread Recipe
    • Lasagna Recipe
    • Molasses Cookies Recipe
    • Oatmeal Raisin Cookies Recipe
    • Pad Thai Recipe
    • Pesto Pasta Recipe
    • Potato Curry + Naan Bread
    • Puff Pastry Christmas Tree Recipe
    • Pumpkin Donut Bites Recipe
    • Pumpkin Loaf Recipe
    • Pumpkin Oat Muffins Recipe
    • Roasted Red Pepper Pasta Recipe
    • Rocky Road Bars Recipe
    • Vegan Bolognese Pasta Sauce
    • Vegetable Soup Recipe
  • About
    • About Us
    • Website Roadmap
    • Shop Our Home
    • Minimalism: How To Get Started
    • Privacy Policy
  • Blog

How to Make Paper Mache Bowls | Decor DIY

October 5, 2020 by admin Leave a Comment

I made several paper mache bowls for free using recycled paper waste from our home so I’m going to share the process here because they’re easy to make and they’re a great way to re-use paper waste.

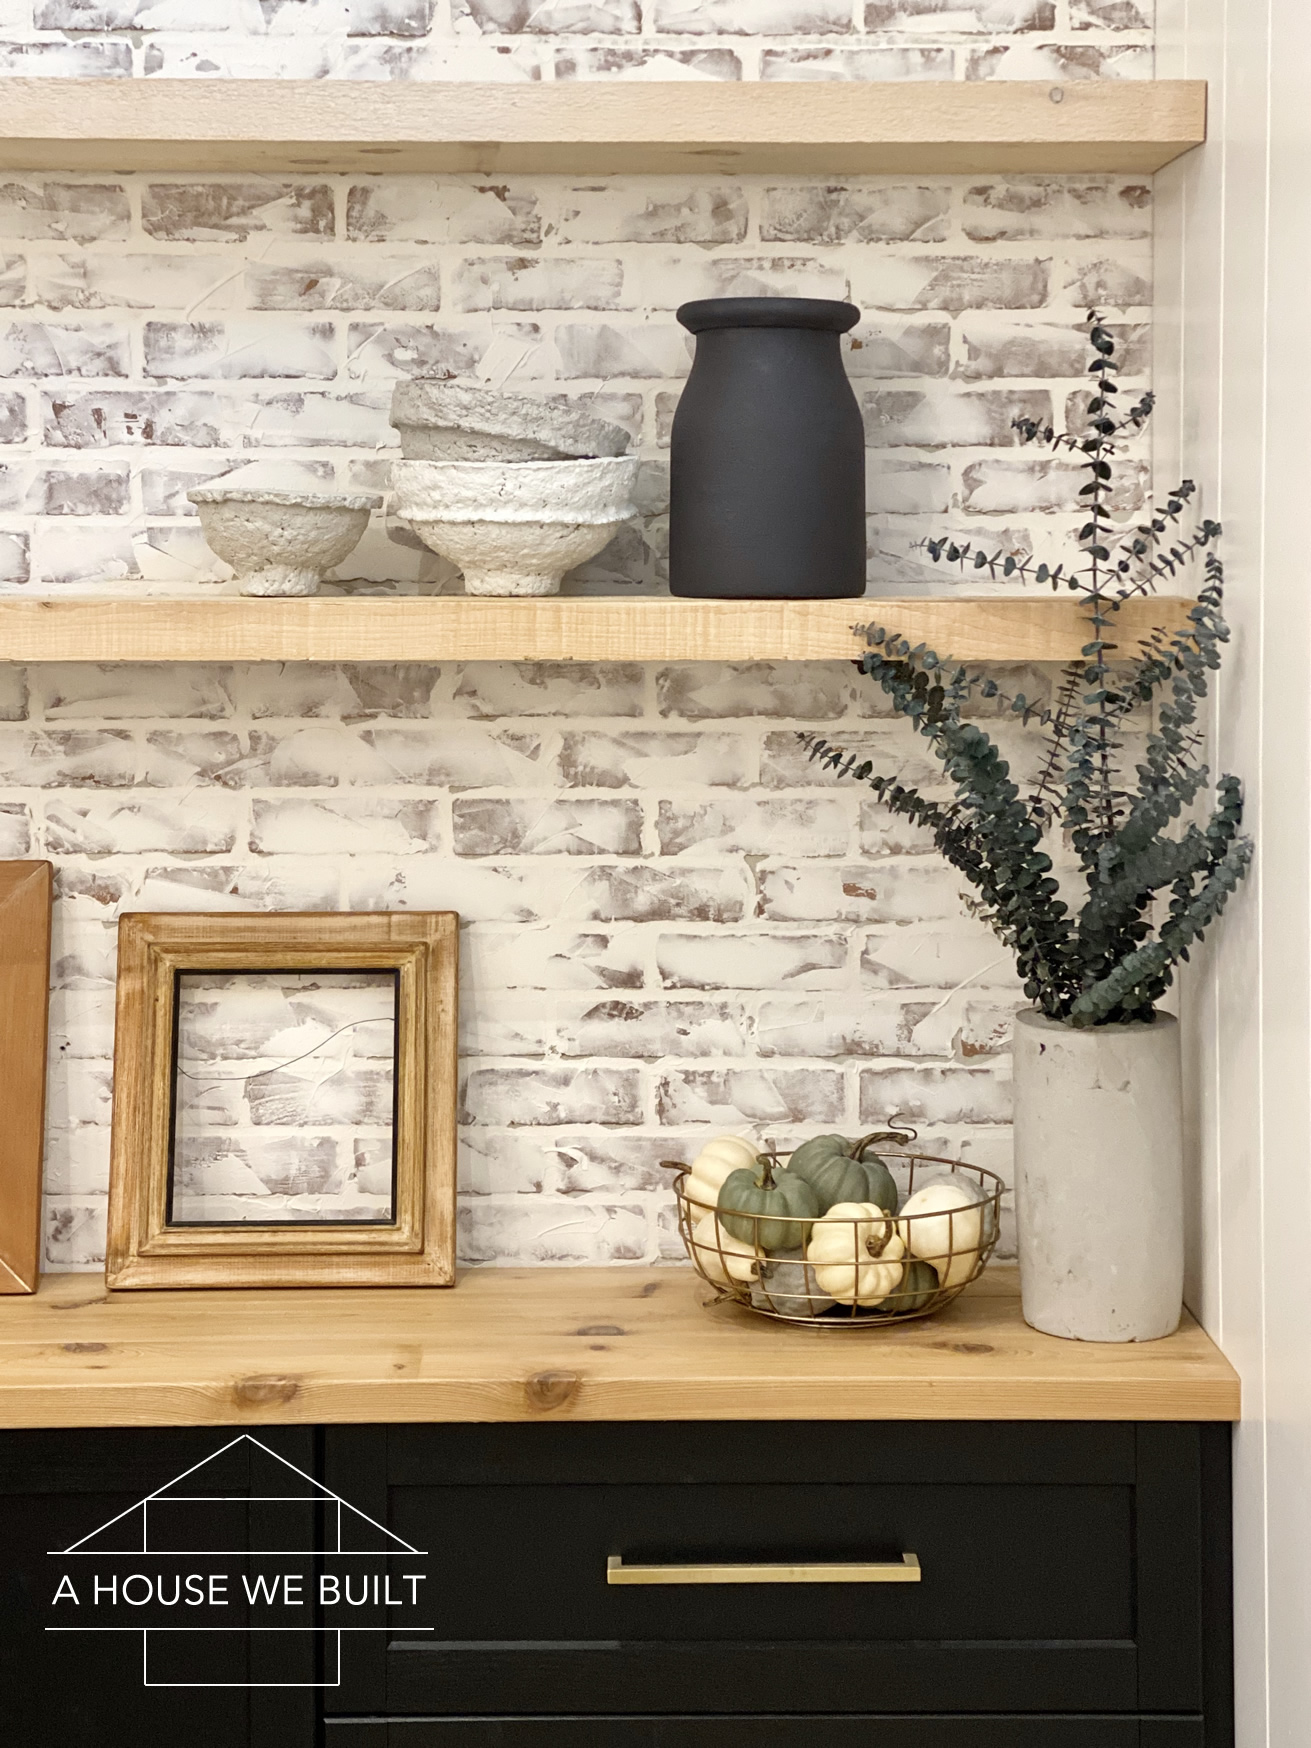
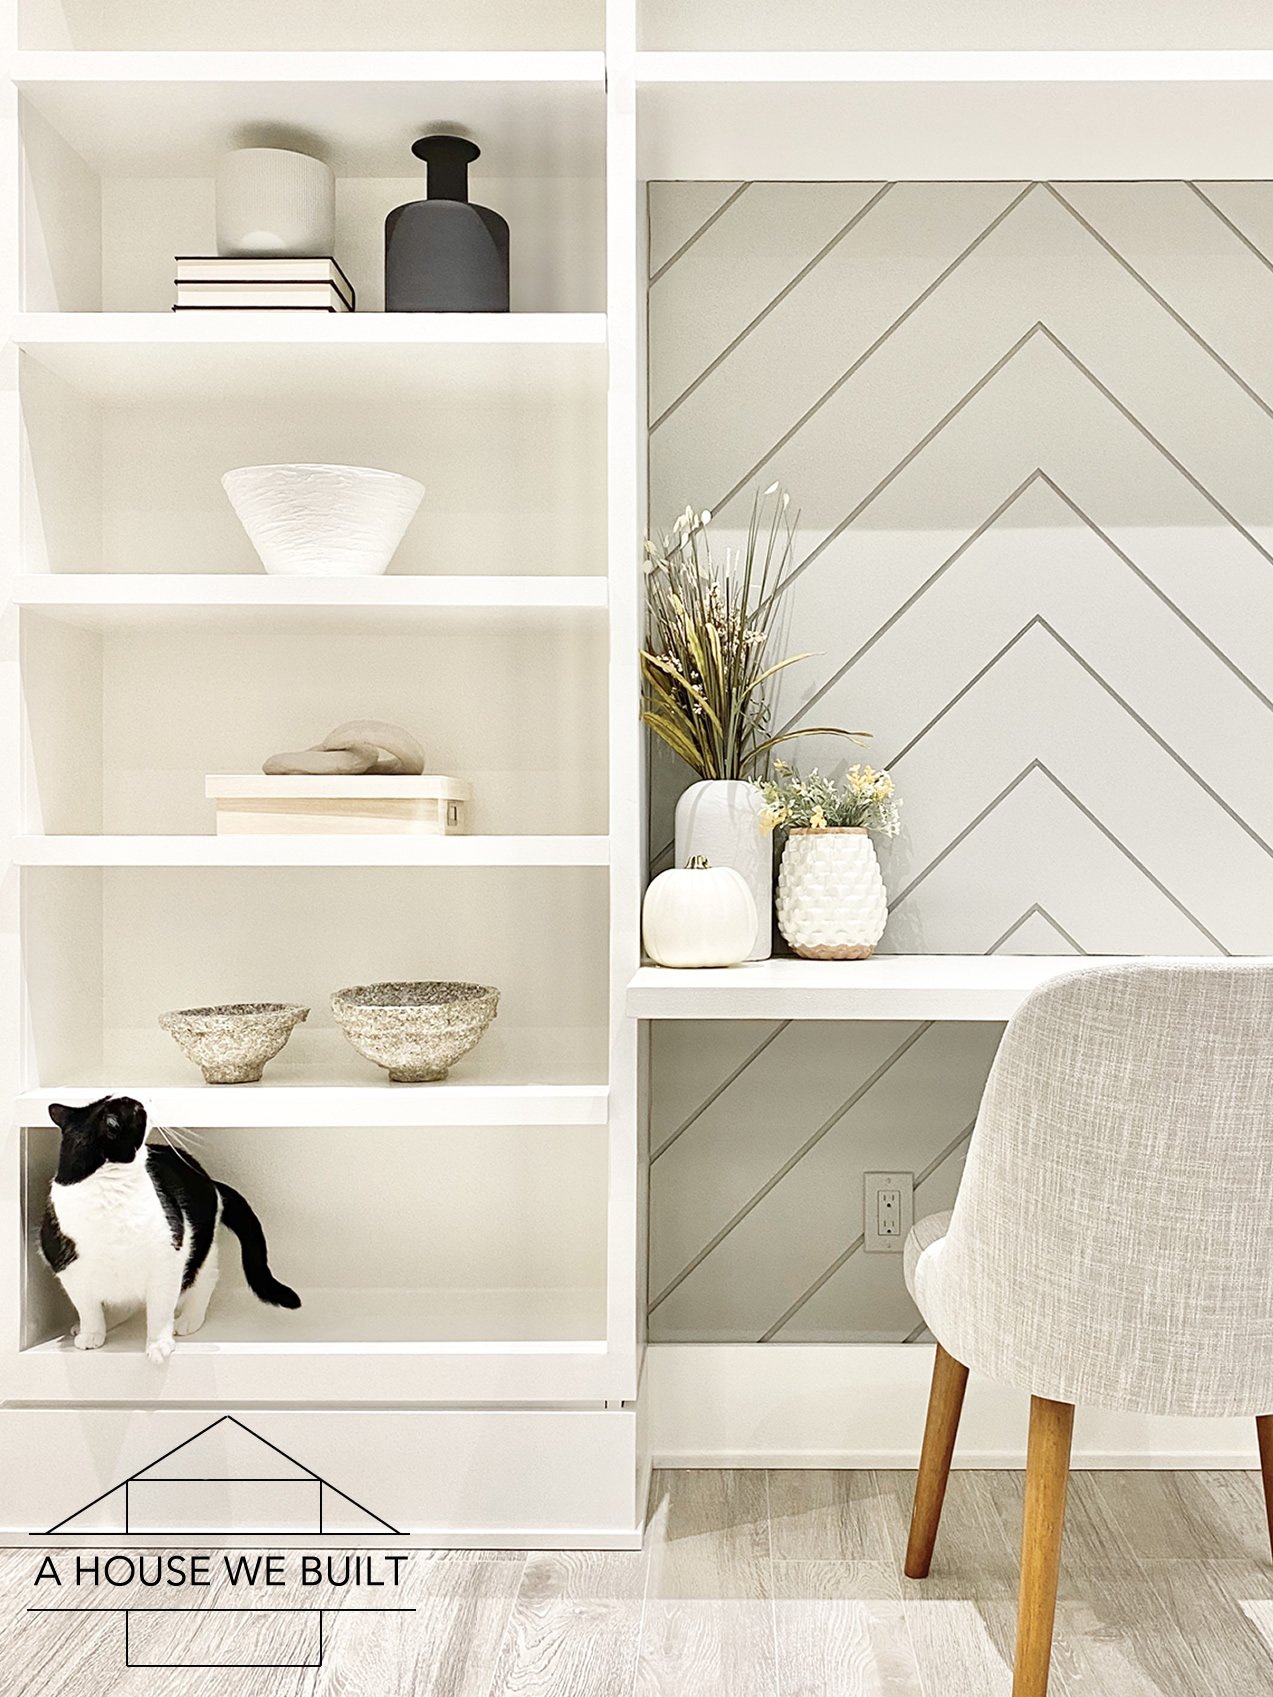
For reference, you can find a few ready-made examples of various beautiful paper mache bowls at both McGee & Co (natural look) and Bloomist (painted bowls). I just love how these look styled on shelving!

Now, I made my paper mache completely from scratch – meaning that I created my own paper pulp because I wanted to recycle our home’s paper waste. However, this does take longer, so there are also “instant paper mache mix” options you can buy if you prefer like these: Michaels and Amazon.

However, in this tutorial, I’m sharing the homemade “from scratch” version.

Materials list (for paper mache pulp):

  • Shredded paper
  • Flour (any kind will do)
  • Salt (to prevent the mixture from going off)
  • Hot water (to soak the paper)

Tools list:

  • 3 large mixing bowls
  • Immersion blender: Amazon (this is what I used but you can probably use a food processor or stand blender or really anything that can blend stuff for this project)
  • Bowls to shape your paper mache bowls around

Finishing list:

  • Paint (any house or acrylic paint, my preference is matte)
  • Top coat (to seal them at the end, optional): Home Depot

Timeline: due to soaking and drying times, these bowls take several days to make because you have to wait for the paper to soak and for the bowls to dry. While the actual “active” time you’ll spend making them is short, the amount of time before they’re ready to use is long so these are not “instant” DIYs.

The following instructions are for how to make bowls with my homemade paper mache. If you use an instant paper mache mix (Michaels | Amazon) then just follow the instructions on their packaging instead.

Instructions on how to make paper mache pulp/clay:

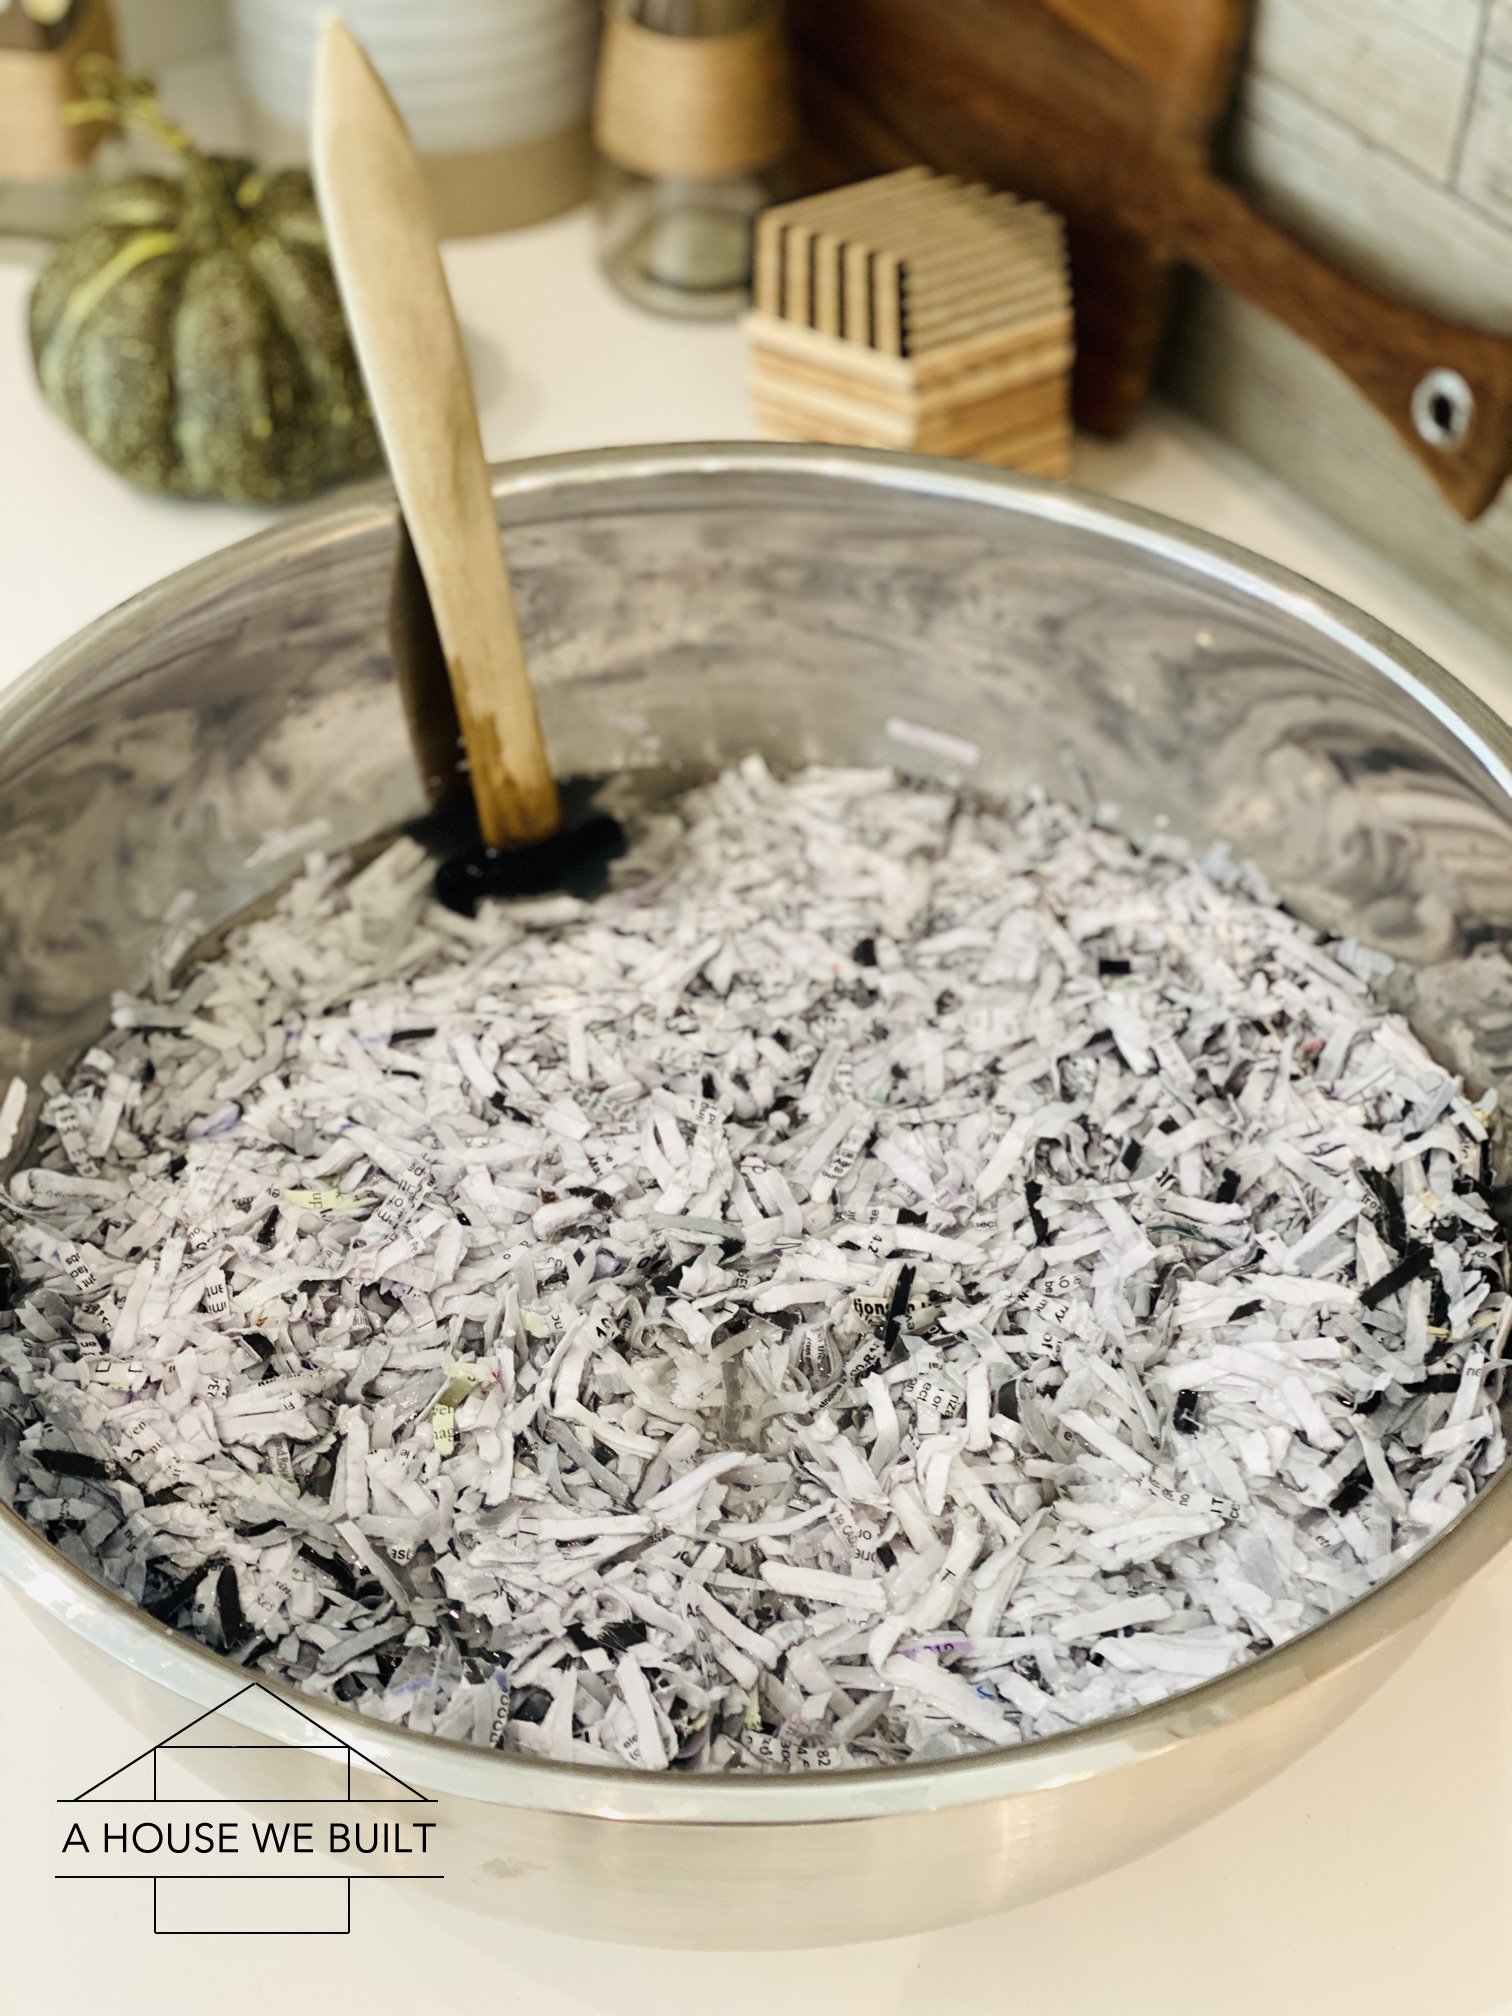
  1. First you’ll need shredded paper. I just gathered up all the scrap paper in our house and ran it through our paper shredder, but you can also just cut it up finely with scissors. The end goal is just to have very finely cut up paper to make your paper mache pulp. The more finely cut, the better.
  2. Place your shredded paper in a large bowl and fill the bowl with hot water until the water just covers the paper. Don’t add more water than necessary because it’ll make your life harder in later steps.
  3. Soak hot water/paper mixture for several hours, or ideally overnight. The purpose of this step is to break down the paper so the longer you can let it soak, the better.
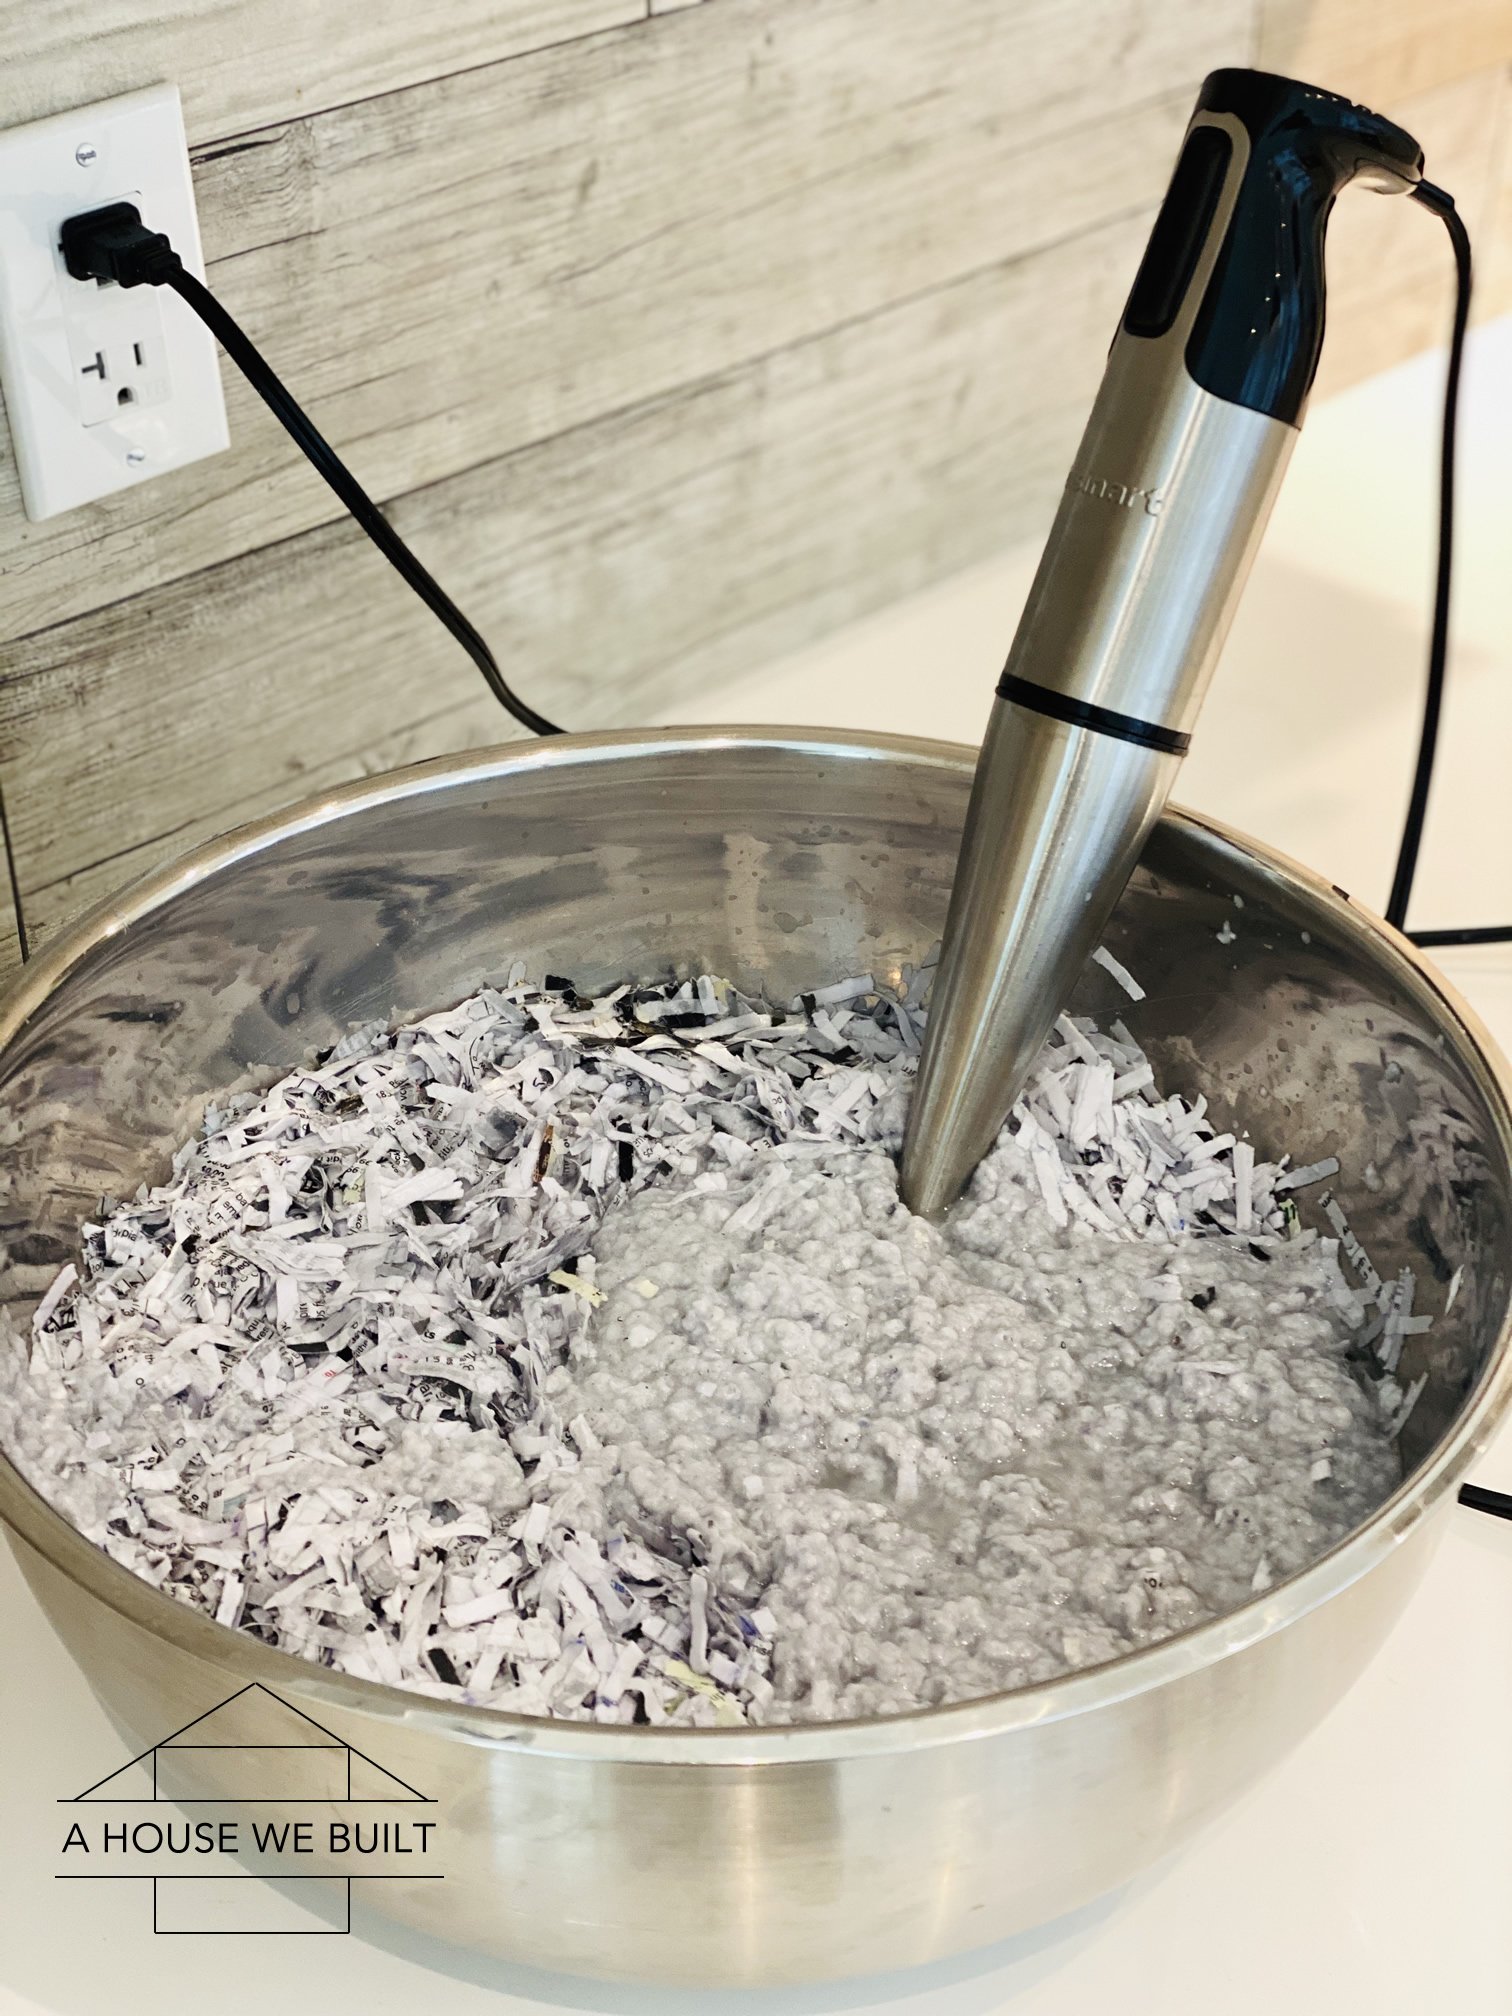
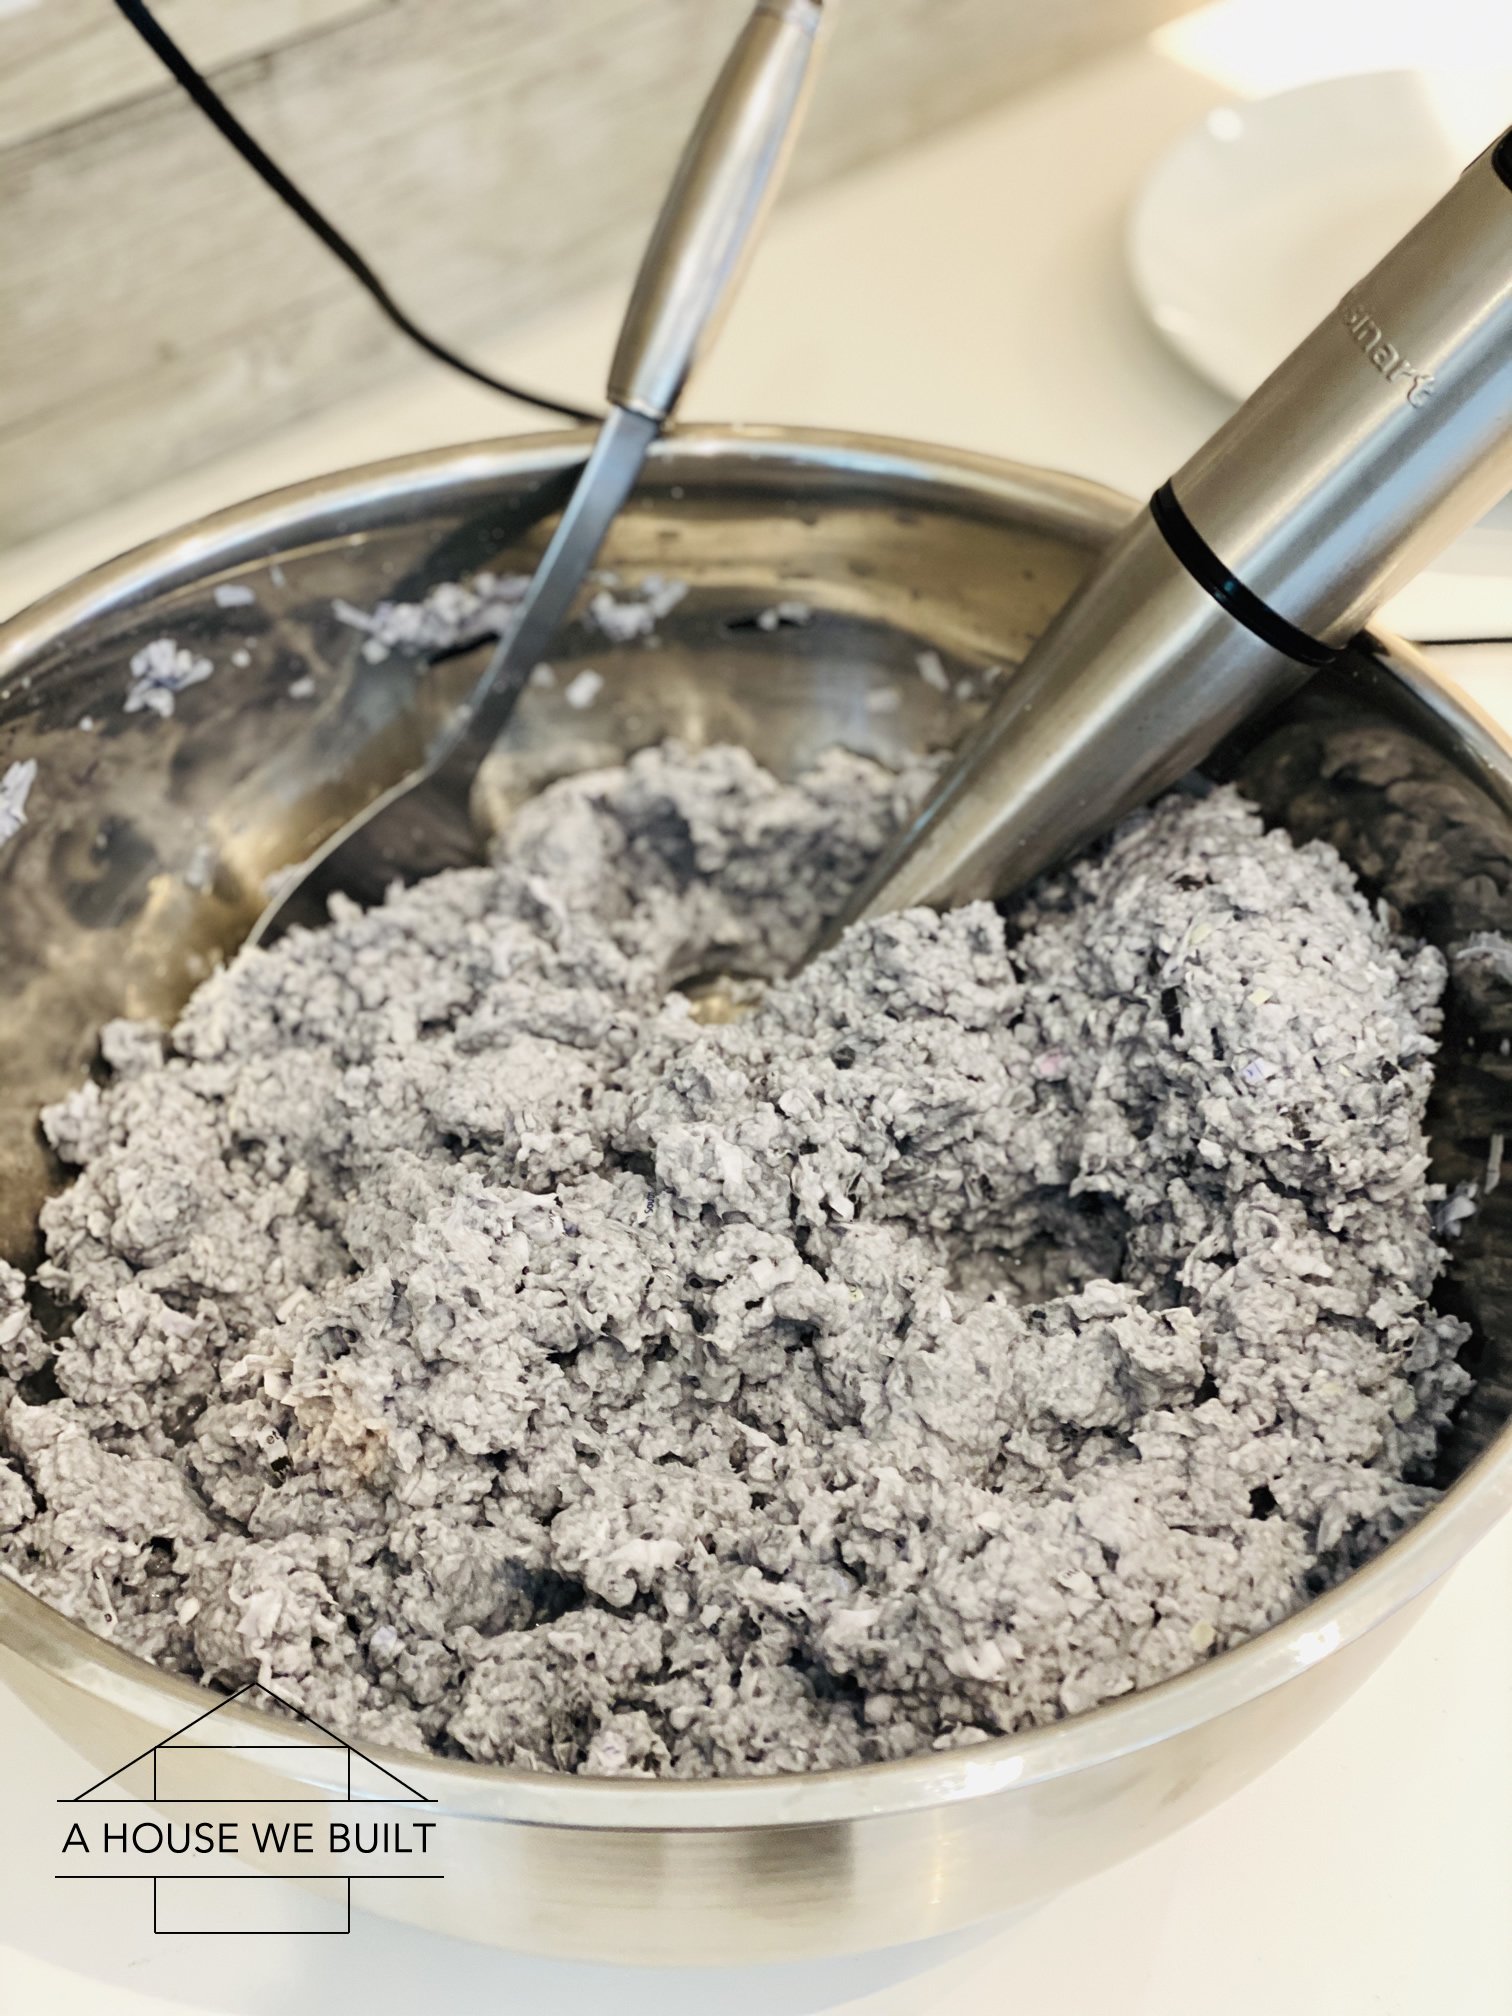
  4. Blend the paper to a fine pulp with an immersion blender. Take your time and be very thorough, don’t leave any chunks unblended. It helps to stir the mixture now and again to make sure you didn’t miss any paper strips along the bottom of the bowl.
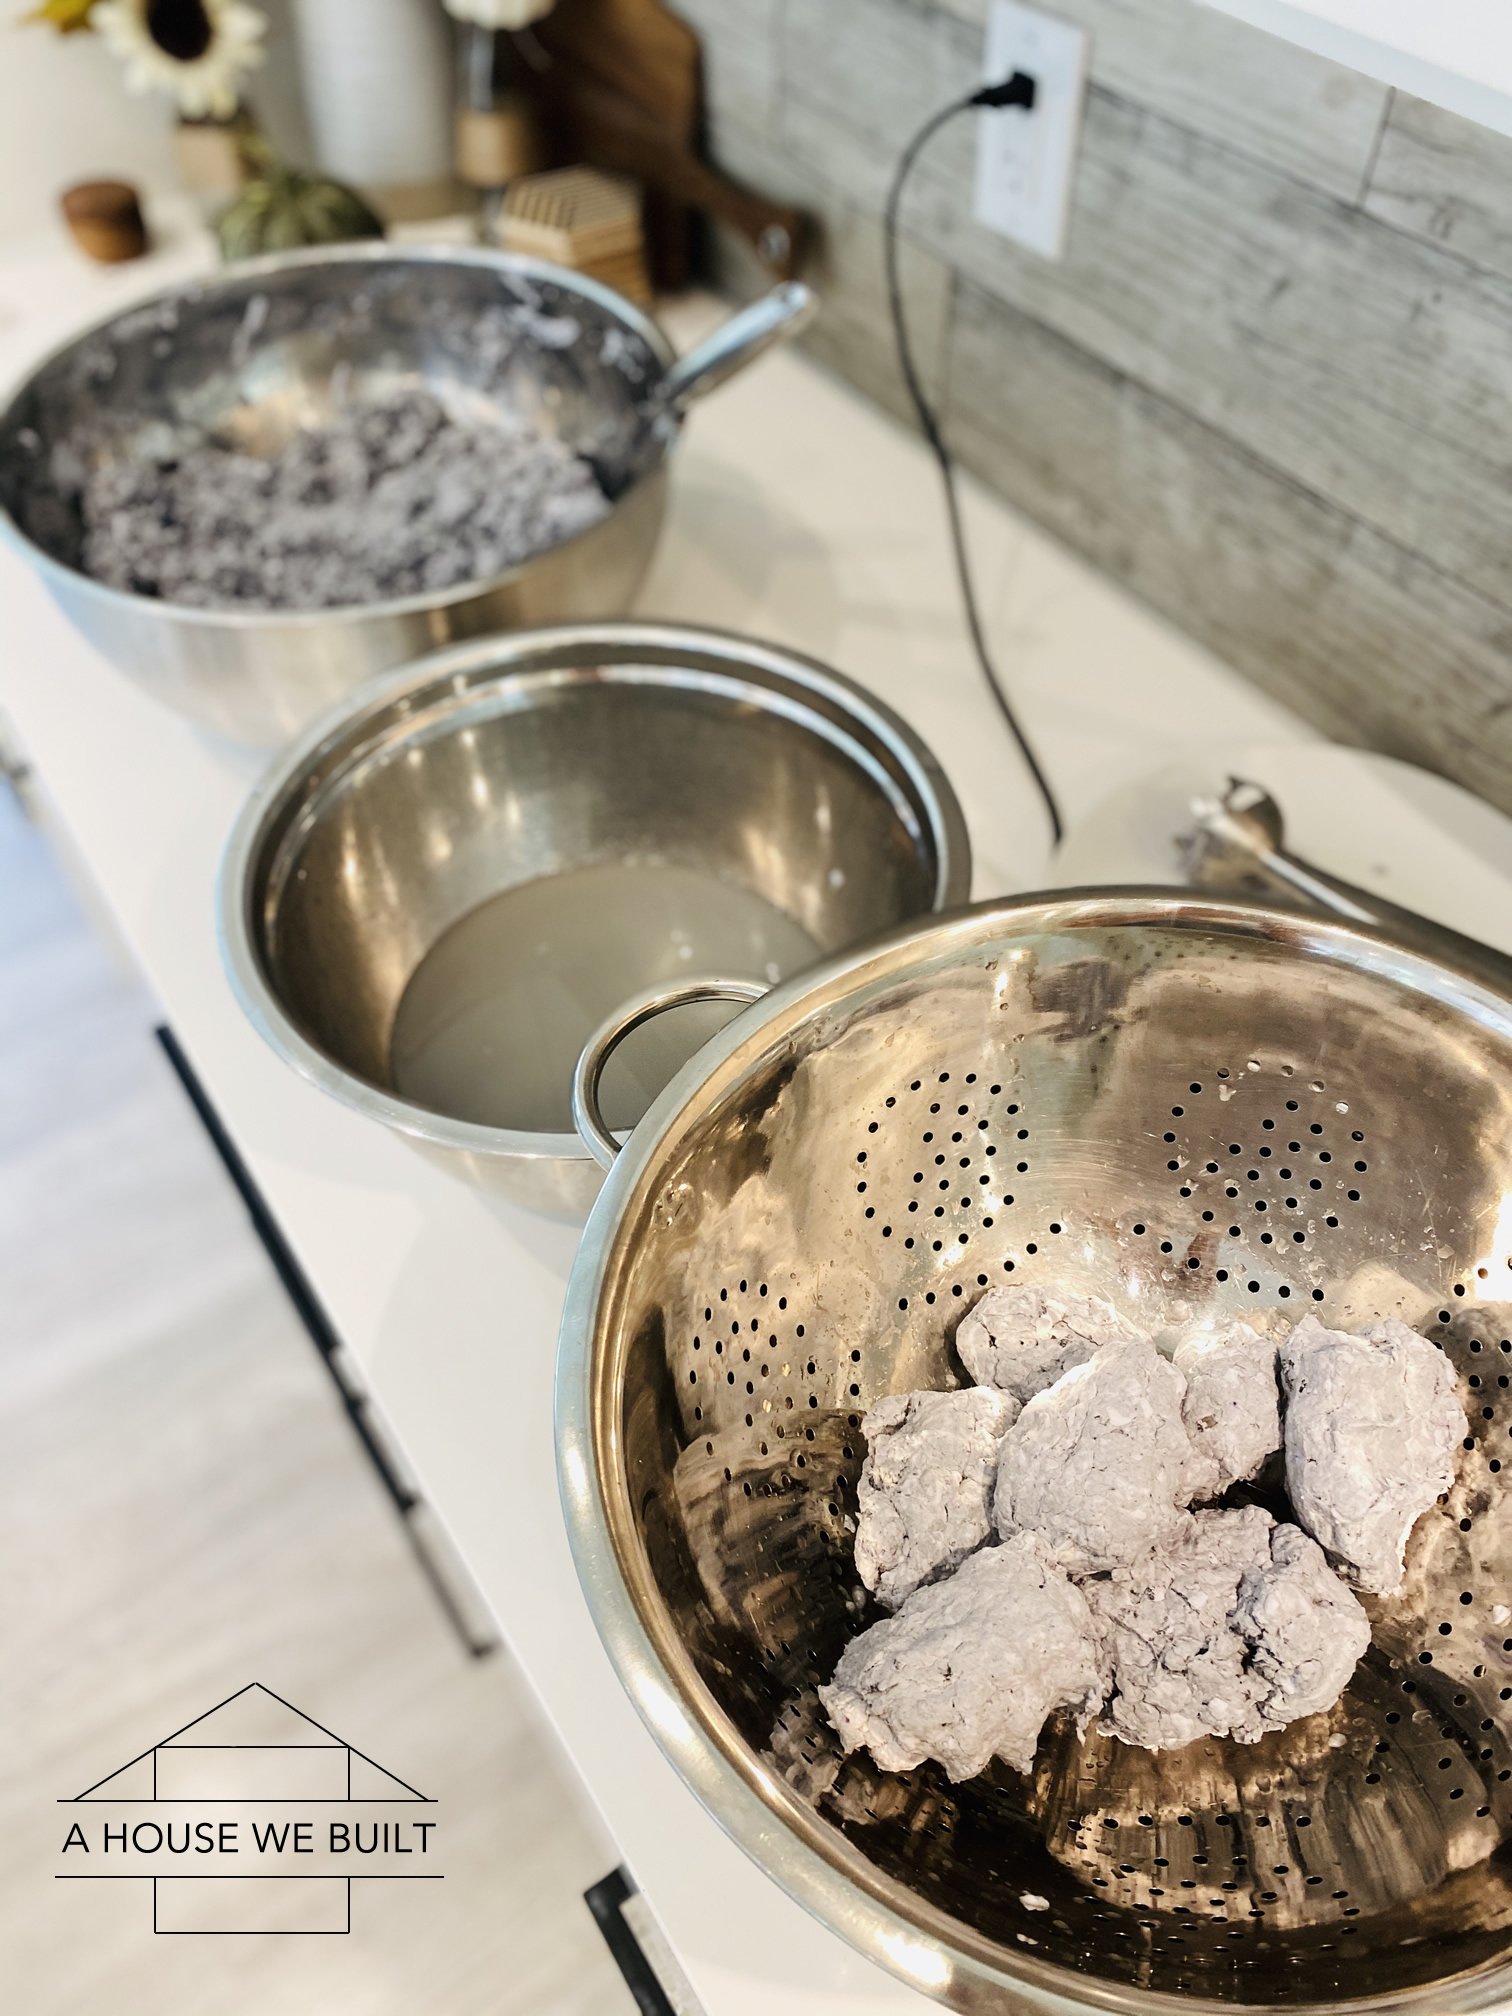
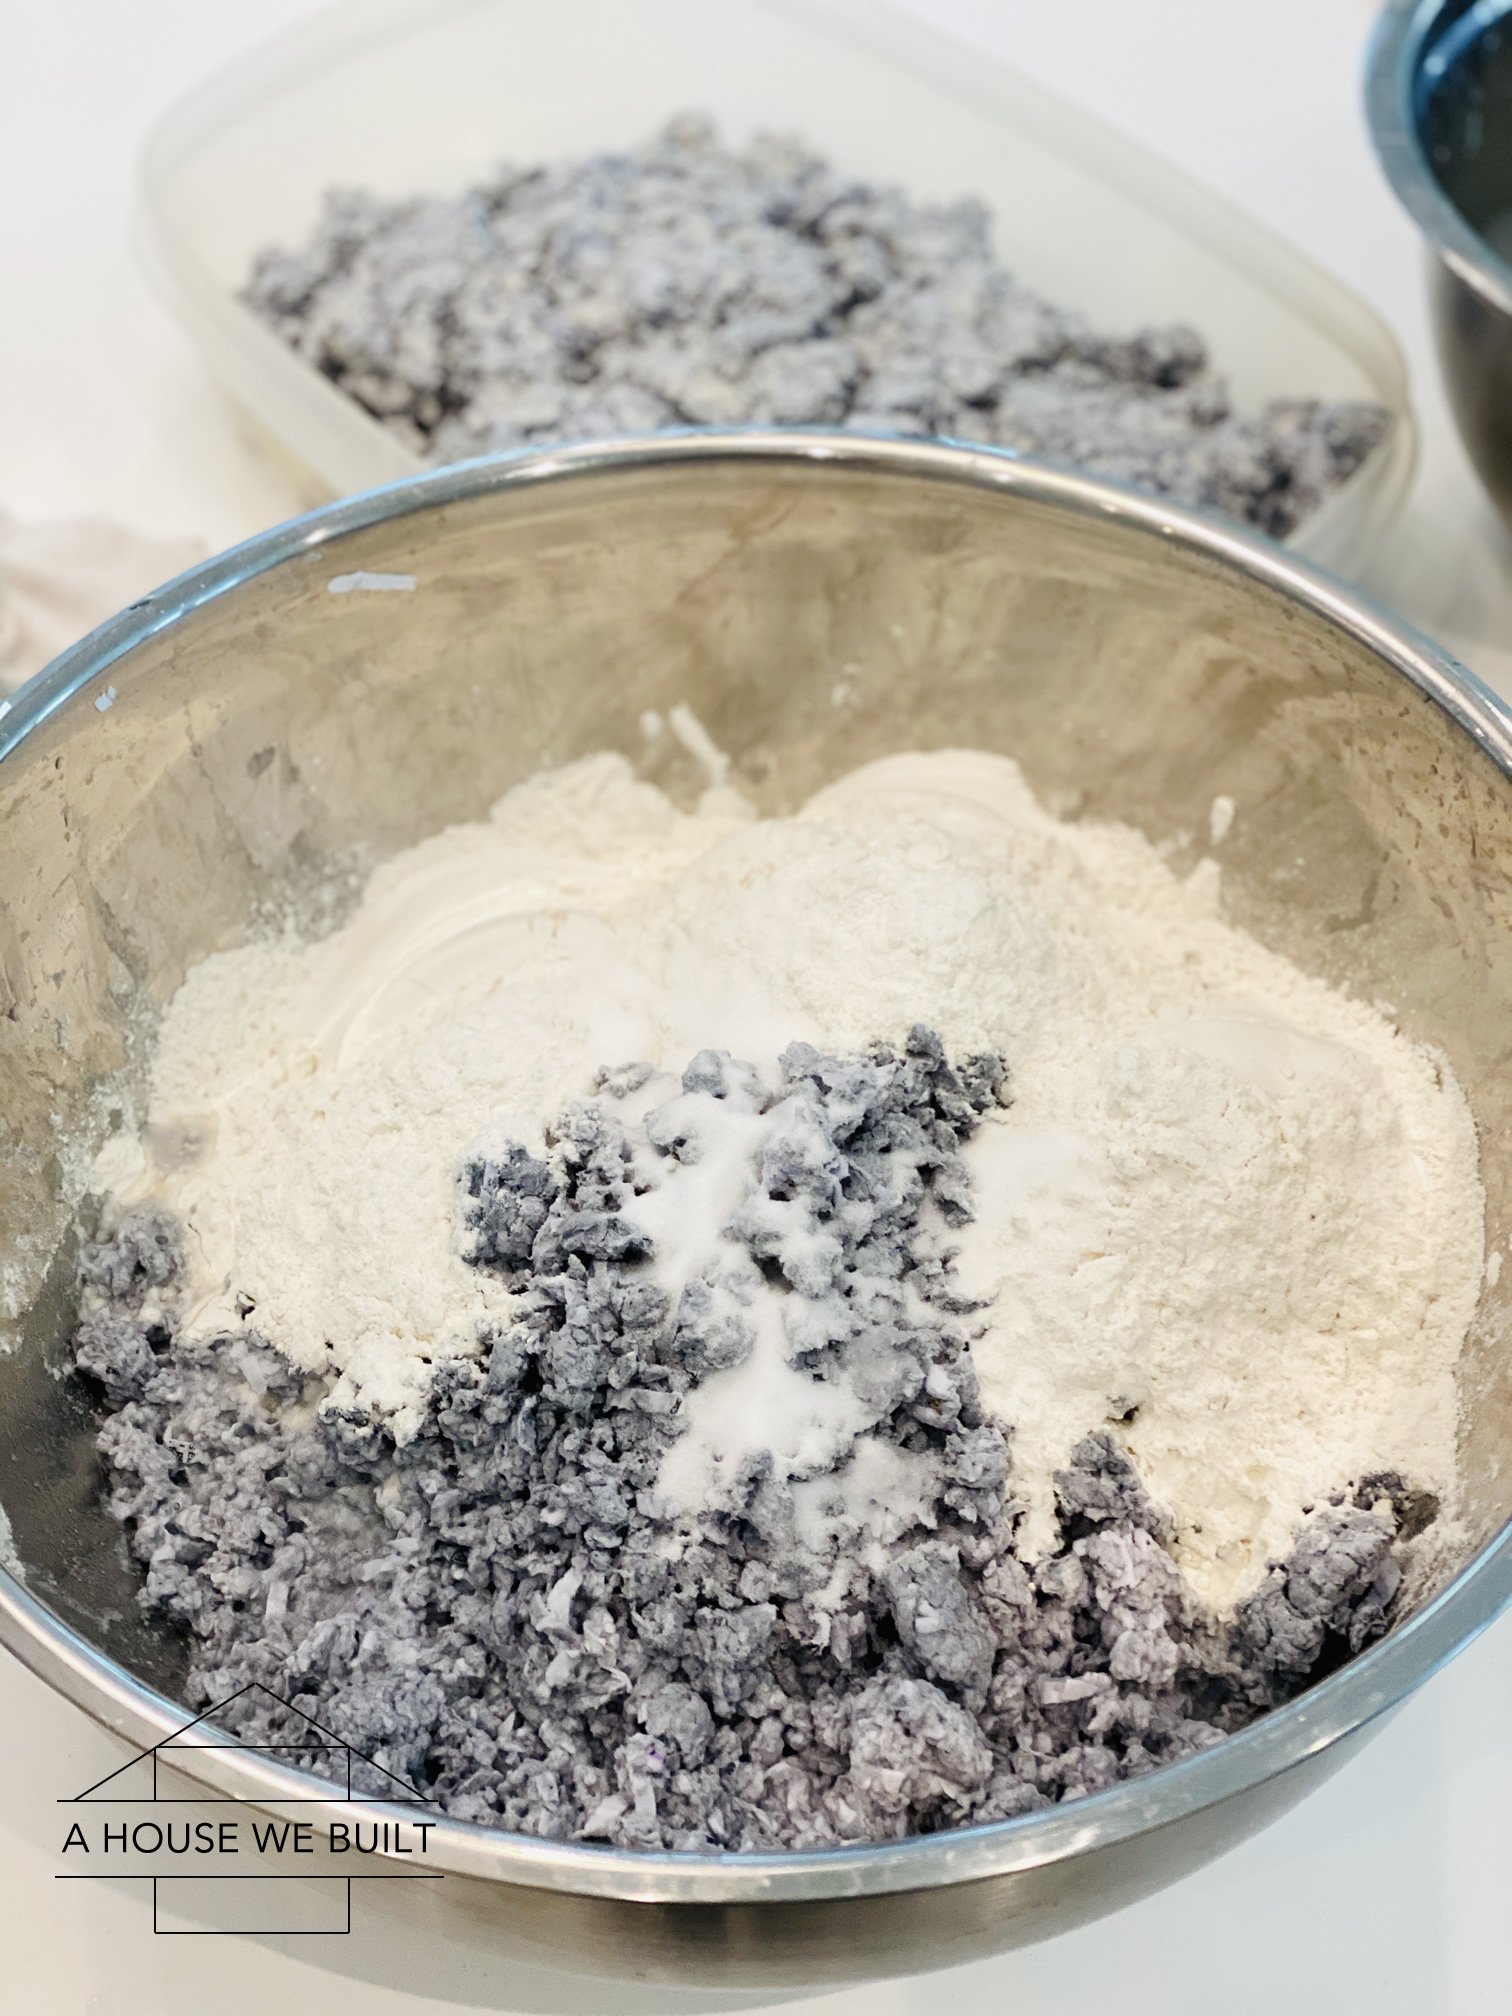
  5. Set up 3 large bowls in a row: first is the bowl with your wet paper pulp, then is a bowl that will be filled with water squeezed out of the pulp, and finally an empty bowl for the now-dry pulp.
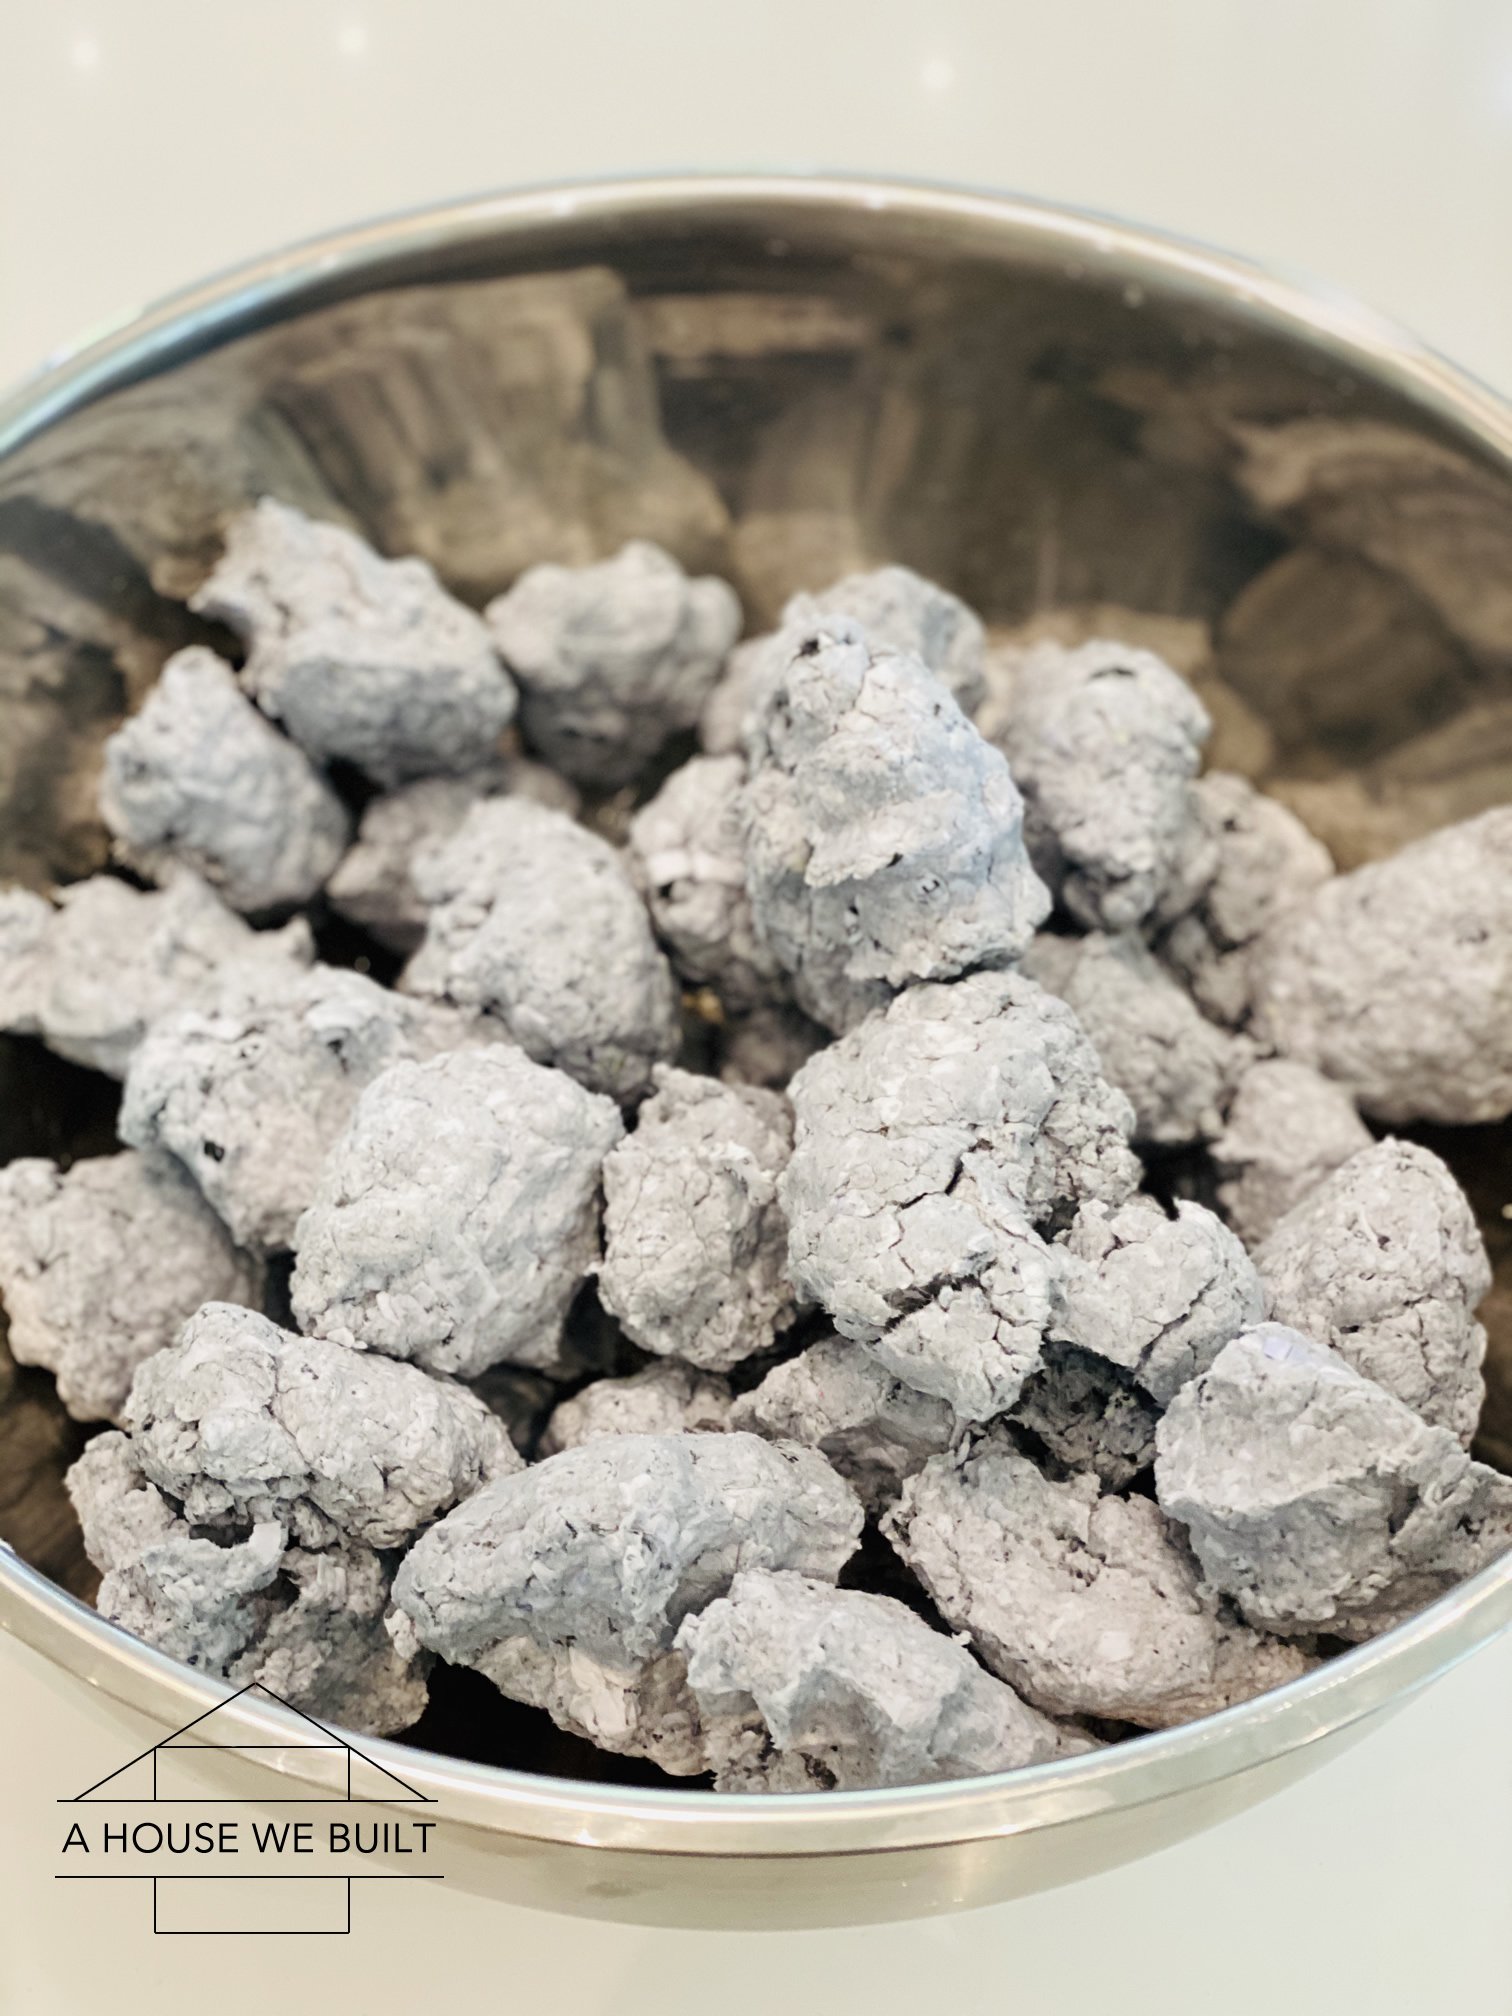
  6. Squeeze about 80-90% of the water out of your wet paper pulp by scooping up large handfuls and squeezing gently (like a snowball) until most of the water is gone. You don’t want them to be bone dry. I actually removed too much of the water from mine, and had to add more water back in later. Once you’ve completed this, you should now have a bowl of mostly-dry paper balls.
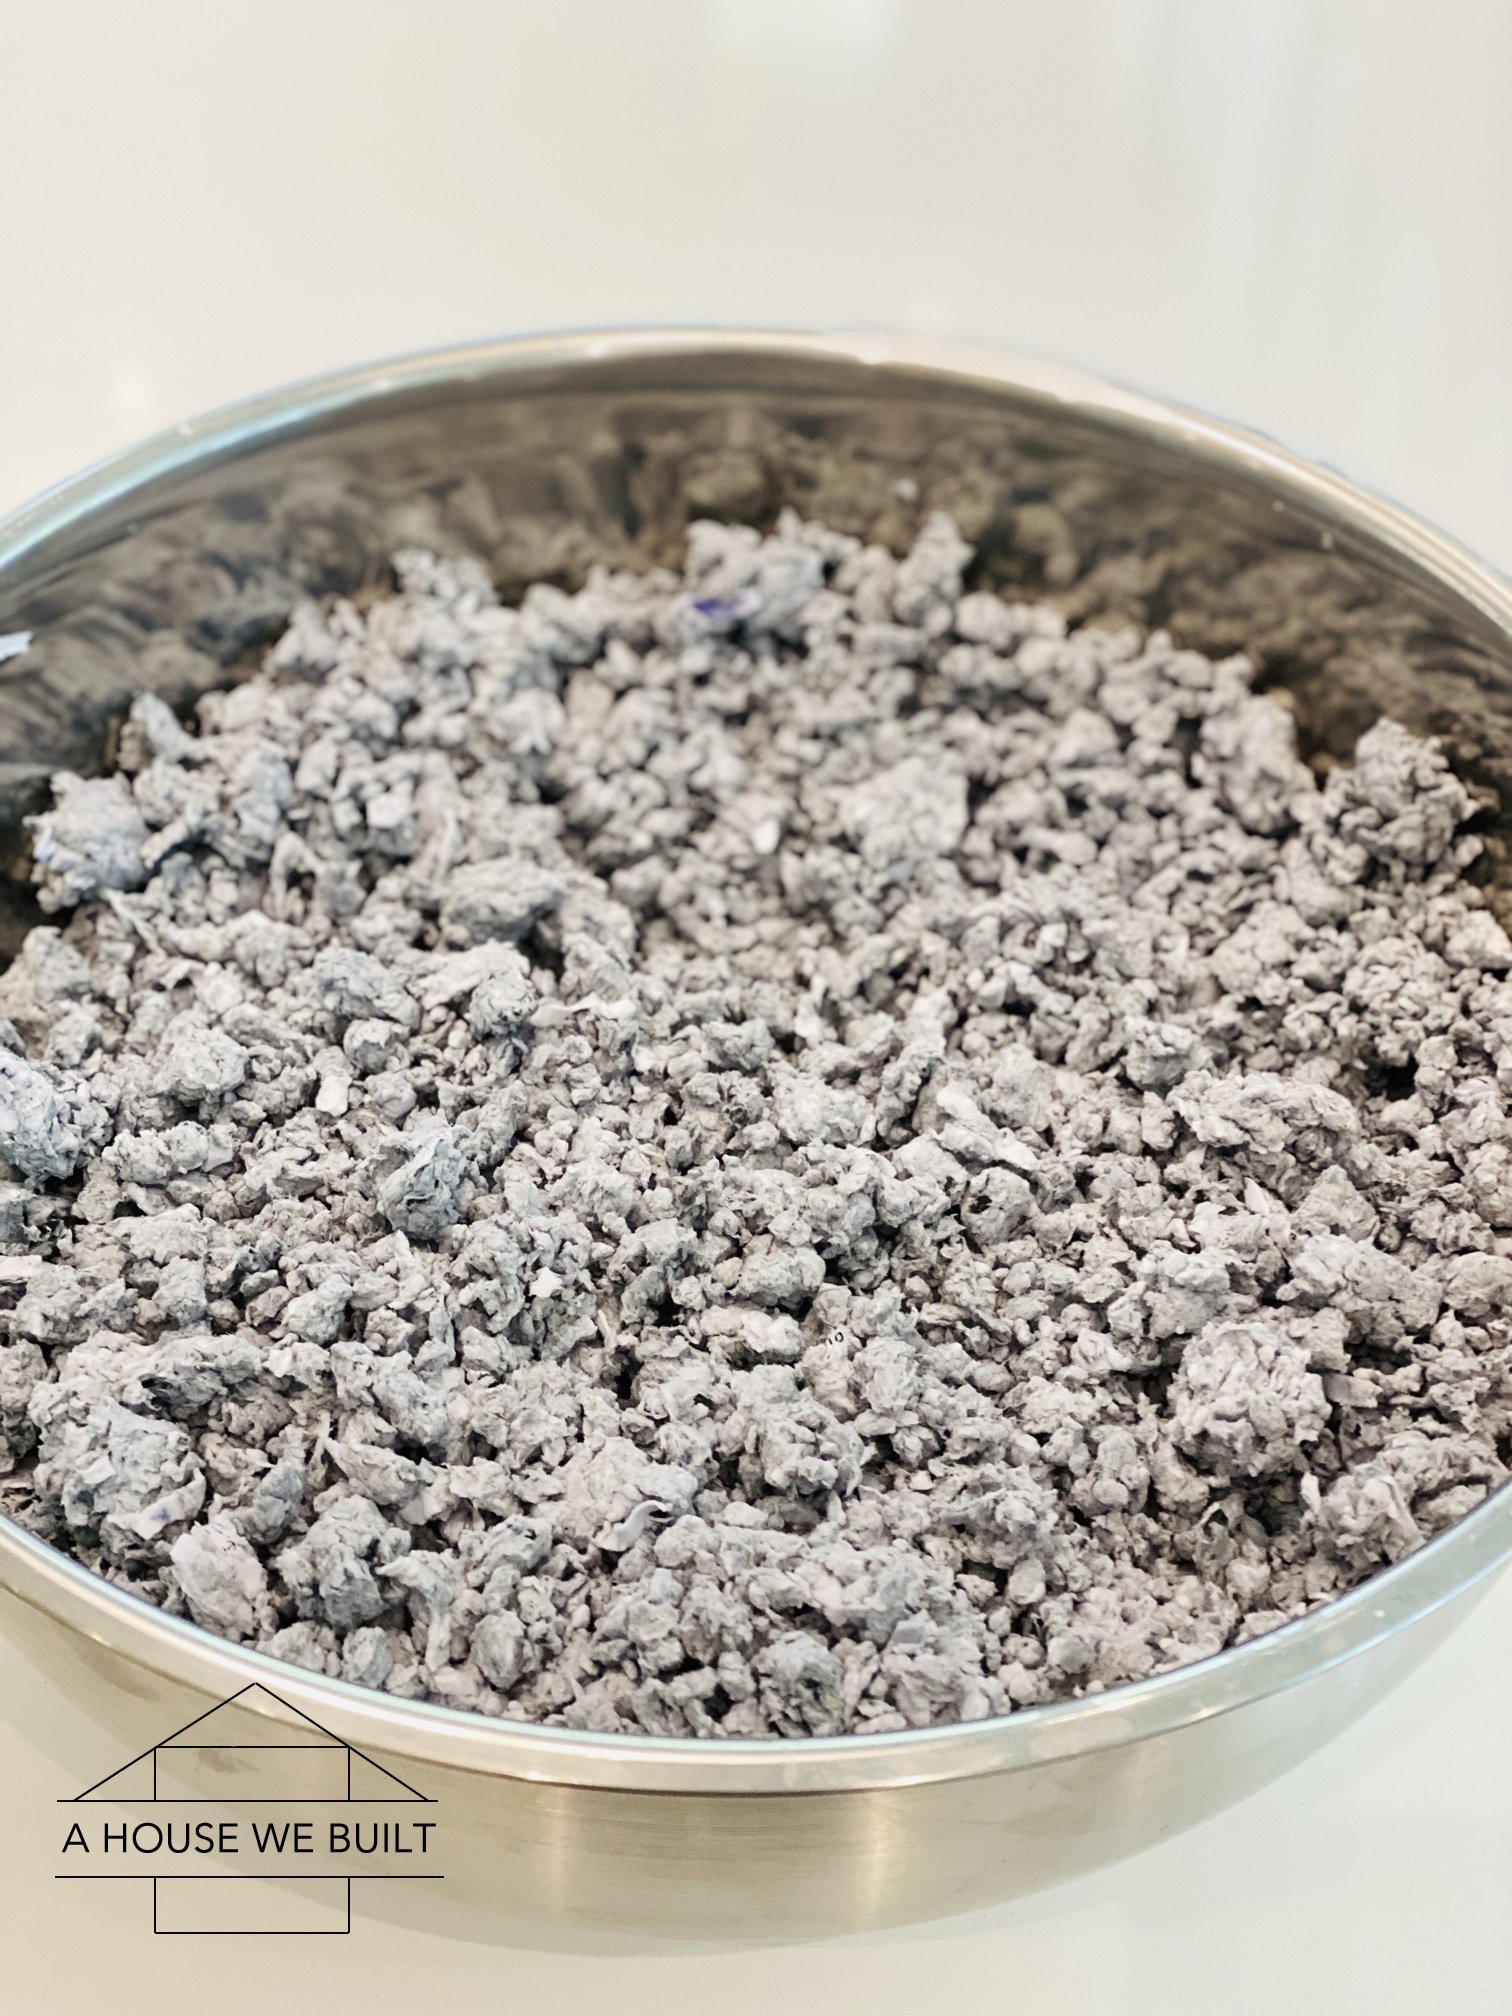
  7. Break up the little balls of paper so that they’re evenly crumbly.
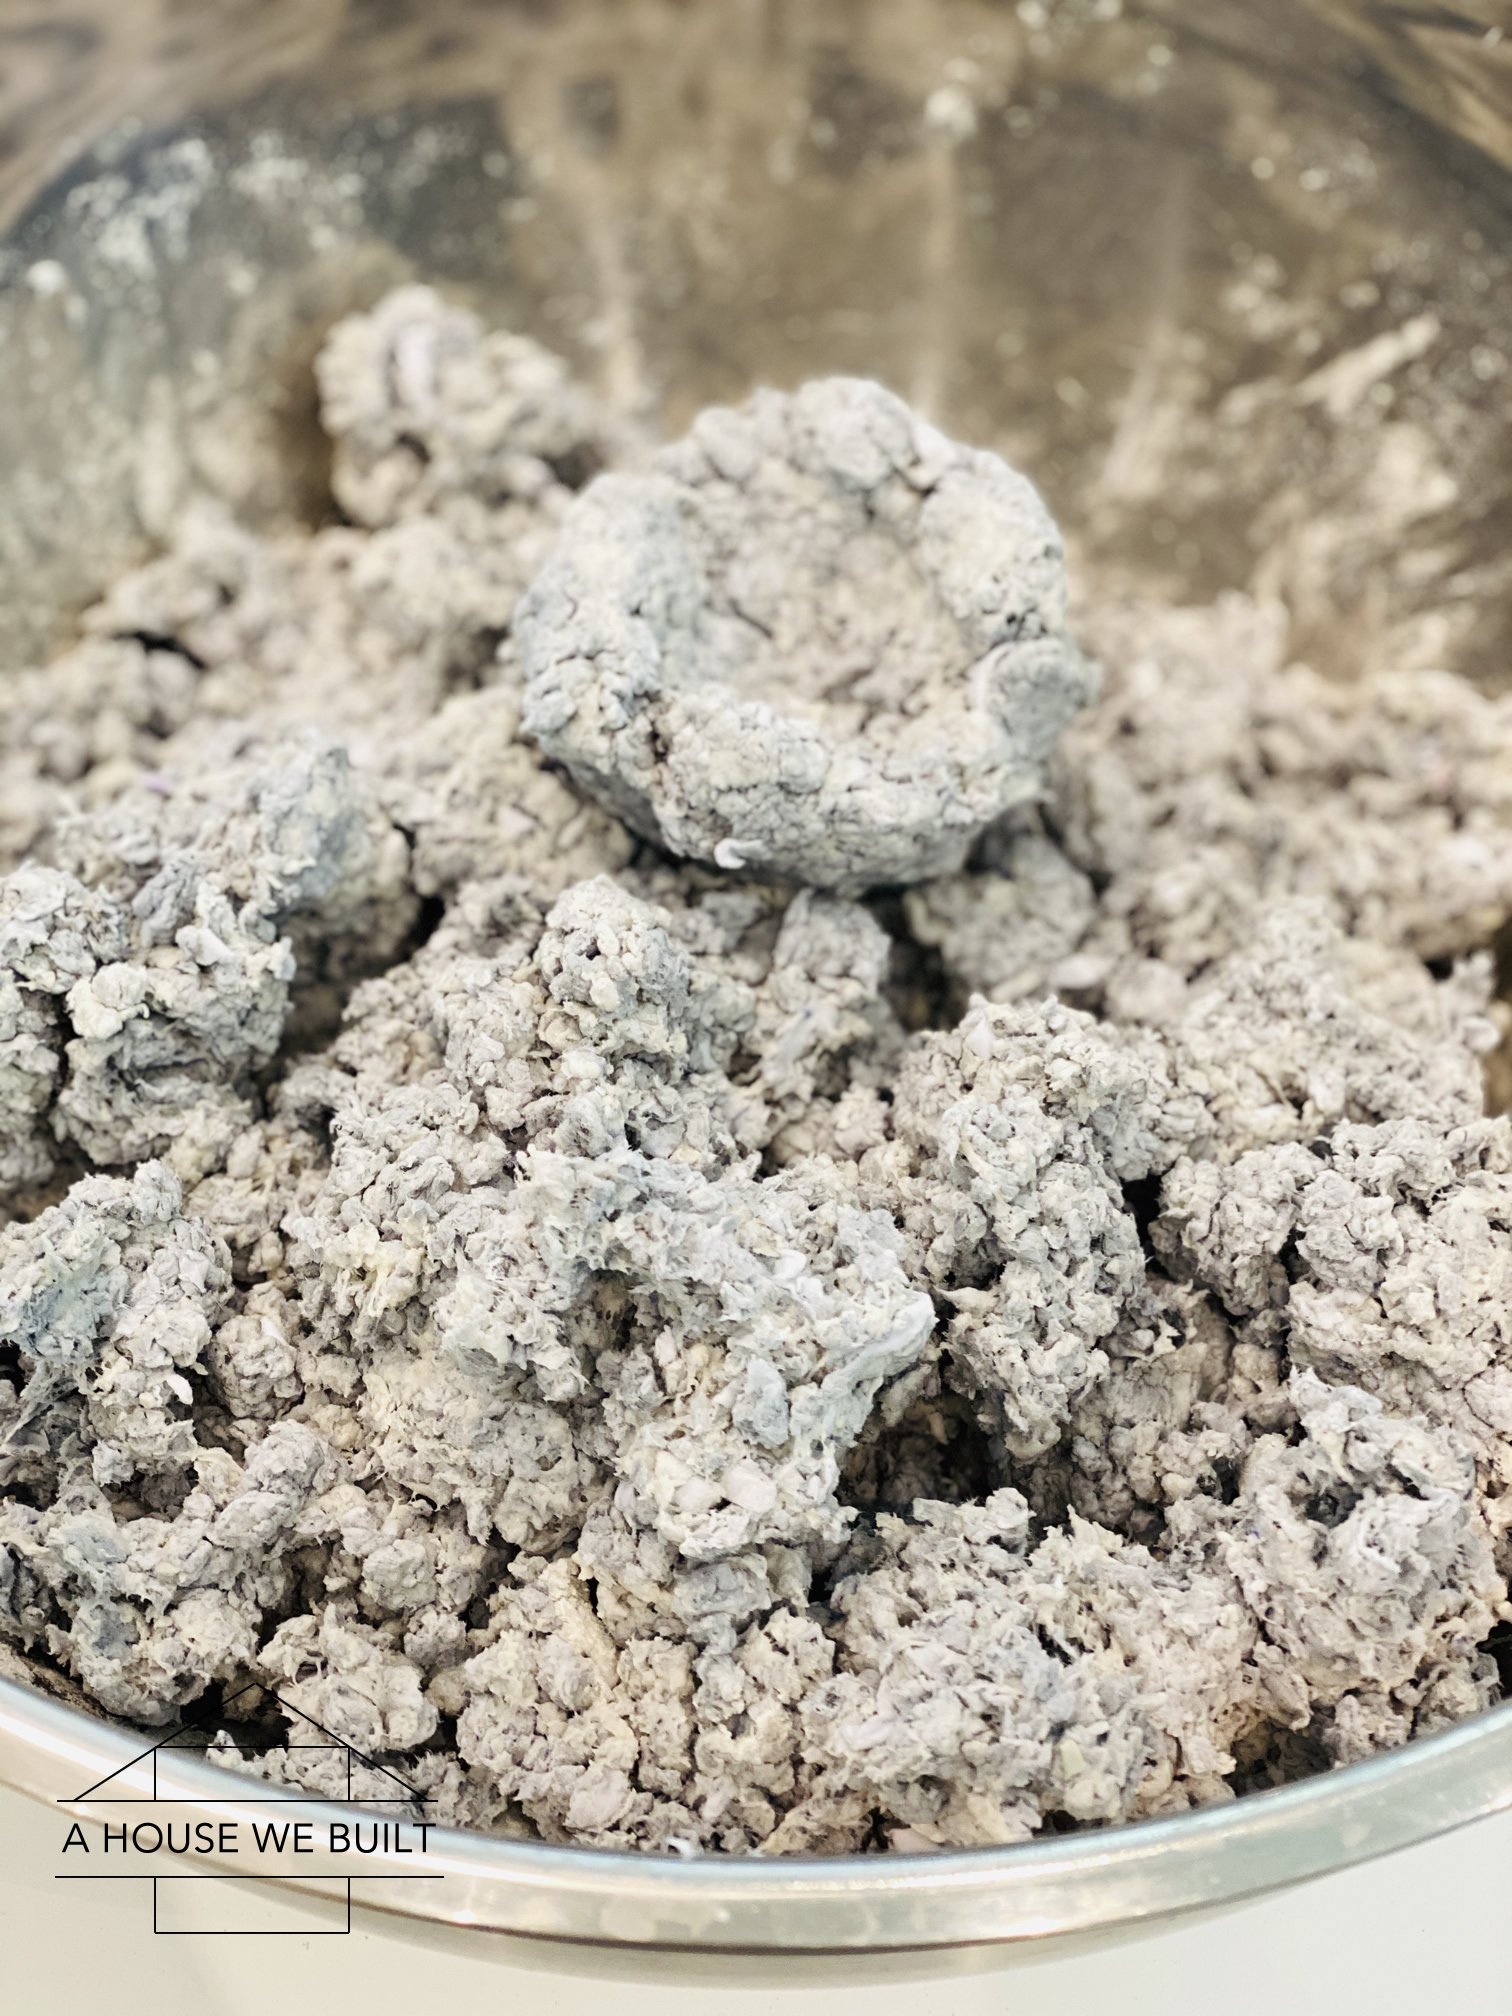
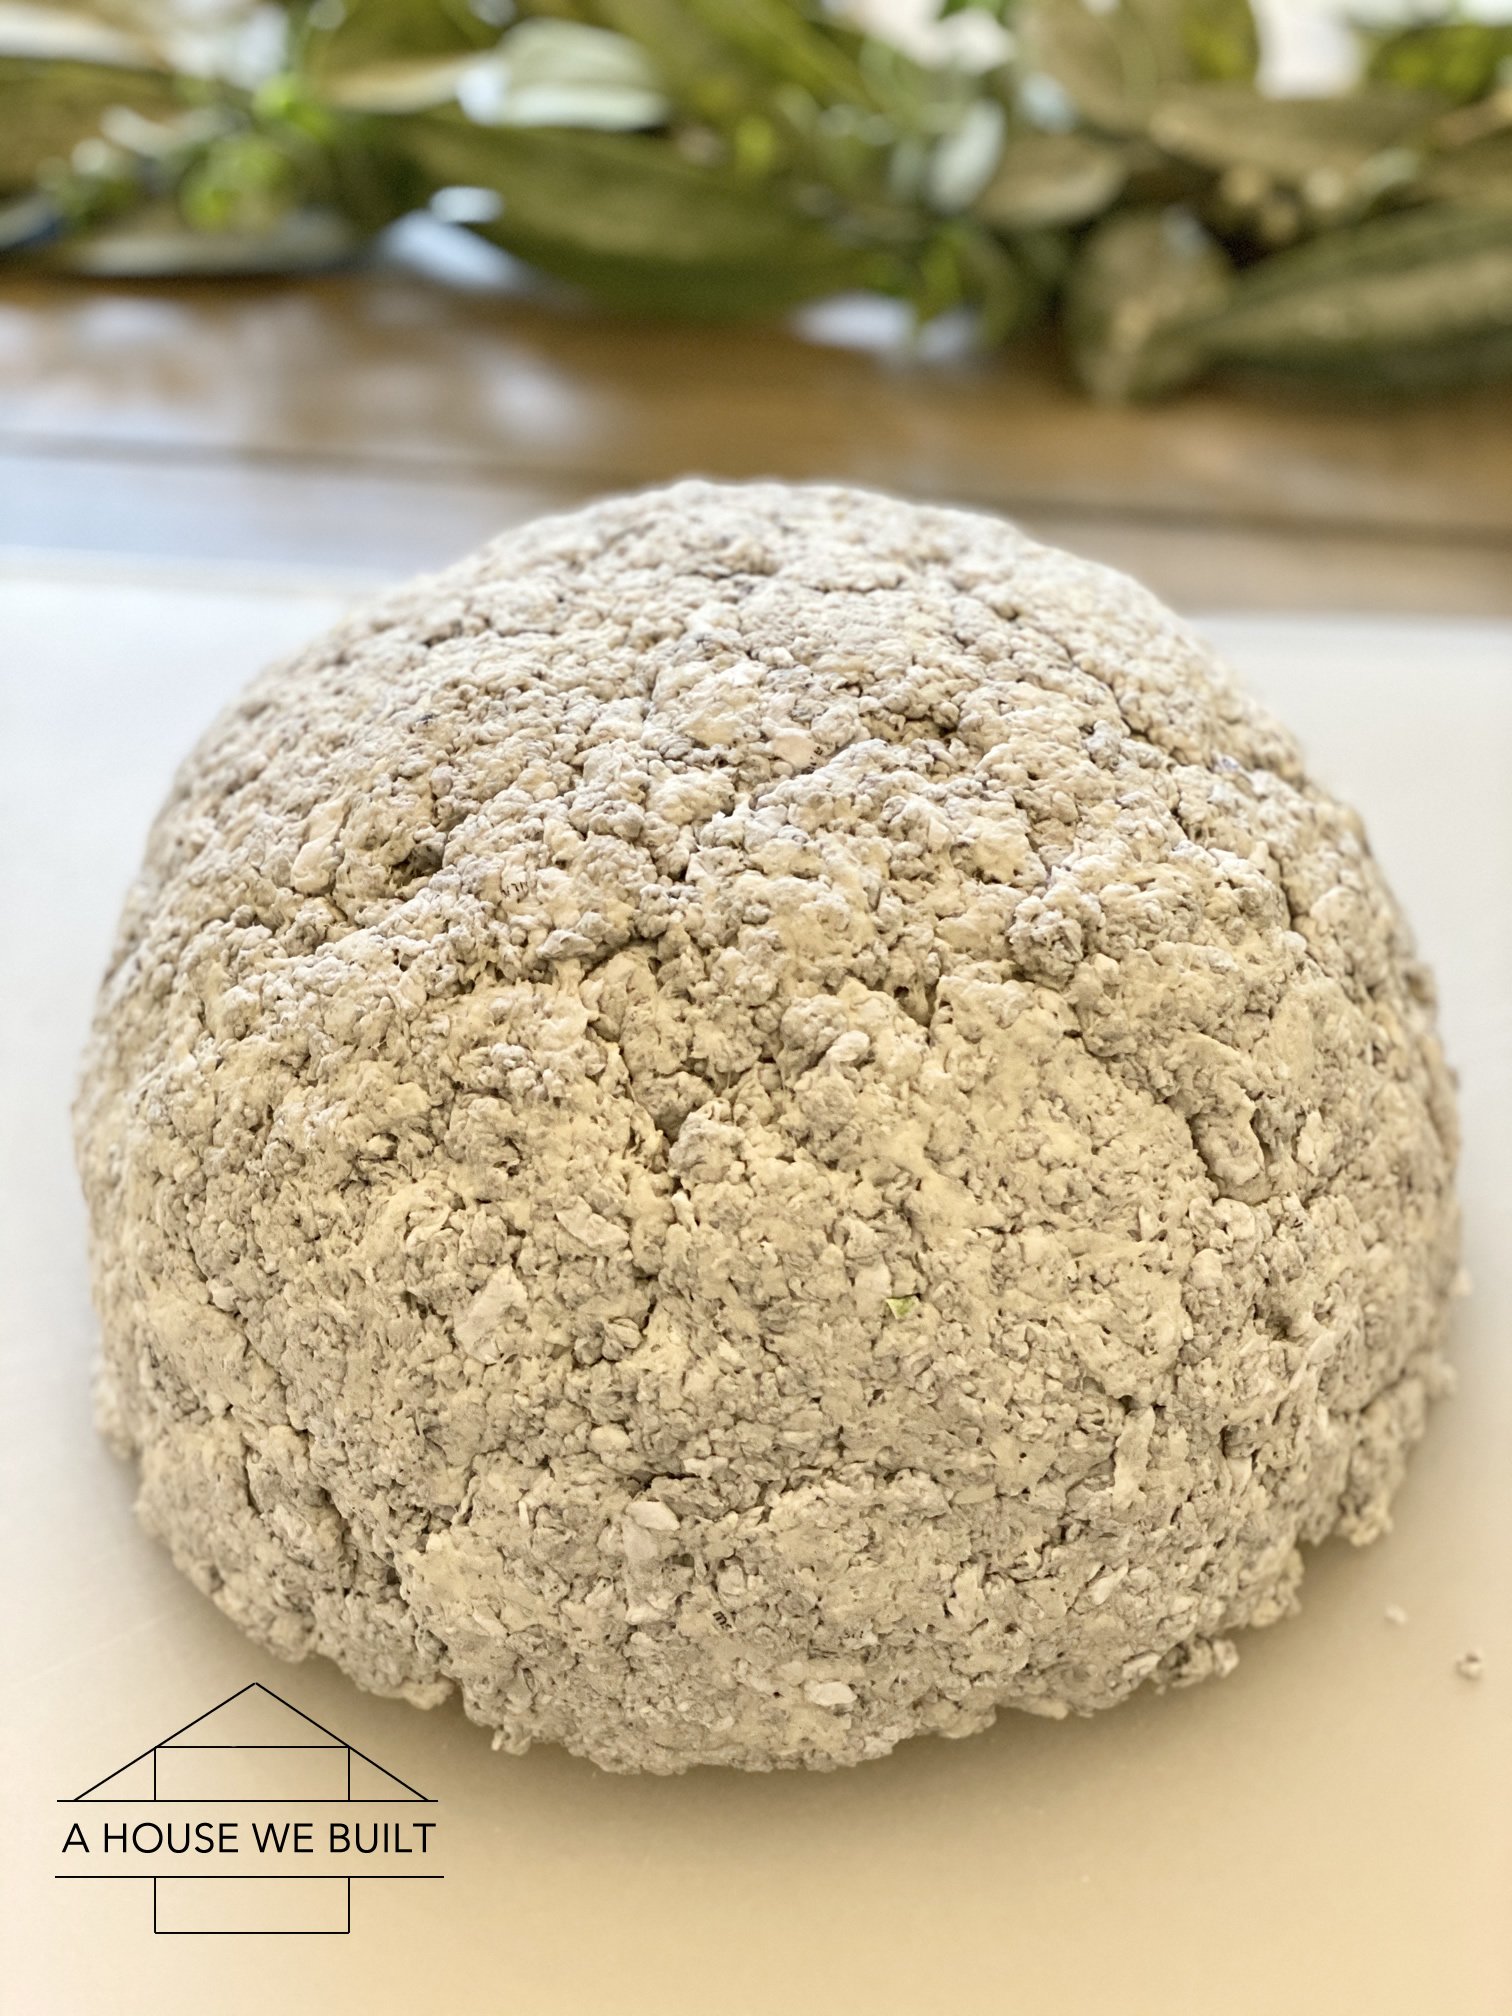
  8. Now it’s time to turn your paper crumbles into a kind of “paper clay”. Add in about 1/3 the amount of flour as you have paper, as well as a bunch of salt. The approximate ratio is 1 part flour to 3 parts paper pulp, plus enough water to create a clay that is thick enough to mold into shapes, but that it is not sticky at all. I recommend reserving some of your paper crumbles before you begin mixing just in case you accidentally add too much water because then you’ll have a bit more paper left to add in and thicken it. You just have to play around with the ratio of paper:flour:salt:water until it feels right and paper-clay-like. The purpose of the salt is to prevent the mixture from going off so just throw in a bunch (I didn’t measure but several tablespoons). You’ll know you’re done when you can form the pulp into a shape (try a flattened triangle or a heart) and it holds its shape on its own without being sticky or crumbling apart.
  9. Now your paper mache pulp/clay is done. At this point, you can choose to either place your finished pulp mixture in the fridge to use later (I kept some in my fridge for a couple weeks and it stayed fresh), or immediately make your paper mache bowl.

Instructions on how to make a paper mache bowl:

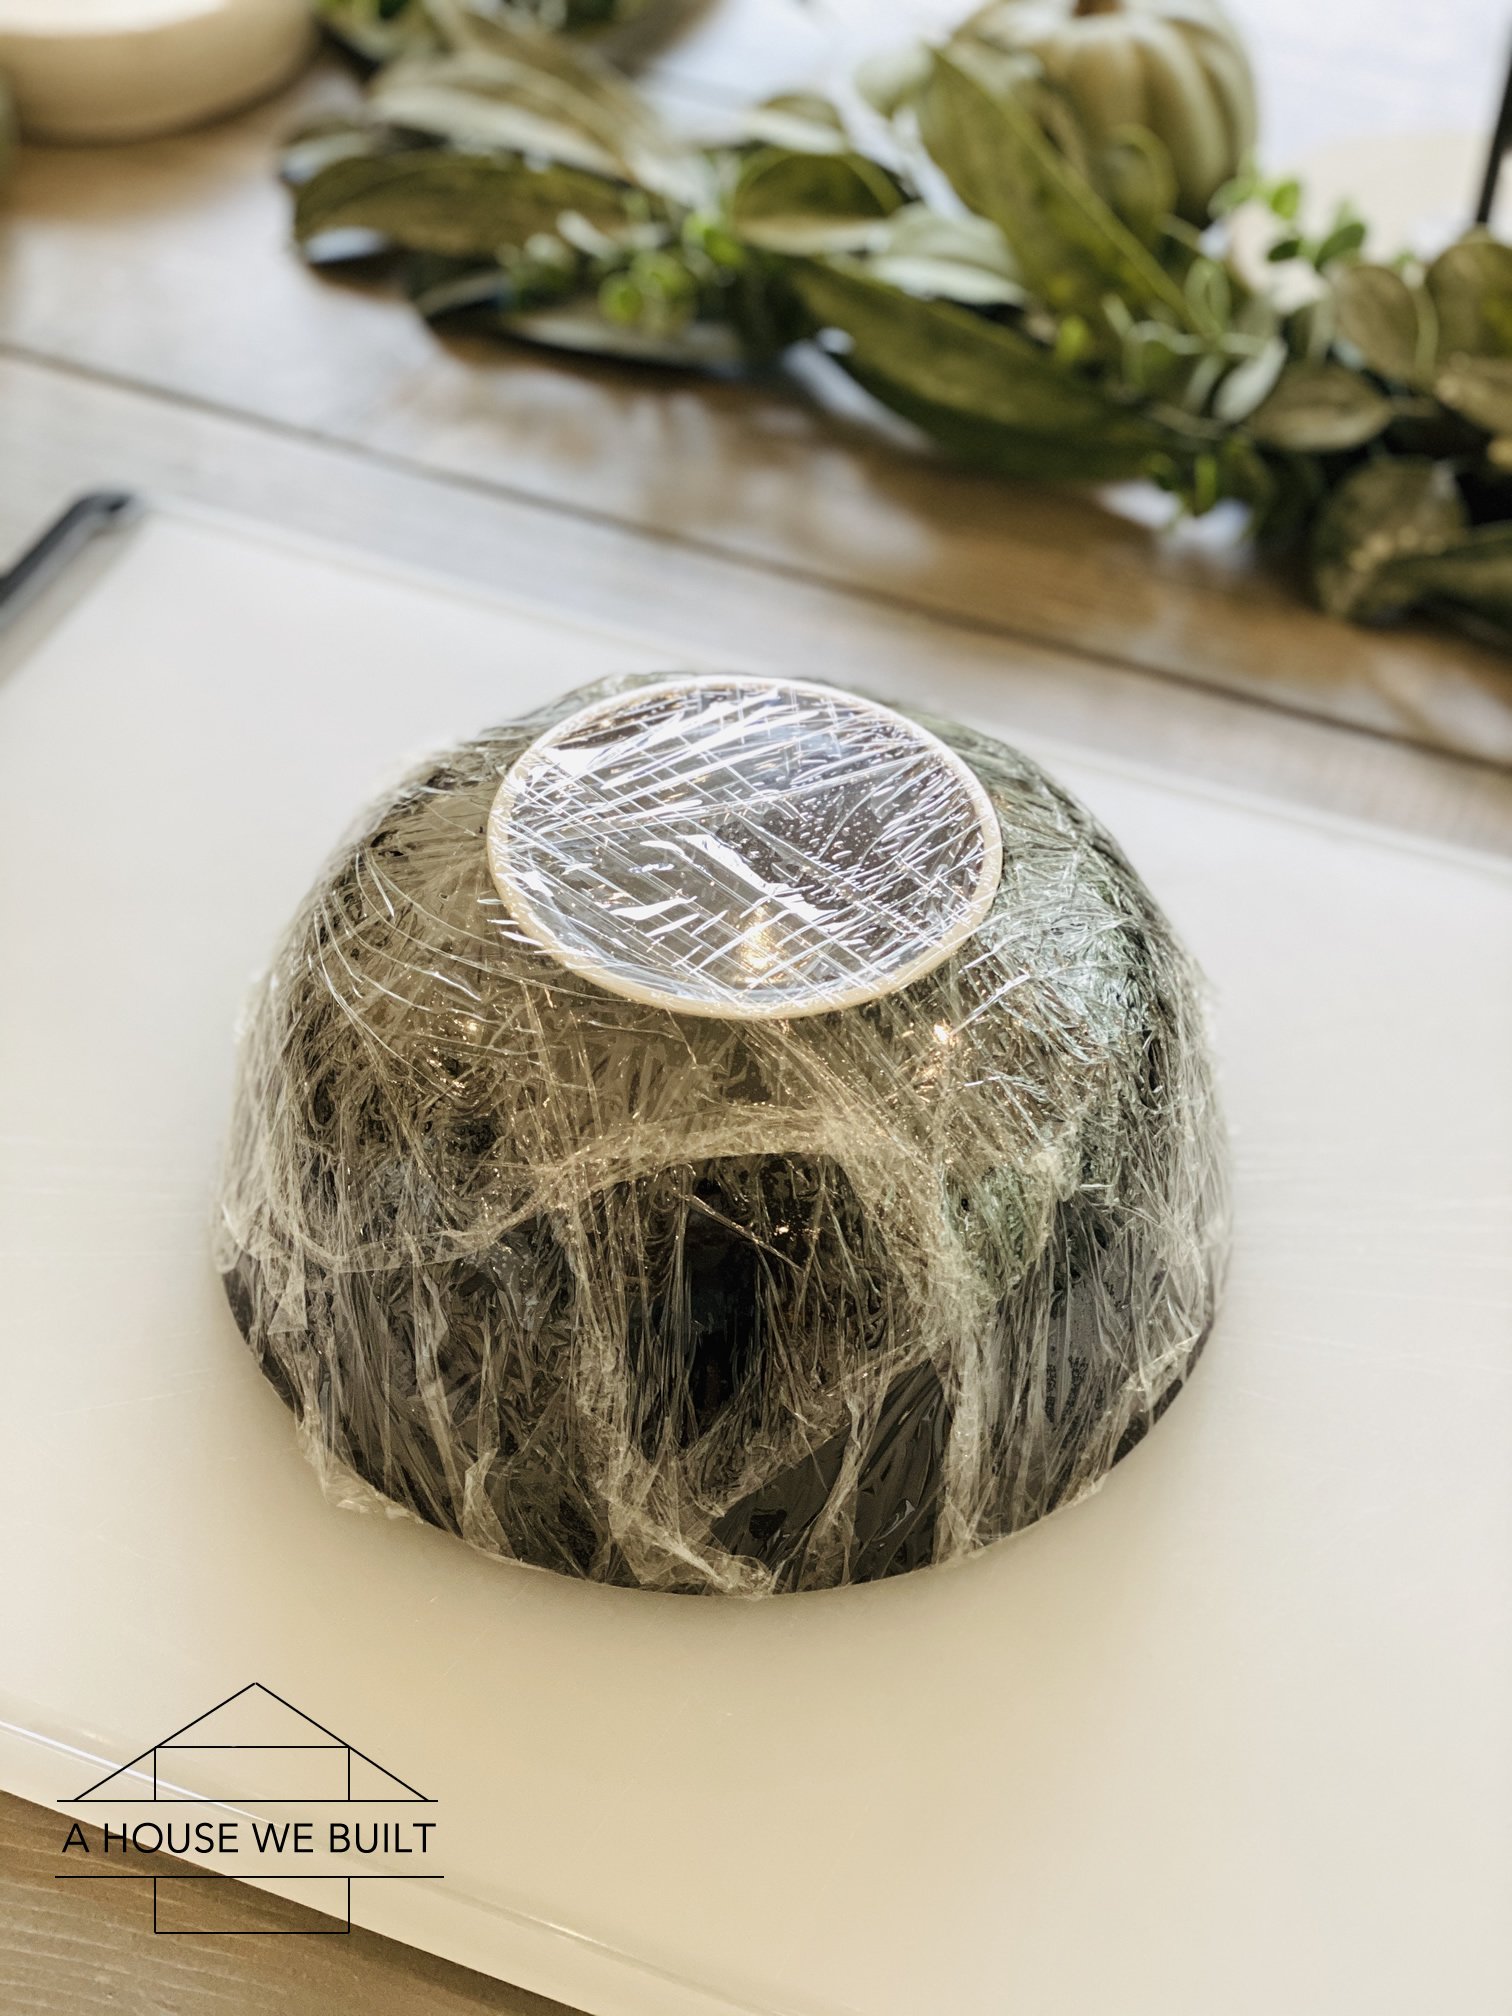
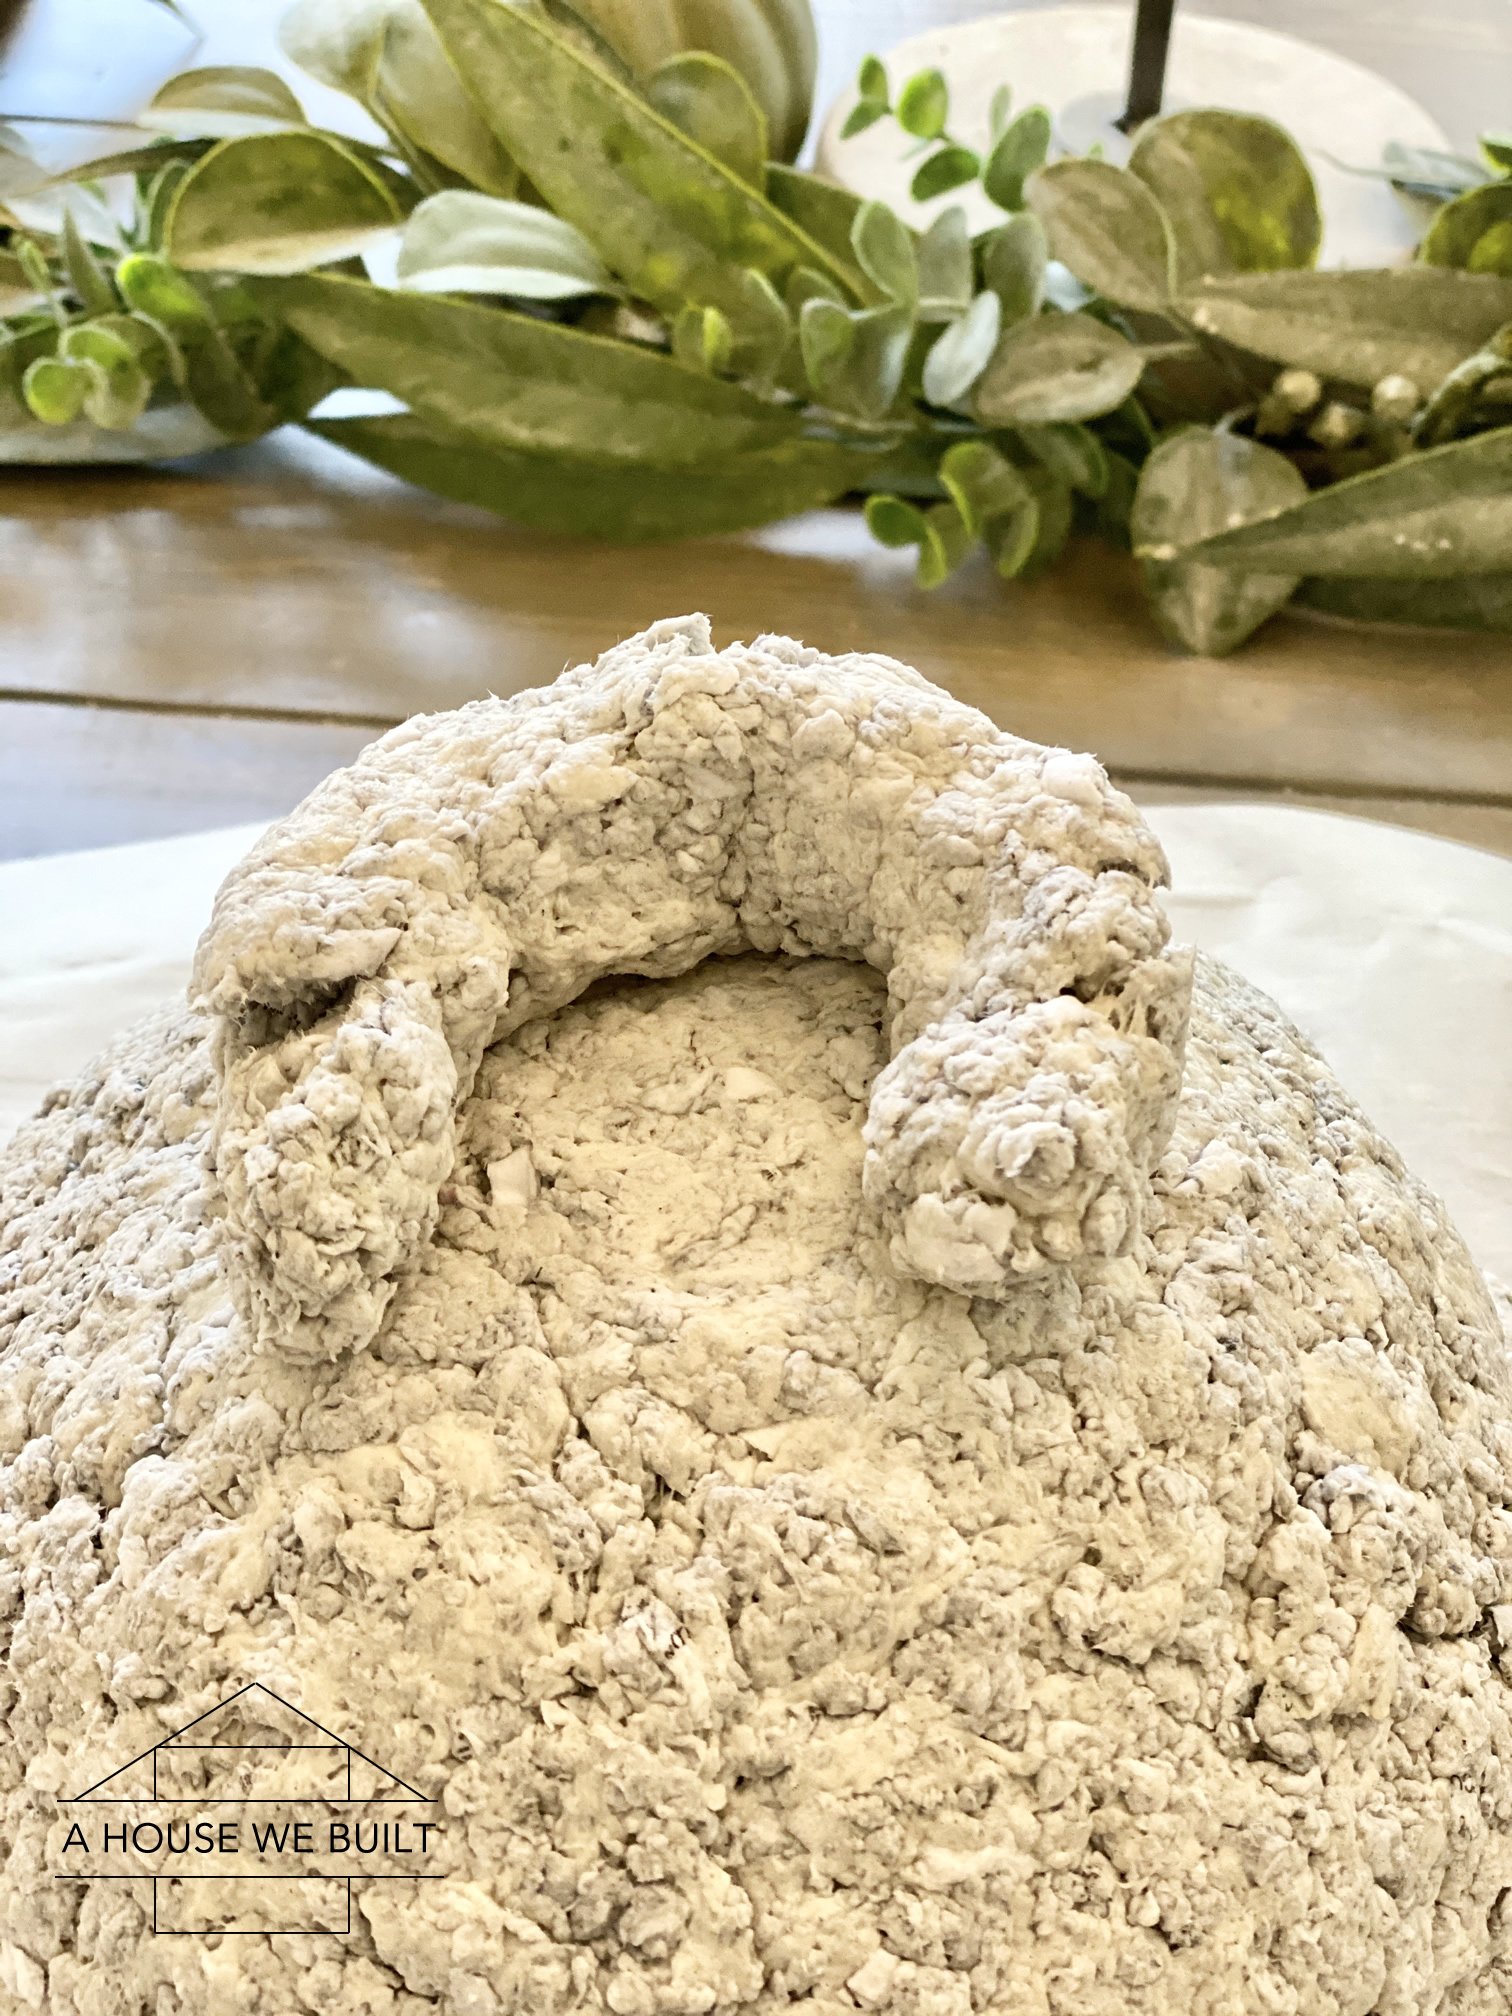
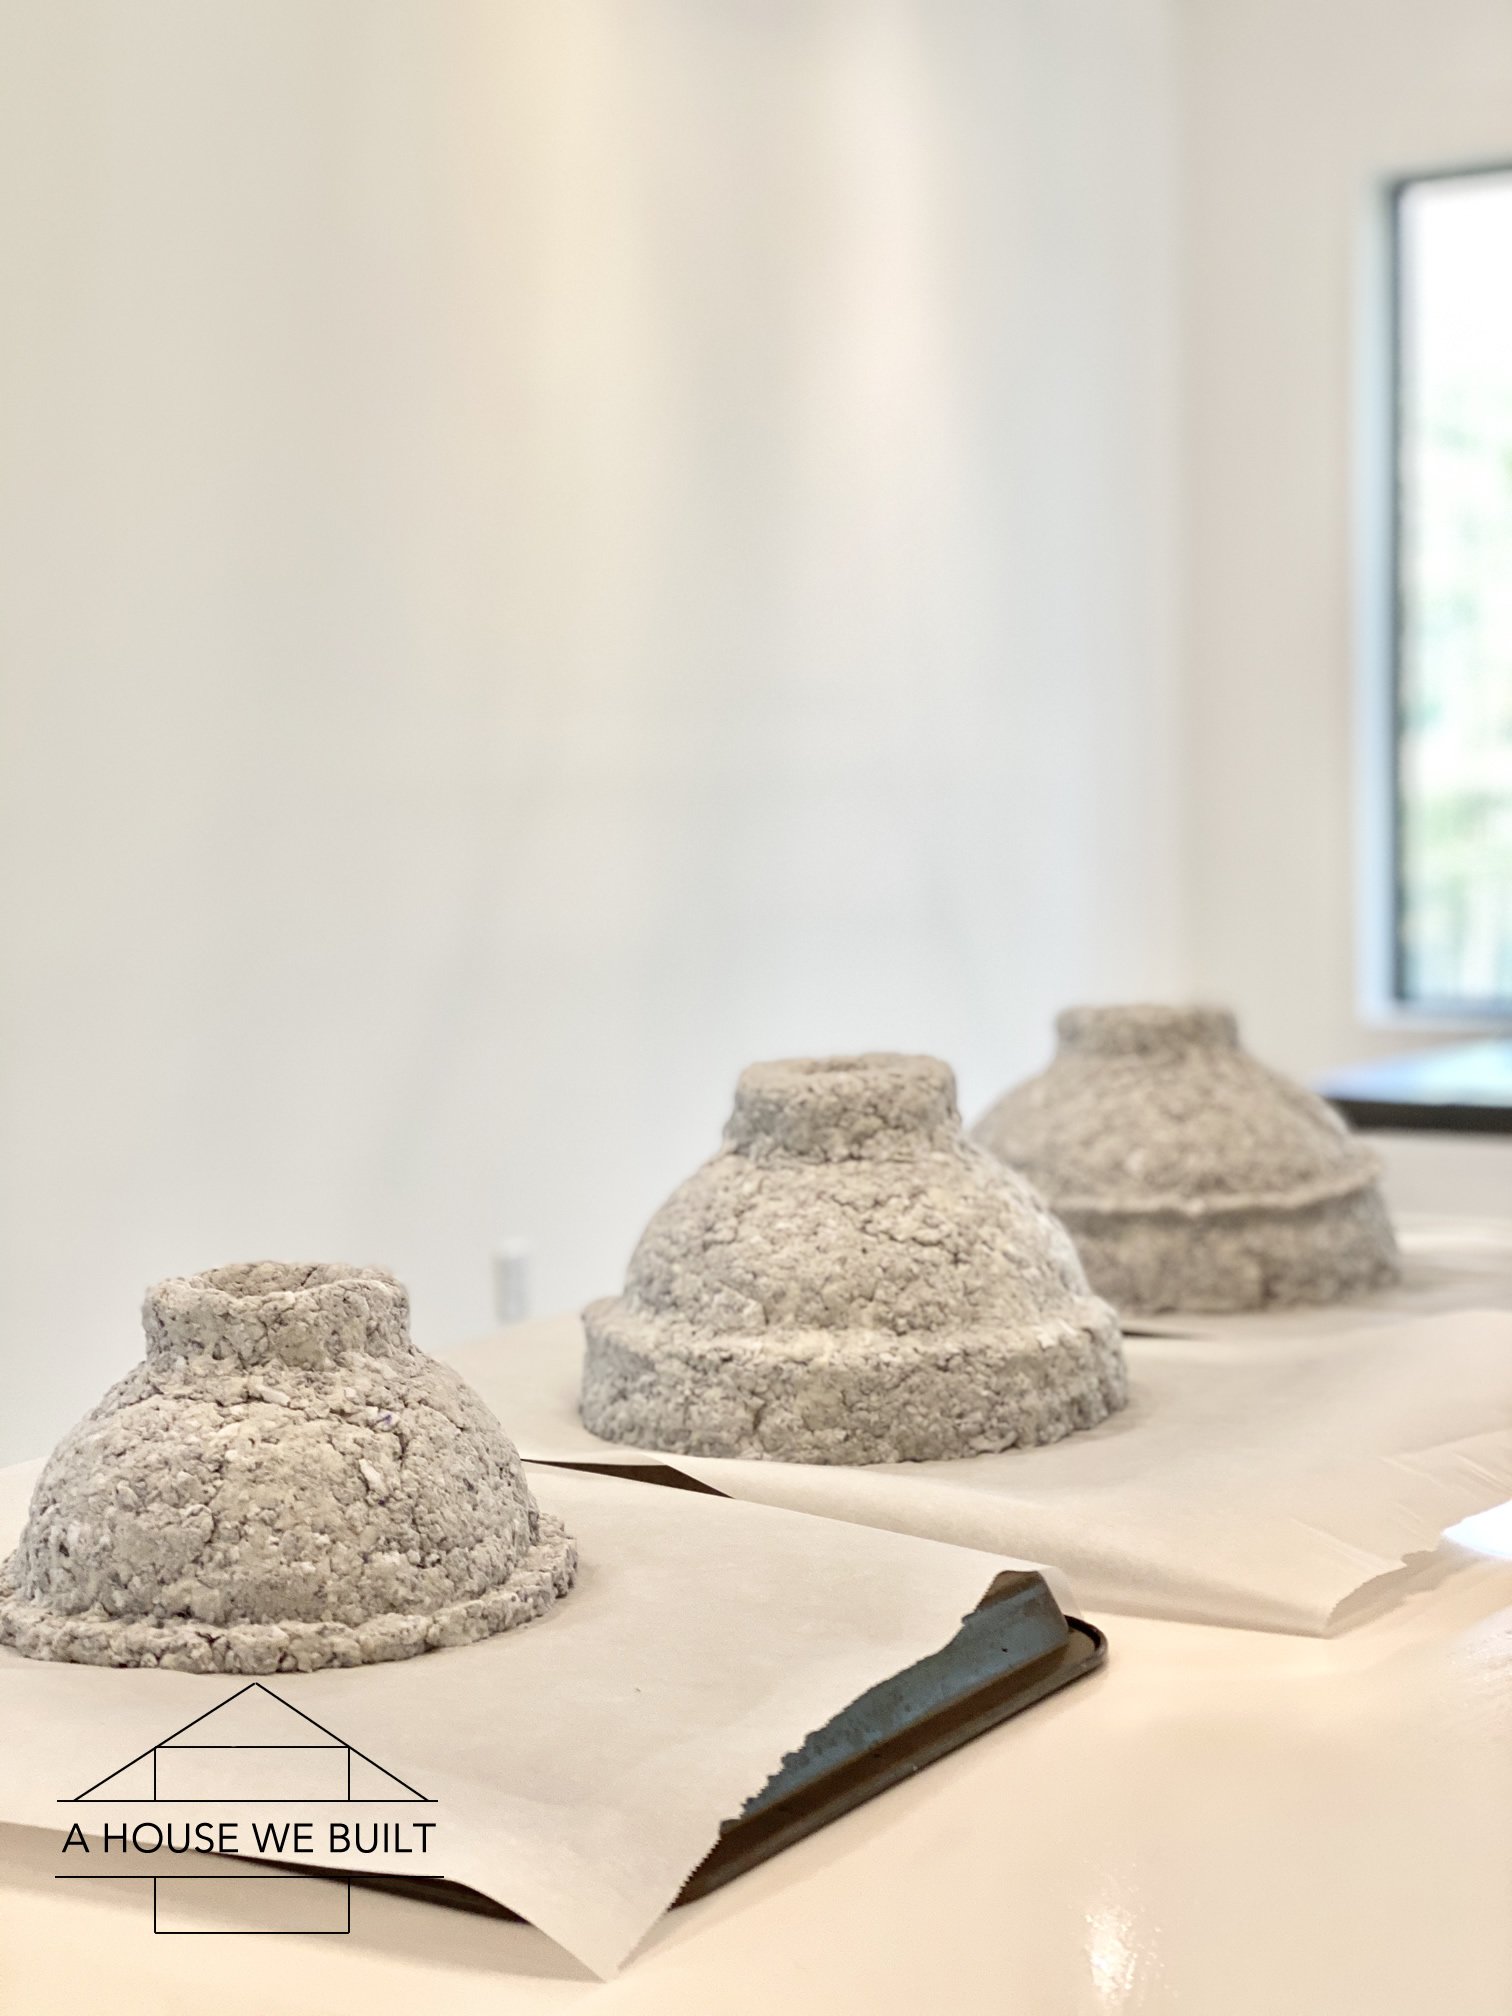
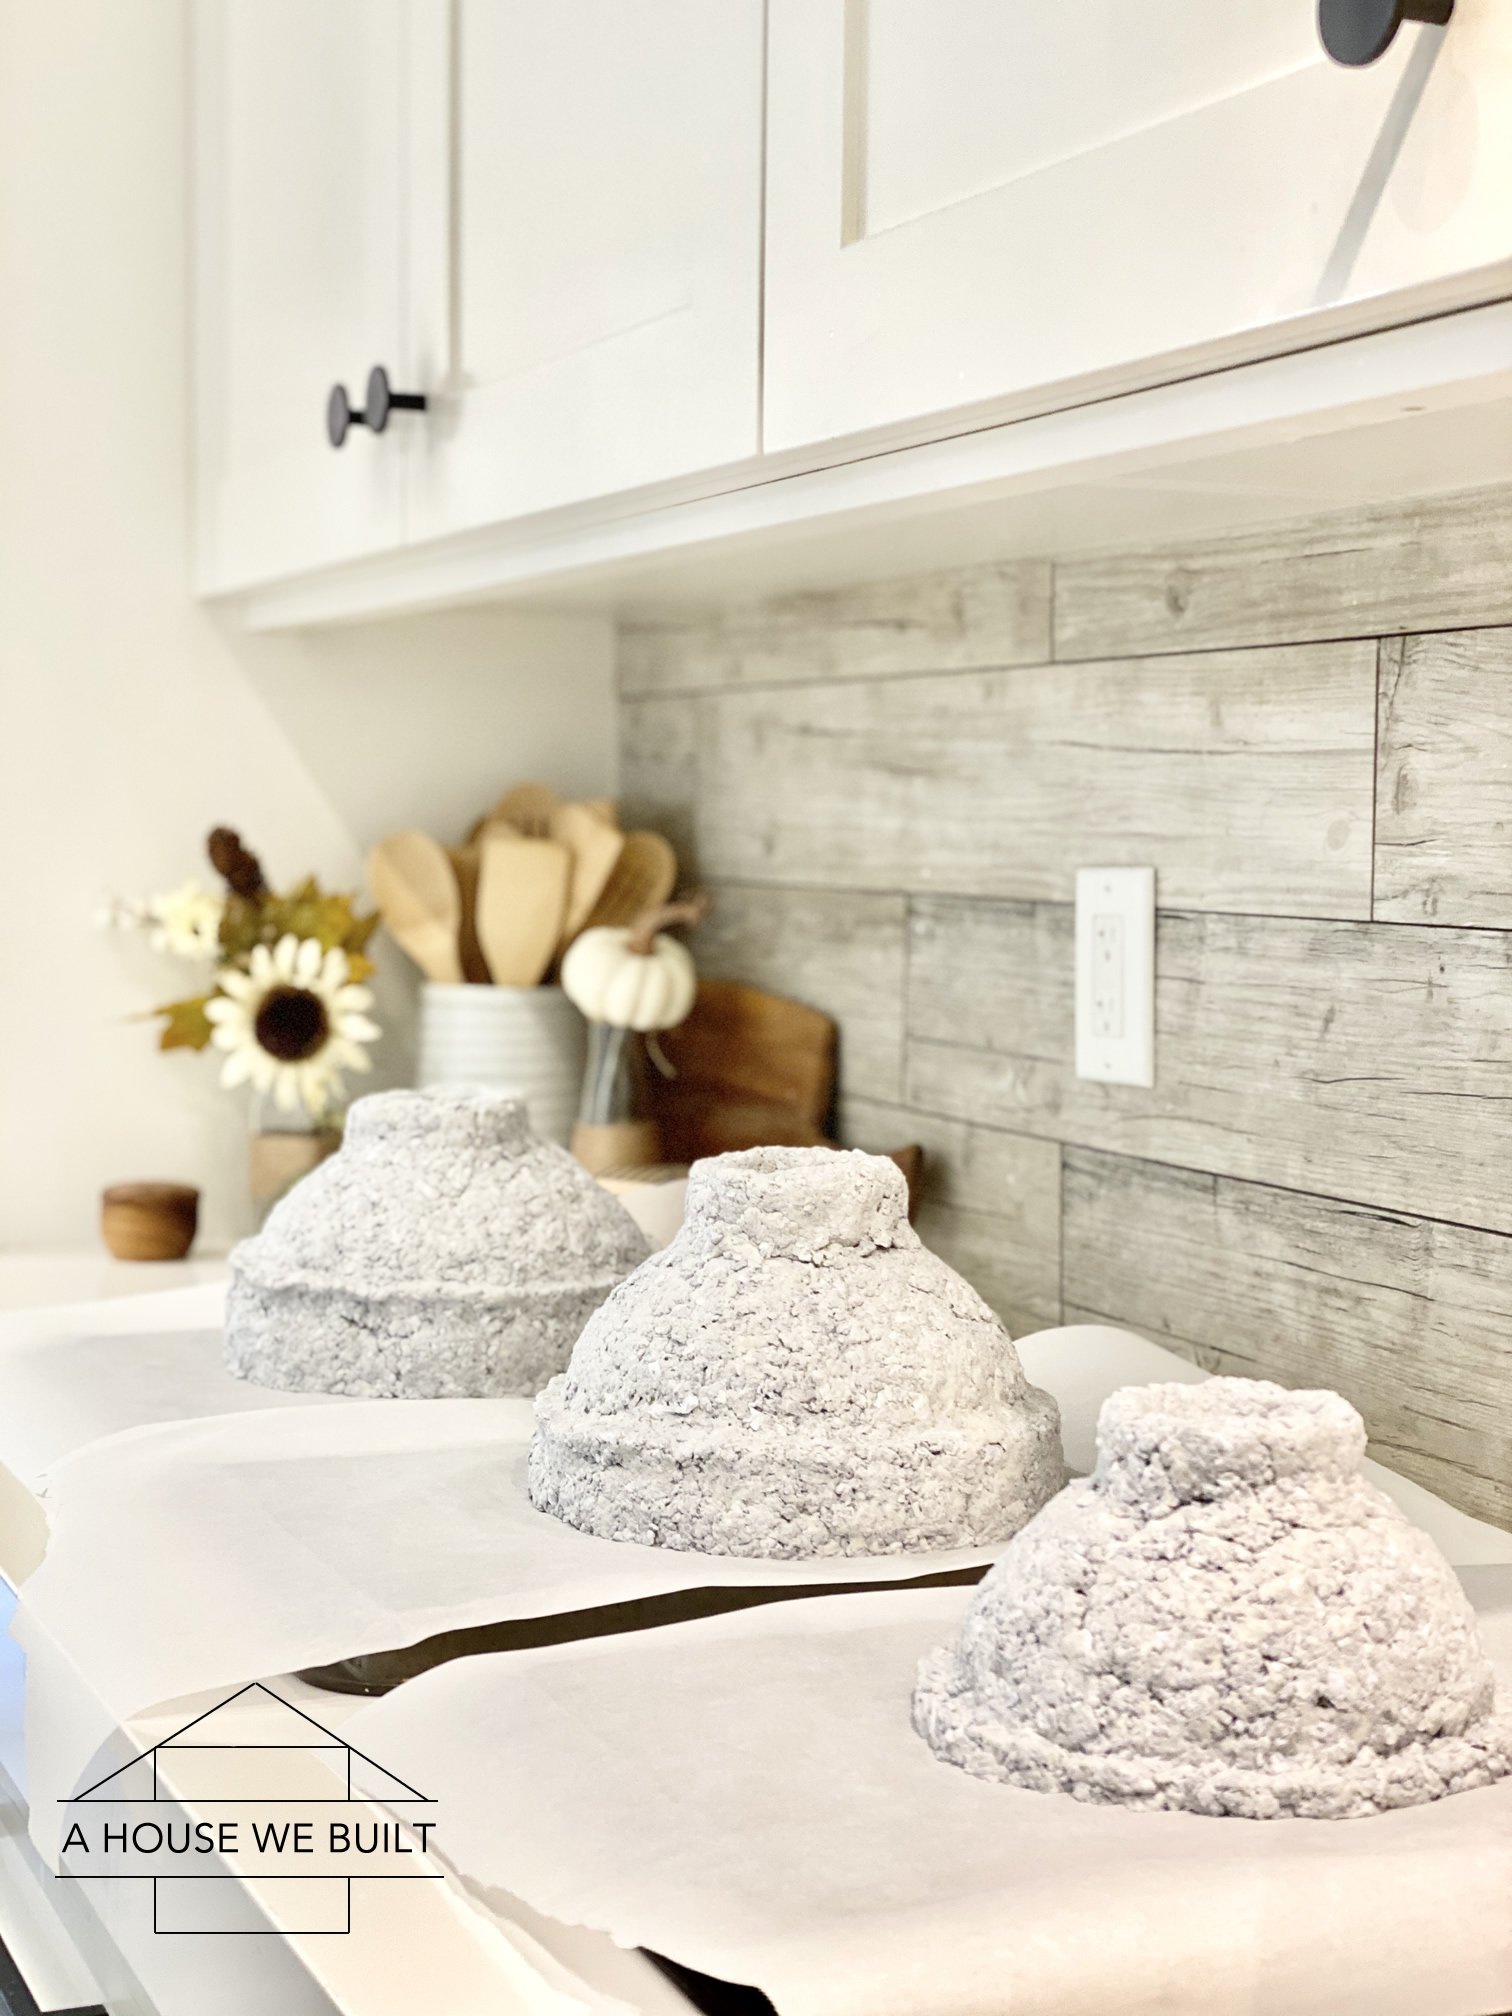
  1. To make your paper mache bowl, you’ll need a bowl to use as a mold/frame. This can be any oven-safe bowl you like the size/shape of. The bowl will not be damaged by this project (but it must be oven-safe) so it’s only temporarily needed until your paper mache has set.
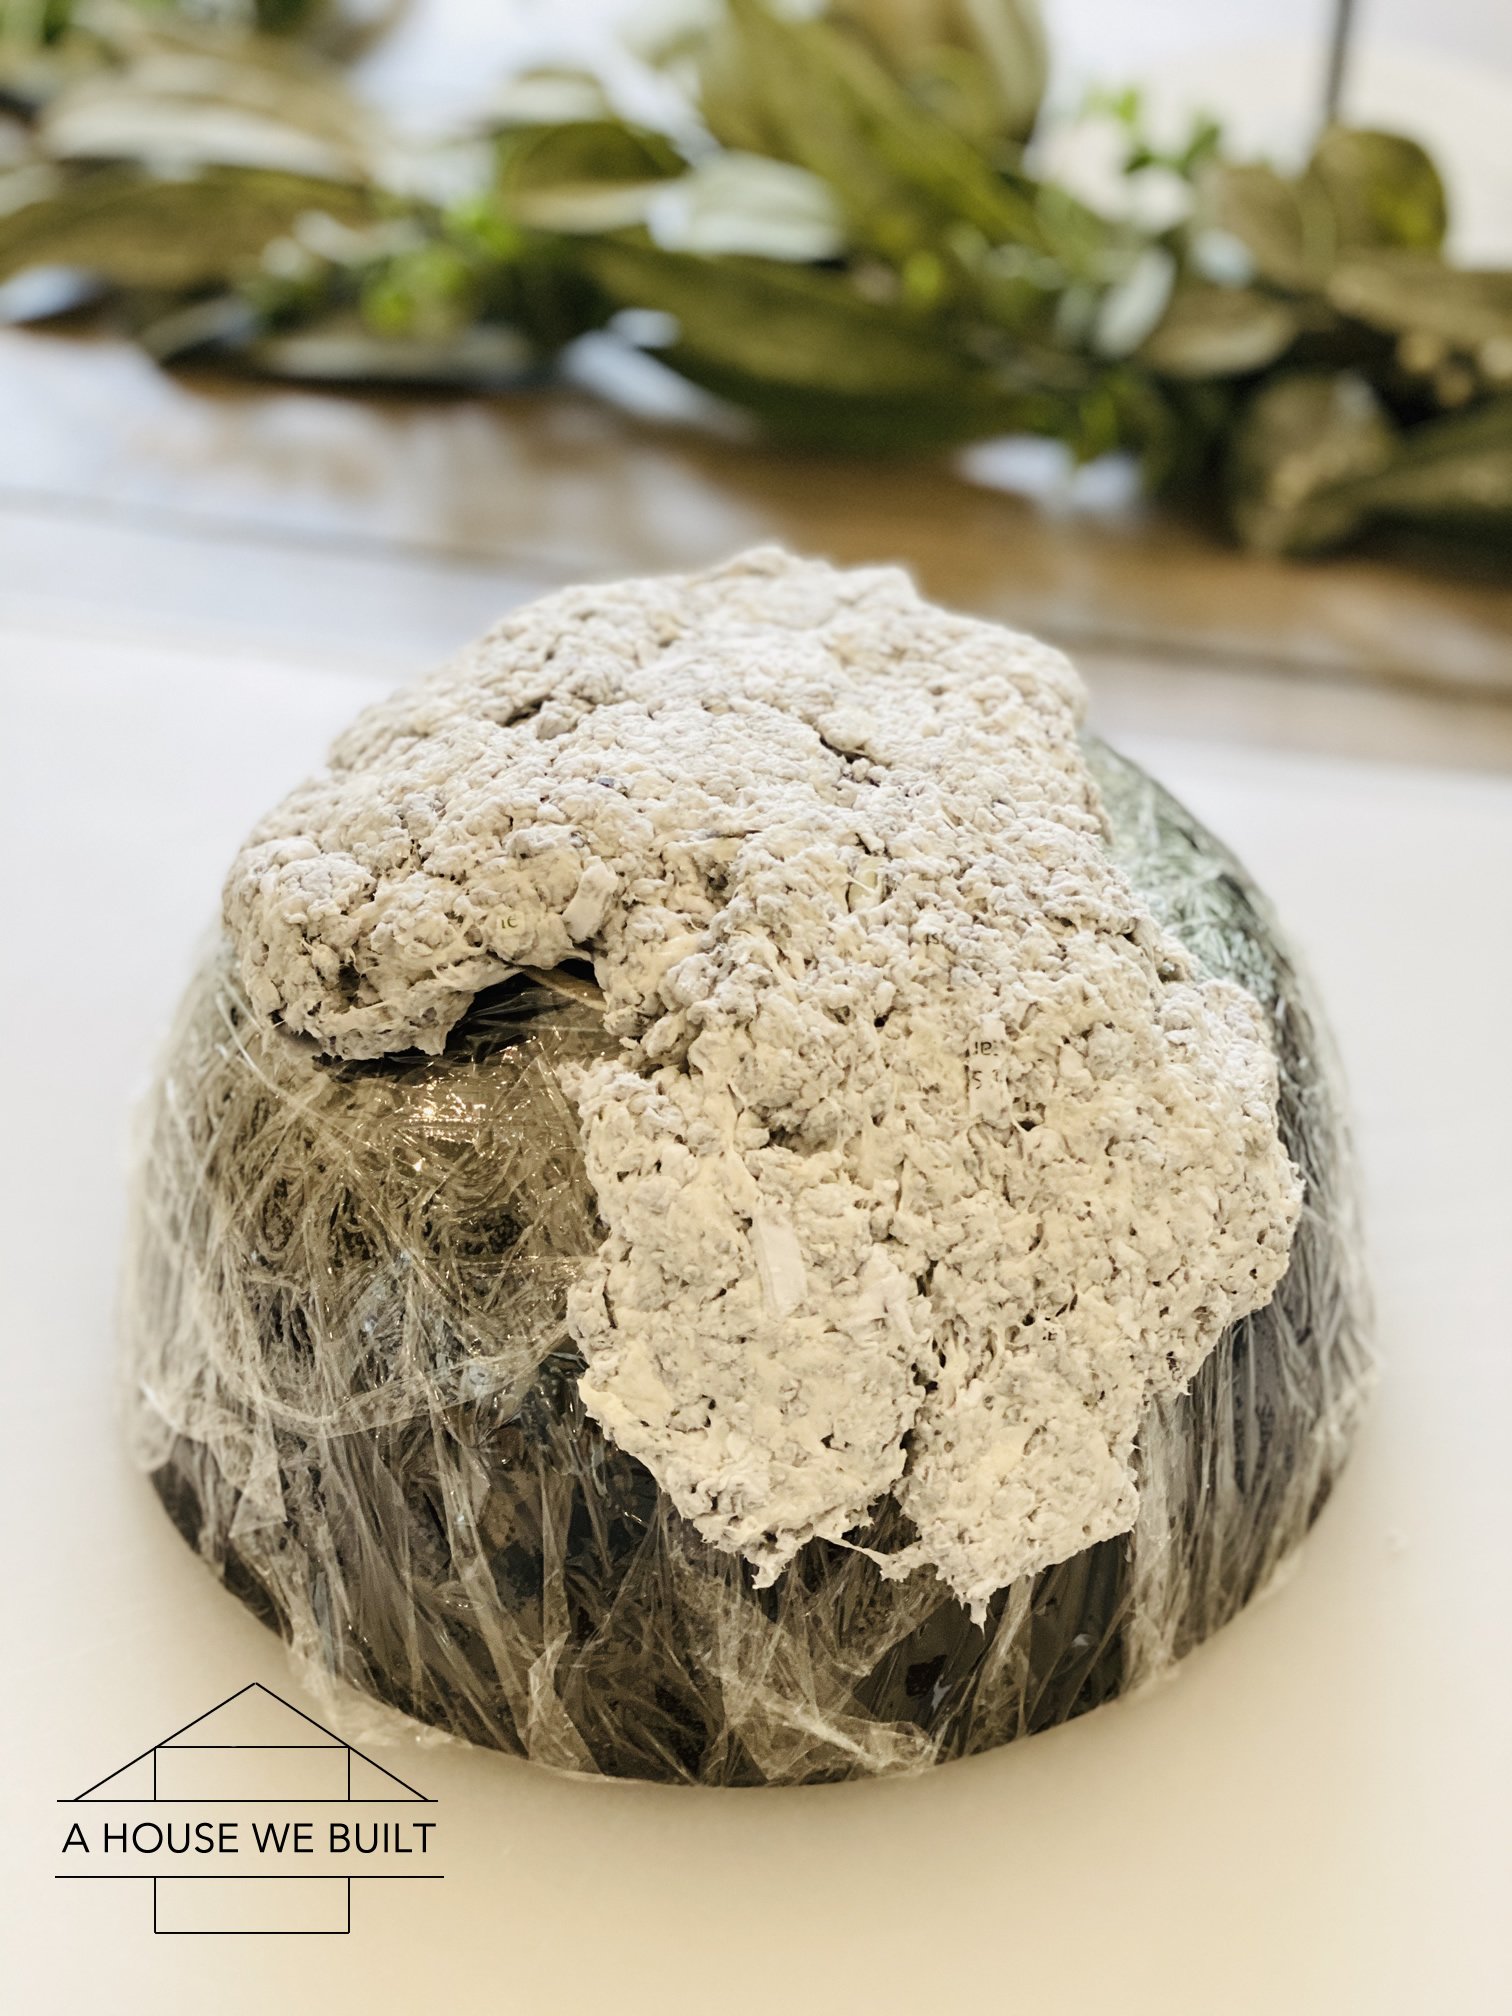
  2. Cover your bowl in saran wrap before starting. This will help you remove the bowl later.
  3. Take small handfuls of the paper mache pulp and press it onto your mold-bowl. Ideally your paper mache bowl would be approximately a 1/4 inch thick (ish). Just keep adding more until your bowl is evenly covered. Make sure to blend the seams too so that everything sticks together.
  4. Now you can add fun texture/dimension to your bowl. I made 5 bowls, each with slightly different designs. You can either use your finger to press indents into the pulp, or add in extra ropes of pulp. Just make sure you properly blend everything together. It’s similar in concept to working with clay or play dough. Ultimately you just have to keep molding it until you’re happy with the shape and everything is blended together.
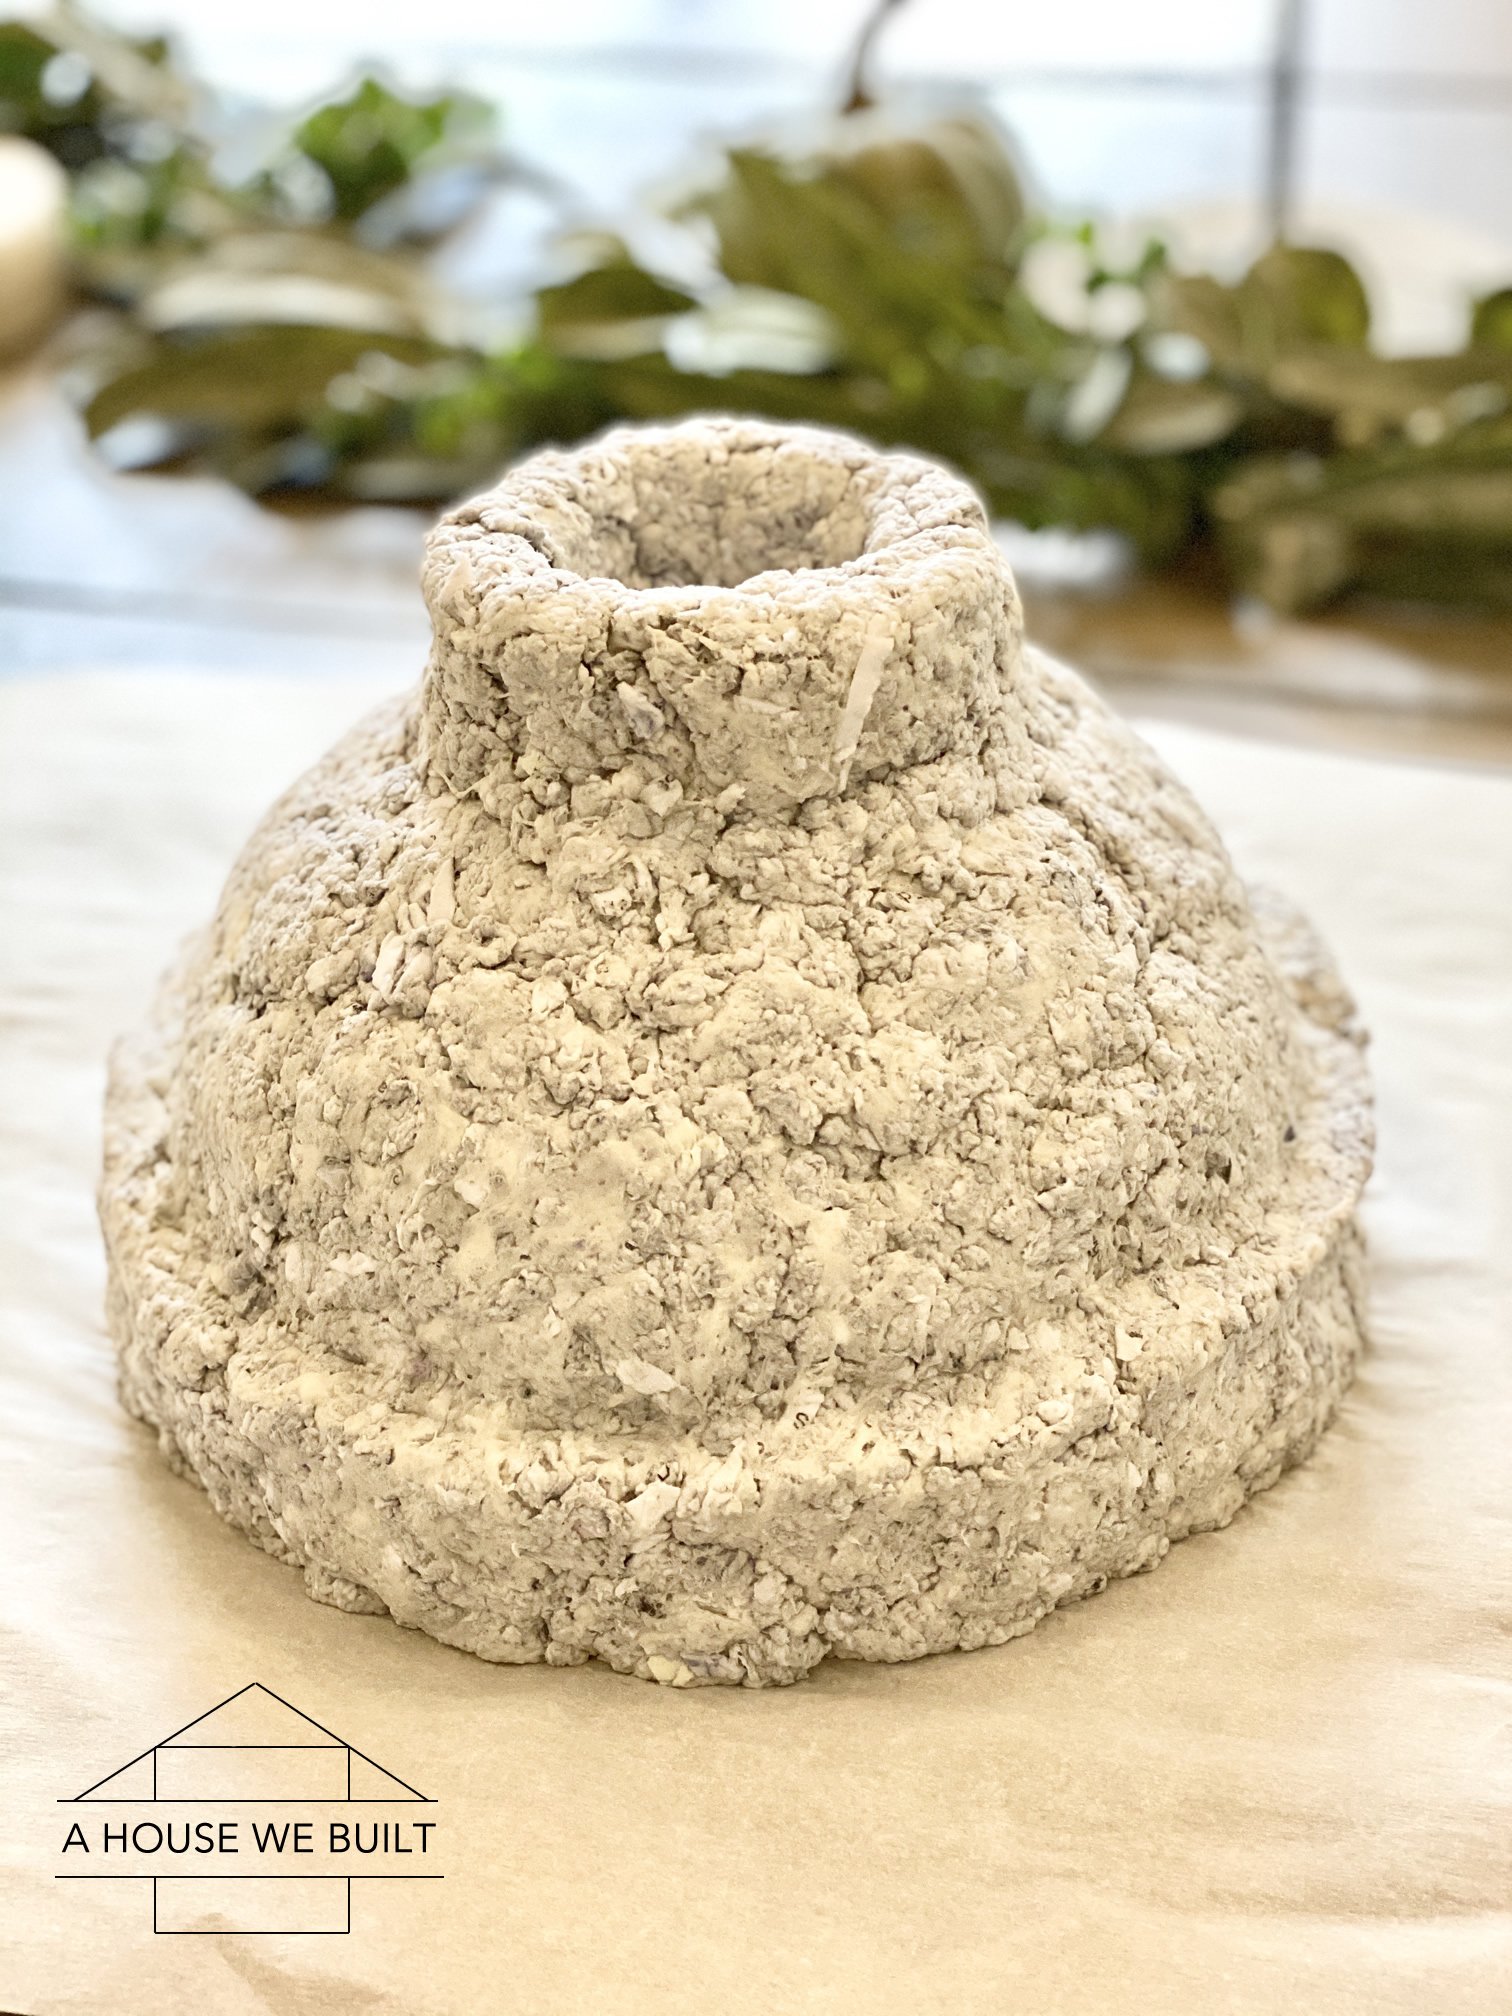
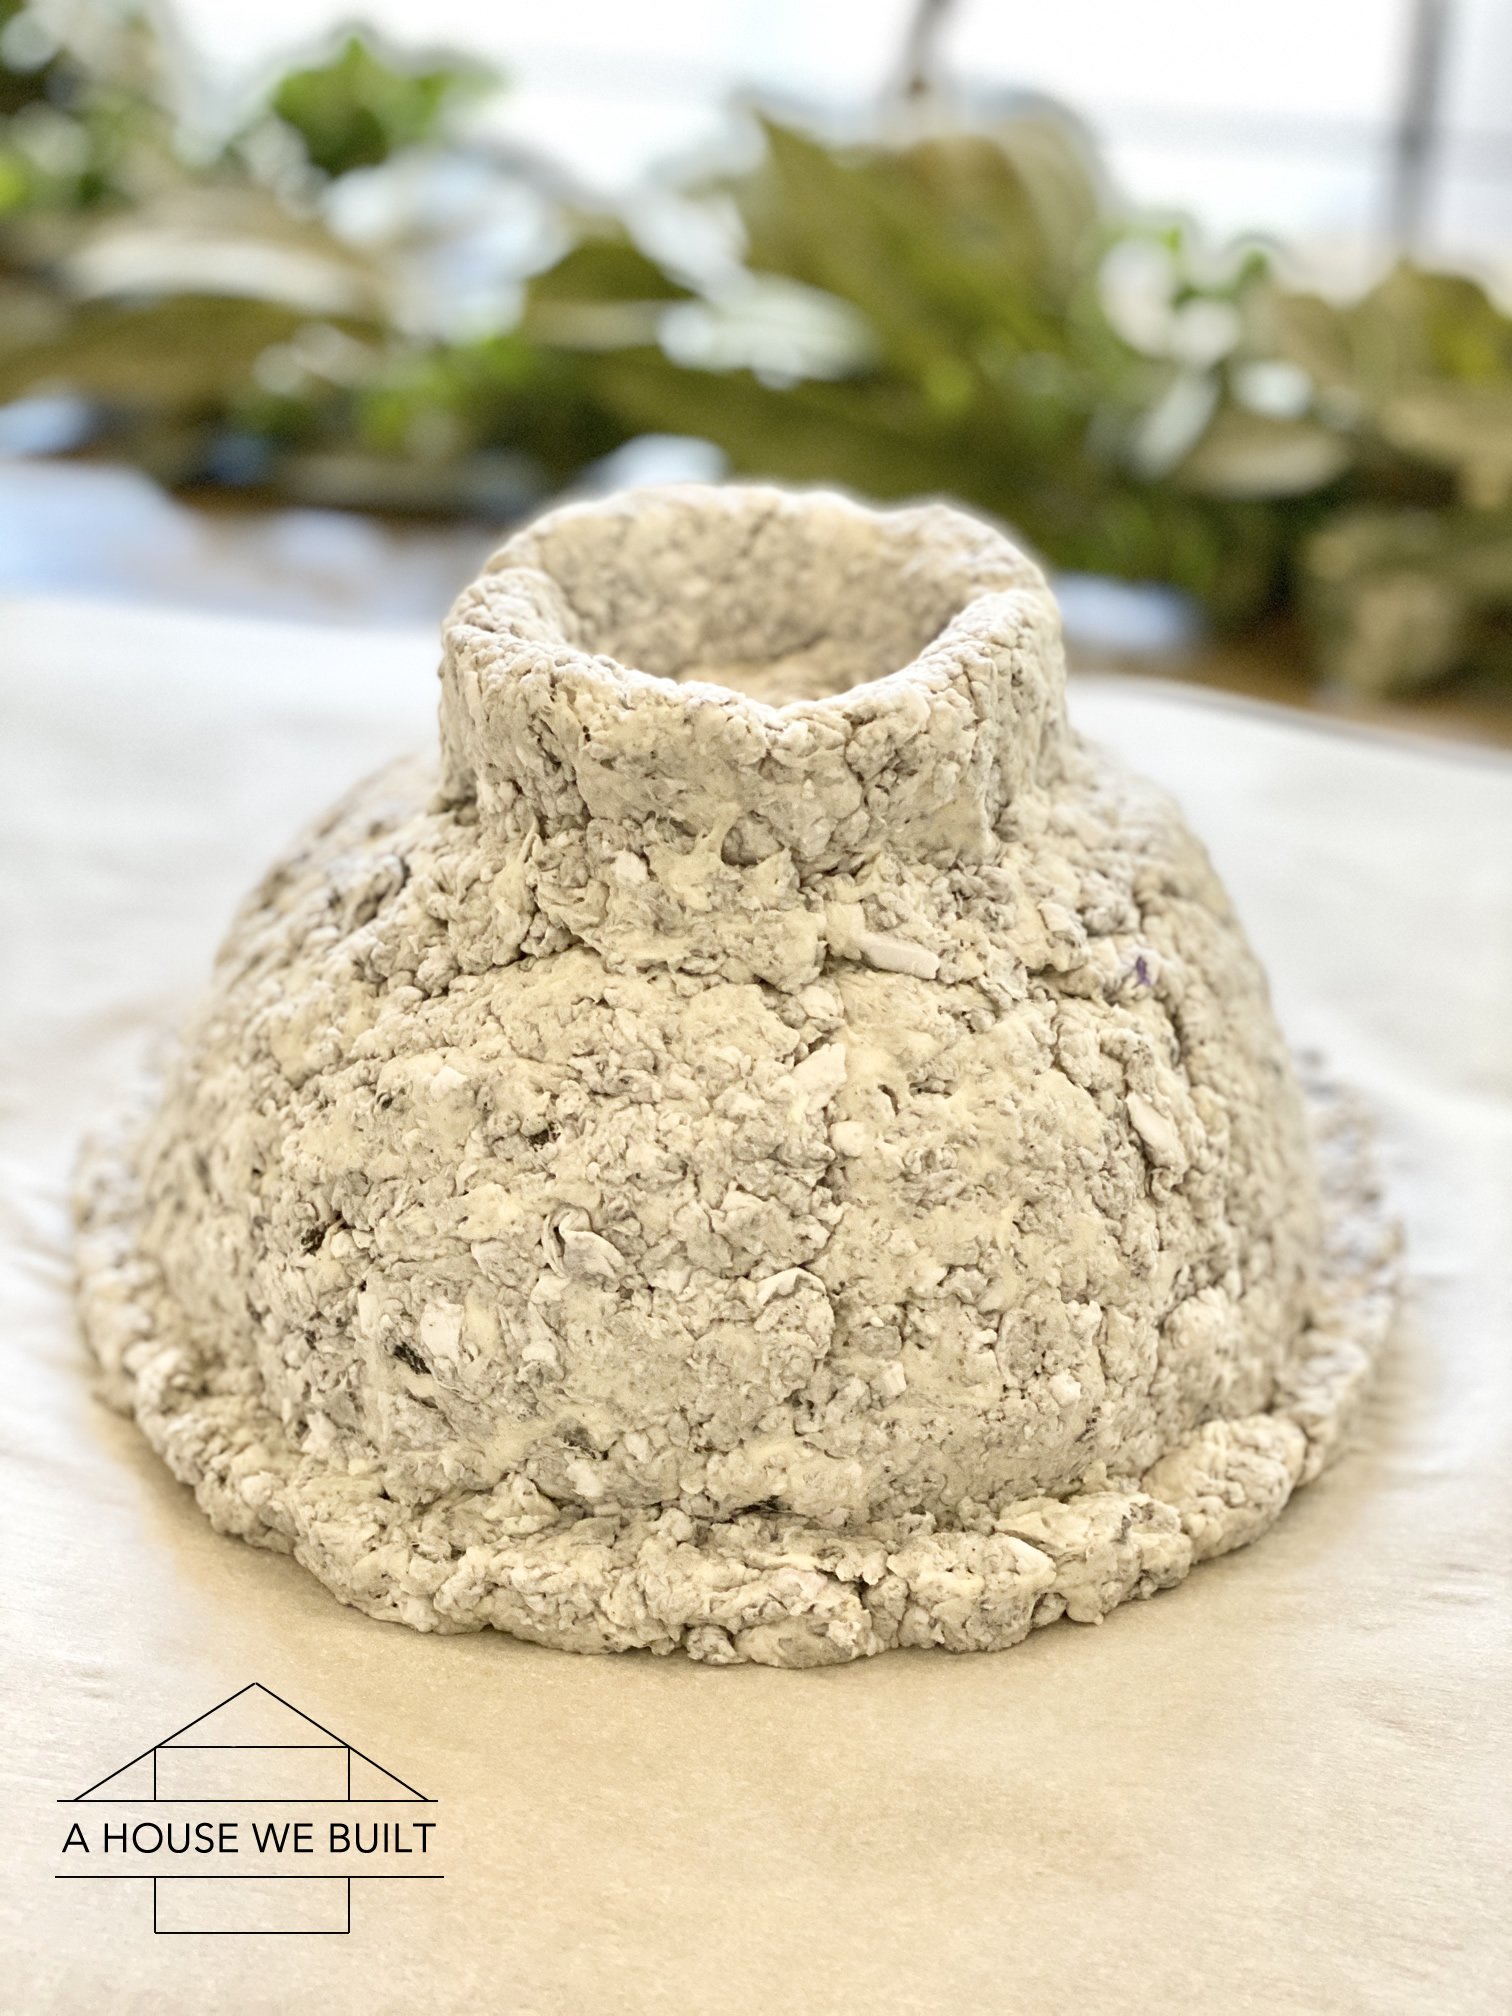
  5. Next you need to dry the bowls out by placing them in your oven on the “keep warm” setting for basically a whole day (5-9 hours depending on the size and thickness) to dry it out. It’s very important you don’t have the oven any hotter than the “keep warm” setting since there is saran wrap under the paper mache but, at least on my oven, that setting is low enough that it just helps it dry out faster without baking it. — Side note: The reason you can’t just leave it out on the counter to dry is a lesson I learned the very hard way with my first bowls – I left them to dry on my counter for about 5 days but not only were they not drying anywhere near fast enough but they started to smell very sour (maybe I didn’t add enough salt?) so it was pretty gross and I hope you can learn from my mistake and just oven-dry them on keep-warm from the start. — You’ll know they’re dry when you touch them and there’s no squish.
  6. When your bowls are finished drying out, take them out of the oven and let them cool completely.
  7. Remove the “real” bowls that they’re formed around. This is MUCH easier said than done. Be VERY PATIENT because at this point you can break your bowl and all your hard work will go to waste so don’t rush this and accept that it takes a bit of time, a few prayers, and the right balance of gentle force and patience. The bowls WILL break if you’re not careful. I found the best thing was to gently but firmly pull the sides away from the bowl just the tiniest bit (like 1/32″) and rotate doing that around the bowl to loosen them, then pull gently at the cling wrap just a little at a time rotating around the bowl again, and just sloweeeely wiggle it loose. This does take a bit of time.
  8. Once you have freed the bowl, you’ll notice the inside is likely still a little wet in spots. If so, just put it back in your oven on “keep-warm” until it fully dried. This could take anywhere from 1-3 hours.
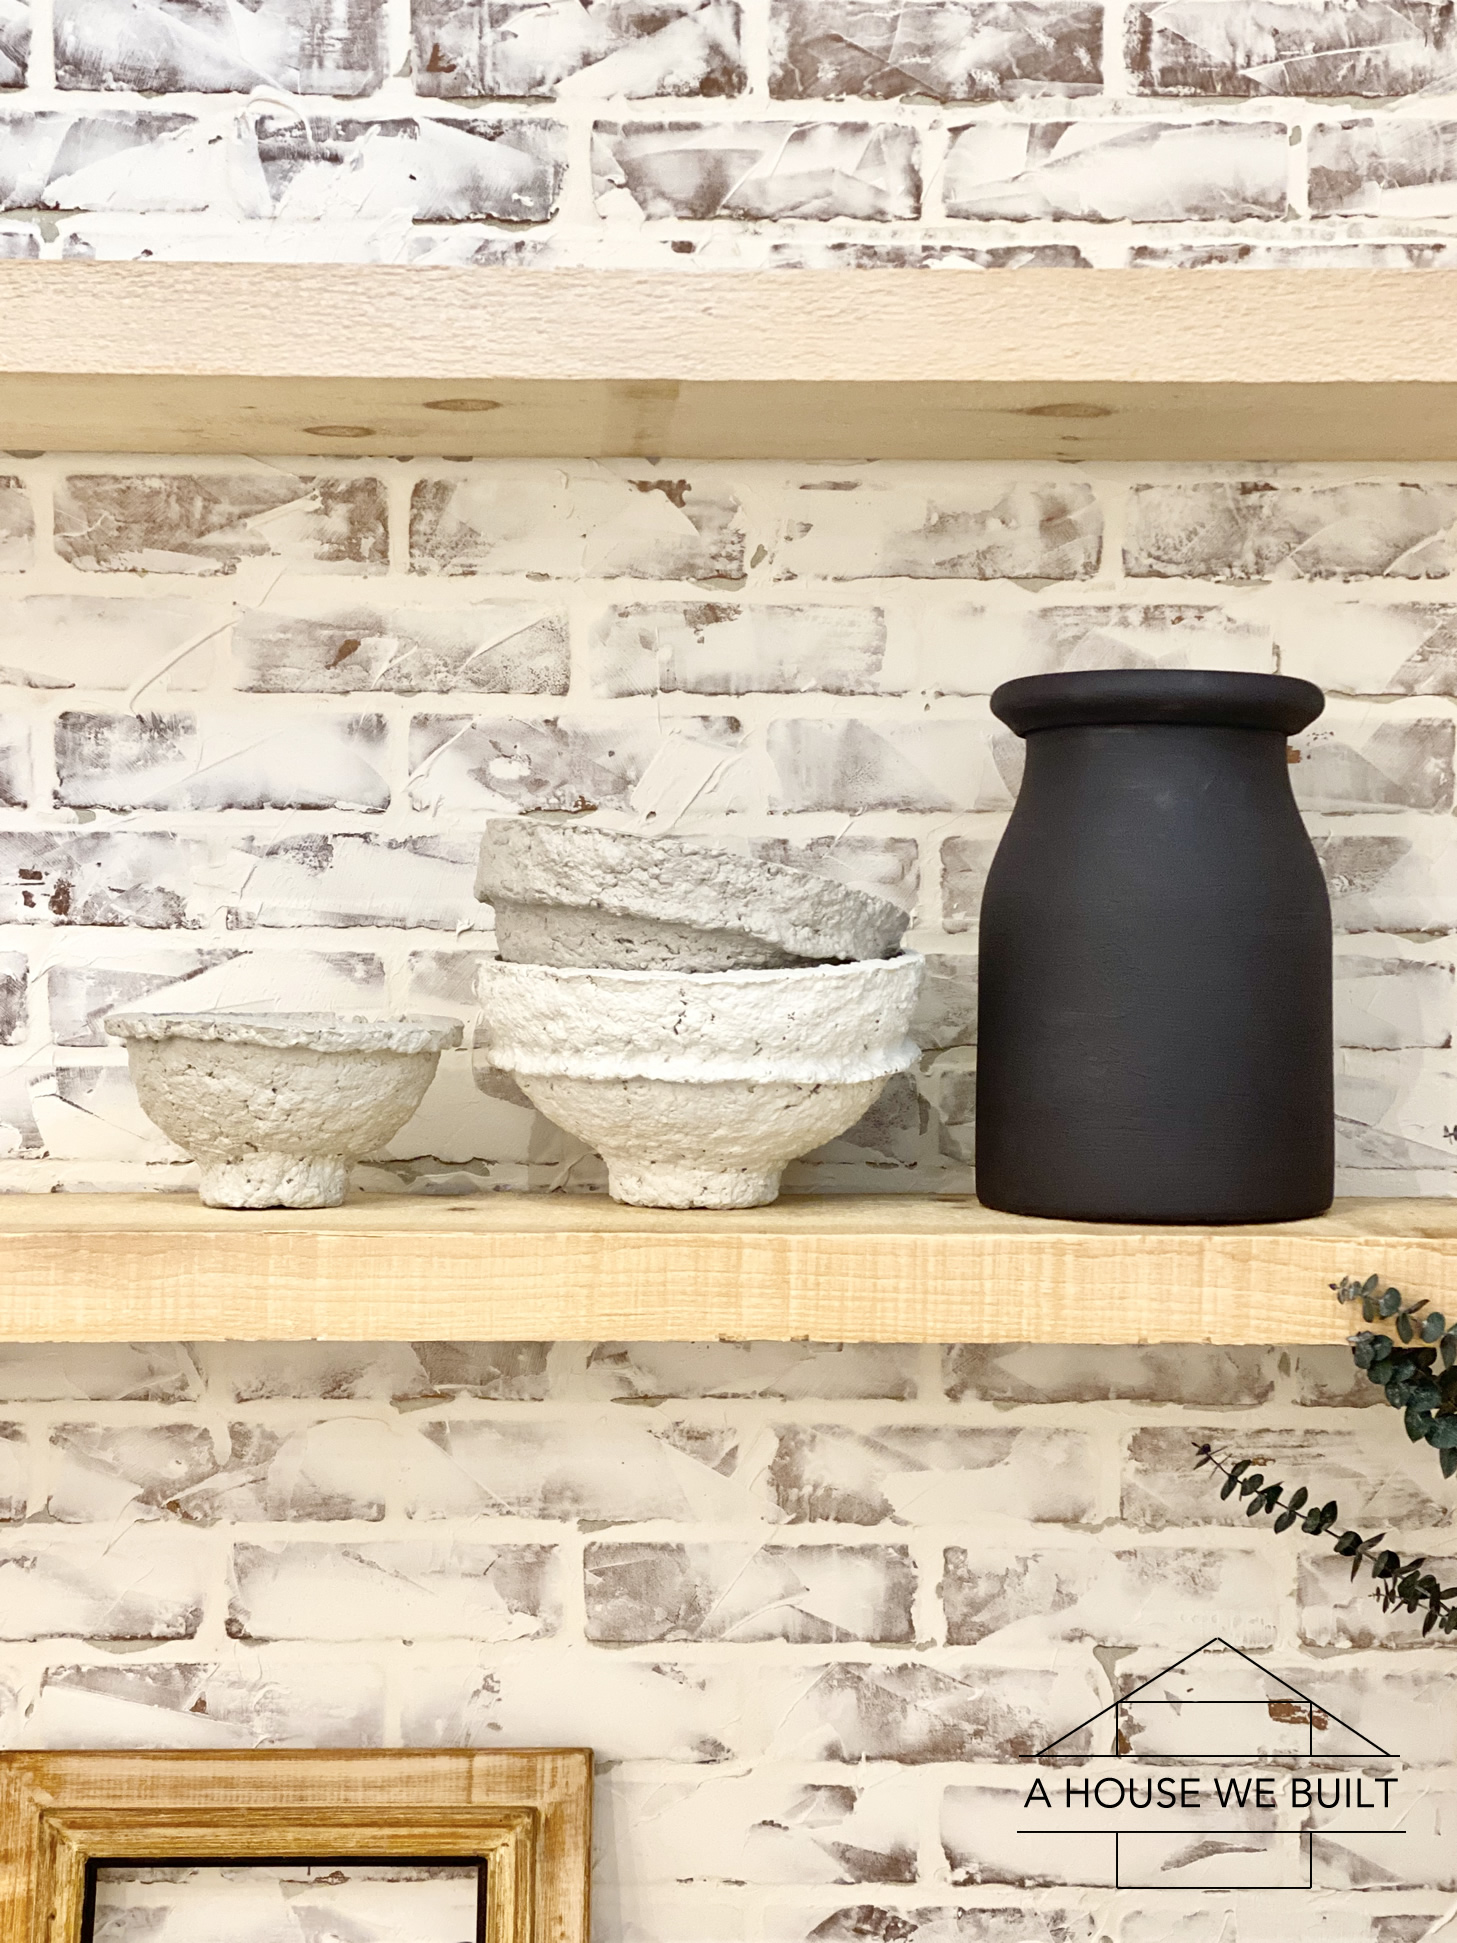
  9. Now that your bowls are formed, dry, and free, it’s time to finish them. You can either leave them their natural color or paint them. If you’re going to paint them, then pretty much just do whatever you want. I painted some of mine with random house paints I had left over from prior projects and I left others their natural color.
  10. When you’re finished painting them, you have the option of sealing them with a clear top coat. I sealed mine with the same poly that I used on all my woodworking projects. I’m sure this isn’t a “proper” or “official” way to do it but hey it worked!

For sources from our Game Room, click here.
For sources from our Office Room, click here.
For more of our DIY Tutorials, click here.
To follow us on Instagram, click here.

Filed Under: Tutorials

Reader Interactions

Leave a Reply Cancel reply

You must be logged in to post a comment.

Primary Sidebar

SHOP OUR HOME

Click any image below for sources from our pics!

WEBSITE ROADMAP

  • Shop Our Home
  • Sources by Room
    • All Sources & FAQs
    • Kitchen Sources
    • Pantry Sources
    • Living Room Sources
    • Dining Room Sources
    • Home Office Sources
    • Laundry Room Sources
    • Entryway Sources
    • Mudroom Sources
    • Gallery Wall Sources
    • Reading Room Sources
    • Theater Room Sources
    • Game Room Sources
    • Guest Bedroom Sources
    • Primary Bedroom Sources
    • Primary Closet Sources
    • Primary Bathroom Sources
    • Powder Bathroom Sources
    • Buffalo Check Bathroom Sources
    • Basement Bathroom Sources
    • Basement Sources
    • Stairs, Landings & Hallways
    • Paint Colors and Stain Recap
    • Cleaning Sources & Routines
  • Tutorials
    • How to Make a Staircase Gallery Wall
    • How to Make Textured Canvas Art
    • How to Install Shiplap
    • How to Build a Slat Wall
    • How to Paint an Ikea Dresser
    • How to Build Bypass Barn Doors
    • How to Build a Farmhouse Table and Benches
    • How to Build a Rustic Sideboard
    • How to Build a Slat Sideboard
    • How to Make a Sofa Pit
    • How to DIY a Faux Brick Wall
    • How to Build a Window Seat
    • How to Build a Paneled Accent Wall
    • How to DIY a Functional Play Kitchen
    • How to Stencil a Wall
    • How to Build a Round Table
    • How to Build a Console Table
    • How to Make Paper Stars
    • How to Make Paper Mache Bowls
    • How to Make Clay Links
    • How to Texture Bowls & Vases
    • How to Install Open Shelves
    • How to Make Wood Block Art
    • How to Make a Wood Bead Garland
    • How to Build Cabinet Doors
    • How to Build a Wood Countertop
    • How to DIY a Nightstand Charging Drawer
    • How to Make a Wheat Wreath
    • How to Hang Gallery Wall Frames
    • How to Stain Stairs and Paint Risers
    • How to Make Industrial Stair Railings
    • How to Build a Window Seat Cushion
    • How to Make Salt Dough Ornaments
    • How to DIY a Modern Mantel Christmas Tree
    • How to DIY a Wooden Christmas Village
    • How to Build a Wood Christmas Tree Collar Box
    • How to Make Paper Christmas Trees
  • Cats
    • Cat Room Tour & Litterboxes
    • Cat-Related Sources & Cleaning Tips
    • How to Cat-Proof Christmas Trees & Decor
    • How to Stop Cats from Scratching Furniture
    • How to Stop Cats from Playing with Decor
    • How to Train Cats and Kittens
    • How to Cope with Cat Allergies
    • How to Introduce New Kittens to Older Cats
  • Christmas
    • Christmas Decor Favorites 2023
    • How to Build a Wood Christmas Tree Collar Box
    • Neutral Christmas Present Wrapping
    • How to Make Paper Christmas Stars
    • How to Make Paper Christmas Trees
    • How to Make Salt Dough Ornaments
    • DIY Holiday Art Ideas
    • How to Cat-Proof Christmas Trees & Decor
    • How to Make Modern Tabletop Trees
    • How to Make a Wooden Christmas Village
    • Holiday Cheese & Snack Boards
    • Christmas Decor 2021
    • Christmas Decor 2020
    • Christmas Decor 2019
    • Gingerbread House & Cookies Recipe
    • Puff Tastry Christmas Tree Recipe
    • Christmas Decor 2018
  • Cleaning
    • Cleaning Sources & Routines
    • Minimalism: How To Get Started
    • Cat-Related Cleaning Tips
  • Recipes
    • Apple Turnovers Recipe
    • Baked Pumpkin Donuts Recipe
    • Banana Chocolate Chip Bread Recipe
    • Blueberry Lemon Cake Recipe
    • Cheese & Cracker Snack Boards
    • Chocolate Chip Cookie Recipe
    • Christmas Crack Recipe
    • Chocolate Crinkle Cookies Recipe
    • Cinnamon Rolls Recipe
    • Cinnamon Star Pastry Recipe
    • Coconut Curry Squash Soup Recipe
    • Creamy No-Cheese Pasta Sauce Recipe
    • Crumble Recipe
    • Easy Veggie Pasta Recipe
    • Fresh Rolls Recipe
    • Garlic Flatbread Recipe
    • Gingerbread Biscotti Recipe
    • Gingerbread House & Cookies Recipe
    • Healthy Hearty Salad Recipe
    • Homemade Bread Recipe
    • Lasagna Recipe
    • Molasses Cookies Recipe
    • Oatmeal Raisin Cookies Recipe
    • Pad Thai Recipe
    • Pesto Pasta Recipe
    • Potato Curry + Naan Bread
    • Puff Pastry Christmas Tree Recipe
    • Pumpkin Donut Bites Recipe
    • Pumpkin Loaf Recipe
    • Pumpkin Oat Muffins Recipe
    • Roasted Red Pepper Pasta Recipe
    • Rocky Road Bars Recipe
    • Vegan Bolognese Pasta Sauce
    • Vegetable Soup Recipe
  • About
    • About Us
    • Website Roadmap
    • Shop Our Home
    • Minimalism: How To Get Started
    • Privacy Policy
  • Blog

WHERE WE SHOP

Amazon

Wayfair

West Elm

Crate & Barrel

CB2

Pottery Barn

McGee & Go

Overstock

Rejuvenation

Joss and Main

All Modern

Target

Home Depot

World Market

Etsy

H&M Home

Lulu and Georgia

Serena & Lily 

Schoolhouse

Anthropologie

RECENT POSTS

  • Christmas 2023
  • Christmas Decor Favorites 2023
  • How to Make a Staircase Gallery Wall
  • Functional Play Kitchen DIY
  • Christmas Decor 2022
  • Cinnamon Rolls Recipe

Meta

  • Log in
  • Entries feed
  • Comments feed
  • WordPress.org

Footer

RECENT POSTS

  • Christmas 2023
  • Christmas Decor Favorites 2023
  • How to Make a Staircase Gallery Wall
  • Functional Play Kitchen DIY
  • Christmas Decor 2022
  • Cinnamon Rolls Recipe
  • Christmas Decor 2021
  • Cinnamon Star Pastry Recipe

SHOP OUR HOME

FOLLOW US

ON INSTAGRAM

For daily updates on our house projects and rescue kitties, follow us on Instagram @ahousewebuilt

ON SHOP.LTK

To shop our home pics daily, follow ahousewebuilt in the free SHOP.LTK app (formerly LIKEtoKNOW.it) now available from the App Store to get product sources from our pics. With this app, you can instantly shop your screenshot of any of our Instagram pics! We always link exactly what we have when available and often offer similar options as well!

Copyright © 2025 · Metro Pro on Genesis Framework · WordPress · Log in