• Skip to primary navigation
  • Skip to main content
  • Skip to primary sidebar
  • Skip to footer

A House We Built

Custom House Designed by Husband & Wife Team | Modern Farmhouse Inspired

  • Shop Our Home
  • Sources by Room
    • All Sources & FAQs
    • Kitchen Sources
    • Pantry Sources
    • Living Room Sources
    • Dining Room Sources
    • Home Office Sources
    • Laundry Room Sources
    • Entryway Sources
    • Mudroom Sources
    • Gallery Wall Sources
    • Reading Room Sources
    • Theater Room Sources
    • Game Room Sources
    • Guest Bedroom Sources
    • Primary Bedroom Sources
    • Primary Closet Sources
    • Primary Bathroom Sources
    • Powder Bathroom Sources
    • Buffalo Check Bathroom Sources
    • Basement Bathroom Sources
    • Basement Sources
    • Stairs, Landings & Hallways
    • Paint Colors and Stain Recap
    • Cleaning Sources & Routines
  • Tutorials
    • How to Make a Staircase Gallery Wall
    • How to Make Textured Canvas Art
    • How to Install Shiplap
    • How to Build a Slat Wall
    • How to Paint an Ikea Dresser
    • How to Build Bypass Barn Doors
    • How to Build a Farmhouse Table and Benches
    • How to Build a Rustic Sideboard
    • How to Build a Slat Sideboard
    • How to Make a Sofa Pit
    • How to DIY a Faux Brick Wall
    • How to Build a Window Seat
    • How to Build a Paneled Accent Wall
    • How to DIY a Functional Play Kitchen
    • How to Stencil a Wall
    • How to Build a Round Table
    • How to Build a Console Table
    • How to Make Paper Stars
    • How to Make Paper Mache Bowls
    • How to Make Clay Links
    • How to Texture Bowls & Vases
    • How to Install Open Shelves
    • How to Make Wood Block Art
    • How to Make a Wood Bead Garland
    • How to Build Cabinet Doors
    • How to Build a Wood Countertop
    • How to DIY a Nightstand Charging Drawer
    • How to Make a Wheat Wreath
    • How to Hang Gallery Wall Frames
    • How to Stain Stairs and Paint Risers
    • How to Make Industrial Stair Railings
    • How to Build a Window Seat Cushion
    • How to Make Salt Dough Ornaments
    • How to DIY a Modern Mantel Christmas Tree
    • How to DIY a Wooden Christmas Village
    • How to Build a Wood Christmas Tree Collar Box
    • How to Make Paper Christmas Trees
  • Cats
    • Cat Room Tour & Litterboxes
    • Cat-Related Sources & Cleaning Tips
    • How to Cat-Proof Christmas Trees & Decor
    • How to Stop Cats from Scratching Furniture
    • How to Stop Cats from Playing with Decor
    • How to Train Cats and Kittens
    • How to Cope with Cat Allergies
    • How to Introduce New Kittens to Older Cats
  • Christmas
    • Christmas Decor Favorites 2023
    • How to Build a Wood Christmas Tree Collar Box
    • Neutral Christmas Present Wrapping
    • How to Make Paper Christmas Stars
    • How to Make Paper Christmas Trees
    • How to Make Salt Dough Ornaments
    • DIY Holiday Art Ideas
    • How to Cat-Proof Christmas Trees & Decor
    • How to Make Modern Tabletop Trees
    • How to Make a Wooden Christmas Village
    • Holiday Cheese & Snack Boards
    • Christmas Decor 2021
    • Christmas Decor 2020
    • Christmas Decor 2019
    • Gingerbread House & Cookies Recipe
    • Puff Tastry Christmas Tree Recipe
    • Christmas Decor 2018
  • Cleaning
    • Cleaning Sources & Routines
    • Minimalism: How To Get Started
    • Cat-Related Cleaning Tips
  • Recipes
    • Apple Turnovers Recipe
    • Baked Pumpkin Donuts Recipe
    • Banana Chocolate Chip Bread Recipe
    • Blueberry Lemon Cake Recipe
    • Cheese & Cracker Snack Boards
    • Chocolate Chip Cookie Recipe
    • Christmas Crack Recipe
    • Chocolate Crinkle Cookies Recipe
    • Cinnamon Rolls Recipe
    • Cinnamon Star Pastry Recipe
    • Coconut Curry Squash Soup Recipe
    • Creamy No-Cheese Pasta Sauce Recipe
    • Crumble Recipe
    • Easy Veggie Pasta Recipe
    • Fresh Rolls Recipe
    • Garlic Flatbread Recipe
    • Gingerbread Biscotti Recipe
    • Gingerbread House & Cookies Recipe
    • Healthy Hearty Salad Recipe
    • Homemade Bread Recipe
    • Lasagna Recipe
    • Molasses Cookies Recipe
    • Oatmeal Raisin Cookies Recipe
    • Pad Thai Recipe
    • Pesto Pasta Recipe
    • Potato Curry + Naan Bread
    • Puff Pastry Christmas Tree Recipe
    • Pumpkin Donut Bites Recipe
    • Pumpkin Loaf Recipe
    • Pumpkin Oat Muffins Recipe
    • Roasted Red Pepper Pasta Recipe
    • Rocky Road Bars Recipe
    • Vegan Bolognese Pasta Sauce
    • Vegetable Soup Recipe
  • About
    • About Us
    • Website Roadmap
    • Shop Our Home
    • Minimalism: How To Get Started
    • Privacy Policy
  • Blog

How to Build a Wood Countertop

May 7, 2020 by admin 12 Comments

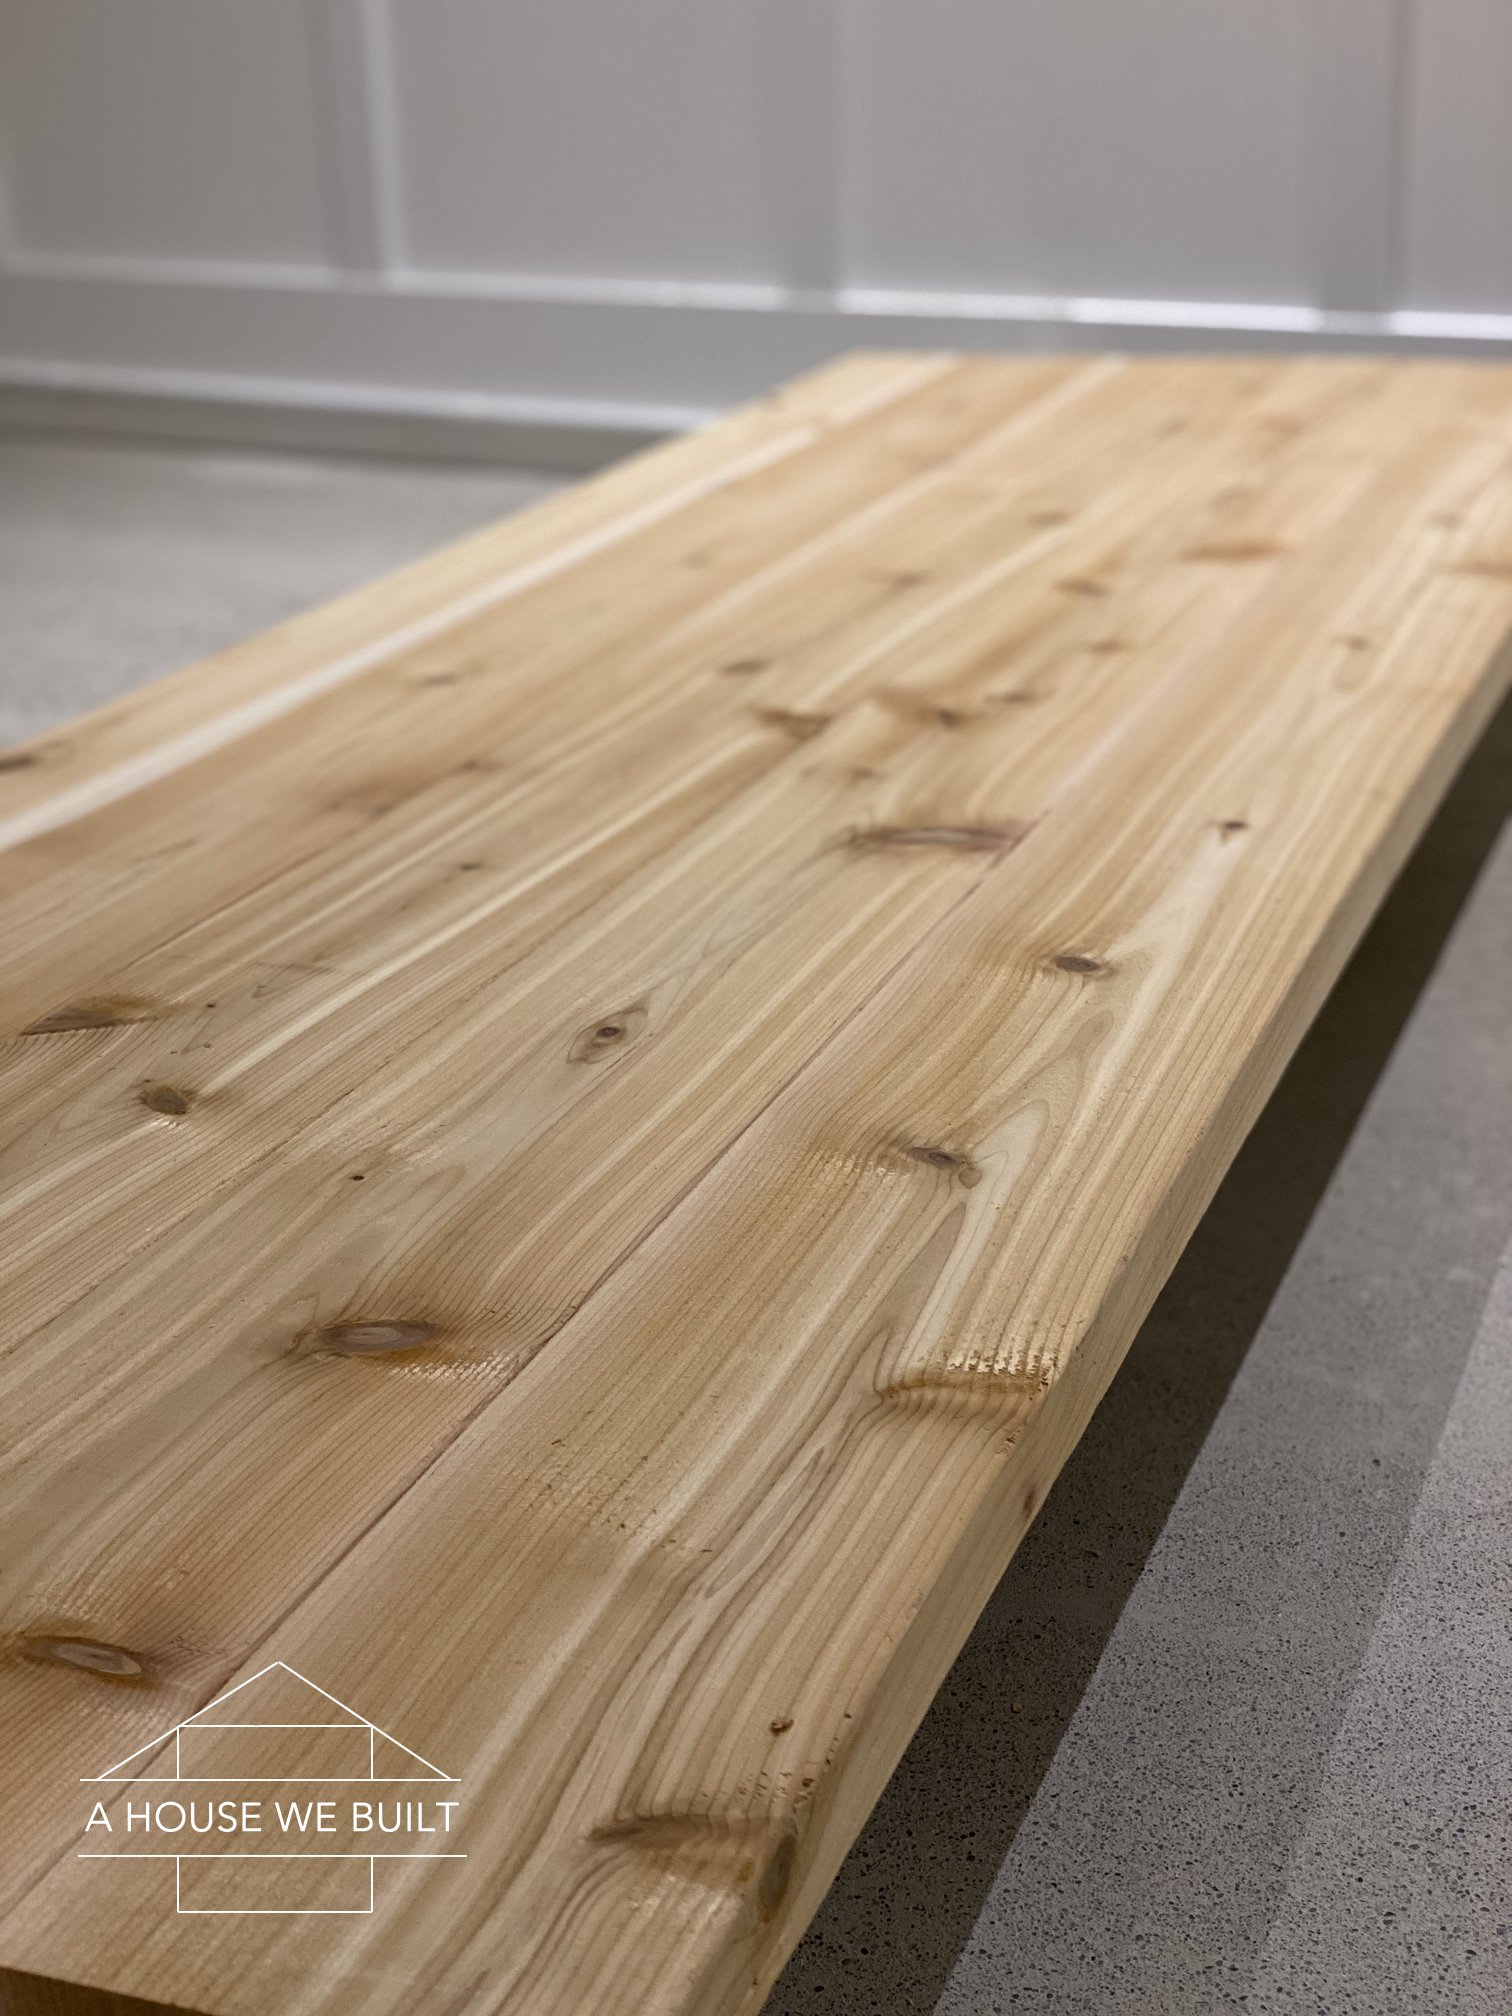
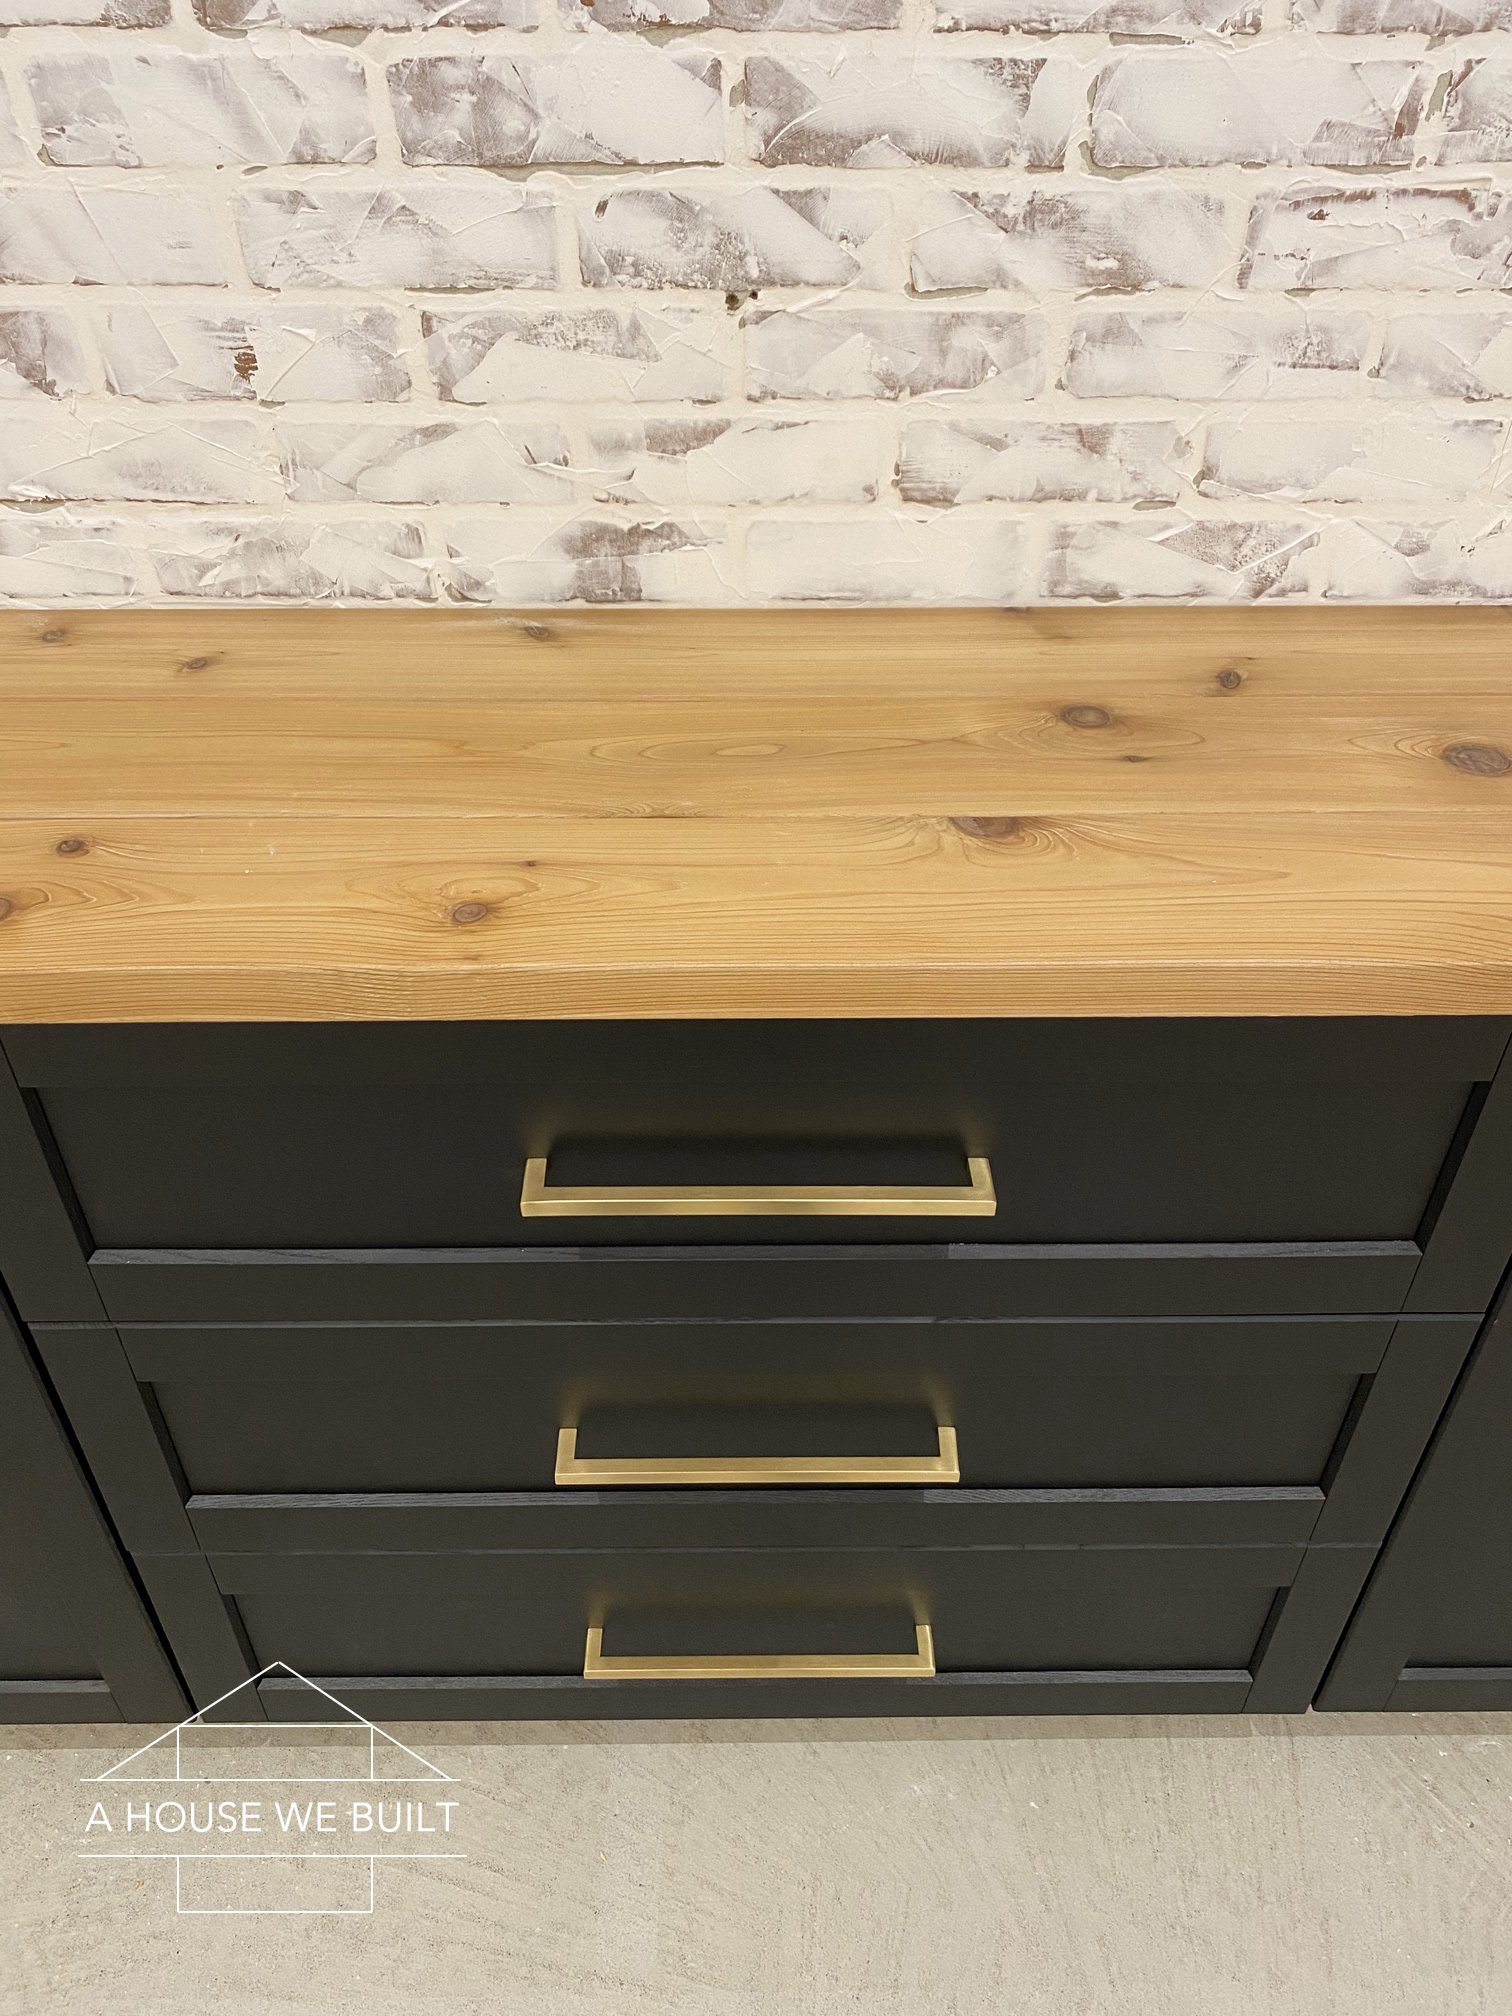
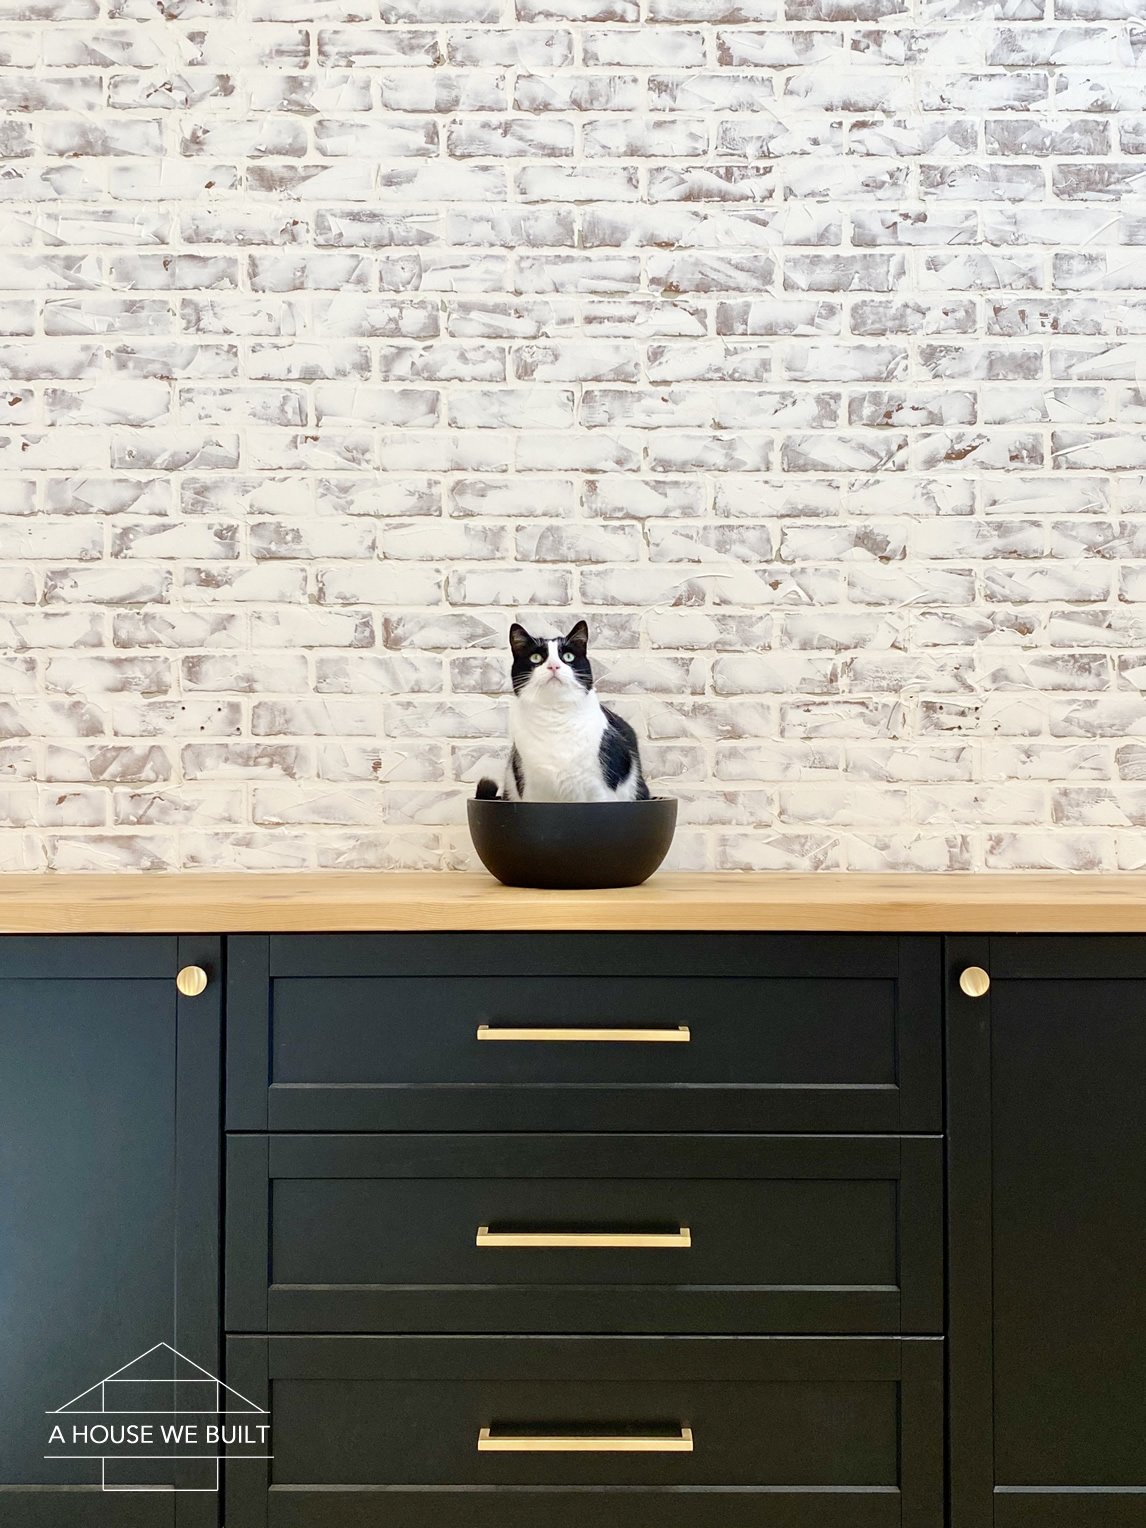
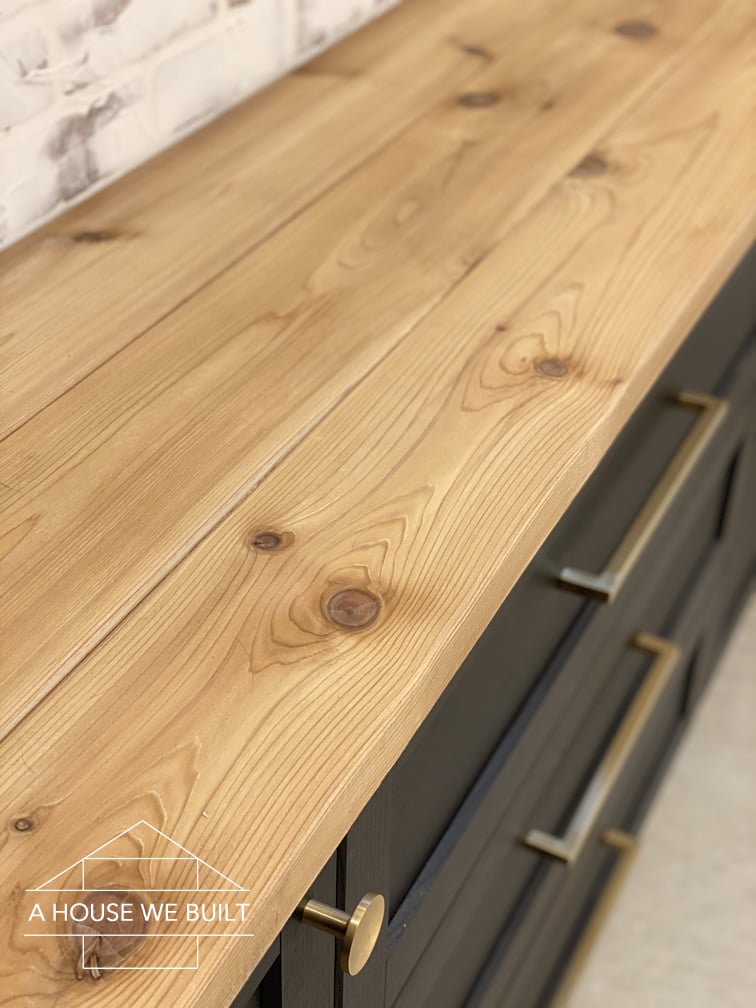
We decided to build our own wood countertops for all the cabinetry in our basement because we wanted this space to have a more rustic feeling than the rest of our house. They were really easy to make, I absolutely love their look, and it was a huge cost savings over some of the more traditional countertops.

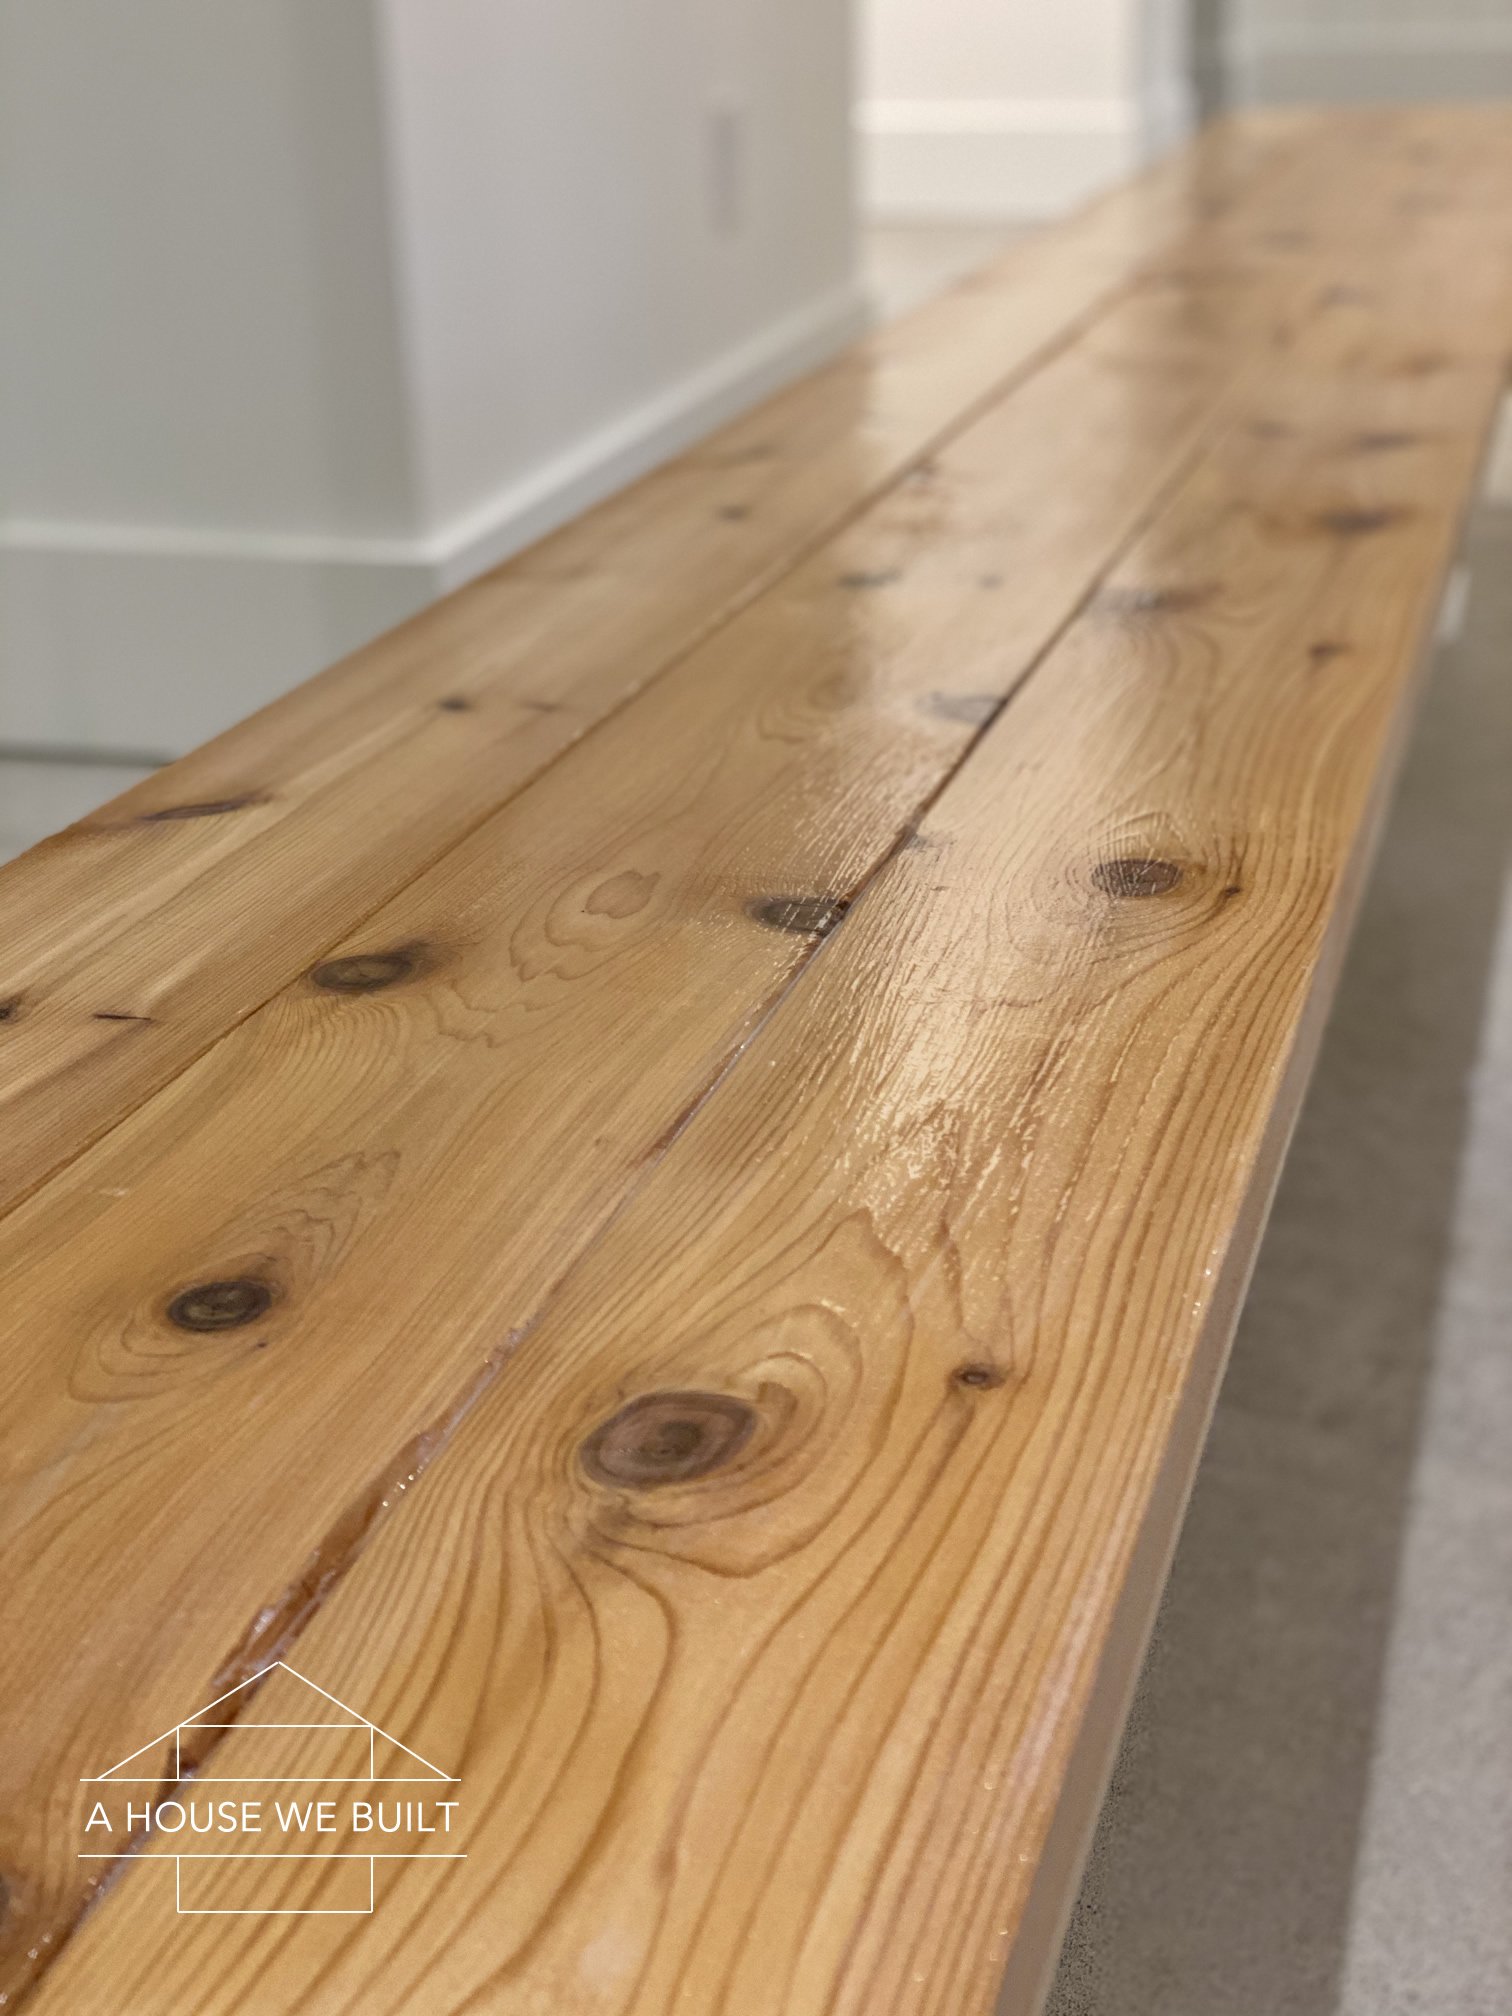
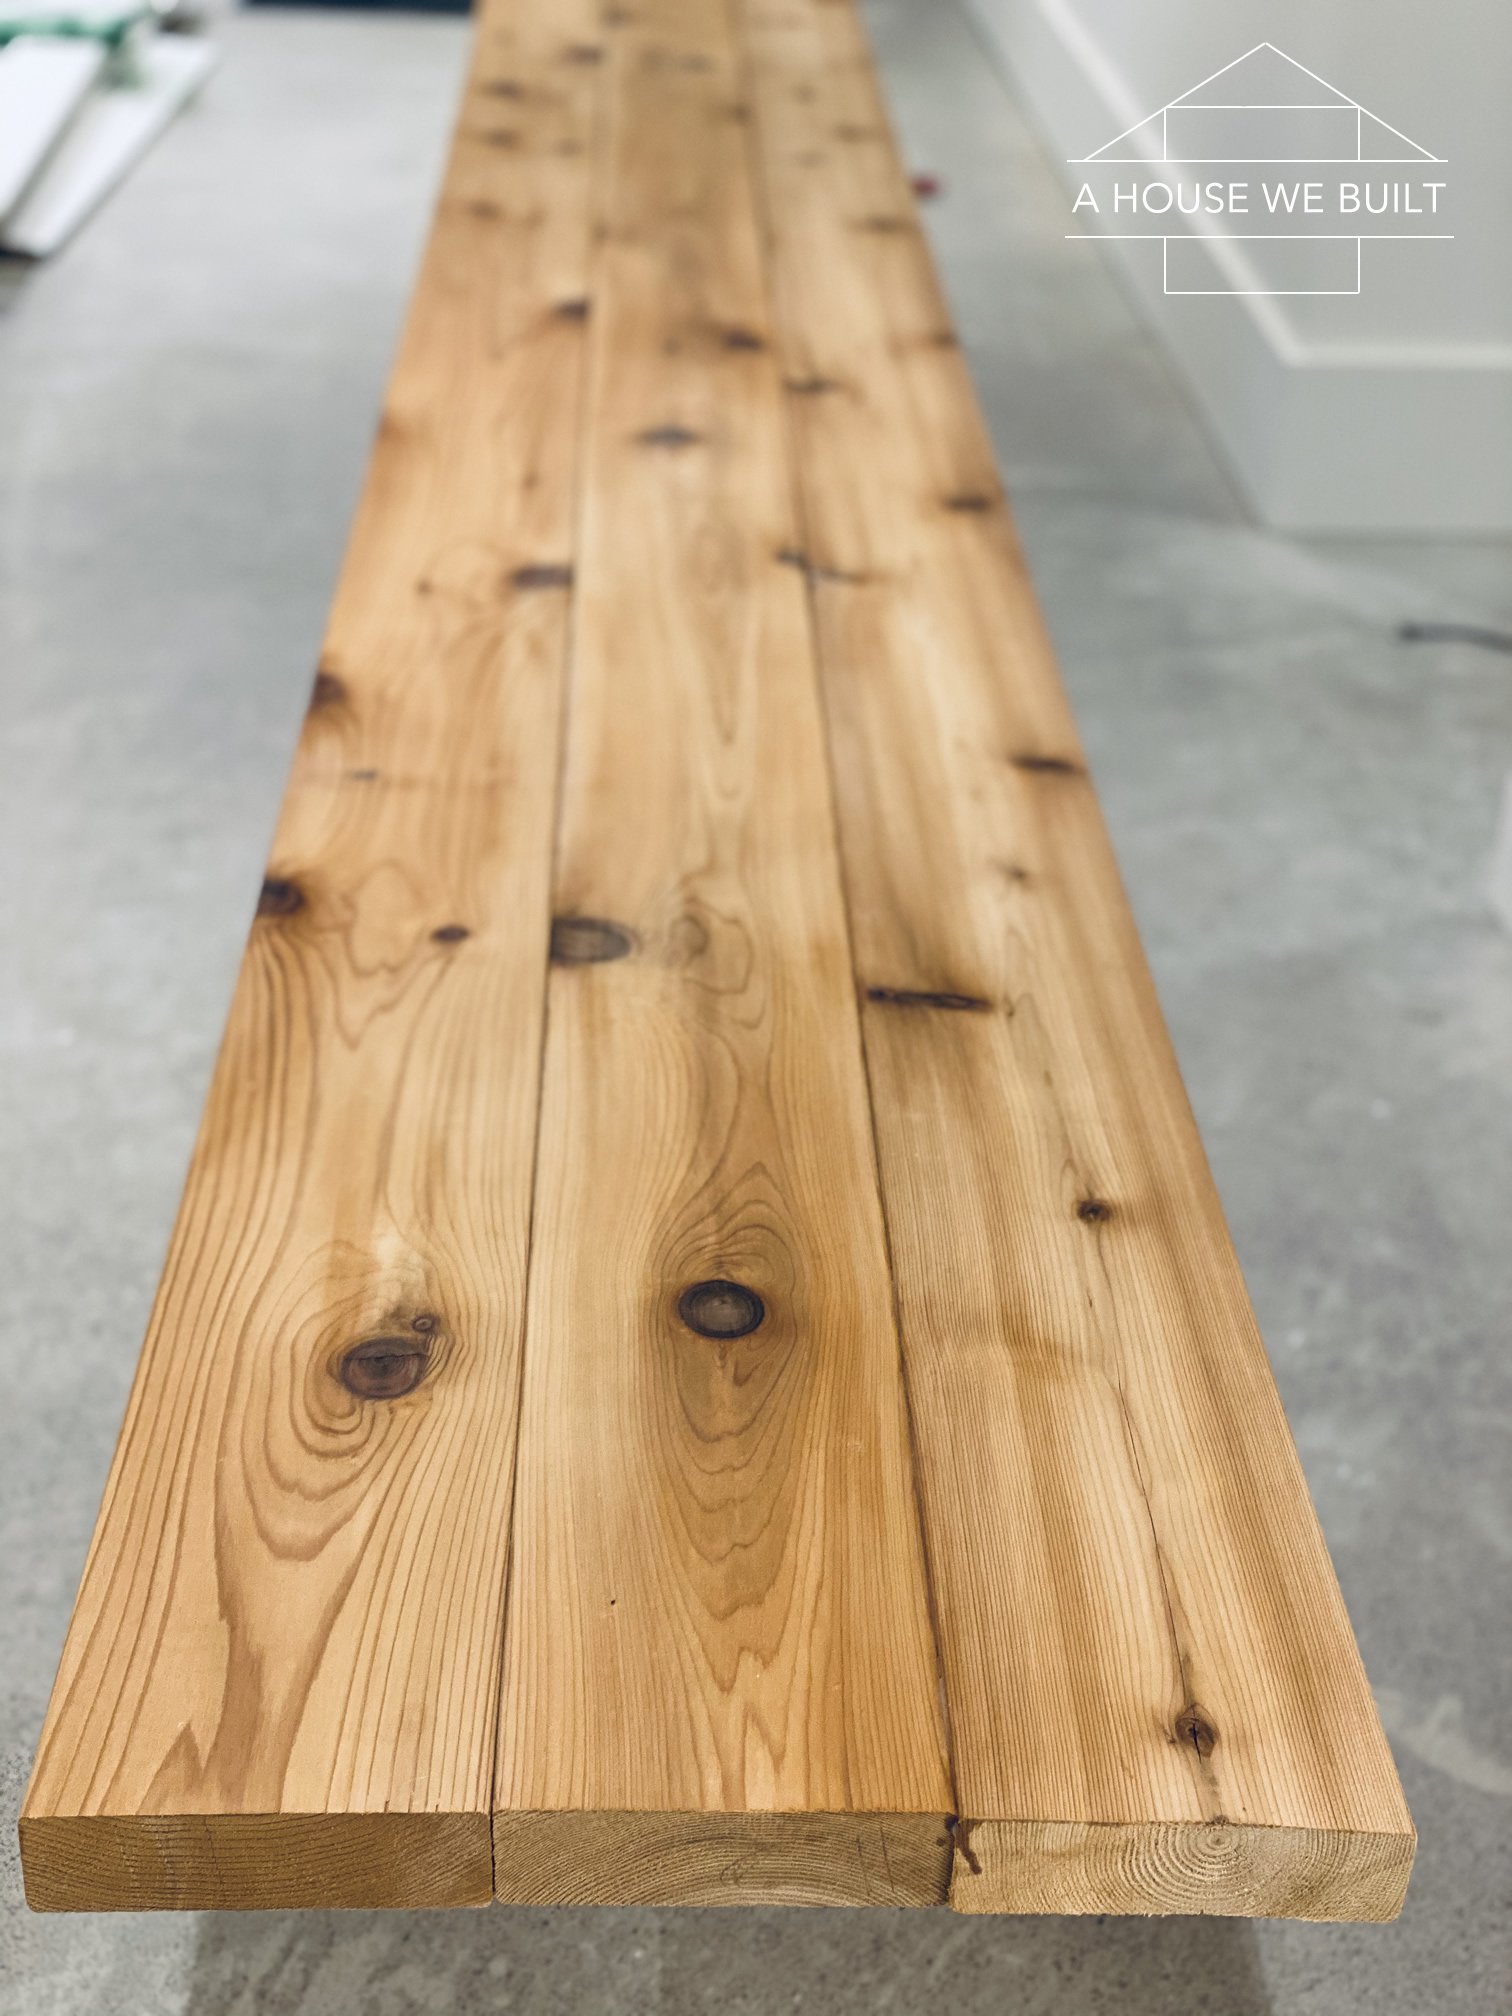
You can use any type of wood you like, but we chose to use 2x6x8 and 2x6x12 cedar planks (raw, not treated). Originally, I considered using wider boards, but I wanted the look of the counter to show the actual planks so I was worried if I went too wide it would diminish that look – so 2×6’s worked perfectly. I also considered using fancier lumber with square edges, but I preferred the rounded edge of standard lumber because it would accentuate the look of the grooves between the planks (and also be a safer front edge). I’m not a carpenter so I’m not sure what the terminology is but I hope that makes sense.

We chose to use cedar because it was naturally the color we wanted since we’d already done a lot of cedar paneling in our theater room, plus our wood hallway beams are a similar color as well.

We built wood countertops for our: Game Room, Home Theater Room, Basement Bathroom.

Finally, it’s important to choose a board length longer than your total span of countertop because (at least to my preference) I don’t think you don’t want to have planks meet end-to-end in the middle of your counter. So for example, if your counter is 11′ long, use 12′ foot boards instead of 2 sets of 8′ lengths.

RAW MATERIALS:

  • 2x6x8’s if your counter is under 8′ long
  • 2x6x12’s if your counter is under 12′ long
  • No matter what boards you use, make sure they are absolutely straight and not warped.

TOOLS YOU’LL NEED:

  • Miter saw: Home Depot | Amazon (for all regular cuts)
  • Table saw: Home Depot | Amazon (only needed if you have to rip down a board)
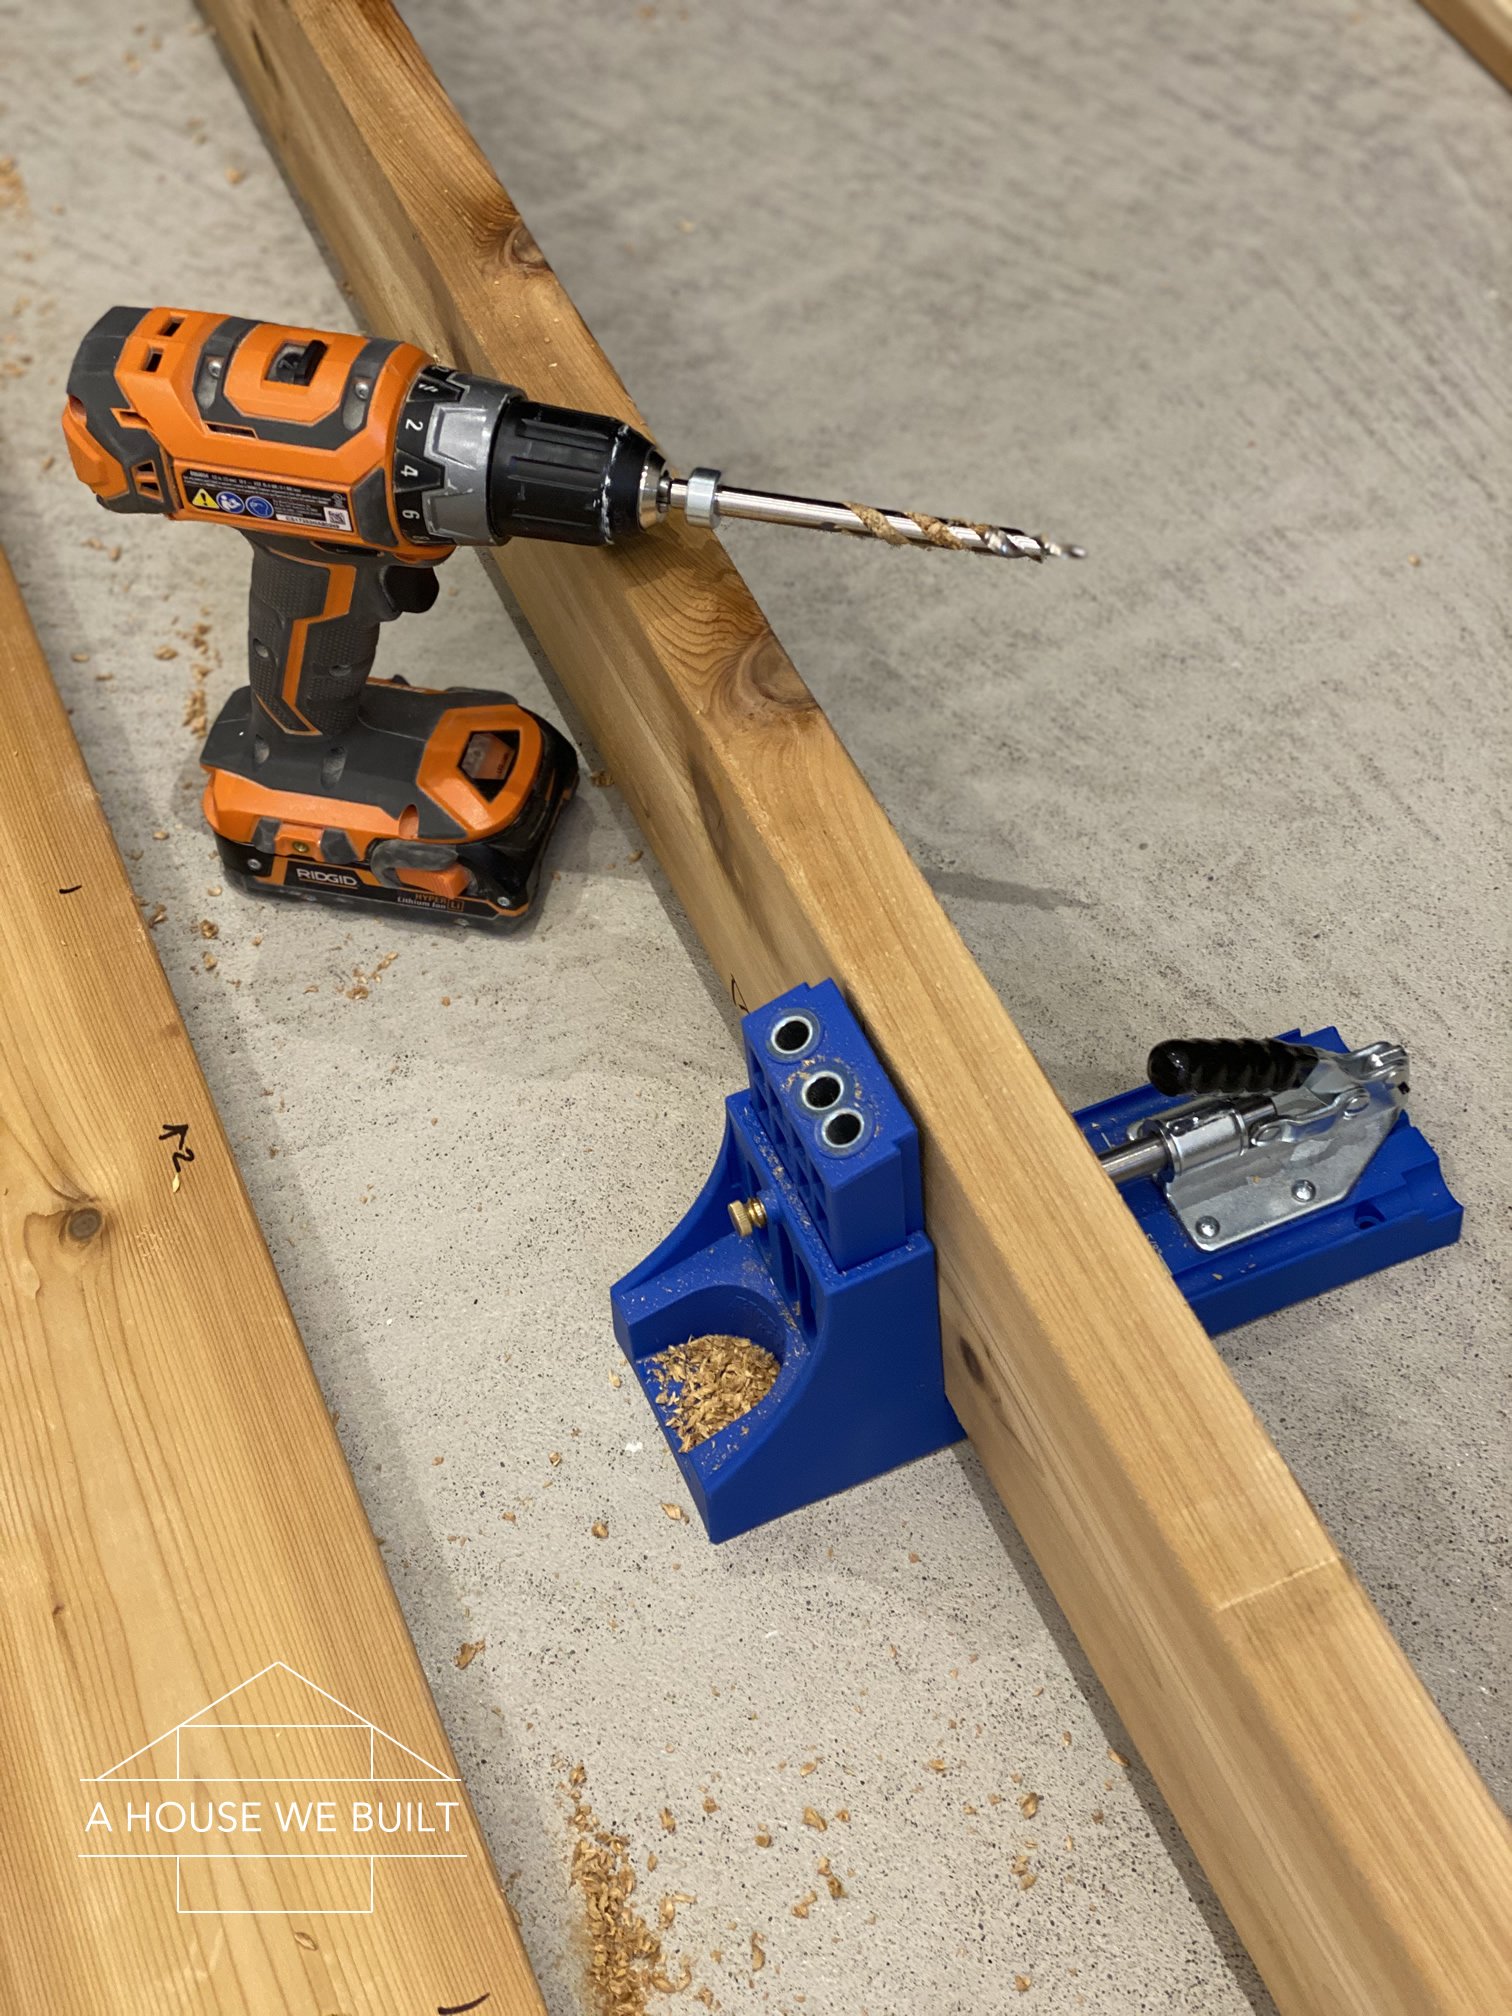
  • Kreg jig: Home Depot | Amazon (to drill pocket holes to join the planks together)
  • Pocket hole screws: Home Depot | Amazon
  • Drill: Home Depot | Amazon
  • Sandpaper: Home Depot | Amazon
  • Matte top coat: Home Depot | Amazon (protective layer to coat your countertop)
  • Chip brush: Home Depot | Amazon

BUILD INSTRUCTIONS:

  1. Plan out your counter. If you need an uneven number of boards to cover the depth of your countertop, make sure it’s the board closest to the wall you rip down to the right width, not the front board. So for example: if the counter depth you need is 25.5″ but your boards are 5.5″ wide each, you’ll need 4 full width boards, and a 5th board ripped down to 3.5″ width. Also, be sure to include about a 1.5″ overhang at the front of your counter in your final depth calculations. So if you’re covering a 24″ counter depth from the wall, your countertop should be about 25.5″ wide.
  2. Before cutting your boards, lay them all out on the floor and assess what they look like. Flip each one over front and back and determine which side you want on top. Then rearrange them so that you’re happiest with their configuration taking the veining and color variations into consideration.
  3. Cut your boards to length. We measured each one individually. Some were 1/16″ different from each other and we cut accordingly. The more accurate your cuts, the more seamless and custom your counter will look. When you’re finished cutting all your boards to length, lay them out on the counter to double check that all your lengths are correct and that everything fits.
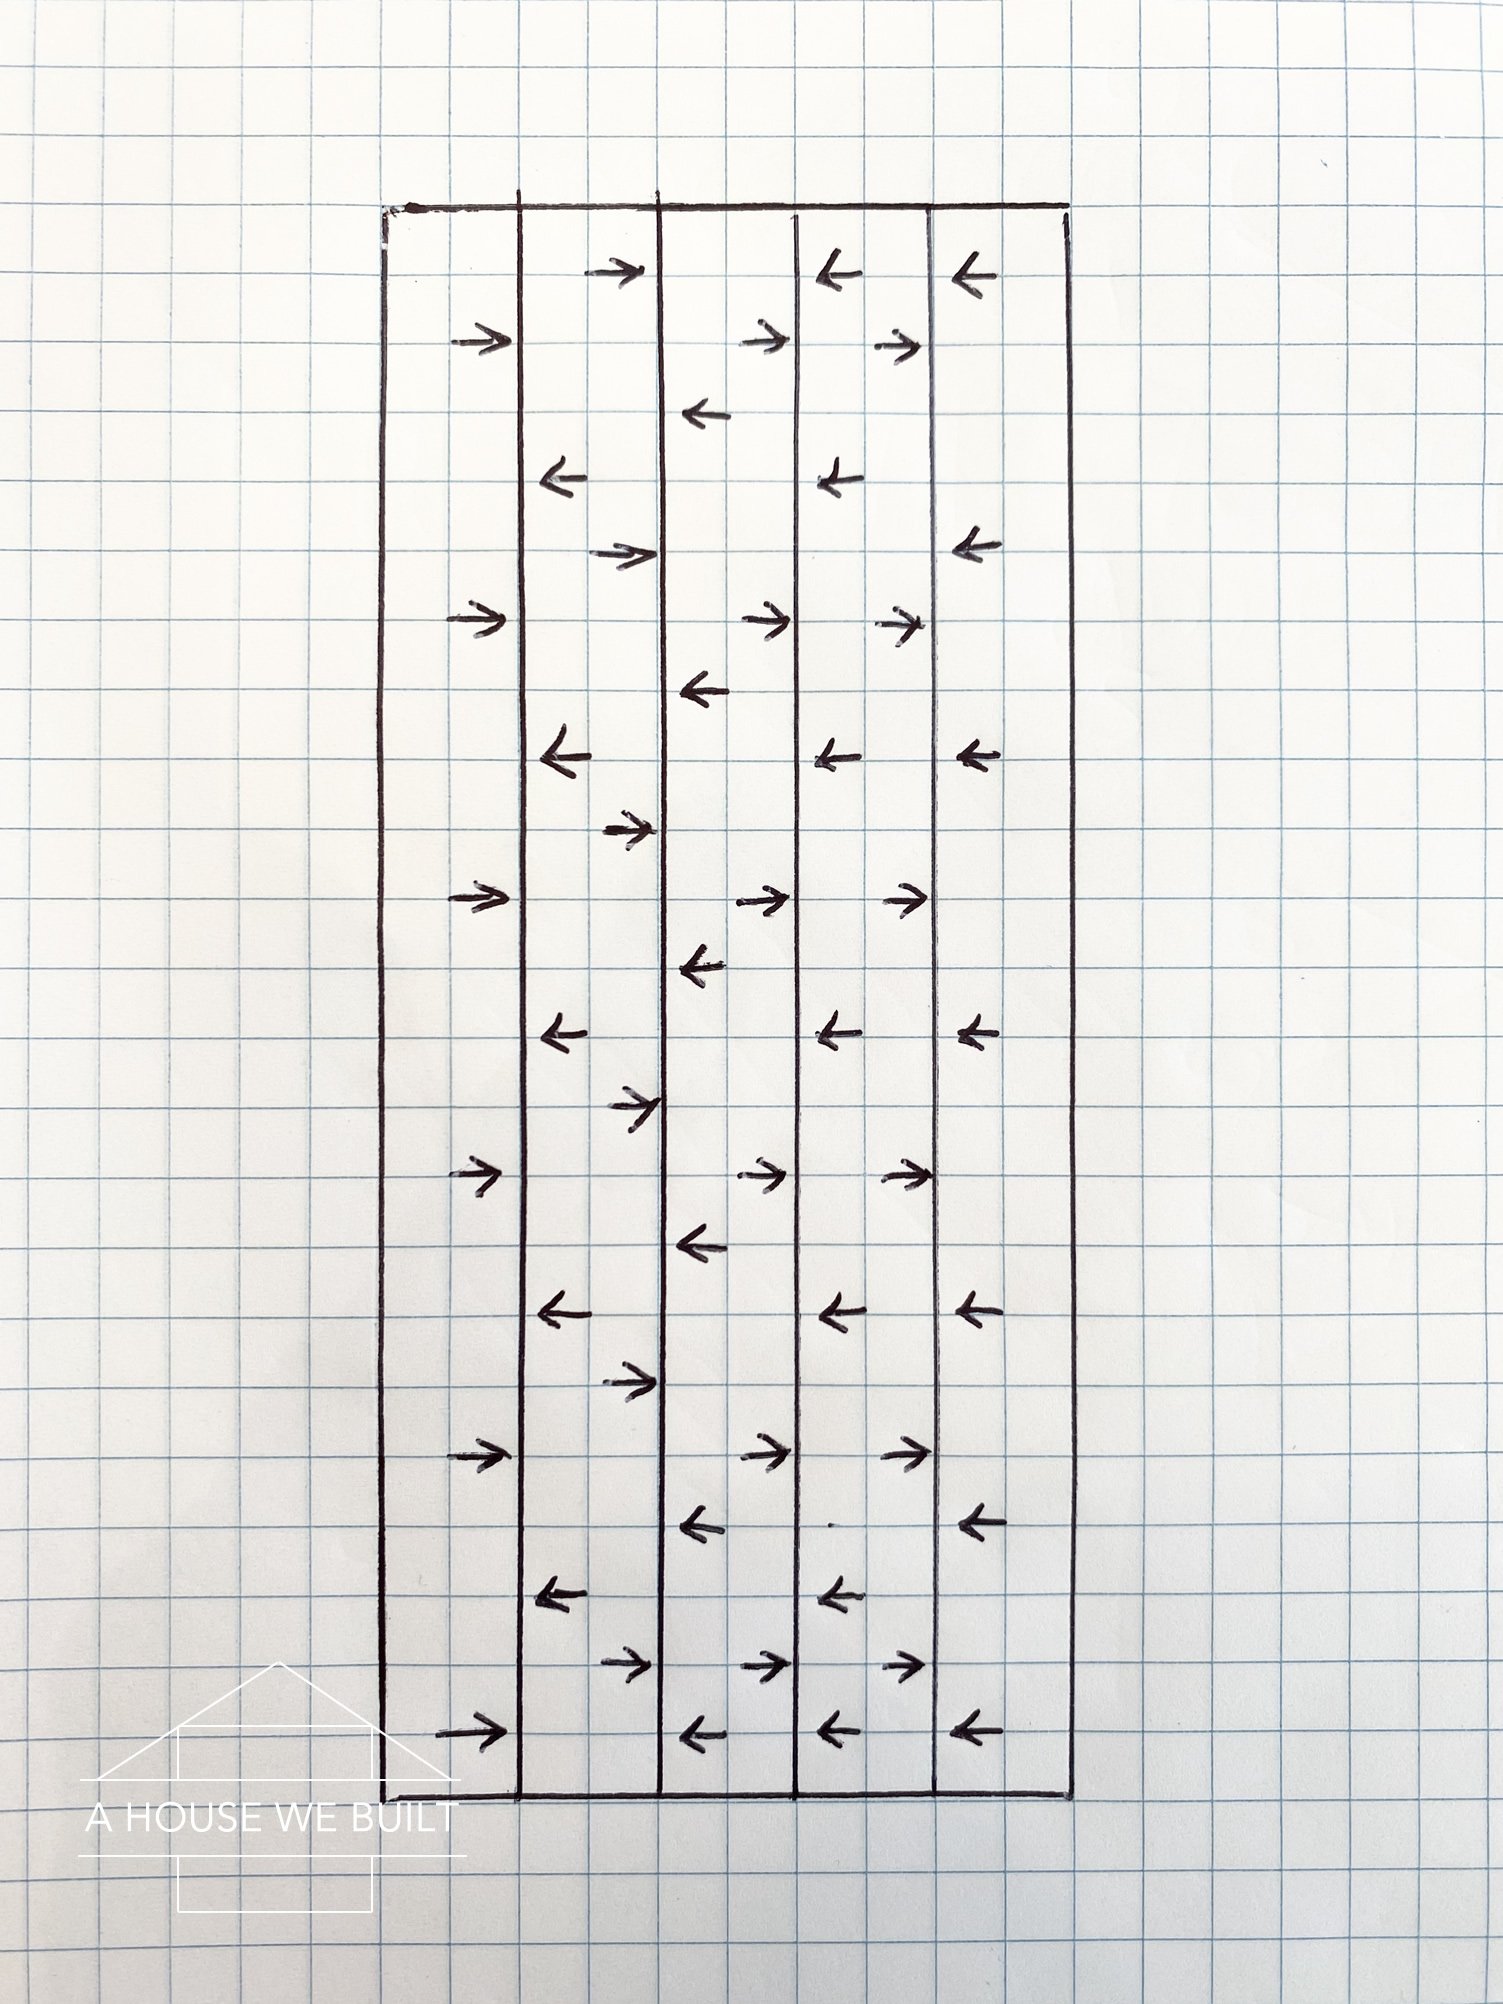
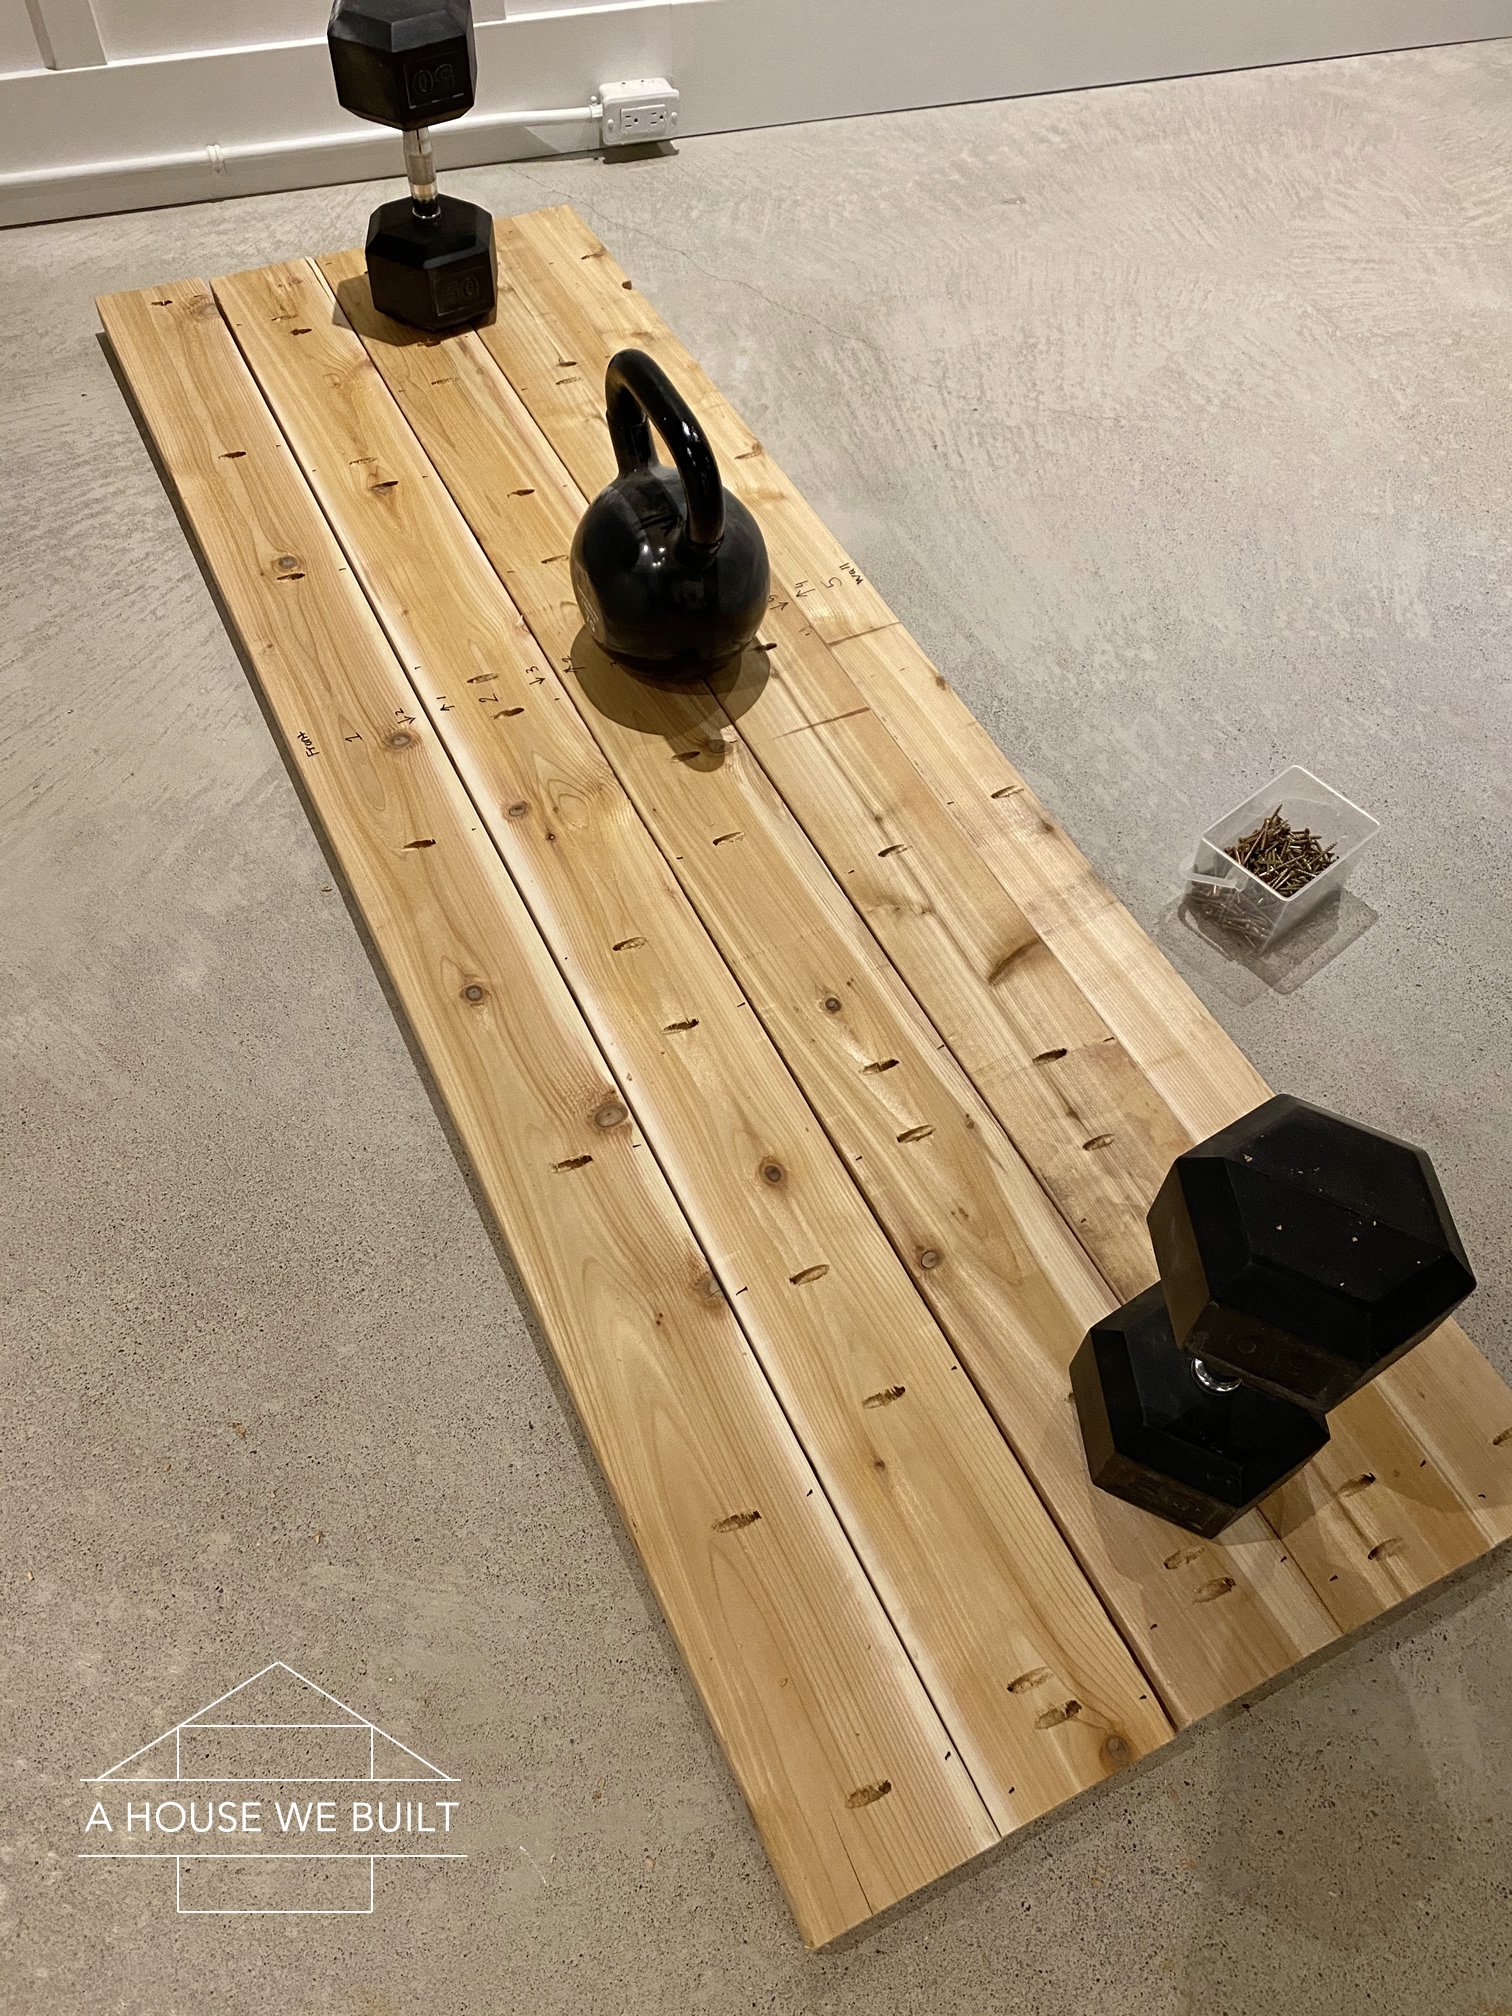
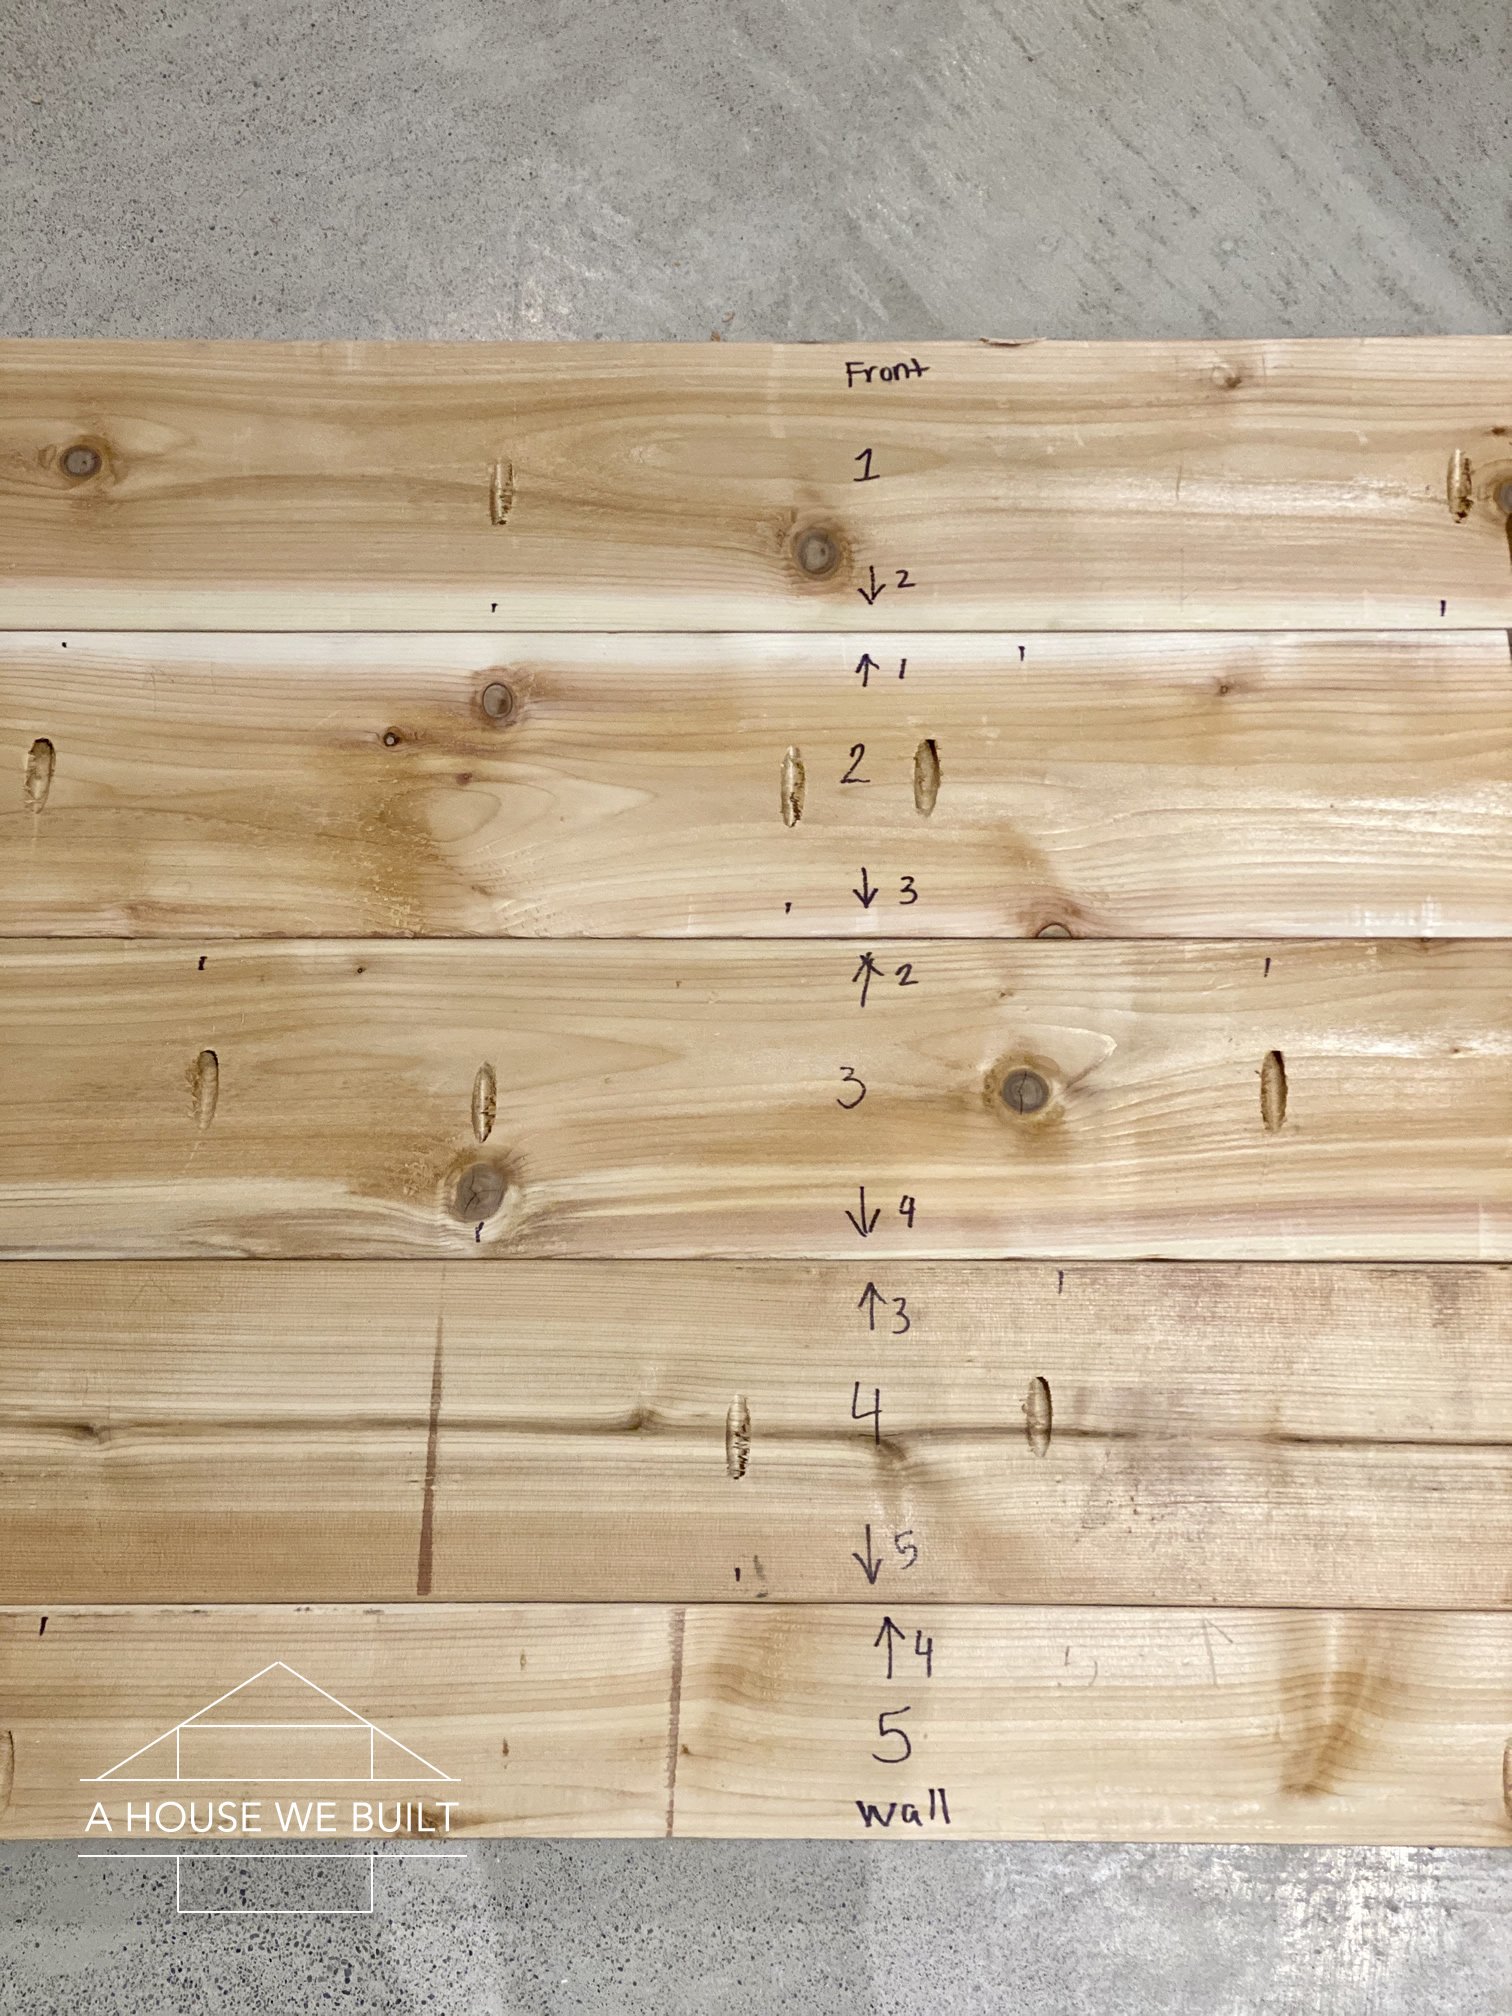
  4. Place the boards top down and mark the bottoms – number them so you know which order they go in. I also like to mark the locations of the pocket holes you’re about to drill. See diagram below for pocket hole placement – this is just an example, your pocket holes don’t have to be identical to this, but the holes have to be every 1′ alternating sides.
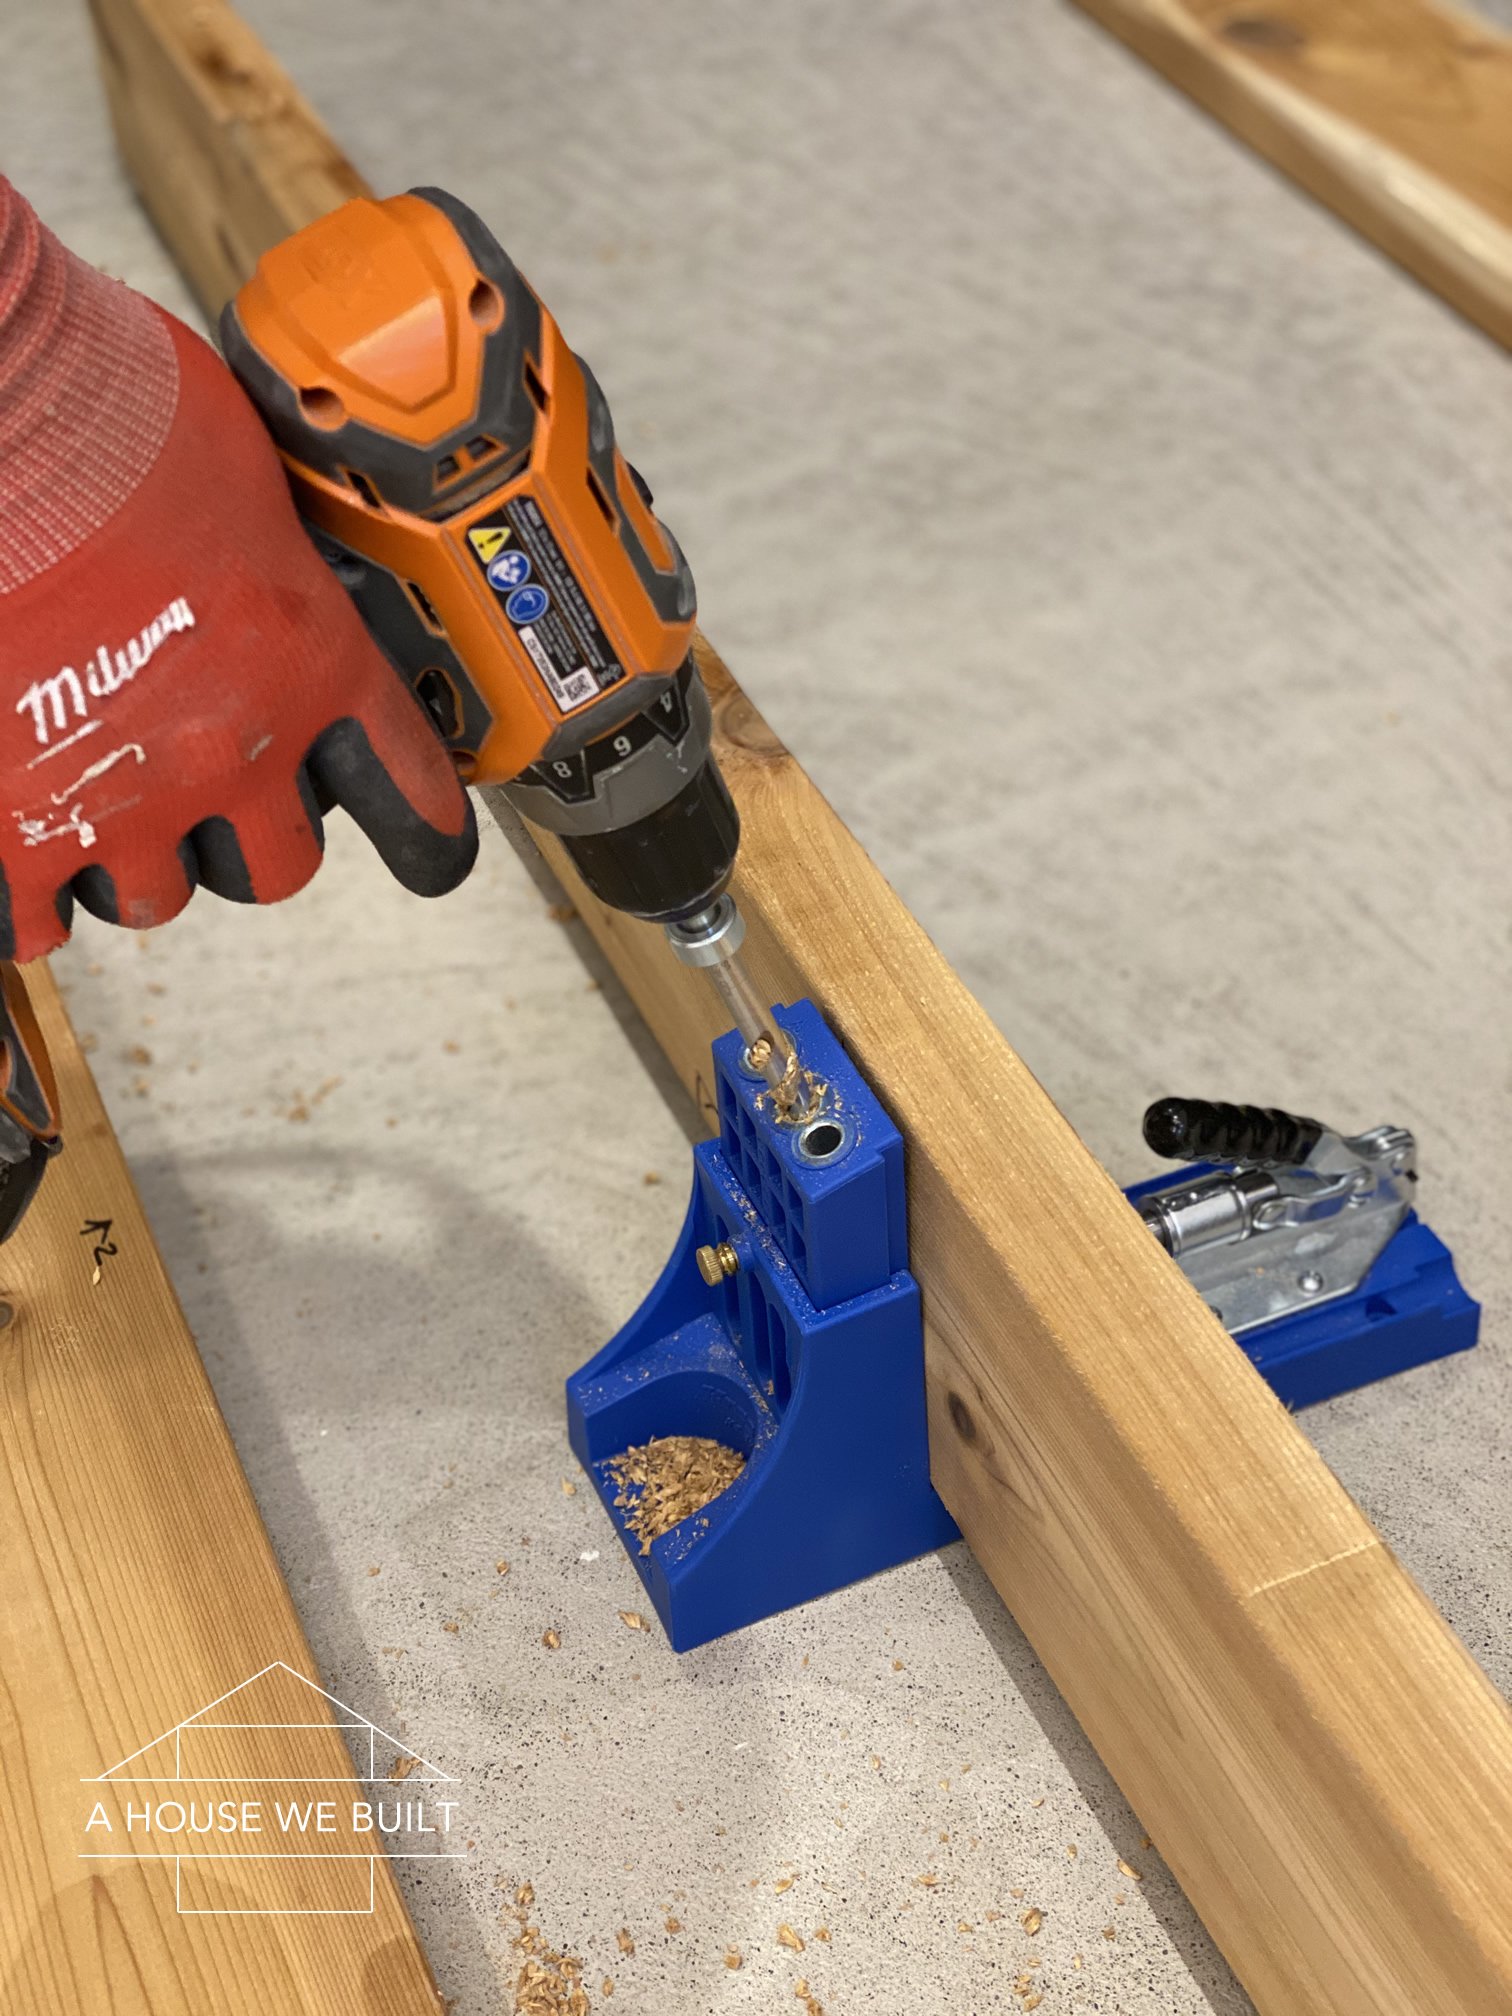
  5. Use the Kreg Jig (one of the best tools we ever bought!) to drill pocket holes on the bottom of each board – these will be used to connect each board to the other.
  6. Next screw your boards together with pocket hole screws into the pocket holes you just drilled. Be sure to first clamp the boards down to ensure that they’re level with each other (we just used hubby’s weights to hold them down straight lol).
  7. Lightly sand the boards (I just did the rough spots because I didn’t want to lighten the board too much). A trick is to run a knitted sweater over the boards, if nothing catches, it’s sanded enough.
  8. Paint the top coat on with a paint brush using even strokes. You’ll want to do 3-5 coats. Apply the next coat as soon as the first coat is dry to the touch, lightly sanding the rough spots between coats. After the first 2 coats, start to specifically add more globs of top coat in the seams between the planks (feather out the strokes) but this will seal up the grooves so they’re easier to clean long term). Note: I put my paintbrush into a ziploc bag between coats to keep it from drying out.
  9. Allow the countertop to fully dry for 24 hours, then install it. Just left it into place and secure it to the cabinet (usually using short screws from the underside going up into the bottom of the counter). — Tip: If your counter is between two walls or tall cabinets and you’re worried about scratching them as you lift the counter into place, use painters tape to cover the bottom edges of the counter to protect whatever it’s brushing up against. Still use caution as installing it and go very slowly.
STAIN OPTION:

We’ve also done a version of this countertop with a stain which you can see in our Basement Bathroom. I’ve listed all the info on the stain we used below. I just apply them according to the instructions on the cans with a light sand between the final stain coat and top coat application to make sure it’s smooth. The top coat we use fully seals it so we have no issues with water.

  • Pre-stain conditioner (one coat): Amazon | Home Depot
  • Gray stain (one coat): Amazon | Home Depot
  • Matte top coat (two coats): Amazon | Home Depot

OTHER SOURCES:

  • Gold cabinet knobs: CB2
  • Gold drawer pulls: Amazon | Similar: Home Depot | Schoolhouse
  • Tutorial on the brick wall: How to DIY a Faux Brick Wall with a German Schmear
  • For more sources from our basement, go to: Basement Sources Page

Filed Under: Tutorials

Reader Interactions

Comments

  1. Roda Bradley says

    July 9, 2020 at 2:02 am

    Thank you for this tutorial, it’s very helpful and your results look beautiful. Question about humidity and bacteria, I’ve read articles about natural wood counters bending with high humidity.. and I live in Houston.. 🙄
    Also bacteria or mold issues.
    Have you had any of those issues?
    Thank you,

    Log in to Reply
    • admin says

      July 9, 2020 at 2:06 pm

      Welcome 🙂 Hmm well, our house is humidity controlled and we don’t leave our windows open so I don’t think it’s really an issue we’d have to deal with but I mean, most houses are structurally made of wood, most dining tables, etc and they do fine. I can’t imagine we’d have issues with this over time because of how well sealed it is. If it was just raw wood, then I’d definitely be worried but I seal mine very well.

      One thing we always do though before all our wood construction projects is that we bring the raw materials to the space it’s going to be installed in and we let it just sit there for about 2 weeks before we use it. This way it will typically get any warping or changing done before you install it.

      Log in to Reply
      • Audrey says

        February 6, 2021 at 3:35 pm

        Your tutorial is well done and the end result is beautiful. Lumber being in high demand, is not likely to be dried as it once was. Our recent trip to HD ended with the purchase of premium lumber for a mirror frame project. We spent far too much time trying to find acceptable boards. Finding straight boards is a tasks not for the faint of heart or for those in a hurry. The current cost is commensurate with the high demand.

        Log in to Reply
        • admin says

          February 7, 2021 at 2:00 pm

          It certainly takes time to select lumber that is straight and not warped. Speaking only for myself, I find it’s worth the taking that time for the end result. A little tip is to call your store ahead of time and ask them what days they restock the lumber you’re looking for so that you can time your trip to coincide with a fresh batch/delivery. 🙂

          Log in to Reply
  2. Robert Buffington says

    April 8, 2021 at 9:41 am

    Not sure if the stain you used is ok as food grade for butcher block countertops, even though we wouldn’t put two food directly on ours, I’m sure kids and grandkids would. Which would you recommend and how would you go about staining the countertops?

    Log in to Reply
    • admin says

      April 8, 2021 at 12:20 pm

      We did not use food-grade stain, but the top coat does seal it very well. If you’re concerned, I suggest doing your own research before making that decision.

      Log in to Reply
  3. Steve says

    August 13, 2021 at 10:33 am

    I love the idea, and plan to do this in our new laundry room. Question, though. 2x stock has rounded edges. I see in the photos that you left these. Seems to me that the resulting groove in the countertop would be problematic- catching all kinds of foreign material and difficult to keep clean. Wouldn’t you want to rip those edges off so you have a cleaner surface?

    Log in to Reply
    • admin says

      August 13, 2021 at 1:51 pm

      You’d think so (I wondered about it when we were building it too) but we actually haven’t had any issues with it. I’m always careful to get lots of sealer in those grooves so it’s actually a pretty smooth and easy to clean surface. I wouldn’t put it in a kitchen of course, but for a bathroom etc it’s totally fine. You can certainly rip them down if you want, but we just liked the look of the grooves so we kept them.

      Edit: I will say that you have to find boards that fit together perfectly cuz if they’re warped then you end up with not only grooves but gaps too which won’t work.

      Log in to Reply
  4. Elizabeth says

    August 29, 2021 at 2:47 am

    It looks beautiful. What color are did you paint your cabinets and what stain did you use?

    Log in to Reply
    • admin says

      August 29, 2021 at 1:29 pm

      Thank you! Stain is listed in the post. Paint colors are here: https://www.ahousewebuilt.com/paint-colors/

      Log in to Reply
  5. Maribel says

    October 23, 2021 at 1:27 pm

    Did you only use boards for the countertop or did you set the boards on 1/2 plywood? I had seen on other ideas that you should do that? Just wondering if it makes a difference?

    Log in to Reply
    • admin says

      October 23, 2021 at 4:29 pm

      No ply, it is built exactly as we showed in the tutorial.

      Log in to Reply

Leave a Reply to Elizabeth Cancel reply

You must be logged in to post a comment.

Primary Sidebar

SHOP OUR HOME

Click any image below for sources from our pics!

WEBSITE ROADMAP

  • Shop Our Home
  • Sources by Room
    • All Sources & FAQs
    • Kitchen Sources
    • Pantry Sources
    • Living Room Sources
    • Dining Room Sources
    • Home Office Sources
    • Laundry Room Sources
    • Entryway Sources
    • Mudroom Sources
    • Gallery Wall Sources
    • Reading Room Sources
    • Theater Room Sources
    • Game Room Sources
    • Guest Bedroom Sources
    • Primary Bedroom Sources
    • Primary Closet Sources
    • Primary Bathroom Sources
    • Powder Bathroom Sources
    • Buffalo Check Bathroom Sources
    • Basement Bathroom Sources
    • Basement Sources
    • Stairs, Landings & Hallways
    • Paint Colors and Stain Recap
    • Cleaning Sources & Routines
  • Tutorials
    • How to Make a Staircase Gallery Wall
    • How to Make Textured Canvas Art
    • How to Install Shiplap
    • How to Build a Slat Wall
    • How to Paint an Ikea Dresser
    • How to Build Bypass Barn Doors
    • How to Build a Farmhouse Table and Benches
    • How to Build a Rustic Sideboard
    • How to Build a Slat Sideboard
    • How to Make a Sofa Pit
    • How to DIY a Faux Brick Wall
    • How to Build a Window Seat
    • How to Build a Paneled Accent Wall
    • How to DIY a Functional Play Kitchen
    • How to Stencil a Wall
    • How to Build a Round Table
    • How to Build a Console Table
    • How to Make Paper Stars
    • How to Make Paper Mache Bowls
    • How to Make Clay Links
    • How to Texture Bowls & Vases
    • How to Install Open Shelves
    • How to Make Wood Block Art
    • How to Make a Wood Bead Garland
    • How to Build Cabinet Doors
    • How to Build a Wood Countertop
    • How to DIY a Nightstand Charging Drawer
    • How to Make a Wheat Wreath
    • How to Hang Gallery Wall Frames
    • How to Stain Stairs and Paint Risers
    • How to Make Industrial Stair Railings
    • How to Build a Window Seat Cushion
    • How to Make Salt Dough Ornaments
    • How to DIY a Modern Mantel Christmas Tree
    • How to DIY a Wooden Christmas Village
    • How to Build a Wood Christmas Tree Collar Box
    • How to Make Paper Christmas Trees
  • Cats
    • Cat Room Tour & Litterboxes
    • Cat-Related Sources & Cleaning Tips
    • How to Cat-Proof Christmas Trees & Decor
    • How to Stop Cats from Scratching Furniture
    • How to Stop Cats from Playing with Decor
    • How to Train Cats and Kittens
    • How to Cope with Cat Allergies
    • How to Introduce New Kittens to Older Cats
  • Christmas
    • Christmas Decor Favorites 2023
    • How to Build a Wood Christmas Tree Collar Box
    • Neutral Christmas Present Wrapping
    • How to Make Paper Christmas Stars
    • How to Make Paper Christmas Trees
    • How to Make Salt Dough Ornaments
    • DIY Holiday Art Ideas
    • How to Cat-Proof Christmas Trees & Decor
    • How to Make Modern Tabletop Trees
    • How to Make a Wooden Christmas Village
    • Holiday Cheese & Snack Boards
    • Christmas Decor 2021
    • Christmas Decor 2020
    • Christmas Decor 2019
    • Gingerbread House & Cookies Recipe
    • Puff Tastry Christmas Tree Recipe
    • Christmas Decor 2018
  • Cleaning
    • Cleaning Sources & Routines
    • Minimalism: How To Get Started
    • Cat-Related Cleaning Tips
  • Recipes
    • Apple Turnovers Recipe
    • Baked Pumpkin Donuts Recipe
    • Banana Chocolate Chip Bread Recipe
    • Blueberry Lemon Cake Recipe
    • Cheese & Cracker Snack Boards
    • Chocolate Chip Cookie Recipe
    • Christmas Crack Recipe
    • Chocolate Crinkle Cookies Recipe
    • Cinnamon Rolls Recipe
    • Cinnamon Star Pastry Recipe
    • Coconut Curry Squash Soup Recipe
    • Creamy No-Cheese Pasta Sauce Recipe
    • Crumble Recipe
    • Easy Veggie Pasta Recipe
    • Fresh Rolls Recipe
    • Garlic Flatbread Recipe
    • Gingerbread Biscotti Recipe
    • Gingerbread House & Cookies Recipe
    • Healthy Hearty Salad Recipe
    • Homemade Bread Recipe
    • Lasagna Recipe
    • Molasses Cookies Recipe
    • Oatmeal Raisin Cookies Recipe
    • Pad Thai Recipe
    • Pesto Pasta Recipe
    • Potato Curry + Naan Bread
    • Puff Pastry Christmas Tree Recipe
    • Pumpkin Donut Bites Recipe
    • Pumpkin Loaf Recipe
    • Pumpkin Oat Muffins Recipe
    • Roasted Red Pepper Pasta Recipe
    • Rocky Road Bars Recipe
    • Vegan Bolognese Pasta Sauce
    • Vegetable Soup Recipe
  • About
    • About Us
    • Website Roadmap
    • Shop Our Home
    • Minimalism: How To Get Started
    • Privacy Policy
  • Blog

WHERE WE SHOP

Amazon

Wayfair

West Elm

Crate & Barrel

CB2

Pottery Barn

McGee & Go

Overstock

Rejuvenation

Joss and Main

All Modern

Target

Home Depot

World Market

Etsy

H&M Home

Lulu and Georgia

Serena & Lily 

Schoolhouse

Anthropologie

RECENT POSTS

  • Christmas 2023
  • Christmas Decor Favorites 2023
  • How to Make a Staircase Gallery Wall
  • Functional Play Kitchen DIY
  • Christmas Decor 2022
  • Cinnamon Rolls Recipe

Meta

  • Log in
  • Entries feed
  • Comments feed
  • WordPress.org

Footer

RECENT POSTS

  • Christmas 2023
  • Christmas Decor Favorites 2023
  • How to Make a Staircase Gallery Wall
  • Functional Play Kitchen DIY
  • Christmas Decor 2022
  • Cinnamon Rolls Recipe
  • Christmas Decor 2021
  • Cinnamon Star Pastry Recipe

SHOP OUR HOME

FOLLOW US

ON INSTAGRAM

For daily updates on our house projects and rescue kitties, follow us on Instagram @ahousewebuilt

ON SHOP.LTK

To shop our home pics daily, follow ahousewebuilt in the free SHOP.LTK app (formerly LIKEtoKNOW.it) now available from the App Store to get product sources from our pics. With this app, you can instantly shop your screenshot of any of our Instagram pics! We always link exactly what we have when available and often offer similar options as well!

Copyright © 2025 · Metro Pro on Genesis Framework · WordPress · Log in