• Skip to primary navigation
  • Skip to main content
  • Skip to primary sidebar

A House We Built

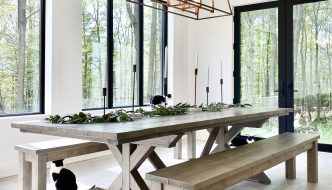
Custom House Designed by Husband & Wife Team | Modern Farmhouse Inspired

  • Sources
    • All Sources & FAQs
    • Kitchen Sources
    • Pantry Room Sources
    • Living Room Sources
    • Dining Room Sources
    • Home Office Sources
    • Laundry Room Sources
    • Entryway/Foyer Sources
    • Gallery Wall Sources
    • Mudroom Sources
    • Guest Bedroom Sources
    • Master Bedroom Sources
    • Master Closet Sources
    • Master Bathroom Sources
    • Powder Bathroom Sources
    • Buffalo Check Bathroom Sources
    • Basement Bathroom Sources
    • Theater Room Sources
    • Game Room Sources
    • Basement Sources
    • Stairs & Landings
    • Paint Colors and Stain Recap
    • Cleaning Sources & Routines
  • Tutorials
    • How to Build a Window Seat
    • How to Make Textured Canvas Art
    • How to Install Shiplap
    • How to Build Bypass Barn Doors
    • How to Build a Paneled Accent Wall
    • How to DIY a Faux Brick Wall
    • How to Build a Rustic Sideboard
    • How to Build a Slat Sideboard
    • How to Build a Slat Wall
    • How to Stencil a Wall
    • How to Make a Sofa Pit
    • How to Build a Farmhouse Table and Benches
    • How to Build a Round Table
    • How to Build a Console Table
    • How to Make Paper Mache Bowls
    • How to Make Clay Links
    • How to Texture Bowls & Vases
    • How to Install Open Shelves
    • How to Make Wood Block Art
    • How to Make a Wood Bead Garland
    • How to Build Cabinet Doors
    • How to Build a Wood Countertop
    • How to DIY a Nightstand Charging Drawer
    • How to Make a Wheat Wreath
    • How to Hang Gallery Wall Frames
    • How to Stain Stairs and Paint Risers
    • How to Build Industrial Stair Railings
    • How to Build a Window Seat Cushion
    • How to Make Salt Dough Ornaments
    • How to DIY a Modern Mantel Christmas Tree
    • How to DIY a Wooden Christmas Village
    • How to Build a Christmas Tree Box Stand
    • How to Make Paper Christmas Trees
  • Cats
    • Cat Room Tour & Litterboxes
    • Cat-Related Sources & Cleaning Tips
    • How to Stop Cats from Scratching Furniture
    • How to Stop Cats from Playing with Decor
    • How to Train Cats and Kittens
    • How to Cope with Cat Allergies
    • How to Introduce New Kittens to Older Cats
    • How to Cat-Proof Christmas Trees & Decor
  • Cleaning
    • Cleaning Sources & Routines
    • Minimalism: How To Get Started
    • Cat-Related Cleaning Tips
  • Recipes
    • Apple or Blueberry Crumble Recipe
    • Apple Turnovers Recipe
    • Baked Pumpkin Donuts Recipe
    • Blueberry Lemon Cake Recipe
    • Cheese & Cracker Snack Boards
    • Chocolate Chip Banana Bread Recipe
    • Chocolate Chip Cookie Recipe
    • Cinnamon Pumpkin Donut Bites Recipe
    • Cinnamon Rolls Recipe
    • Coconut Curry Squash Soup Recipe
    • Creamy No-Cheese Pasta Sauce Recipe
    • Easy Garlic Flatbread Recipe
    • Easy Veggie Pasta Recipe
    • Fresh Rolls Recipe
    • Gingerbread House & Cookies Recipe
    • Healthy Hearty Salad Recipe
    • Hearty Vegetable Soup Recipe
    • Molasses Cookies Recipe
    • Oatmeal Raisin Cookies Recipe
    • Pesto Pasta Recipe
    • Potato Chickpea Curry + Naan Bread
    • Puff Pastry Christmas Tree Recipe
    • Pumpkin Oat Muffins Recipe
    • Roasted Red Pepper Pasta Recipe
    • Vegan Bolognese Pasta Sauce
    • Vegan Pad Thai Recipe
    • Veggie Lasagna Recipe
  • Past Decor
    • Christmas Decor 2020
    • Fall & Halloween Decor 2020
    • Summer Decor 2020
    • Spring Decor 2020
    • Christmas Decor 2019
    • Fall Decor 2019
    • Summer Decor 2019
    • Spring Decor 2019
    • Winter Decor 2018
    • Christmas Decor 2018
  • Christmas
    • Christmas Decor 2020
    • How to Make Paper Christmas Trees
    • Neutral Christmas Present Wrapping
    • How to Make Salt Dough Ornaments
    • How to Cat-Proof Christmas Trees & Decor
    • How to Make Modern Tabletop Trees
    • How to Make a Wooden Christmas Village
    • How to Build a Christmas Tree Box Stand
    • Holiday Cheese & Snack Boards
    • Christmas Decor 2019
    • Christmas Decor Preview 2019
    • Gingerbread House & Cookies Recipe
    • Puff Tastry Christmas Tree Recipe
    • Christmas Decor 2018
  • About Us
    • Minimalism: How To Get Started
  • Q&A
    • Website Roadmap
  • Blog
    • Privacy Policy

Tutorials

How to Make Paper Mache Bowls | Decor DIY

October 5, 2020 by admin Leave a Comment

I made several paper mache bowls for free using recycled paper waste from our home so I’m going to share the process here because they’re easy to make and they’re a great way to re-use paper waste.

For reference, you can find a few ready-made examples of various beautiful paper mache bowls at both McGee & Co (natural look) and Bloomist (painted bowls). I just love how these look styled on shelving!

Now, I made my paper mache completely from scratch – meaning that I created my own paper pulp because I wanted to recycle our home’s paper waste. However, this does take longer, so there are also “instant paper mache mix” options you can buy if you prefer like these: Michaels and Amazon.

However, in this tutorial, I’m sharing the homemade “from scratch” version.

Materials list (for paper mache pulp):

  • Shredded paper
  • Flour (any kind will do)
  • Salt (to prevent the mixture from going off)
  • Hot water (to soak the paper)

Tools list:

  • 3 large mixing bowls
  • Immersion blender: Amazon (this is what I used but you can probably use a food processor or stand blender or really anything that can blend stuff for this project)
  • Bowls to shape your paper mache bowls around

Finishing list:

  • Paint (any house or acrylic paint, my preference is matte)
  • Top coat (to seal them at the end, optional): Home Depot

Timeline: due to soaking and drying times, these bowls take several days to make because you have to wait for the paper to soak and for the bowls to dry. While the actual “active” time you’ll spend making them is short, the amount of time before they’re ready to use is long so these are not “instant” DIYs.

The following instructions are for how to make bowls with my homemade paper mache. If you use an instant paper mache mix (Michaels | Amazon) then just follow the instructions on their packaging instead.

Instructions on how to make paper mache pulp/clay:

  1. First you’ll need shredded paper. I just gathered up all the scrap paper in our house and ran it through our paper shredder, but you can also just cut it up finely with scissors. The end goal is just to have very finely cut up paper to make your paper mache pulp. The more finely cut, the better.
  2. Place your shredded paper in a large bowl and fill the bowl with hot water until the water just covers the paper. Don’t add more water than necessary because it’ll make your life harder in later steps.
  3. Soak hot water/paper mixture for several hours, or ideally overnight. The purpose of this step is to break down the paper so the longer you can let it soak, the better.
  4. Blend the paper to a fine pulp with an immersion blender. Take your time and be very thorough, don’t leave any chunks unblended. It helps to stir the mixture now and again to make sure you didn’t miss any paper strips along the bottom of the bowl.
  5. Set up 3 large bowls in a row: first is the bowl with your wet paper pulp, then is a bowl that will be filled with water squeezed out of the pulp, and finally an empty bowl for the now-dry pulp.
  6. Squeeze about 80-90% of the water out of your wet paper pulp by scooping up large handfuls and squeezing gently (like a snowball) until most of the water is gone. You don’t want them to be bone dry. I actually removed too much of the water from mine, and had to add more water back in later. Once you’ve completed this, you should now have a bowl of mostly-dry paper balls.
  7. Break up the little balls of paper so that they’re evenly crumbly.
  8. Now it’s time to turn your paper crumbles into a kind of “paper clay”. Add in about 1/3 the amount of flour as you have paper, as well as a bunch of salt. The approximate ratio is 1 part flour to 3 parts paper pulp, plus enough water to create a clay that is thick enough to mold into shapes, but that it is not sticky at all. I recommend reserving some of your paper crumbles before you begin mixing just in case you accidentally add too much water because then you’ll have a bit more paper left to add in and thicken it. You just have to play around with the ratio of paper:flour:salt:water until it feels right and paper-clay-like. The purpose of the salt is to prevent the mixture from going off so just throw in a bunch (I didn’t measure but several tablespoons). You’ll know you’re done when you can form the pulp into a shape (try a flattened triangle or a heart) and it holds its shape on its own without being sticky or crumbling apart.
  9. Now your paper mache pulp/clay is done. At this point, you can choose to either place your finished pulp mixture in the fridge to use later (I kept some in my fridge for a couple weeks and it stayed fresh), or immediately make your paper mache bowl.

Instructions on how to make a paper mache bowl:

  1. To make your paper mache bowl, you’ll need a bowl to use as a mold/frame. This can be any oven-safe bowl you like the size/shape of. The bowl will not be damaged by this project (but it must be oven-safe) so it’s only temporarily needed until your paper mache has set.
  2. Cover your bowl in saran wrap before starting. This will help you remove the bowl later.
  3. Take small handfuls of the paper mache pulp and press it onto your mold-bowl. Ideally your paper mache bowl would be approximately a 1/4 inch thick (ish). Just keep adding more until your bowl is evenly covered. Make sure to blend the seams too so that everything sticks together.
  4. Now you can add fun texture/dimension to your bowl. I made 5 bowls, each with slightly different designs. You can either use your finger to press indents into the pulp, or add in extra ropes of pulp. Just make sure you properly blend everything together. It’s similar in concept to working with clay or play dough. Ultimately you just have to keep molding it until you’re happy with the shape and everything is blended together.
  5. Next you need to dry the bowls out by placing them in your oven on the “keep warm” setting for basically a whole day (5-9 hours depending on the size and thickness) to dry it out. It’s very important you don’t have the oven any hotter than the “keep warm” setting since there is saran wrap under the paper mache but, at least on my oven, that setting is low enough that it just helps it dry out faster without baking it. — Side note: The reason you can’t just leave it out on the counter to dry is a lesson I learned the very hard way with my first bowls – I left them to dry on my counter for about 5 days but not only were they not drying anywhere near fast enough but they started to smell very sour (maybe I didn’t add enough salt?) so it was pretty gross and I hope you can learn from my mistake and just oven-dry them on keep-warm from the start. — You’ll know they’re dry when you touch them and there’s no squish.
  6. When your bowls are finished drying out, take them out of the oven and let them cool completely.
  7. Remove the “real” bowls that they’re formed around. This is MUCH easier said than done. Be VERY PATIENT because at this point you can break your bowl and all your hard work will go to waste so don’t rush this and accept that it takes a bit of time, a few prayers, and the right balance of gentle force and patience. The bowls WILL break if you’re not careful. I found the best thing was to gently but firmly pull the sides away from the bowl just the tiniest bit (like 1/32″) and rotate doing that around the bowl to loosen them, then pull gently at the cling wrap just a little at a time rotating around the bowl again, and just sloweeeely wiggle it loose. This does take a bit of time.
  8. Once you have freed the bowl, you’ll notice the inside is likely still a little wet in spots. If so, just put it back in your oven on “keep-warm” until it fully dried. This could take anywhere from 1-3 hours.
  9. Now that your bowls are formed, dry, and free, it’s time to finish them. You can either leave them their natural color or paint them. If you’re going to paint them, then pretty much just do whatever you want. I painted some of mine with random house paints I had left over from prior projects and I left others their natural color.
  10. When you’re finished painting them, you have the option of sealing them with a clear top coat. I sealed mine with the same poly that I used on all my woodworking projects. I’m sure this isn’t a “proper” or “official” way to do it but hey it worked!

For sources from our Game Room, click here.
For sources from our Office Room, click here.
For more of our DIY Tutorials, click here.
To follow us on Instagram, click here.

Filed Under: Tutorials

How to Build Cabinet Doors

September 20, 2020 by admin 2 Comments

We decided to modify our pantry room and change the bottom row of cabinetry from roll-outs to full drawers so I made 6 drawer fronts in one day and thought I’d share the process because it’s seriously so simple and I feel like sometimes this kind of thing seems more complicated than it really is.

I specifically made drawer fronts but this exact same technique could be used to make any size cabinet door or drawer front so it’s more about the method than the specific dimensions.

In my case here, I made a simple 5-piece door with a 1/2″ MDF backer panel and 1/4″ MDF 2″ rails and 3″ stiles to create the cabinet style I wanted, but you can make your rails/stiles any size you prefer.

MATERIALS LIST:

  • 1/2″ MDF panel: Home Depot
  • 1/4″ MDF panel: Home Depot
  • Wood glue: Home Depot | Amazon
  • Wood filler: Home Depot | Amazon
  • Sandpaper: Home Depot | Amazon

TOOLS LIST:

  • Table saw: Home Depot | Amazon
  • Miter saw: Home Depot | Amazon
  • Putty knife: Home Depot | Amazon
  • Measuring tape: Home Depot | Amazon

INSTRUCTIONS:

  1. Create your backer boards by cutting your 1/2″ MDF to size on a table saw. Be sure to leave about a 1/16 to 1/8 gap on each side between the door and the cabinet side.
  2. Create your rails & stiles by cutting your 1/4″ MDF into 2″ (rails) and 3″ (stiles) strips on a table saw. Then cut them to the lengths your need on a miter saw.
  3. Dry fit your rails & stiles over your backer board to ensure a flawless fit.
  4. Glue the backs of your rails & stiles then place them on your backer board. You may need to clamp them down or just place something heavy over them as they dry (but be very careful that they don’t shift under the weight). I actually didn’t use any clamping and I only weighed one of mine down.
  5. Allow them to fully dry for several hours.
  6. Apply wood filler to all surface seams with a putty knife, and also around all 4 exterior edges to blend the seam between the 1/2″ and 1/4″ MDF panels.
  7. Once it’s fully dry, sand all wood filler down until perfectly smooth.
  8. Now your door is done and it’s ready to be painted.

For sources from our pantry room, click here.
For sources from the rest of our home, click here.
For more of our tutorials, click here.

Filed Under: Tutorials

How to Install Floating Open Shelves (Solid Wood)

August 24, 2020 by admin 5 Comments

We installed floating open shelves over the snack bar in our Home Theater Room in our Basement so we thought we’d share how we did it here! There are many great ways to do floating shelves and each of them have their own advantages. The method we used not only seemed the easiest to us but also using genuinely solid wood planks achieved the thick, chunky, rustic look we were going for very authentically.

We also did these shelves in our Game Room and the little nook in our Basement Hallway.

We use real solid wood boards as our shelves, so they’re not specifically “shelving”, they’re just planks of the right size and shape that we then turn into shelves.

The process for installing floating shelves is simple. You just screw the rod brackets (Amazon) to studs, drill holes for them in the wood, and slide the board onto the rods. But I’ll go into more detail below:

MATERIALS & TOOLS LIST:

  • Floating shelf brackets: Amazon (4 pack) | Amazon ( 6 pack) | Amazon (10 pack)
  • Wood boards: ours are 2″ solid planks (you can use any type of wood)
  • Extra long spade drill bit (+ drill): Home Depot (to drill for brackets)
  • Miter saw: Home Depot | Amazon (to cut boards to size)
  • Matte top coat: Home Depot | Amazon
  • Sandpaper: Home Depot | Amazon

1. INSTALL SHELF BRACKETS:

The style of floating shelf bracket we used is listed below. We chose this style because we wanted the brackets to be completely hidden once the shelving was in place to give the “floating” look. When your brackets arrive, we recommend checking them all for straightness. A tiny bit off is ok, but they should be generally all welded straight. We used 3 brackets per shelf and each of our shelves was ~ 6 feet long.

  • Floating shelf brackets (4-pack): Amazon
  • Floating shelf brackets (6-pack): Amazon (we used 6)
  • Floating shelf brackets (10-pack): Amazon

To install them:

  1. Decide where your shelf should go and draw a level line across the space.
  2. Mark the studs and pre-drill holes for your brackets.
  3. Screw them into the studs.

2. PREPARE WOOD BOARDS:

Our shelves are solid wood planks: 2″ thick x 10″ wide (true measurements) x 6′ long.

First, cut them to the length you need. A little tip if your shelving is going between two walls or two cabinets (as ours were) is to leave about 1/16″ of space on either side when calculating your board/shelf length. This ensures that the board doesn’t scrape against anything as you slide it into place.

Next, finish them. We chose rough planks since we were going for a bit of a rustic look. The shelves needed to be easy to clean, but we also wanted to retain their warm natural color tone so we didn’t want to just sand them down to smoothness (which would have lightened them and lost their color). So we finished them in a way that kept their rustic/rough look while making them smooth enough to wipe down.

This is how we finished them:

  1. Apply a clear matte top coat (source: Home Depot | Amazon) to your rough board with a paint brush and allow it to fully dry. Very important that you do NOT sand before applying the top coat!
  2. Once the top coat is dry, lightly sand (by hand, do NOT use an orbital sander) with 150 grit until the immediate roughness is gone. You have to run your hand over it to determine the smoothness.
  3. Repeat applying another layer of top coat, wait for it to dry, then lightly sand it. This was all our boards needed, but depending on how rough yours is, you may need to repeat this several times.
  4. Do this same process to the other side (all sides of the board should be finished in the same way).

The goal with this process is that you’re filling the board’s roughness with the top coat layers and you’re lightly sanding the top coat, not the actually board (or at least, not much of it) to retain its color.

Lastly, drill holes for your brackets. You will need an extra long drill bit (ours: Home Depot) for this. Make sure your drill bit is either the same size as or only slightly bigger than the rod/bracket. Our rods were 1/2″ and we had a 1/2″ drill bit so we just enlarged the hole a bit by moving the drill about a little since the brackets were mostly straight, but not perfectly straight. A 5/8″ drill bit would have been great too, but no bigger than that. We calculated the exact placement of the holes based on the brackets’ locations on our wall (don’t forget to account for the 1/16″ gap between the board + wall if you did one), then we just eyeballed the straightness of the drill bit.

3. INSTALL SHELVES:

Once your brackets are in place and your boards are finished, simply lift the board up to your brackets and slide them onto the rods. If you’ve calculated the placement and drilled the holes correctly, they should just slide into place. A couple notes:

  • It’s helpful to have a rubber mallet on hand if you need to give it an extra push.
  • We used painters tape to cover the two sides of the shelf before we lifted them into place. This just ensured that if it made contact with the cabinets, it wouldn’t cause any damage.
  • The brackets likely have a tiny bit of play back and forth so you can kinda pull them into position if needed – it’s just a tiny fraction of an inch of play but it was enough for us.
  • You can fill the holes with a little bit of construction adhesive before installing the shelving if you feel it’s necessary or if you feel the fit is too loose. We didn’t need to do this (and we liked having the option of easily removing the shelving if needed) but the adhesive is an option to consider.
  • We used 8″ brackets with 10″ boards so our bracket rods span most of the depth of each shelf. If you have a smaller bracket-to-shelf depth ratio, then I definitely recommend using an adhesive so that they don’t slide off if you place something heavier on them.

Other sources:

  • Sofa pit: How to Make a Sofa Pit Tutorial
  • Black linen pillows: We made ours | Similar: Pottery Barn | CB2 | West Elm
  • Gray linen pillows: We made ours | Similar: Pottery Barn | West Elm
  • Black & white X-block pillows: CB2 | Similar: West Elm
  • Poster frames (same size): Overstock (4-pack) | Overstock (single) | West Elm
  • Lord of the Rings movie poster: Amazon
  • Faucet: Wayfair | Home Depot
  • Drinking water faucet: Amazon | Overstock
  • Soap pump: Wayfair | Home Depot
  • Gold cabinet knobs: CB2
  • Gold drawer pulls: Amazon | Similar: Home Depot | Schoolhouse
  • Vase (similar): Crate & Barrel | Pottery Barn | McGee & Co
  • Eucalyptus greenery: Michaels
  • Wood countertop: How to Build a Wood Countertop Tutorial
  • Shiplap: Tutorial & Info
  • Brick wall: How to DIY a Faux Brick Wall Tutorial
  • Brick panels: Home Depot
    • Paint colors & more details on the Theater Room Sources Page

     
    For more sources from our Theater Room, click here.
    For more sources from our Basement, click here.
    For more of our DIY tutorials, click here.
    To explore the other rooms in our house, click here.

Filed Under: Tutorials

How to Build a Round Table

August 13, 2020 by admin Leave a Comment

We built a modern rustic 48″ round table for our Basement Game Room out of a dozen 2x4x8s and I’m going to share how we did it here! It was a challenging piece to build but we love how it turned out!

The basic concept of how to build this table is simple but I’ll be honest that we ran into a lot of issues while building it even though, by this point, we’ve had a fair bit of experience building things. If you’ve never built any furniture before, I would not recommend this as a first piece to start with. I’d consider it more of a moderate level of difficulty. It’s neither super easy nor super hard, but my tutorial is going to assume that you generally know how to build stuff and use the tools mentioned if you build this table.

Here are some similar ready-to-order tables for reference:

  • Similar base: McGee & Co | Pottery Barn | Wayfair | West Elm | Lulu & Georgia
  • Alternative base: Crate & Barrel | Crate & Barrel | Crate & Barrel | West Elm

For our table design, we considered many different styles as shown in my concept sketches in the right pics. For the base, we originally planned to build a single-leg variation of our farmhouse dining table‘s X-based design, but instead we kept coming back to the simplicity of the more minimal base we chose over and decided to do a modern, geometric wood plank design for the table top. You may notice that our tabletop subtly ties in with our guest bedroom accent wall in a different part of our house. I’ve always really loved finding ways to to little tie-ins between rooms without blatantly matching – I just feel it makes the overall house design feel more cohesive.

Our table is 48″ in diameter and 30.5″ high.

MATERIALS LIST:

  • 12 x 2x4x8 lumber (we used cedar) – I recommend getting a few extra just in case
  • Wood screws (2 1/2″ and 3″ lengths)
  • Wood glue: Home Depot | Amazon
  • Matte top coat: Home Depot | Amazon

*Lumber buying tip: carefully select your boards. Check each one for straightness and, if you’re using a wood with color variation, make sure the boards your select have the colors you want on your table.

TOOLS LIST:

  • Miter saw: Home Depot | Amazon (to cut boards to size)
  • Jig saw: Home Depot | Amazon (to cut the circle)
  • Table saw: Home Depot | Amazon (to rip boards down – this is optional)
  • Orbital sander: Home Depot | Amazon
  • Kreg Jig: Home Depot | Amazon
  • Drill: Home Depot | Amazon
  • Tape measure

TABLE DESIGN:

TABLE TOP BUILDING INSTRUCTIONS:

  1. To remove the rounded edges on your lumber, use a table saw to rip 1/8″ off both narrow sides. This will give you lumber with nice square edges to work with. This step is optional.
  2. Cut your tabletop planks to size creating whatever pattern you choose (can be totally different than ours), but generally allowing for at least 1″ of extra space on the outside. So in our case, we did a 48″ round table, so my first piece was cut to 48″ exactly and I laid it down in the middle. Then the pieces around it would be progressively less. It helps to make a guide that you can twirl around your boards to make sure the pieces you cut are bigger than your circle.
  3. Use wood glue between the planks and screw them together. Be careful placing your screws so they don’t interfere with your final rounded cut line. First, we attached the individual planks together into 3 sections using pre-drilled holes and countersunk 3″ screws going halfway through each plank. Then we attached those 3 sections to each other with Kreg Jig pocket hole screws. (Note: the wood glue is very important because if you have any warp, the glue can help correct it in combination with the next step listed below so don’t skip the glue and don’t skimp on it!)
  4. Place it under something heavy (we used gym weights) overnight to dry so that it dries straight/flat.

Couple of problems we ran into during this stage and how we fixed them:

  • To prevent warping, you’re supposed to alternate the direction of the grain in boards when you build tables but we were so caught up in choosing our boards based on the coloring of the individual boards (there’s a lot of color variation in the type of wood we used so the undersides of our table boards are often completely different colors than the tops) that we forgot to alternate the direction of the grain in the boards so we as we began screwing the boards together, some of the sections had quite a curve to them. We corrected this with wood glue and weighting the table top down as it dried, but still had to add a steel plate to the underside of one area at the end of the build. Not a big deal, but preventable if you remember to alternate your grain. We should have known better.
  • The steel plate we added was specifically to the underside of the tabletop half that’s all straight boards – the plate is ~ 1″x8″. I have a feeling that even if we’d done everything perfectly, we would still have needed the steel plate for stability but there’s no way for me to know for sure.
  • Even though our wood pieces dry-fit perfectly, they didn’t always fit together as perfectly once we started screwing them together so be prepared to make adjustments as you go. For this reason, it’s helpful to have a table saw as we ended up using it to shave off bits to make the pieces fit better.

TABLE TOP CUTTING INSTRUCTIONS:

Once your table top is fully assembled and the glue has dried, it’s time to cut out the round circle. Ultimately we found that the best way to do this was to draw a perfect circle using a homemade compass and freehanding the cut with a jig saw. I think a router is a better tool to cut the circle but we don’t have one and renting one just seemed like a lot of trouble and we had a jig saw so we used it.

First, we tried to build a jig for the jig saw and the jig actually worked really well in theory. It held the jig saw perfectly in place and it moved in a perfect circle. Unfortunately it didn’t work for us though because I guess the wood we used was too thick for the jig saw blade to handle in a jig because the blade just kept bending out of the way and creating an angled cut instead of a straight cut. So in the end, we just freehanded the cut and that actually worked really well! We were worried we wouldn’t be able to get it perfectly round but we did and it wasn’t even all that hard honestly as long as you go slow and steady and don’t try to rush the cut. I’ll show you the jig we built though down below in the next pics because the concept worked really well and on either softer wood or a sheet of plywood/mdf or just anything less thick than our 1 1/2″ solid wood planks, this jig would’ve been the perfect solution to cutting a circle.

TABLE BASE BUILDING INSTRUCTIONS:

Please refer to our Table Design diagram in the first section above ^^.

  1. Cut all your pieces to size.
    For the top cross:
    1 x 32″ (both ends backcut 45*)
    2 x 14 1/4″ (each piece: one end straight, the other backcut 45*)
    For the floor cross:
    1 x 29″ (both ends backcut 15*)
    2 x 12 3/4″ (each piece: one end straight, the other backcut 15*)
    For the legs:
    4 x 28.5″ (both ends cut 15* in the same direction)
  2. Assemble the top and bottom/floor cross pieces as shown in the diagram with pocket hole screws.
  3. Attach the legs to the bottom cross piece as shown in the diagram with pocket hole screws..
  4. Attach the top cross piece to the base as shown in the diagram with countersunk screws.

FINISHING INSTRUCTIONS:

  1. Sand your table down to whatever level of smoothness seems good to you. We just did a couple passes of 150 grit everywhere including the edges with an orbital sander.
  2. If you’re planning to stain your table, now’s the time. Staining is very simple: Stir your stain well (but don’t shake), apply to wood with a rag, wipe off excess with another rag, allow to dry overnight.
  3. Top coating the table is the final step! I used a matte top coat for our table. I applied one coat to the base, but three coats to the tabletop and edges, and I always sand lightly between coats.

Our 48″ table comfortably fits 6 chairs around it:

  • Our chairs: Wayfair (x2 sets) | Amazon | Similar: West Elm | West Elm | World Market | Pottery Barn

And you’re done!!

If this sounds like too much work, here are some similar ready-to-order tables for reference:

  • Similar base: McGee & Co | Pottery Barn | Wayfair | West Elm | Lulu & Georgia
  • Alternative base: Crate & Barrel | Crate & Barrel | Crate & Barrel | West Elm

Other sources:

  • Our lighting (black/gold): Build.com | Wayfair | Gold version: Overstock | Black version: Wayfair | Nickel version: Build.com | Similar: Wayfair | West Elm | McGee & Co | Overstock | Overstock
  • Our chairs: Wayfair (x2 sets) | Amazon | Similar: West Elm | West Elm | World Market | Pottery Barn

 
For more sources from our Game Room, click here.
For more sources from our Basement, click here.
For our tutorial on how to DIY a faux brick wall, click here.
For our tutorial on how to install shiplap, click here.
For more of our DIY tutorials, click here.
To explore the other rooms in our house, click here.

Filed Under: Tutorials

How to Make a Wood Block Art Piece (or Sound Diffuser)

August 1, 2020 by admin 12 Comments

We made an art piece for our home out of little blocks of wood and it’s seriously my new favorite thing ever so I wanted to share how we made it here in case you want to try your hand at making one too!

I’m honestly very picky about art and about what I hang on my walls. If I’m going to display something in my home, I prefer it to be something with special meaning to us or to be something we made ourselves.

We were researching sound diffusers for hubby’s office when we came across this idea that we found dozens of different examples of all over for using simple wood blocks to create acoustic panels or sound diffuser boards. Some favorite variations were on Etsy and I’ll link a few fav examples (each one goes to a different piece): Etsy | Etsy | Etsy | Etsy | Etsy | Etsy | Etsy | Etsy | Etsy | Etsy | Etsy | Etsy. These options were beautiful, but for our hallway wall nook, we needed a very specific frame size and none of the options we found were exactly the right size or style that we wanted… So we decided to make one!

Two important notes:

  1. In this tutorial, I’m just sharing the process for how we made this particular art piece, but it’s such a versatile art style and there are dozens of different color combinations, sizes, materials, shapes, and configurations that you could make this type of wood art. You could do different colors, use stains instead of paint or even leave it all natural, use different materials or different sizes of wood, etc. I used 2×2 pine lumber for everything for example, but you could use a thicker wood for the frames, use 4x4s instead of 2x2s, I mean the options are endless. So the sizes and quantities I’ve shared here are just what I chose to use but I suggest you take the “concept” away from this tutorial and adapt it to whatever style/colors appeal most to you because there are no real rules to this art.
  2. The size of the art piece we built is around 42 inches x 52 inches. Even if you make this same size piece, you’ll probably need to adjust the frame size slightly depending on the type of lumber you use for the blocks. I used 2×2 framing lumber which has a real size of just under 1 1/2″ x 1 1/2″ so remember that lumber sizes vary and your final frame size is fully determined by the length of exactly how many blocks of the exact type of wood you’re using fit the length and width of your rows.

We used 945 individual blocks of wood in this art piece!
So it’s 27 blocks wide x 35 blocks high.

MATERIALS LIST:

  • 24 x 2″x2″x8′ lumber: Home Depot (for the blocks & frame)
  • 1/4″ MDF or plywood or hardboard panel: Home Depot | Home Depot (for the backing)
  • 4 x 2″ wood screws (for the frame)
  • 16 x 1″ wood screws (for the frame)
  • 4 x 3″ wood screws (to attach art to studs)
  • Wood filler: Home Depot | Amazon
  • Sandpaper: Home Depot | Amazon
  • Construction adhesive: Home Depot
  • Paint or stain of your choice (I used BM Black Panther in Matte because I needed a black color and I happened to have this left over from when we made our Sofa Pit in our Theater Room)

TOOLS LIST:

  • Miter saw: Home Depot | Amazon
  • Drill: Home Depot | Amazon
  • Putty knife: Home Depot | Amazon
  • Clamps: Home Depot

INSTRUCTIONS:

Note: these instructions are specifically for the exact wood art I made so if you want to do a different style (maybe stain instead of paint, or use different size lumber etc) then you’ll have to adapt the instructions.

PHASE ONE: PREPARING THE LUMBER

  1. Pre-paint & sand all your 2x2s. We laid them outside and rollered each side. Once dry, lightly sand all the rough sections, then paint a second coat. Once dry, they’re ready to be used.
  2. Reserve the 3 nicest full-length 2x2s for your frame, and also reserve 2-3 other 2x2s to cut later.
  3. Carefully cut the remainder of your 2x2s into blocks of varying lengths on a miter saw. We cut pieces at random. It may help to cut a whole 8′ piece into 1″ blocks, the next one into 1 1/2″, then 2, 2 1/2, 3, 3 1/2, 4 4 1/2, 5. Once you get the hang of it, you can cut your pieces at random but make sure you have an even distribution of lengths. The smallest piece I cut was 1/2″ long, the biggest piece was 5″ long, and all the rest were varying lengths in between. The smaller the piece, the more dangerous the cut. (The reason I said to reserve a couple 2x2s in the previous step is that as you build your art piece, you may find that you need more blocks of a specific size and having these extra pieces allows you to create exactly the sizes you need once you need them.)

PHASE TWO: PREPARING THE FRAME

  1. To determine the size of your frame and backer board, first determine the approximate size you want your art piece to be. Mine was approximately 42″ x 52″, then to determine the exact specific size of your backer & frame, place a single row blocks along the length and width of your backer until you’re as close as possible to the size of art piece you want, then place full length 2x2s around the edges. Measure from the outside of the top frame to the outside of the bottom frame for the final length, and measure from the outside of the left frame to the outside of the right frame for the final width. *** Note: You must have the perfect amount of space for a row of blocks along the length and width of your art piece. They should be snug enough that you can’t wiggle the pieces, but loose enough that you can remove and re-insert a block (with a tiny bit of effort).
  2. Cut your 1/4″ backer panel to whatever size perfectly fits under your blocks and frame pieces. We had some 1/4″ MDF that was leftover from another project which we used. It ended up being 2 pieces but that’s no problem since the frame pieces will hold it all together. I just don’t suggest using anything thicker than 1/4″ for the backer as it will just get heavy and 1/8″ is too wobbly.
  3. Cut your frame pieces to size. You’ll need 4 pieces, each one as long as the outer edges of your backer board. Then cut the corners back 45 degrees to create mitered corners.
  4. Dry-fit your frame over your backer board again now that they’re all cut to size and place a row of blocks along the long and short inside sides to be 100% sure that your frame is the perfect fit.
  5. Glue your frame pieces and clamp them onto your backer board making sure they align perfectly both with the edges of the board, and are a perfect fit for the blocks temporarily aligned inside.
  6. Secure the frame pieces to the backer board using the 1″ wood screws screws from the underside of the board so that they don’t show.
  7. Use wood filler to hide the seam between the 2×2 frame pieces and the MDF backer board. Once that dries, sand it down, and repaint one last finish coat of paint over the frame.
  8. Allow to dry completely before continuing (construction adhesive usually needs 24 hours).

PHASE THREE: CREATING THE BLOCK ART

  1. Once your frame is fully dry, create the block art by placing blocks of varying lengths along one of the sides. There are no rules to art but the way I did it was that I created a random non-repeating pattern where each piece was a different size than the pieces all around it. I recommend doing the first few rows “dry” (without glue) just to get used to the process.
  2. Once you’ve gotten the hang of it, shift your pieces upward and begin to glue them into place. I just did one line of glue and pushed the blocks down into it. Keep building your way across the frame. I recommend doing one line at a time so that you can be sure all the blocks are perfectly aligned.

PHASE FOUR: COMPLETING & HANGING THE ART PIECE

Note: depending on how you decide to hang your art piece, the rest of the instructions may or may not apply to you. This art piece is very heavy and we chose to screw it directly into the studs on our wall (so we’re probably never going to take it down). If you have an alternate way of hanging it, then just build your blocks all the way to the top of the frame, allow the glue to fully cure, and hang it however you choose. But if you want to hang it the same way we did, then continue to follow the rest of these instructions.

  1. Build the block art about 3/4 of the way up the frame, then stop. Fill in 1-2 rows up to the top on the far left and right sides, then do a couple rows down from the top. This will create an open space in the middle without blocks that you can use to secure the art piece to the wall from behind the blocks where it can’t be seen.
  2. I then created a “template frame” of the same size as my art piece using extra 2x2s because that helped me determine exactly where on the wall I wanted to hang it. Then we located the studs, calculated where they’d fall on the art frame, and pre-drilled holes for the screws. We were able to get 3 screws directly into studs behind the blocks. Then we filled in the rest of the blocks around the screw holes leaving only the last few pieces off.
  3. Then, before the glue had a chance to cure (giving us more flexibility in case we needed to make adjustments), we hoisted the art piece into place, screwed it into the studs, and filled in the last remaining blocks.
  4. We also added one more screw at the bottom middle right through the frame into the stud just for good measure (seriously, this piece is hefty!!). We counter sunk the screw into the frame just a little so I wood-fillered and painted over it to hide the hole.

And that’s it!!!!!!!!!

Btw, that amazing metal console table can be found at: Walmart | Wayfair | Overstock | Target | Home Depot with a matte black base like I have, or there’s a gunmetal gray version at: Home Depot. It’s the same table everywhere – lots of places just happen to have it. I also painted the top of mine black 😉

I’m so in love with this art piece! It totally completes our hallway and just feels so “us”! I love the mix of natural wood tones & black against our white shiplap. We’ve used this color scheme again and again in many different ways and it was so much fun to find another way to incorporate it into our home!

If you’re thinking this sounds like way too much work, I encourage you to check out some of the amazing art pieces of this style on Etsy (each one goes to a different piece so you can see lots of different versions): Etsy | Etsy | Etsy | Etsy | Etsy | Etsy | Etsy | Etsy | Etsy | Etsy | Etsy | Etsy.

 
For more of our tutorials, click here.
For more sources from our basement, click here.
To follow our daily progress on Instagram, click here.

Filed Under: Tutorials

  • « Go to Previous Page
  • Go to page 1
  • Go to page 2
  • Go to page 3
  • Go to page 4
  • Go to page 5
  • Interim pages omitted …
  • Go to page 7
  • Go to Next Page »

Primary Sidebar

  • Sources
    • All Sources & FAQs
    • Kitchen Sources
    • Pantry Room Sources
    • Living Room Sources
    • Dining Room Sources
    • Home Office Sources
    • Laundry Room Sources
    • Entryway/Foyer Sources
    • Gallery Wall Sources
    • Mudroom Sources
    • Guest Bedroom Sources
    • Master Bedroom Sources
    • Master Closet Sources
    • Master Bathroom Sources
    • Powder Bathroom Sources
    • Buffalo Check Bathroom Sources
    • Basement Bathroom Sources
    • Theater Room Sources
    • Game Room Sources
    • Basement Sources
    • Stairs & Landings
    • Paint Colors and Stain Recap
    • Cleaning Sources & Routines
  • Tutorials
    • How to Build a Window Seat
    • How to Make Textured Canvas Art
    • How to Install Shiplap
    • How to Build Bypass Barn Doors
    • How to Build a Paneled Accent Wall
    • How to DIY a Faux Brick Wall
    • How to Build a Rustic Sideboard
    • How to Build a Slat Sideboard
    • How to Build a Slat Wall
    • How to Stencil a Wall
    • How to Make a Sofa Pit
    • How to Build a Farmhouse Table and Benches
    • How to Build a Round Table
    • How to Build a Console Table
    • How to Make Paper Mache Bowls
    • How to Make Clay Links
    • How to Texture Bowls & Vases
    • How to Install Open Shelves
    • How to Make Wood Block Art
    • How to Make a Wood Bead Garland
    • How to Build Cabinet Doors
    • How to Build a Wood Countertop
    • How to DIY a Nightstand Charging Drawer
    • How to Make a Wheat Wreath
    • How to Hang Gallery Wall Frames
    • How to Stain Stairs and Paint Risers
    • How to Build Industrial Stair Railings
    • How to Build a Window Seat Cushion
    • How to Make Salt Dough Ornaments
    • How to DIY a Modern Mantel Christmas Tree
    • How to DIY a Wooden Christmas Village
    • How to Build a Christmas Tree Box Stand
    • How to Make Paper Christmas Trees
  • Cats
    • Cat Room Tour & Litterboxes
    • Cat-Related Sources & Cleaning Tips
    • How to Stop Cats from Scratching Furniture
    • How to Stop Cats from Playing with Decor
    • How to Train Cats and Kittens
    • How to Cope with Cat Allergies
    • How to Introduce New Kittens to Older Cats
    • How to Cat-Proof Christmas Trees & Decor
  • Cleaning
    • Cleaning Sources & Routines
    • Minimalism: How To Get Started
    • Cat-Related Cleaning Tips
  • Recipes
    • Apple or Blueberry Crumble Recipe
    • Apple Turnovers Recipe
    • Baked Pumpkin Donuts Recipe
    • Blueberry Lemon Cake Recipe
    • Cheese & Cracker Snack Boards
    • Chocolate Chip Banana Bread Recipe
    • Chocolate Chip Cookie Recipe
    • Cinnamon Pumpkin Donut Bites Recipe
    • Cinnamon Rolls Recipe
    • Coconut Curry Squash Soup Recipe
    • Creamy No-Cheese Pasta Sauce Recipe
    • Easy Garlic Flatbread Recipe
    • Easy Veggie Pasta Recipe
    • Fresh Rolls Recipe
    • Gingerbread House & Cookies Recipe
    • Healthy Hearty Salad Recipe
    • Hearty Vegetable Soup Recipe
    • Molasses Cookies Recipe
    • Oatmeal Raisin Cookies Recipe
    • Pesto Pasta Recipe
    • Potato Chickpea Curry + Naan Bread
    • Puff Pastry Christmas Tree Recipe
    • Pumpkin Oat Muffins Recipe
    • Roasted Red Pepper Pasta Recipe
    • Vegan Bolognese Pasta Sauce
    • Vegan Pad Thai Recipe
    • Veggie Lasagna Recipe
  • Past Decor
    • Christmas Decor 2020
    • Fall & Halloween Decor 2020
    • Summer Decor 2020
    • Spring Decor 2020
    • Christmas Decor 2019
    • Fall Decor 2019
    • Summer Decor 2019
    • Spring Decor 2019
    • Winter Decor 2018
    • Christmas Decor 2018
  • Christmas
    • Christmas Decor 2020
    • How to Make Paper Christmas Trees
    • Neutral Christmas Present Wrapping
    • How to Make Salt Dough Ornaments
    • How to Cat-Proof Christmas Trees & Decor
    • How to Make Modern Tabletop Trees
    • How to Make a Wooden Christmas Village
    • How to Build a Christmas Tree Box Stand
    • Holiday Cheese & Snack Boards
    • Christmas Decor 2019
    • Christmas Decor Preview 2019
    • Gingerbread House & Cookies Recipe
    • Puff Tastry Christmas Tree Recipe
    • Christmas Decor 2018
  • About Us
    • Minimalism: How To Get Started
  • Q&A
    • Website Roadmap
  • Blog
    • Privacy Policy

Where We Shop

Amazon

Wayfair

West Elm

Crate & Barrel

CB2

Pottery Barn

McGee & Go

Overstock

Rejuvenation

Joss and Main

All Modern

Target

Home Depot

World Market

Etsy

H&M Home

Lulu and Georgia

Serena & Lily 

Schoolhouse

Anthropologie

Meta

  • Log in
  • Entries feed
  • Comments feed
  • WordPress.org

Copyright © 2021 · Metro Pro on Genesis Framework · WordPress · Log in